# CI/CD Pipelines
Go from source code to production with CI/CD Pipelines. We support Github, Gitlab & docker registries as source. Pipelines can be deployed on any cloud, even on-premise.
# Overview
**Elestio is the simplest and fastest way to deploy your source code from github/gitlab/docker registry to production.**
[](https://docs.elest.io/uploads/images/gallery/2022-06/TLUimage.png)
**In** **3 steps** you can deploy any kind of project, frontend, backend, API, DB, you name it.
1. Select your source code in Github / Gitlab or from a Docker registry (private registries are supported)
2. Select the target where you want to deploy
3. Configure in the UI env vars, volumes, life cycle events, reverse proxy with SSL
Wait a few minutes and **your app is live!**
We support **ANY** Linux tech stack and we provide [samples for the most popular stacks & frameworks (54 Apps & Frameworks)](https://github.com/orgs/elestio-examples/repositories)
[](https://docs.elest.io/uploads/images/gallery/2022-06/qw6image.png)
##### Deploy to 132 datacenters in 29 countries + BringYourOwnVM
CI/CD Pipelines by Elestio are available with our 5 cloud partners (AWS Lightsail, Digital Ocean, Vultr, Linode & Hetzner) in 137 locations over 29 countries but also on any cloud (AWS, Azure, Google, Oracle, ...) and on-premise with [BYOVM.](https://doc.elest.io/books/cloud-providers/page/byovm-bring-your-own-vm)
#####
##### Vertical & Horizontal scaling
Scale from 1 CPU/2GB Ram up to 48 CPU/256GB Ram, you can also scale horizontally with a [load balancer](https://doc.elest.io/books/load-balancers/page/create-a-new-load-balancer) and clustered infrastructure. All are fully managed on any cloud.
#####
##### Full isolation or Shared infrastructure
You can decide to deploy CI/CD pipelines in full isolation mode (1 pipeline on 1 VM) or deploy several pipelines to the same CI/CD target (Multiple pipelines on 1 VM). It's up to you if you are not sure we recommend going with full isolation to avoid one pipeline affecting the performance of others.
##### What is included
- Automated source code build & deployment from Github/Gitlab & docker registries
- Live & history logs, quickly edit your config, and redeploy when needed
- Deploy multiple pipelines on a single target
- You can move a pipeline from a target to another one in a click (nearly instant migration)
- Reverse proxy with managed SSL, additional custom domains are supported
- Tools: ssh, web terminal, VS Code, File explorer all in the context of your pipeline
- Automated Backups/Restore to S3 Bucket
#####
##### Pricing
- We don't charge for build minutes
- We don't charge per user
- We don't charge per pipeline
- We don't charge per project
- We don't charge per X, Y, or Z BS metrics
You pay only for the CICD Targets that you launch, the price is per hour and details are available on the [Elestio pricing page](https://elest.io/pricing)
Example: If you need to deploy 2 CI/CD pipelines, 1 for the frontend of your app (React.js) and 1 for the backend (Node.js) you can deploy both of them to the same CI/CD target instance. Now if you need to deploy 5 projects to the same CI/CD target the price won't change. Of course, at some point, you might have to upgrade your instance to get more RAM/CPU to satisfy all your apps.
##### Philosophy & Vision
**Low overhead:** we regularly see orchestration, networking, monitoring & logging systems using 80% of the hardware resources. Leaving not much for the apps to perform well or pushing customers to over-provision everything to get decent performances at a huge cost. We have created in-house a super low overhead management system. This allows us to offer a very efficient way to deploy and manage a lot of projects at scale.
**Portability:** your pipelines can be moved from one CI/CD target to another with a click. You can also download a backup and run it locally. There is no lock-in. We want customers to stay with us because of the quality of service, support, and time-saving compared to doing all the DevOps tasks by yourself.
**KISS:** an acronym for keeping it simple and stupid. The principle states that most systems work best if they are kept simple rather than made complicated; therefore, simplicity should be a key goal in design, and unnecessary complexity should be avoided.
# Deploy your first CI/CD pipeline on Elestio
You are about to learn how to deploy an application from a Git repository to production on any cloud.
First, open the [Elestio dashboard and click on CI/CD](https://dash.elest.io/new/deployment/ci-cd/)
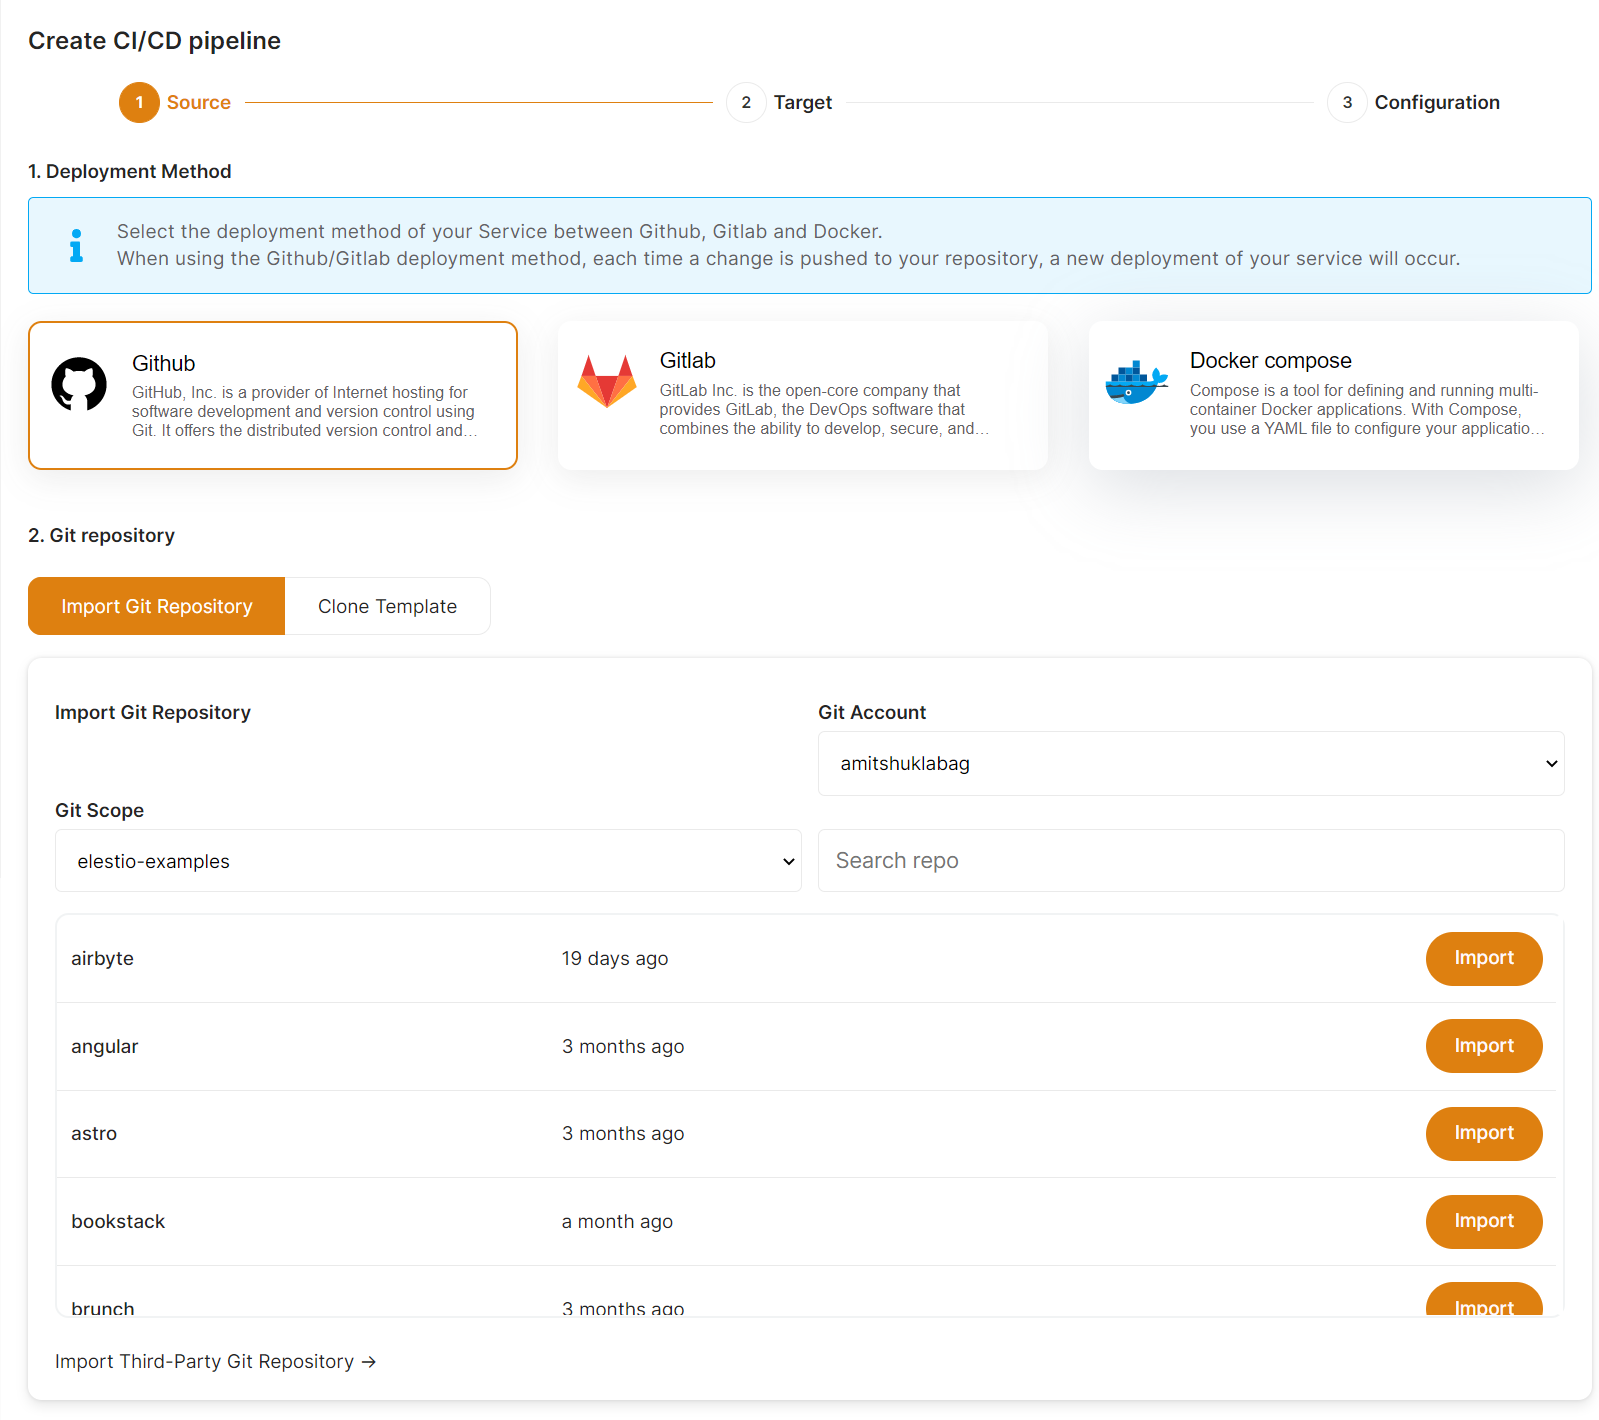
##### **1) Select your source**
[](https://docs.elest.io/uploads/images/gallery/2022-06/g5Jimage.png)
From there click on Github or Gitlab, and you will be asked to provide authorization to list your projects in Elestio.
Then you will be able to browse Organizations & Repositories detected on your account. You can also use the search to find directly your project to deploy. Once you found it, click on Import, then click on next.
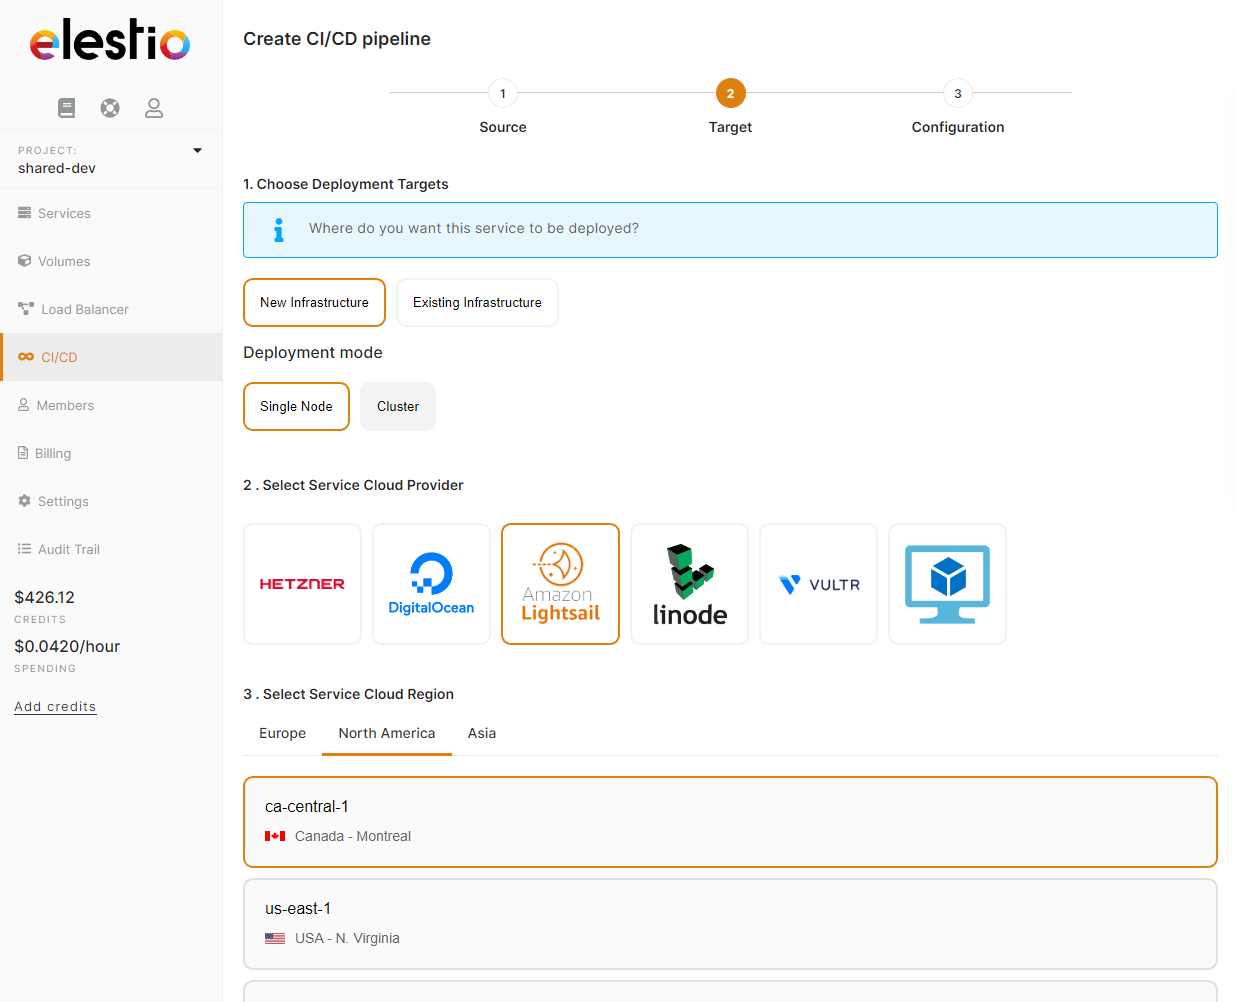
##### **2) Select your target**
Here you have to indicate where the app should be deployed, it can be a "New infrastructure", in that case, you can select your preferred provider/region/instance size. Or an existing infrastructure, then you just have to pick it from the list.
[](https://docs.elest.io/uploads/images/gallery/2022-06/On9image.png)
[](https://docs.elest.io/uploads/images/gallery/2022-06/YZ7image.png)
#####
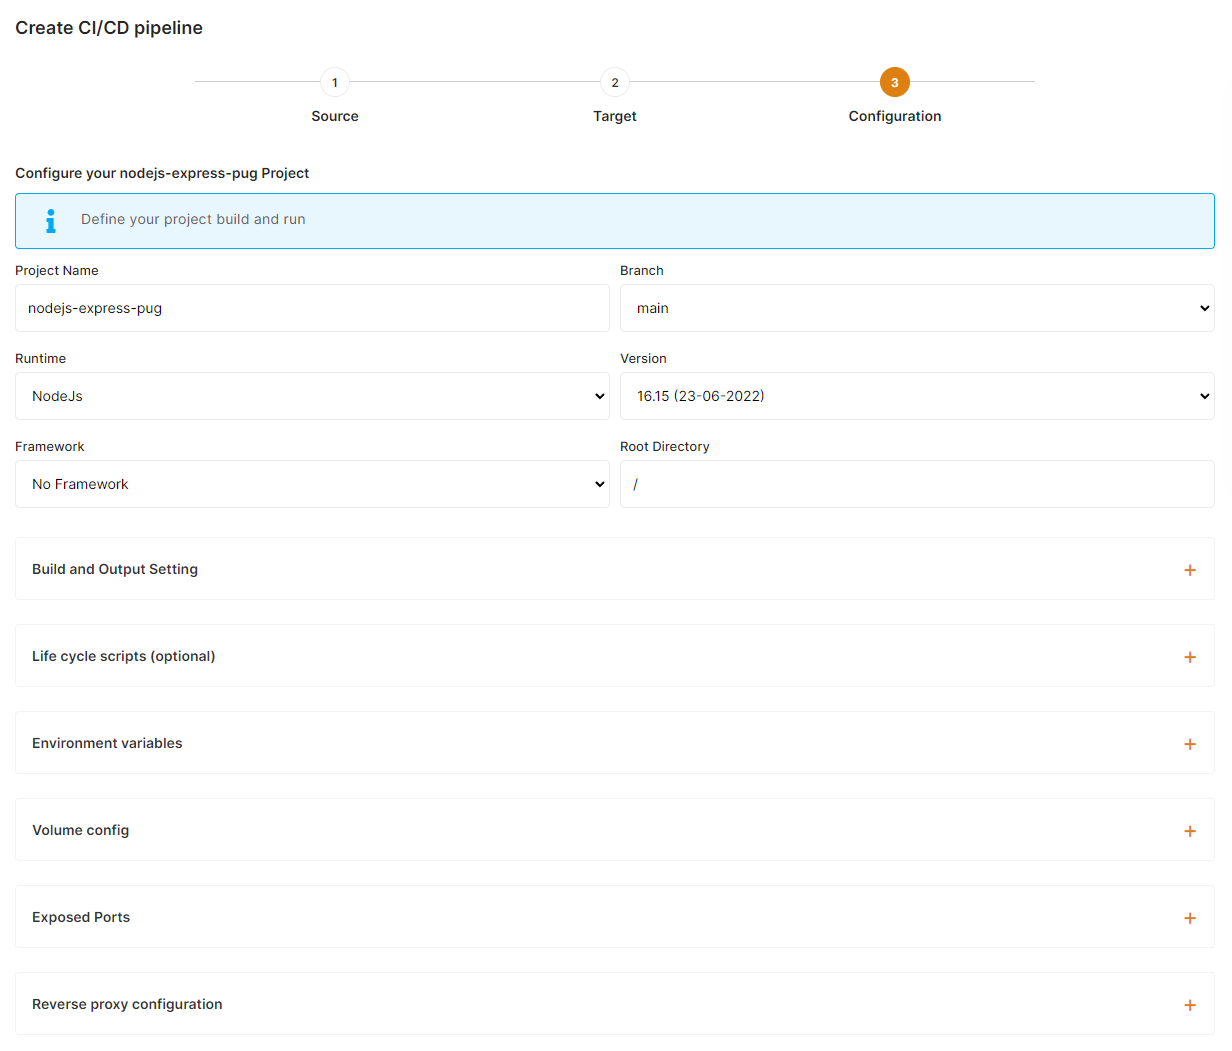
##### **3) Configure your project**
This is the last step of the process where you can configure your project name, branch, runtime, and all other settings about your build and environment configuration.
##### a) global settings
Select the Runtime & version matching your project needs. If you are using a framework select it in the framework dropdown, this will auto-populate the build/run commands.
[](https://docs.elest.io/uploads/images/gallery/2022-06/BNaimage.png)
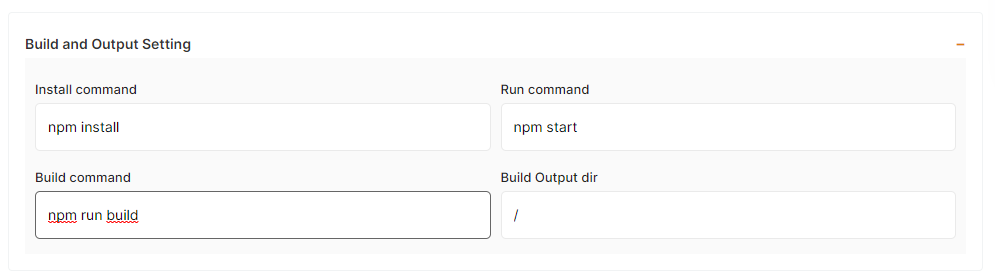
##### b) Build settings
You can customize the install/build/run command to suit your requirements.
[](https://docs.elest.io/uploads/images/gallery/2022-06/tS7image.png)
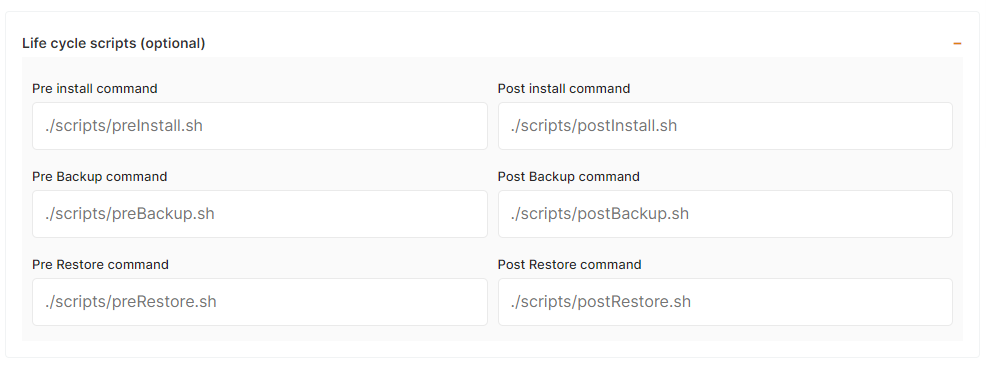
##### c) Life cycle scripts
In some situations, you will need to execute scripts before or after the installation of a new pipeline to setup your env, install some dependencies, and copy the dataset, ... In those cases, you can define pre/post scripts to execute before/after an installation and other actions like backup/restore. To activate it just indicate your script path relative to the root folder of your git repository.
[](https://docs.elest.io/uploads/images/gallery/2022-06/NH8image.png)
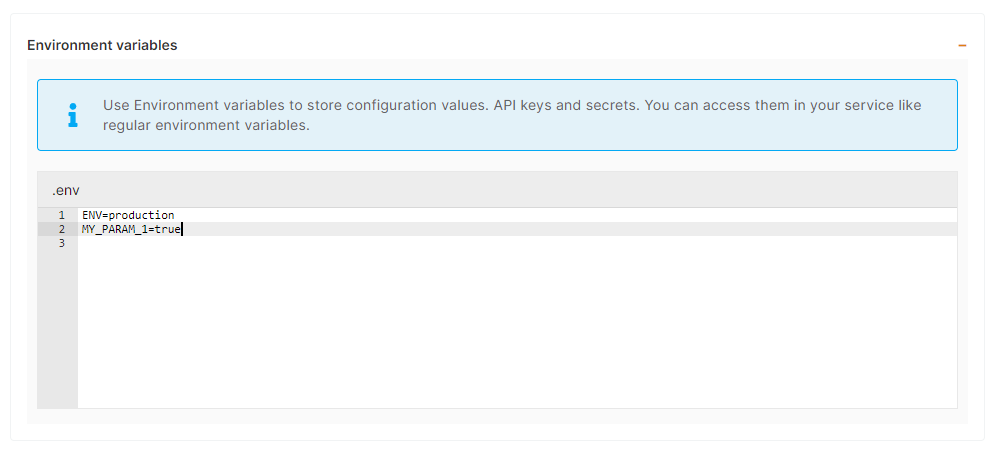
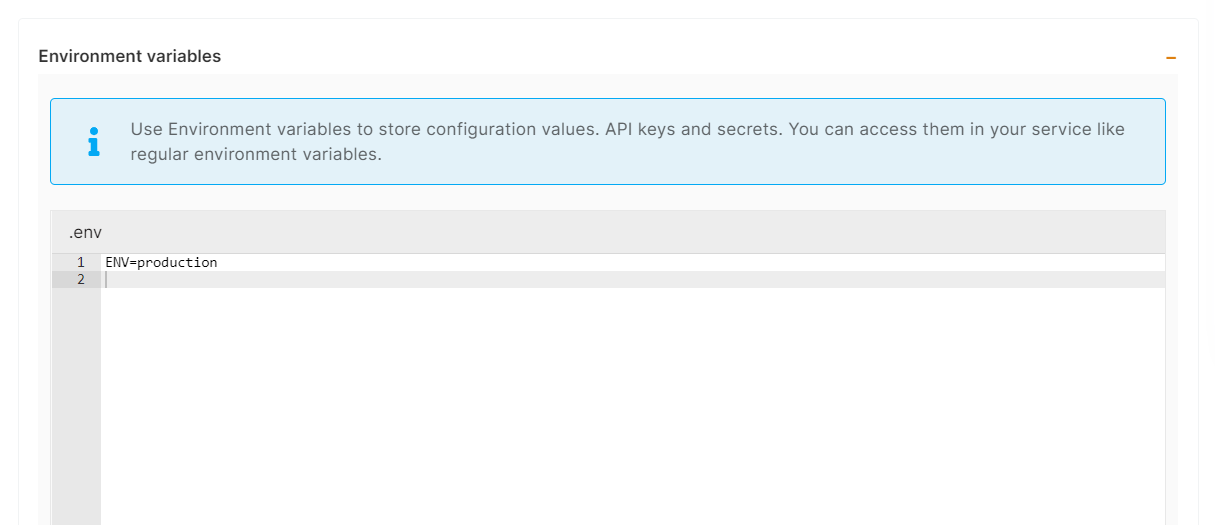
##### d) Environment variables
In most case, you will have to indicate configuration for your app through env vars. This is useful to pass various configurations to your app like database connection string, S3 bucket details, email address to use, and other global configurations.
[](https://docs.elest.io/uploads/images/gallery/2022-06/Lqmimage.png)
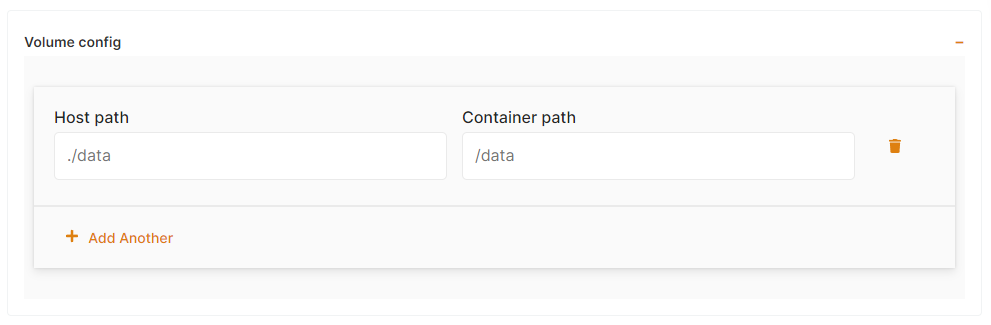
##### e) Volumes (data storage)
A lot of apps are totally stateless and don't require any volumes, but some of them need persistent storage to store file uploads, config, logs and other files. You can define one or multiple volumes as folders from the host (CI/CD target instance) mounted into the container. That way the files are persisted and available to the container.
[](https://docs.elest.io/uploads/images/gallery/2022-06/lWnimage.png)
Host path must be relative and must start with ./
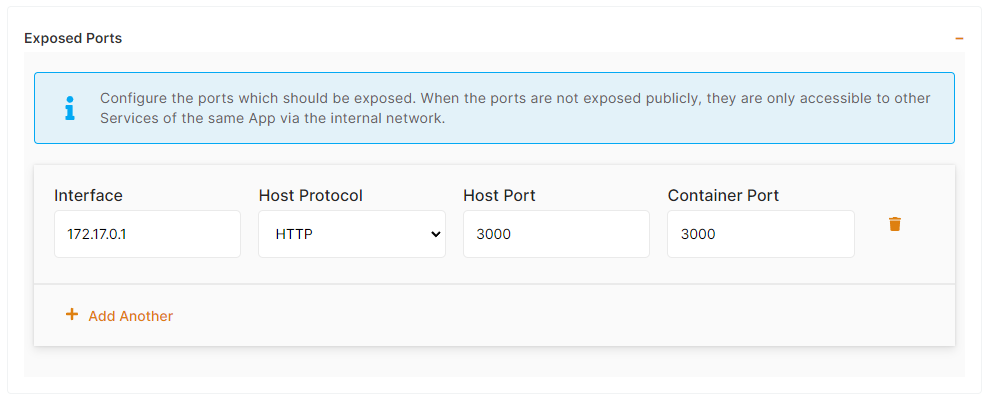
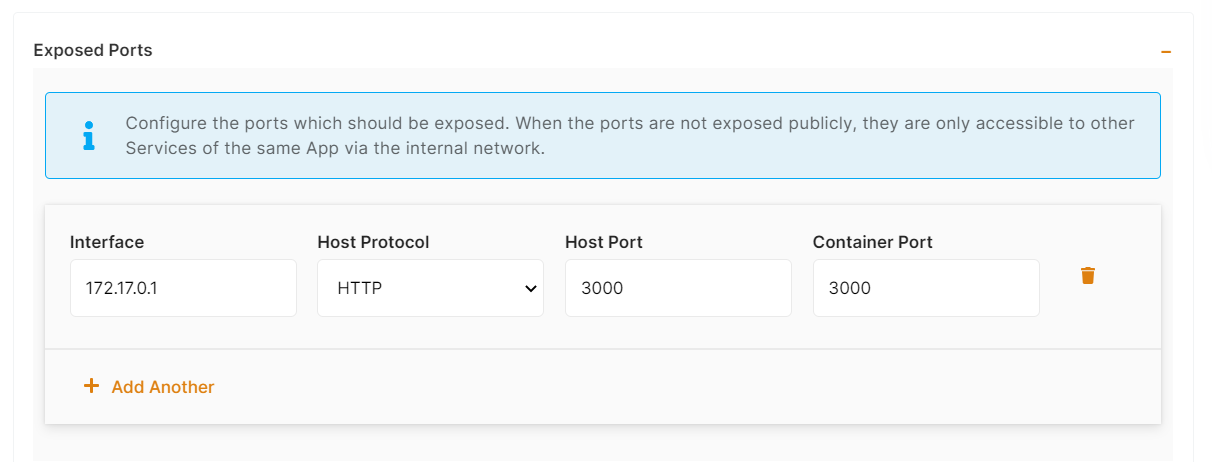
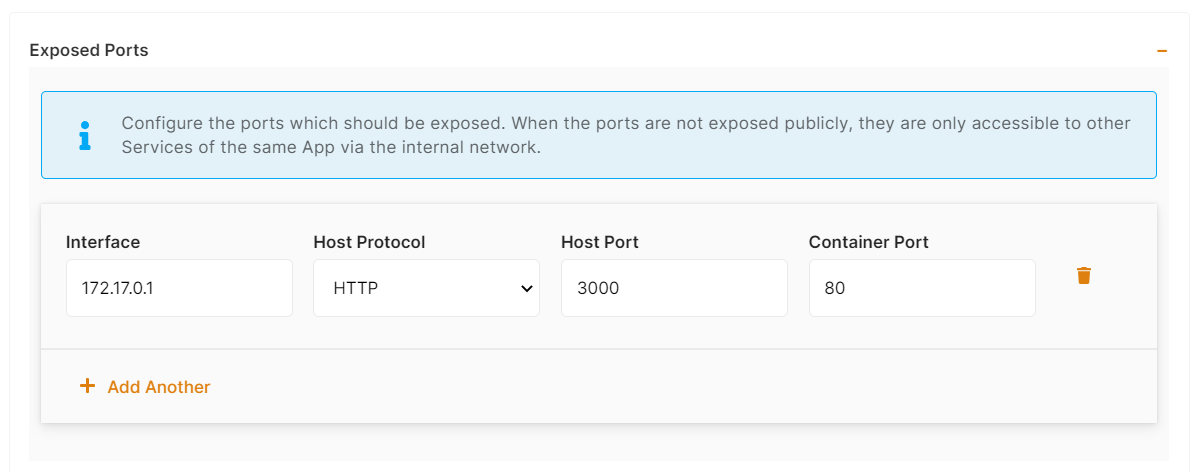
##### f) Exposed ports
If you app is listening on port 3000, you should indicate Container port to 3000, then Host port can be the same or anything else. If your app is listening on multiple ports you can add them as additional rows by clicking on "Add another".
[](https://docs.elest.io/uploads/images/gallery/2022-06/7rfimage.png)
If you need to deploy several instances of the same app on a single node you will have to change the host port in the exposed ports > host port and also in reverse proxy > target port accordingly.
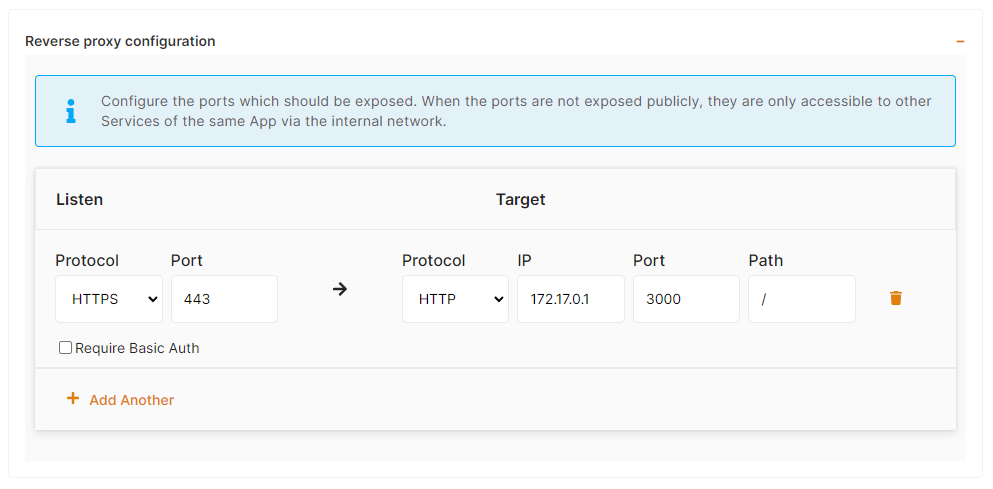
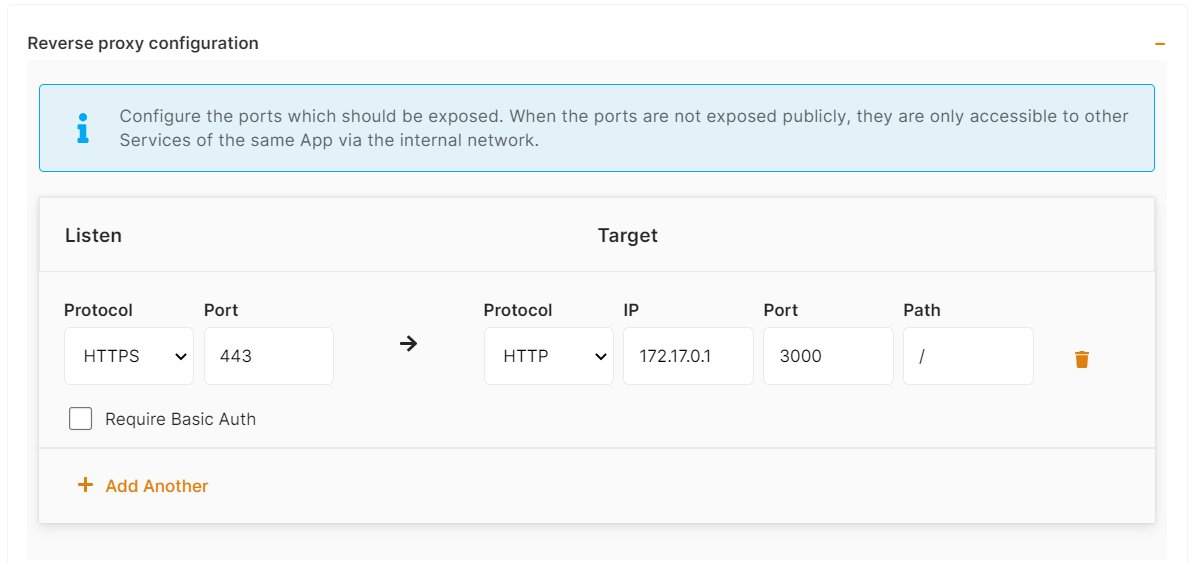
##### g) Reverse proxy
Finally to make your app accessible on the internet, indicate in the target port the same thing you have configured on the host port in the previous step, so here is port 3000.
##### [](https://docs.elest.io/uploads/images/gallery/2022-06/RM7image.png)
It's possible to activate Basic Authentication if you check the corresponding checkbox and define login and password
[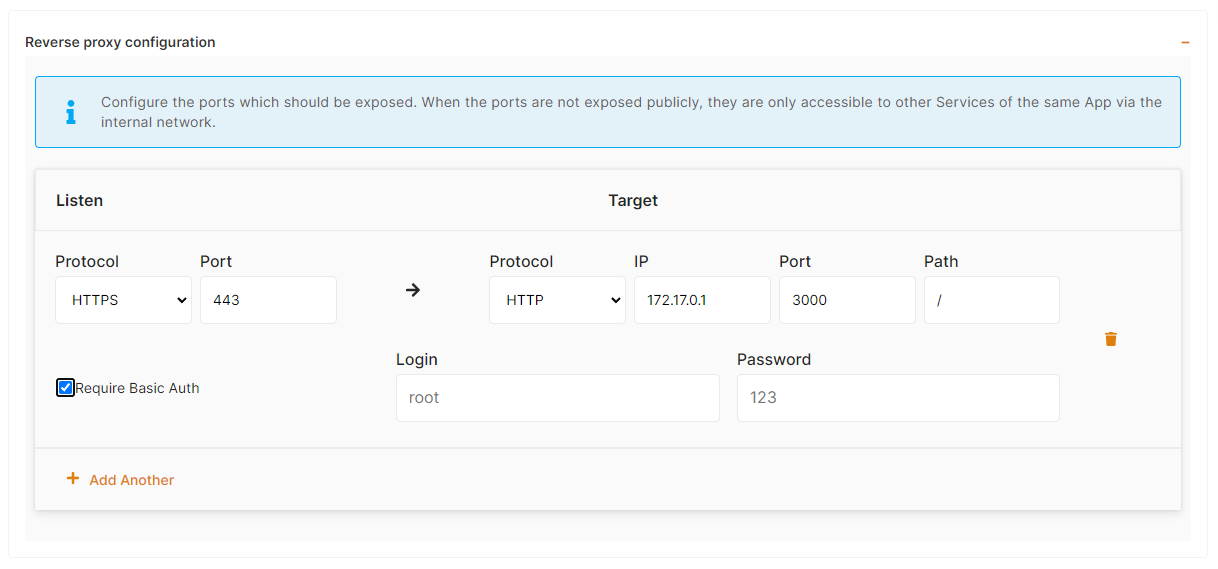](https://docs.elest.io/uploads/images/gallery/2022-06/Caiimage.png)
Finally, click on "Create CI/CD pipeline" to complete your deployment.
[](https://docs.elest.io/uploads/images/gallery/2022-06/OYcimage.png)
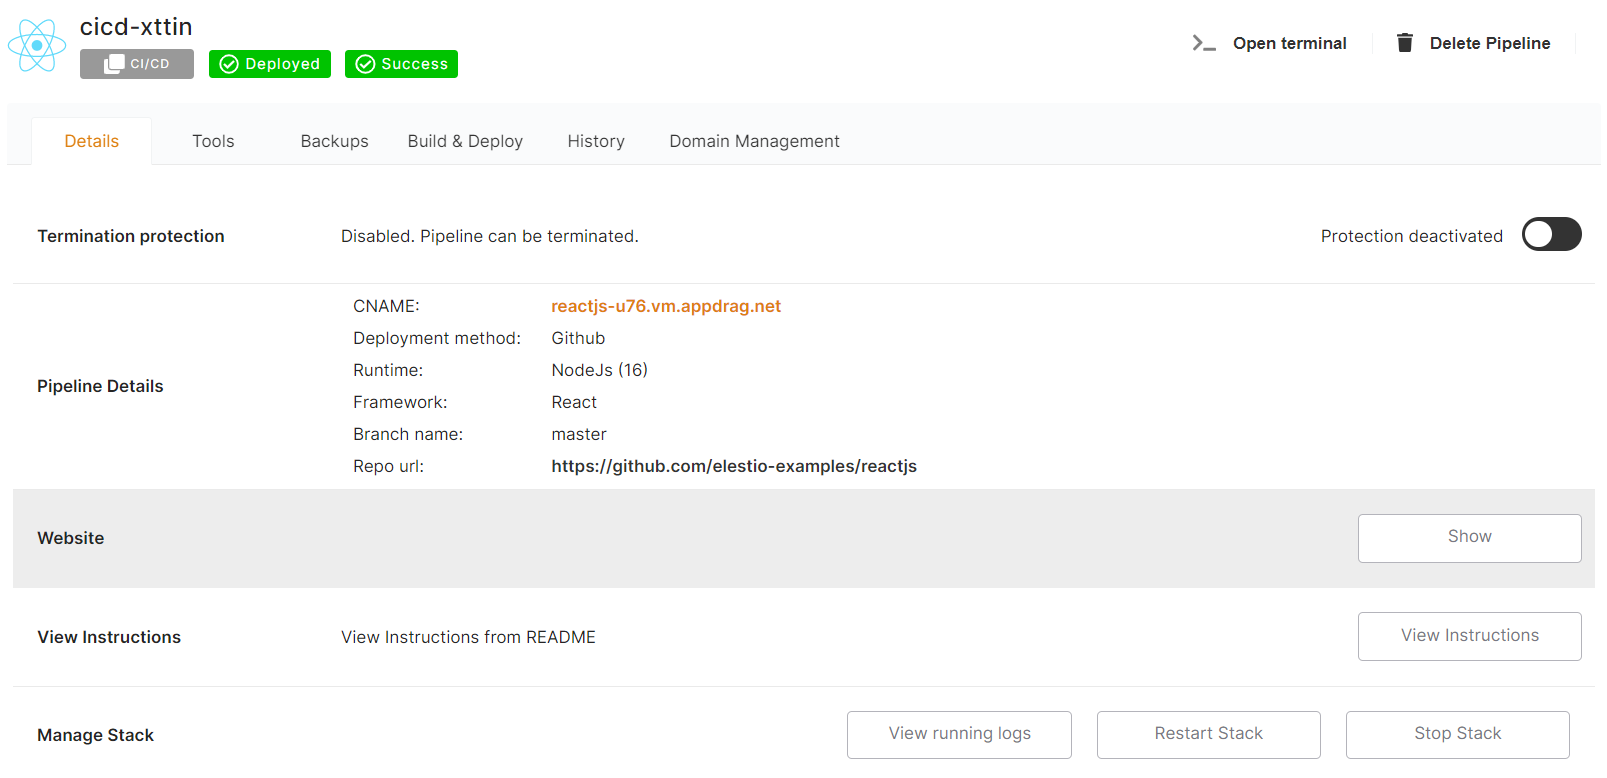
After a few minutes, your app should be accessible on the CI/CD pipeline url, you can find it in the dashboard overview of your pipeline. Also, each time you commit to your repo code will be rebuilt & re-deployed.
[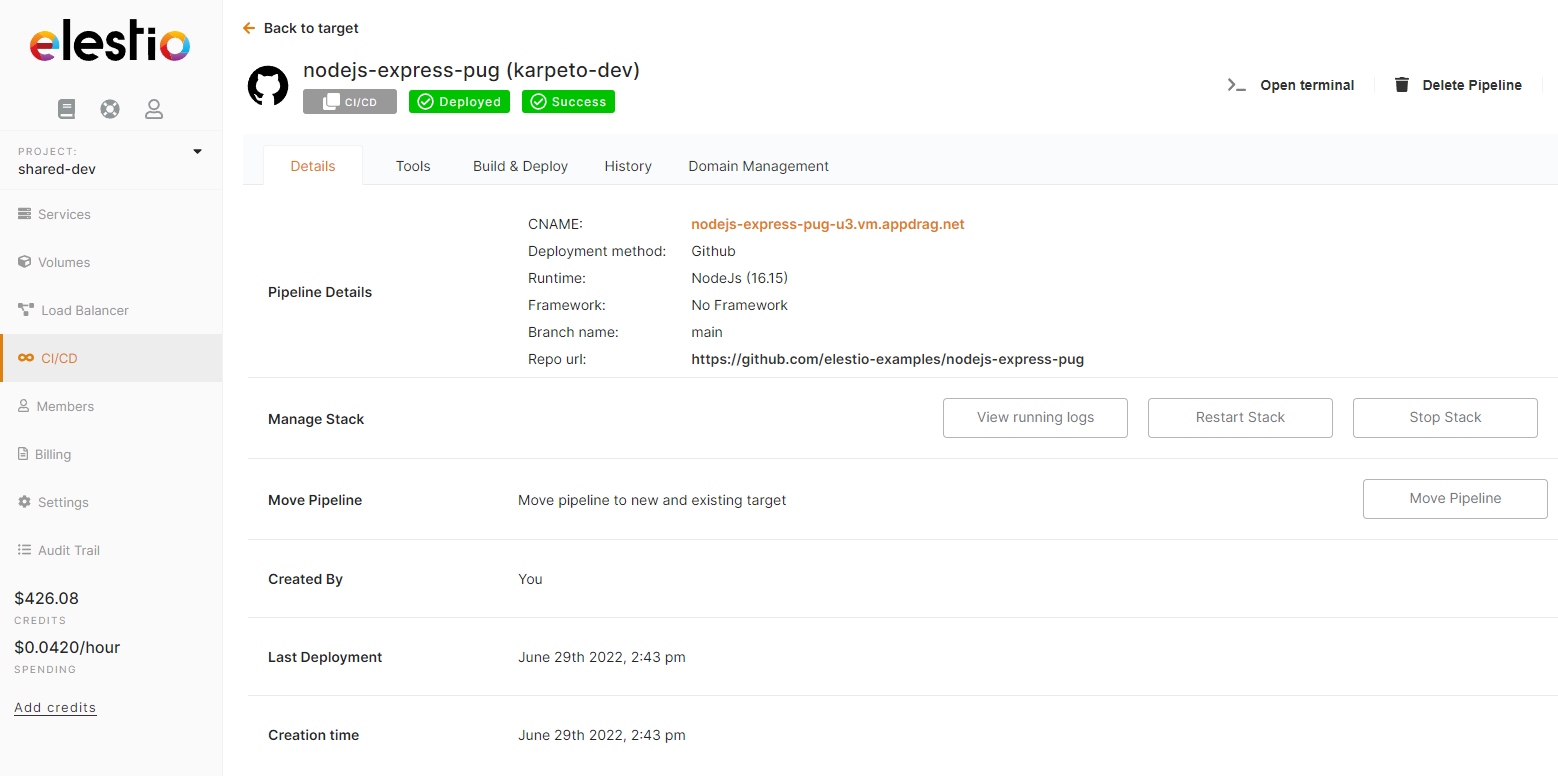](https://docs.elest.io/uploads/images/gallery/2022-06/Vr8image.png)
# Deploy docker-compose apps (Wordpress, MySQL, Redis, Keycloak ...)
You are about to learn how to deploy docker-compose applications to a CI/CD target. This is useful when you don't need a Git workflow and your images are already available on a public or private docker registry.
Use cases:
- Deploy one or multiple instances of stateful apps like Wordpress / Directus / MySQL / Redis / RabbitMQ / ...
- Deploy an internal service available only to your private network
- Deploy an app built somewhere else and published to a private docker registry
First, open the [Elestio dashboard and click on CI/CD](https://dash.elest.io/new/deployment/ci-cd/)
##### **1) Select your app to deploy**
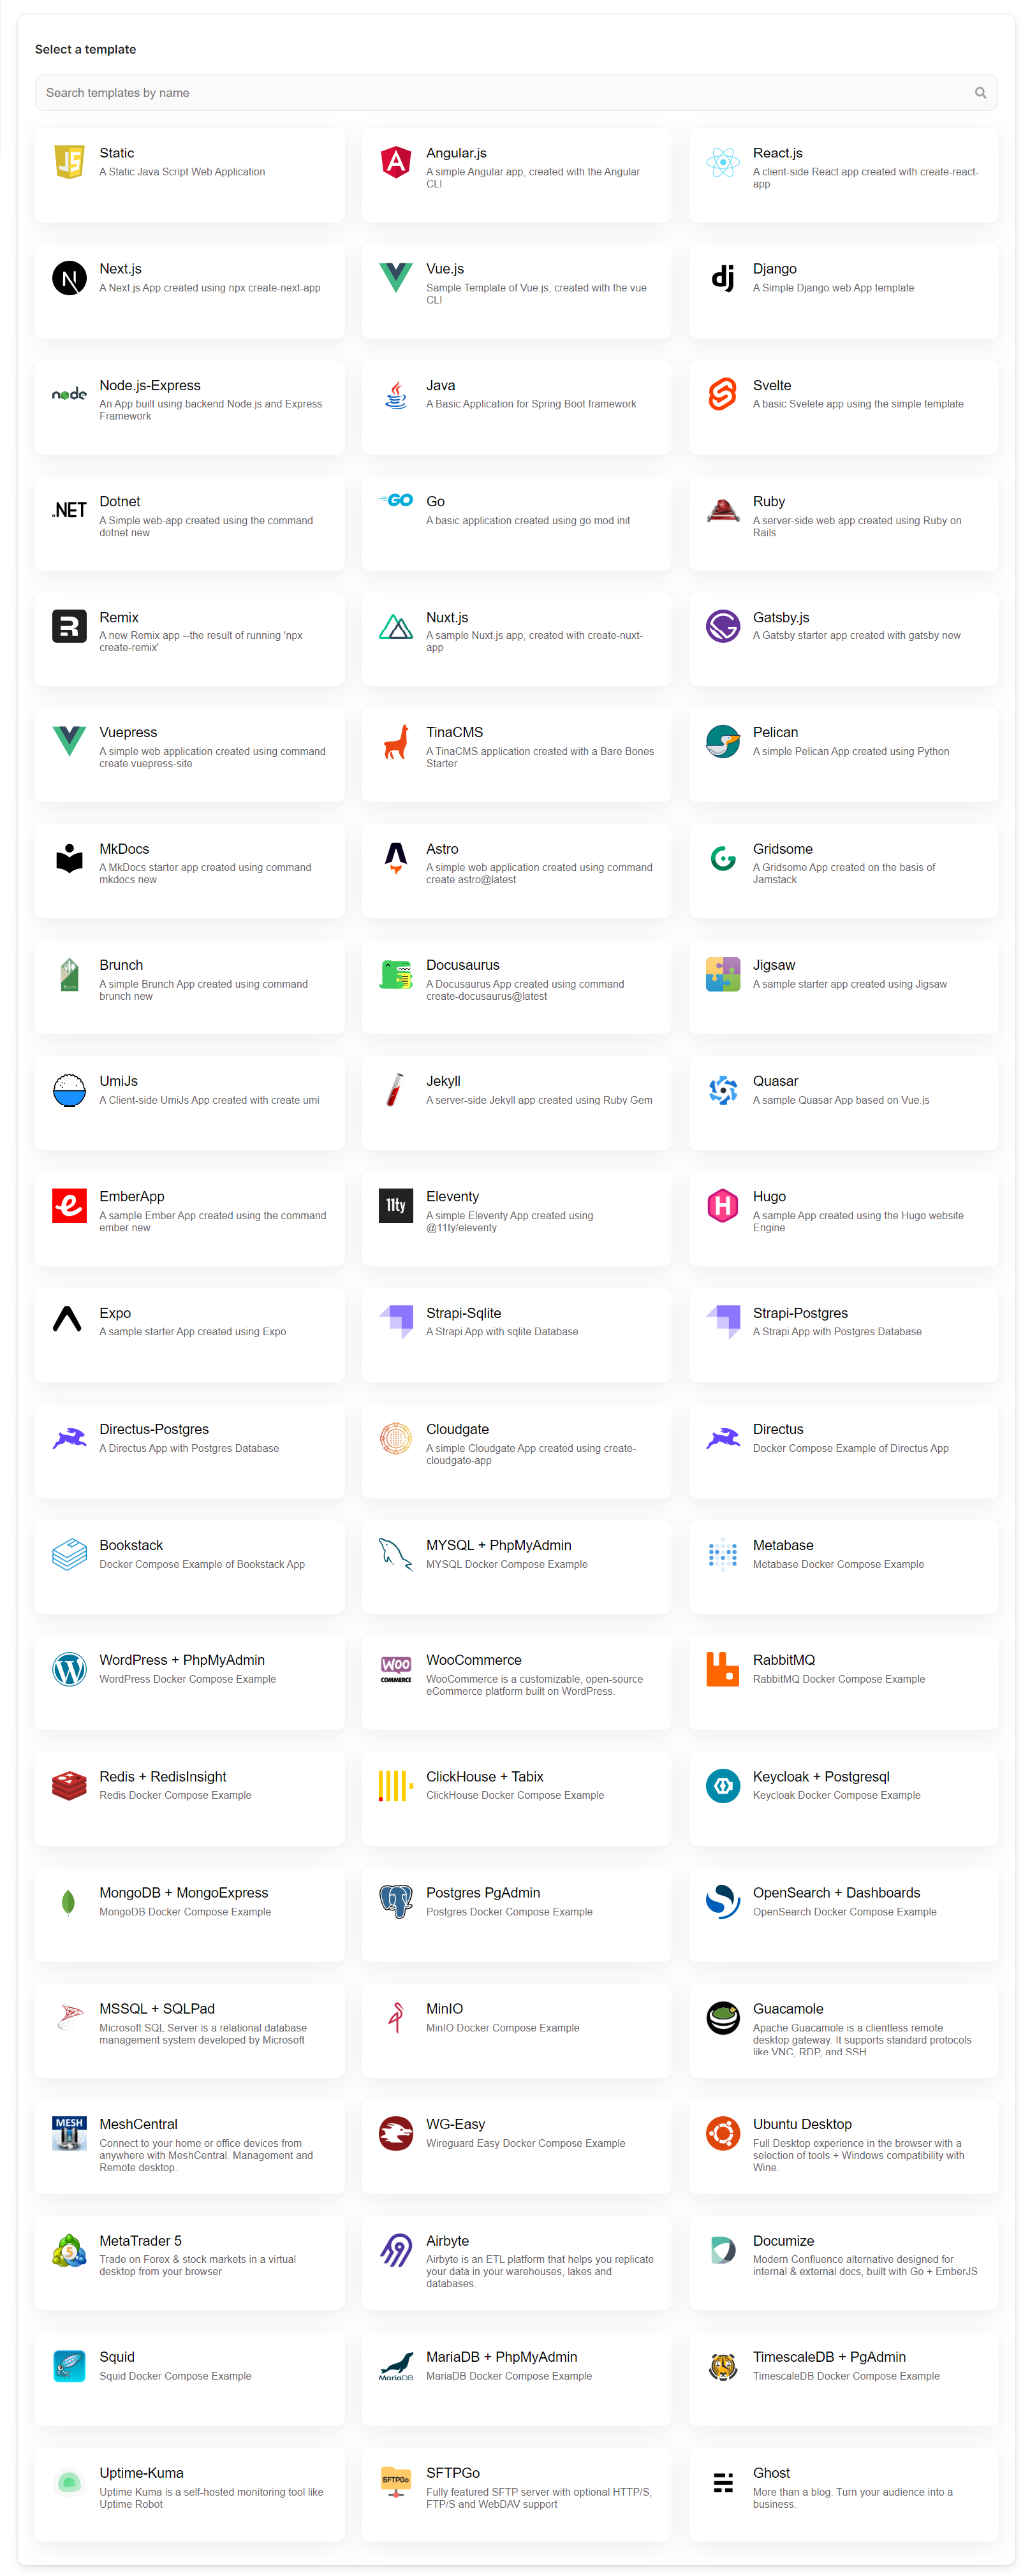
When you select Docker to compose the deployment method, we provide a few samples of applications that you can deploy
[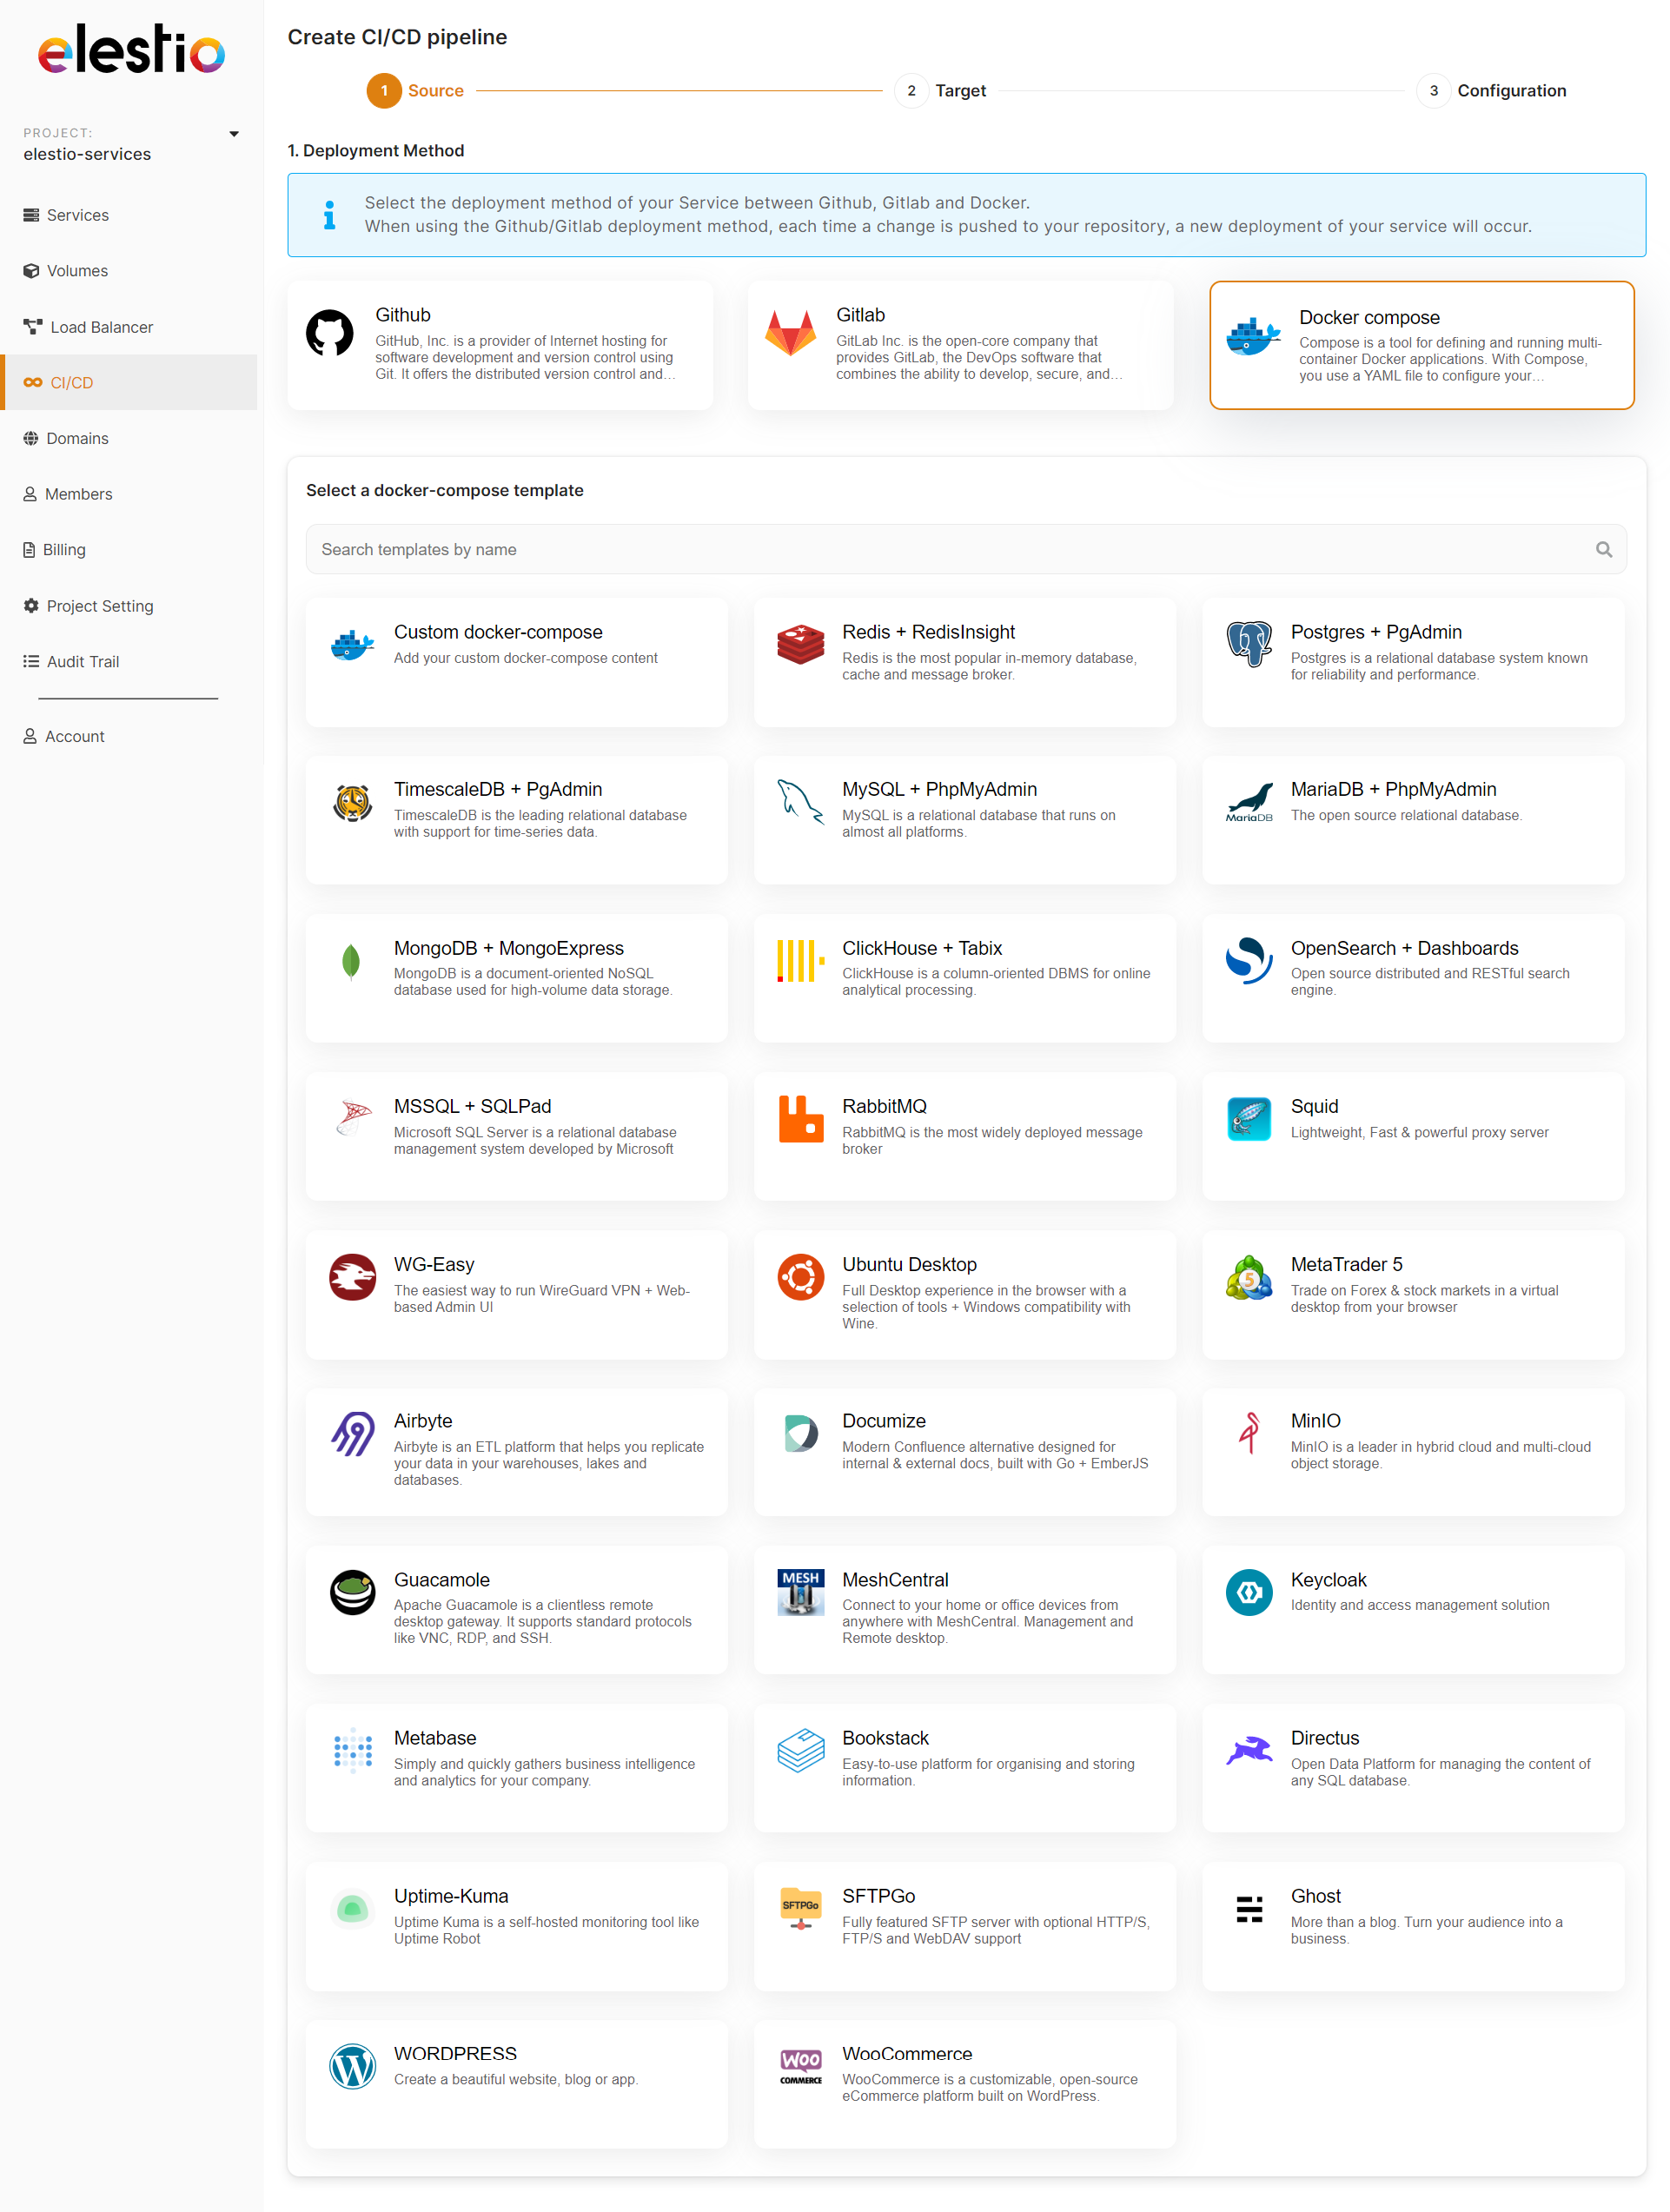](https://docs.elest.io/uploads/images/gallery/2022-07/image.png)
From there click on Github or Gitlab, and you will be asked to provide authorization to list your projects in Elestio.
Then you will be able to browse Organizations & Repositories detected on your account. You can also use the search to find directly your project to deploy. Once you found it, click on Import, then click on next.
##### **2) Select your target (where to deploy)**
Here you have to indicate where the app should be deployed, it can be a "New infrastructure", in that case, you can select your preferred provider/region/instance size. Or an existing infrastructure, then you just have to pick it from the list.
[](https://docs.elest.io/uploads/images/gallery/2022-06/On9image.png)
[](https://docs.elest.io/uploads/images/gallery/2022-06/YZ7image.png)
#####
##### **3) Configure your app**
This is the last step of the process where you can adjust the app settings, docker-compose, env vars, and reverse proxy configuration.
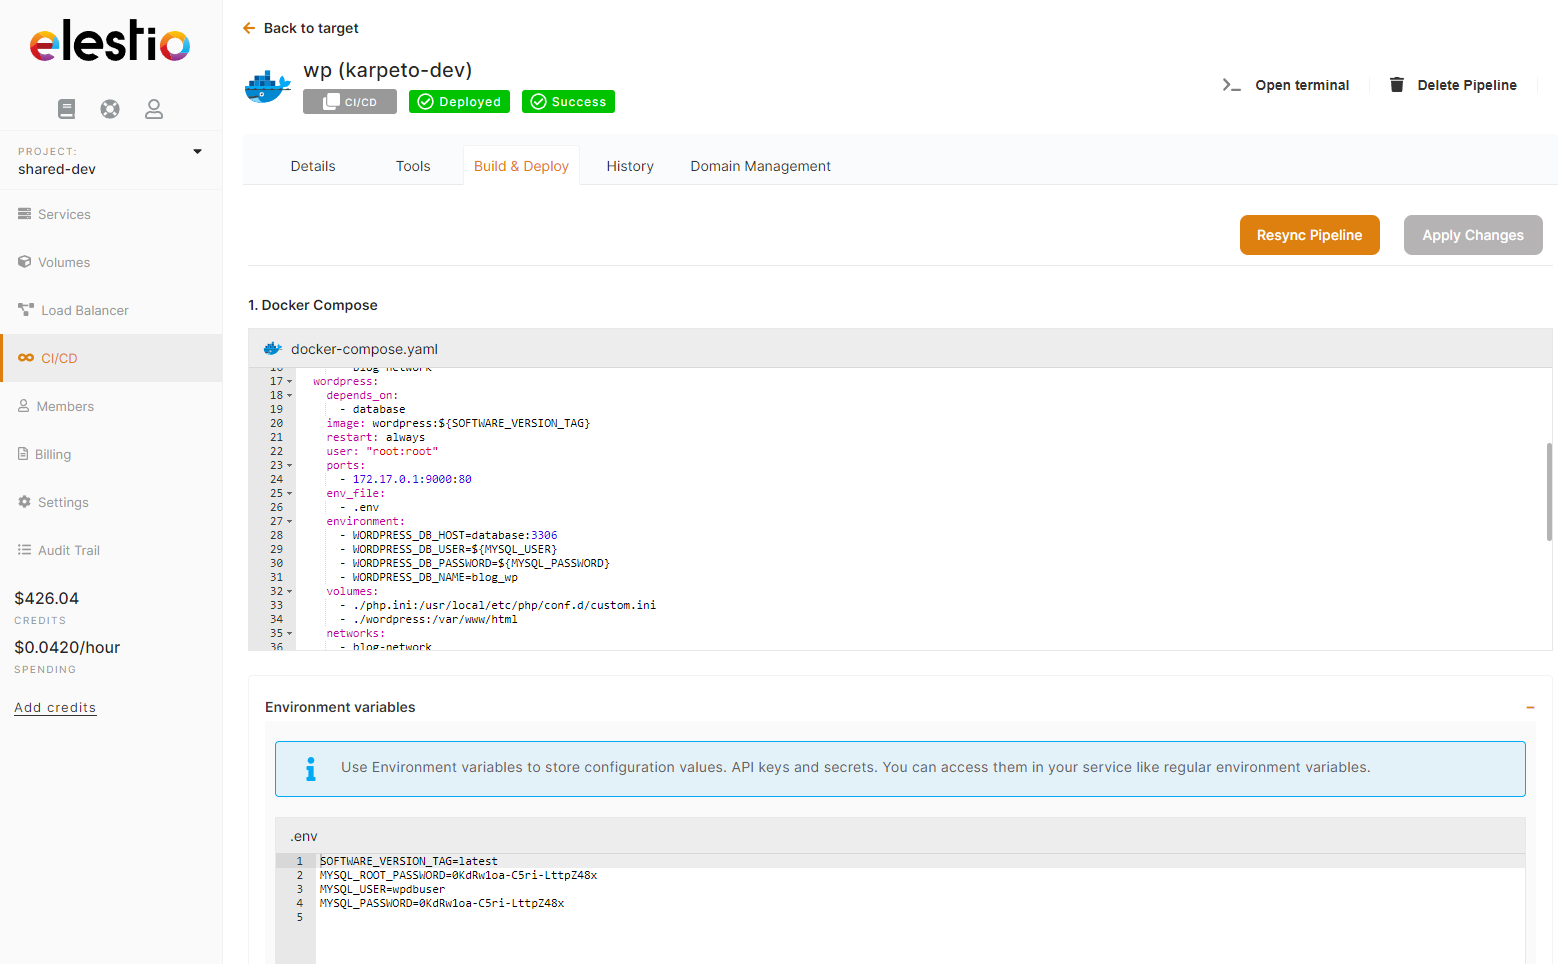
##### a) Docker-compose stack
[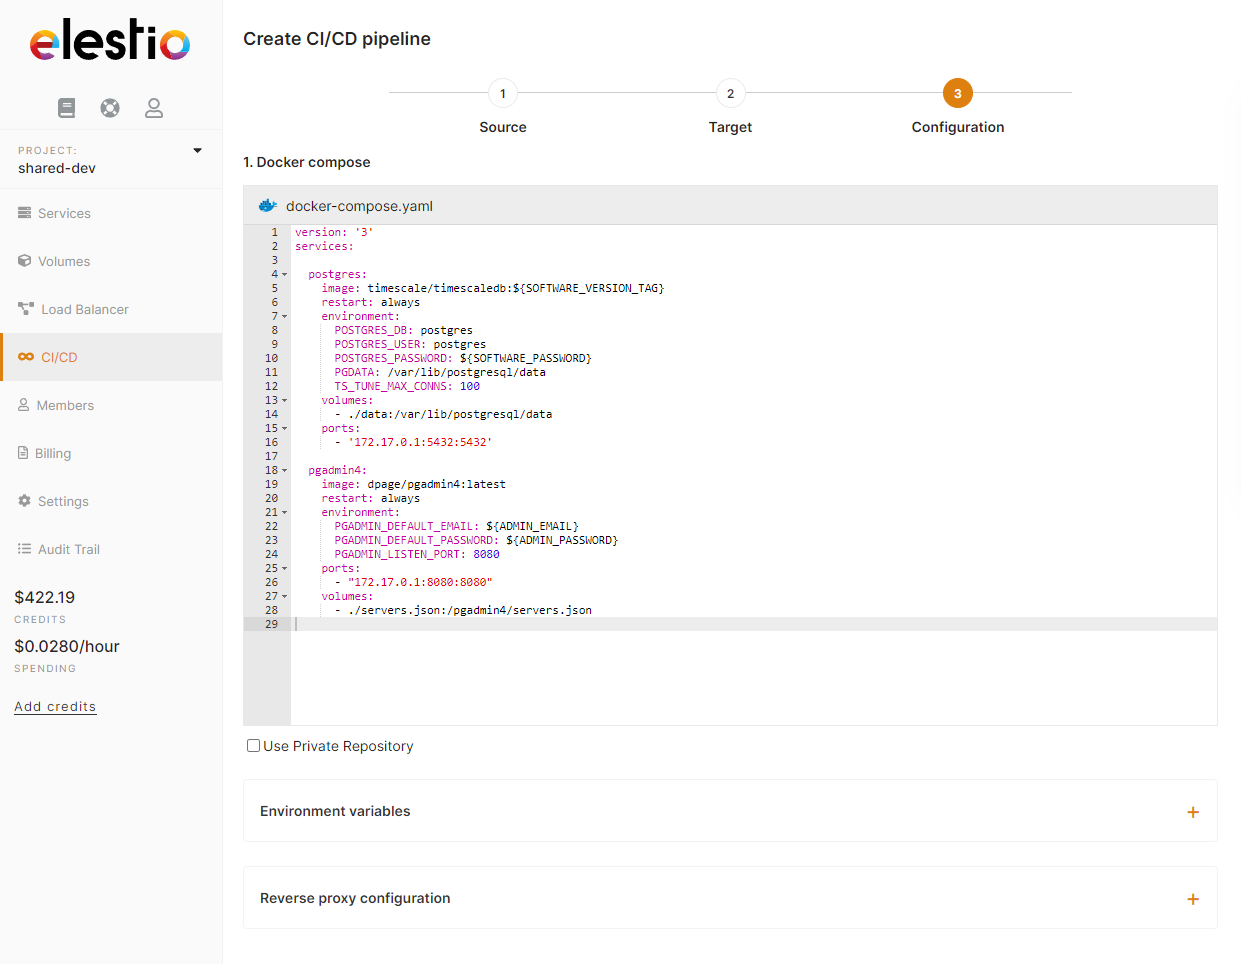](https://docs.elest.io/uploads/images/gallery/2022-07/okzimage.png)
##### b) Environment variables
In most cases, you will have to indicate configuration for your app through env vars. This is useful to pass various configurations to your app like database connection string, S3 bucket details, email address to use, and other global configurations.
[](https://docs.elest.io/uploads/images/gallery/2022-06/Lqmimage.png)
##### c) Reverse proxy
To make your app accessible on the internet, indicate in the target port the same thing you have configured on the host port in the docker-compose ports binding.
[](https://docs.elest.io/uploads/images/gallery/2022-06/JW5image.png)
Finally, click on "Create CI/CD pipeline" to complete your deployment.
[](https://docs.elest.io/uploads/images/gallery/2022-06/OYcimage.png)
After a few minutes, your app should be accessible on the CI/CD pipeline url, you can find it in the dashboard overview of your pipeline. Your generated credentials are visible in the "Build & Deploy" tab in the env var section or reverse proxy section if you have activated basic authentication.
[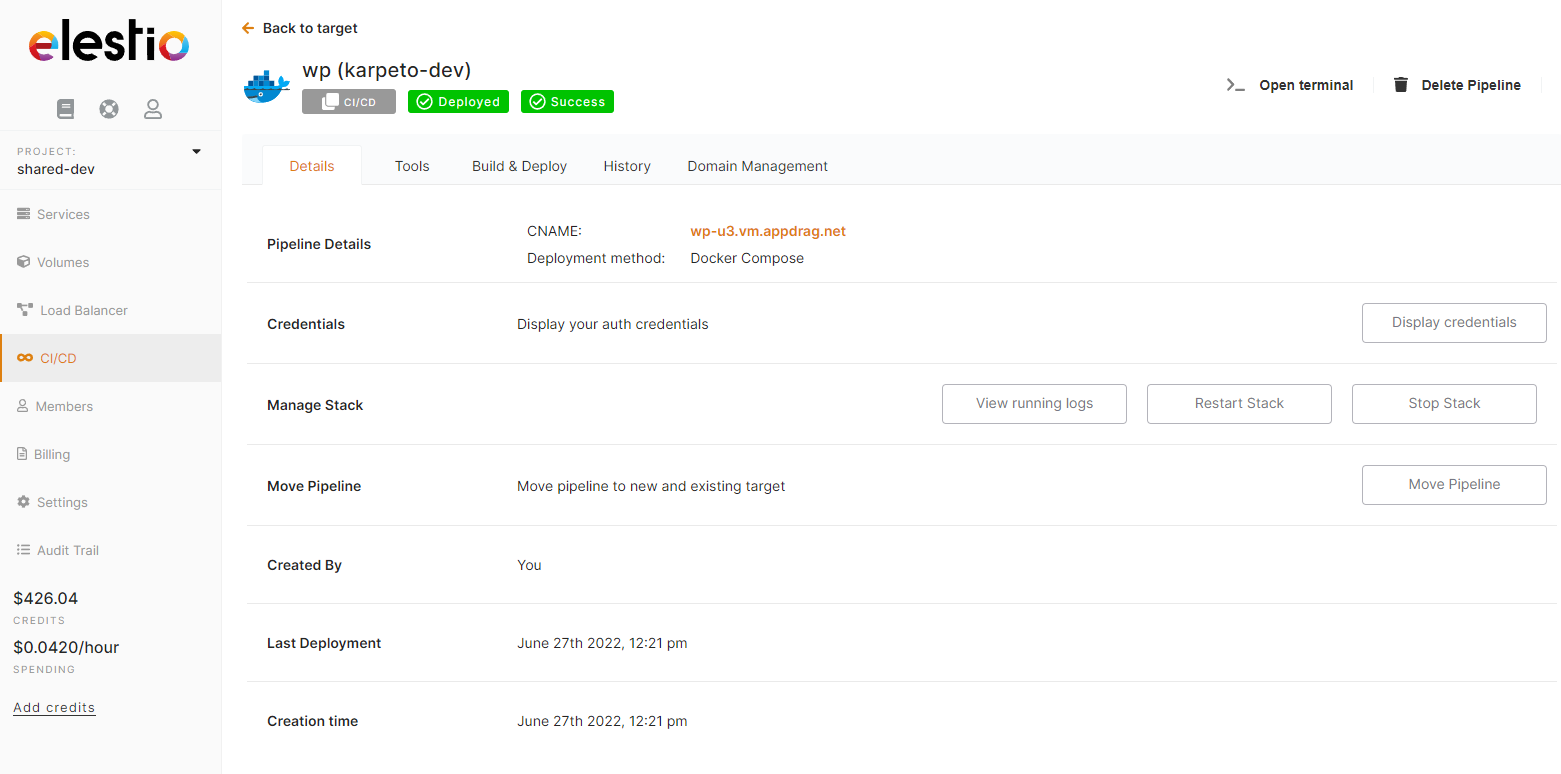](https://docs.elest.io/uploads/images/gallery/2022-06/Mc0image.png)
[](https://docs.elest.io/uploads/images/gallery/2022-06/7IFimage.png)
# Deploy own docker-compose image using Elestio "Custom docker-compose"
This tutorial will walk you through the process of deploying your own custom Docker image to the Elestio cloud.
Use cases:
- Deploy one or multiple instances of stateful apps like Wordpress / Directus / MySQL / Redis / RabbitMQ / ...
- Deploy an internal service available only to your private network
- Deploy an application that was created elsewhere and published to a private Docker registry.
To learn more about the elestio CI/CD, go *[**here**](https://docs.elest.io/books/cicd-pipelines/page/overview).*
If you're new, sign up for *[Elestio](https://dash.elest.io/)*, otherwise, login to your existing account.
#### **Deploy a custom docker-compose image to the Elestio cloud using the CI/CD custom docker-compose template.**
#### Step 1:
Go to CI/CD from the left sidebar.
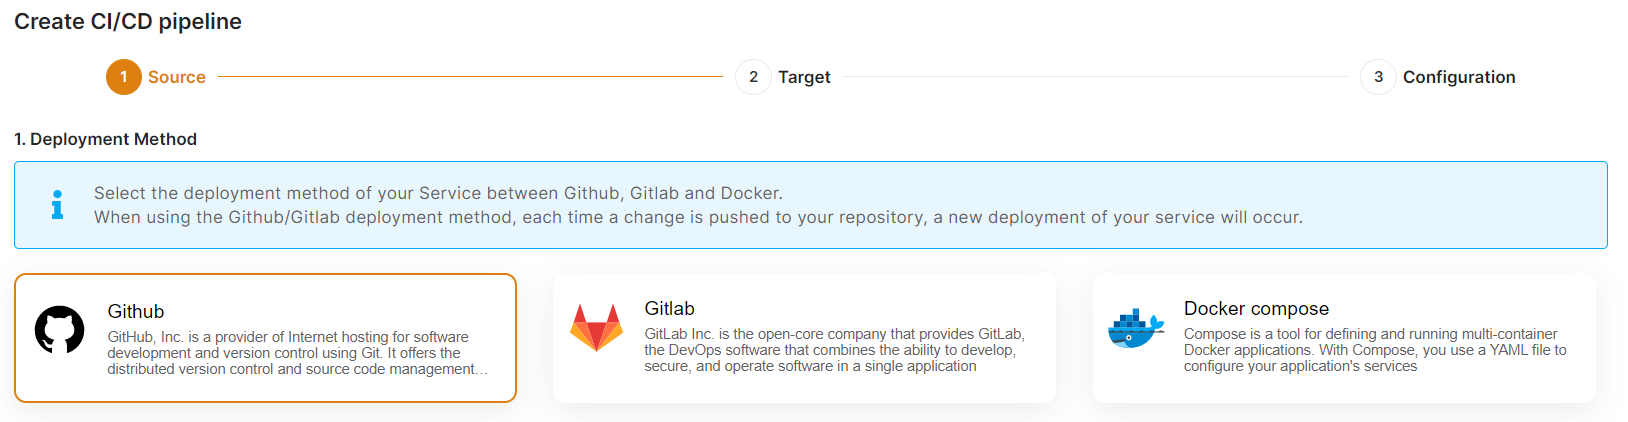
#### Step 2:
Now, select the ***Docker compose*** as the deployment source.
[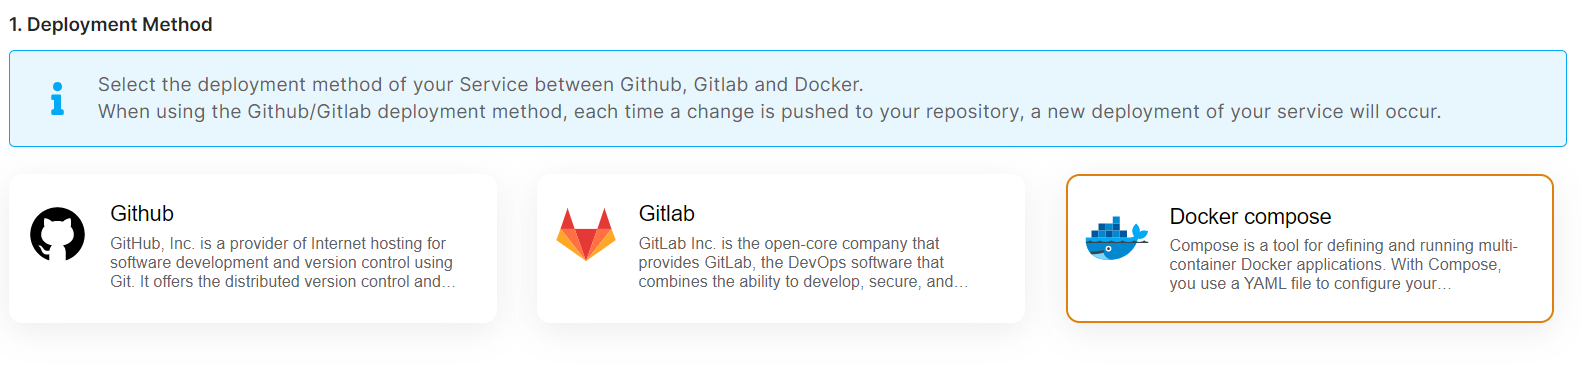](https://docs.elest.io/uploads/images/gallery/2022-11/screenshot-2022-11-02-185434.png)
#### Step 3:
> ***Here you can see the most interesting and well-liked tech stacks' elestio templates.***
[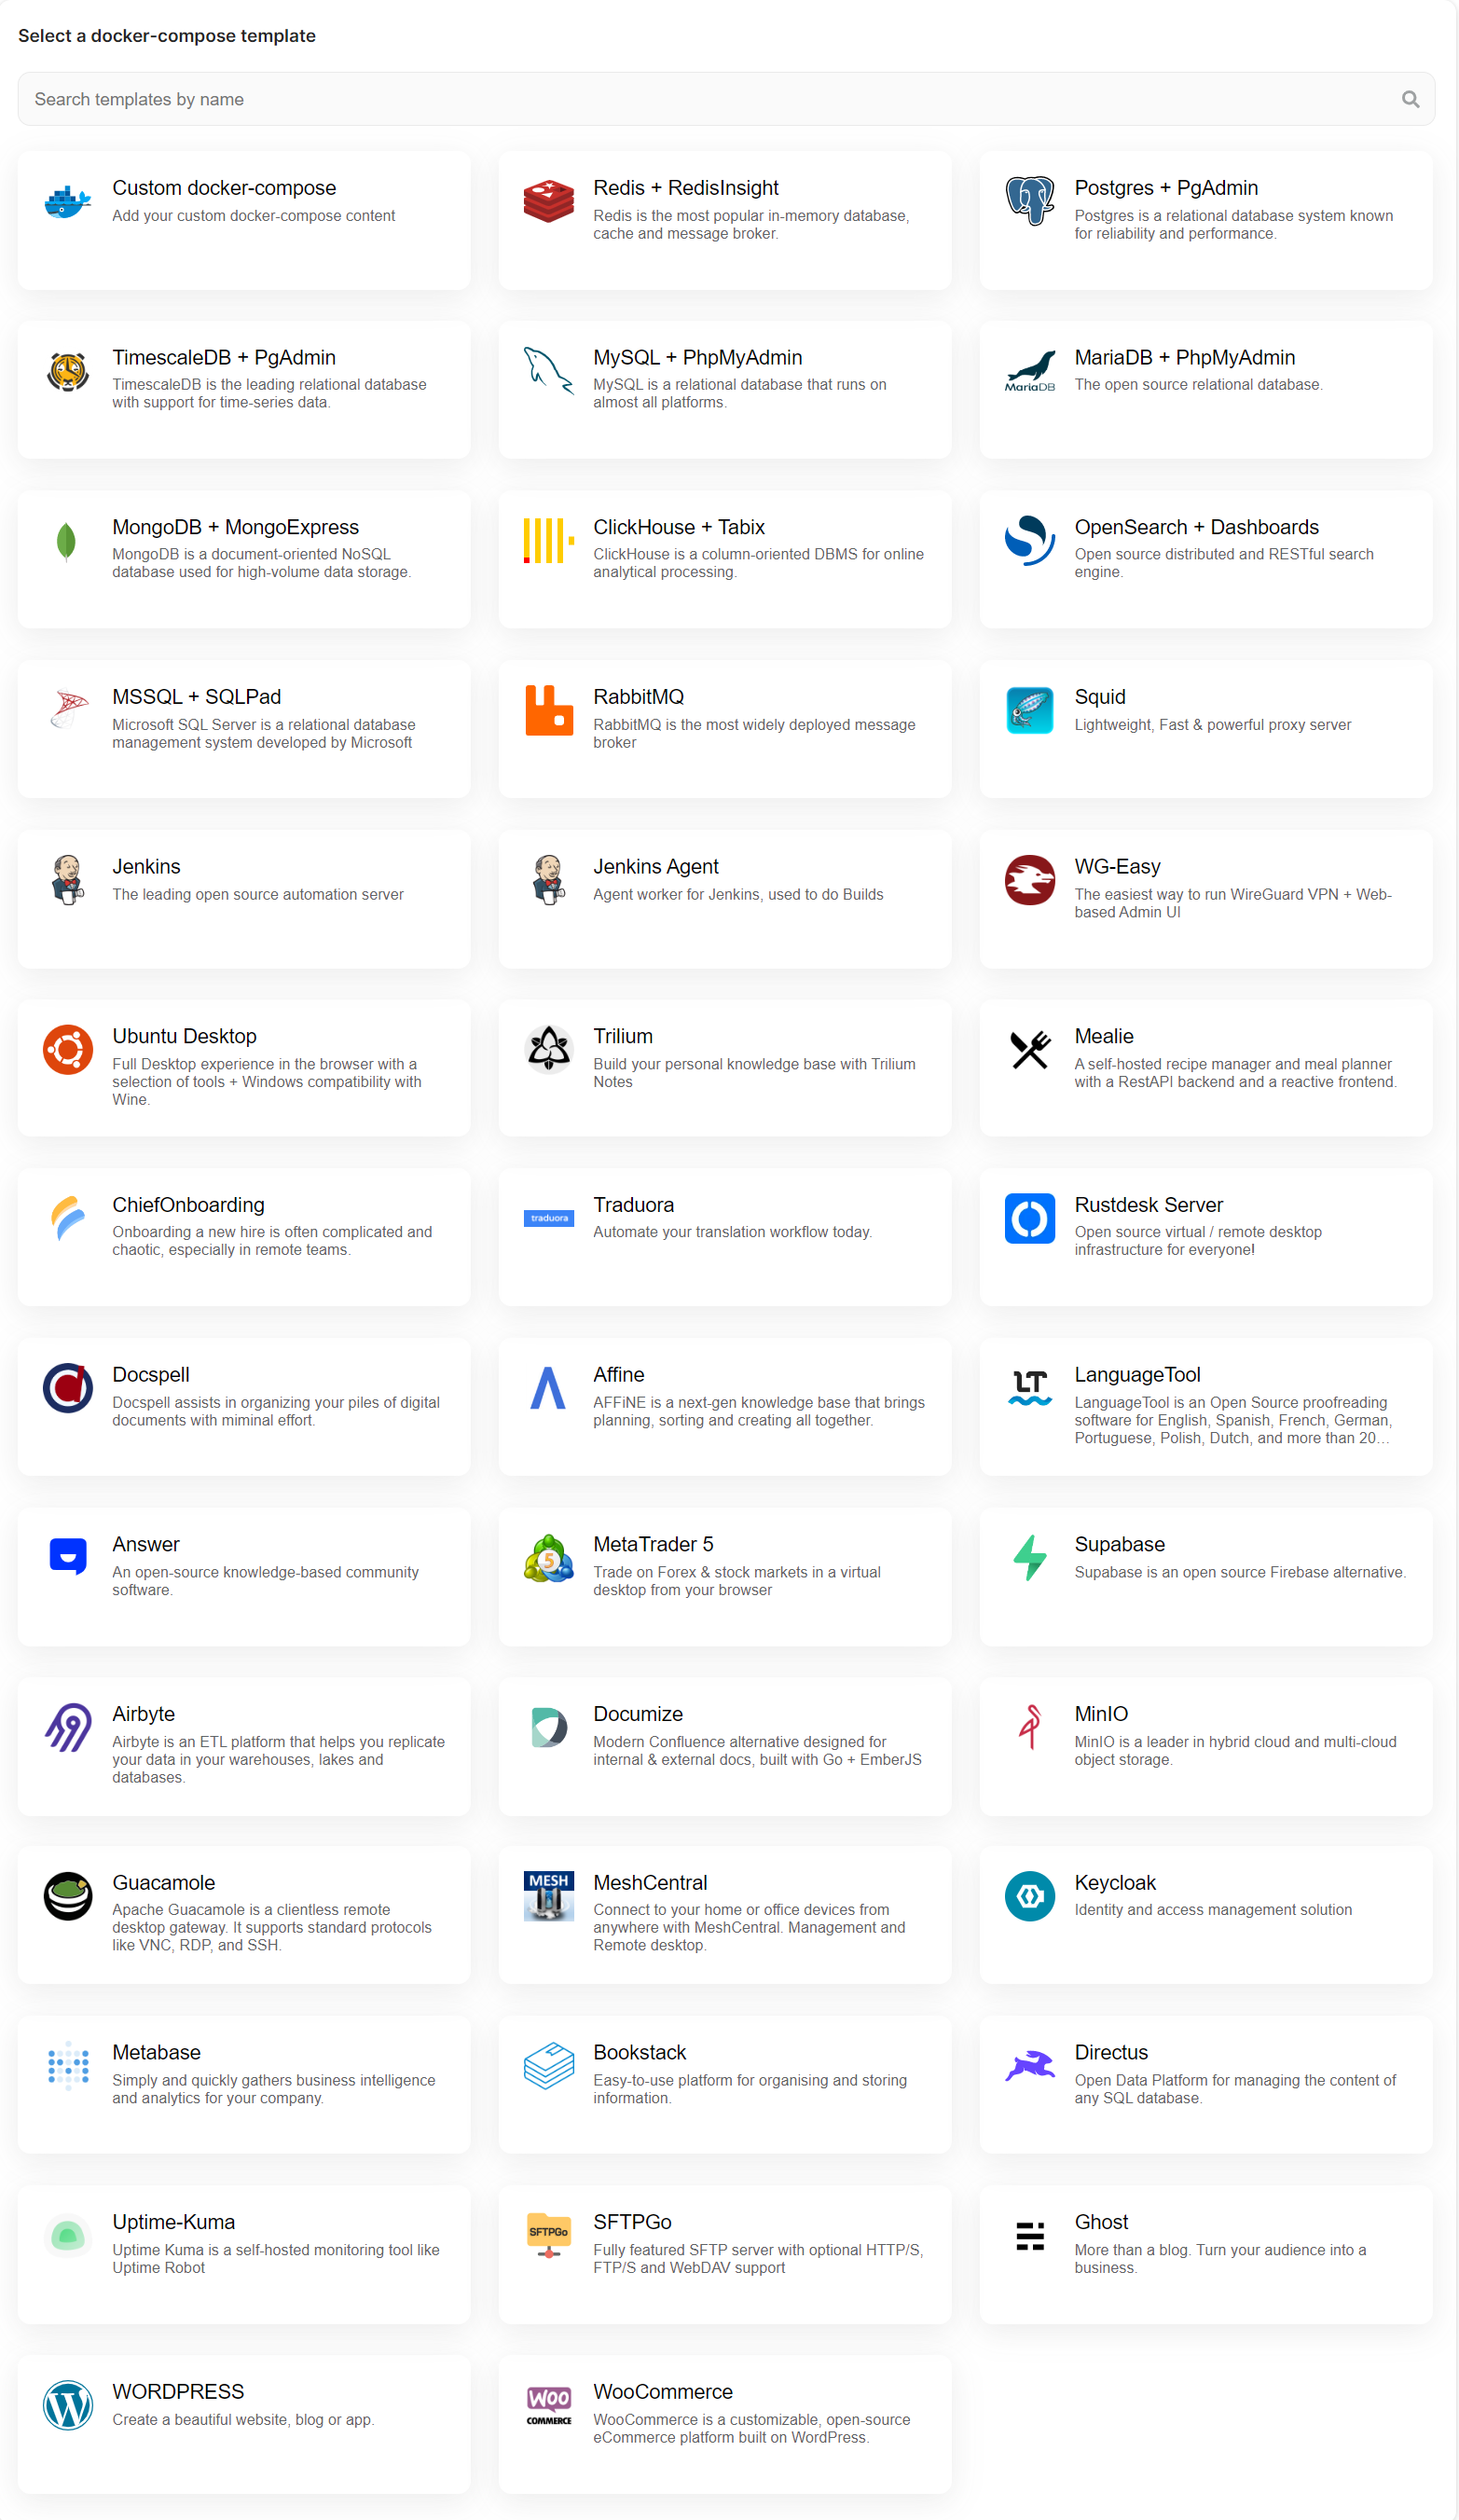](https://docs.elest.io/uploads/images/gallery/2022-11/managed-service-dashboard-13.png)
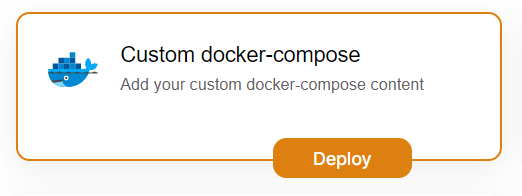
Now, for deploying customer docker images, select ***Custom docker-compose*** template; otherwise, if you want to deploy from ***elestio example*** templates, select the template you want to deploy and follow the [***steps***](https://docs.elest.io/books/cicd-pipelines/page/deploy-docker-compose-apps-wordpress-mysql-redis-keycloak).
[](https://docs.elest.io/uploads/images/gallery/2022-11/screenshot-2022-11-04-195057.png)
Now click the ***Deploy* **button to proceed.
#### Step 4:
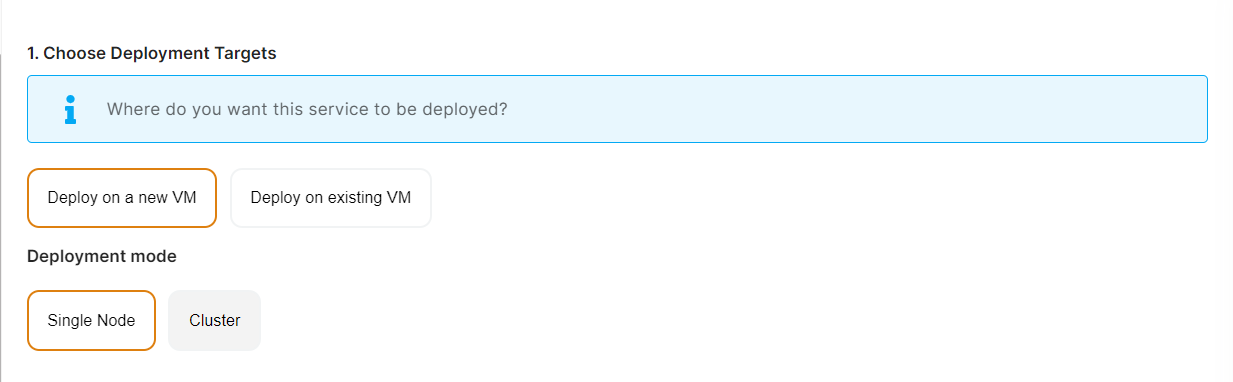
Choose Deployment Targets
[](https://docs.elest.io/uploads/images/gallery/2022-11/screenshot-2022-11-02-191657.png)
Elestio offers two types of deployment targets "**Deploy on a new VM**" and "**Deploy on an existing VM**".
You are allowed to set up n pipelines on each elestio CI/CD target/VM. According to the project configuration you select and the project you're deploying, the number of pipelines varies.
If you want to deploy these projects as a pipeline on a new Target/VM or don't have any installed targets, choose "Deploy on a new VM." If you already have any installed or previously configured CI/CD targets/VMs, choose "Deploy on an existing VM," and then choose the existing target from the targets dropdown.
Follow the steps below only if you select "**Deploy on a new VM**," otherwise click the next button to proceed.
CI/CD Pipelines by Elestio are available with our 5 cloud partners (AWS Lightsail, Digital Ocean, Vultr, Linode & Hetzner) in 85 locations over 27 countries but also on any cloud (AWS, Azure, Google, Oracle, ...) and on-premise with [BYOVM.](https://doc.elest.io/books/cloud-providers/page/byovm-bring-your-own-vm)
- Select Service Cloud Region[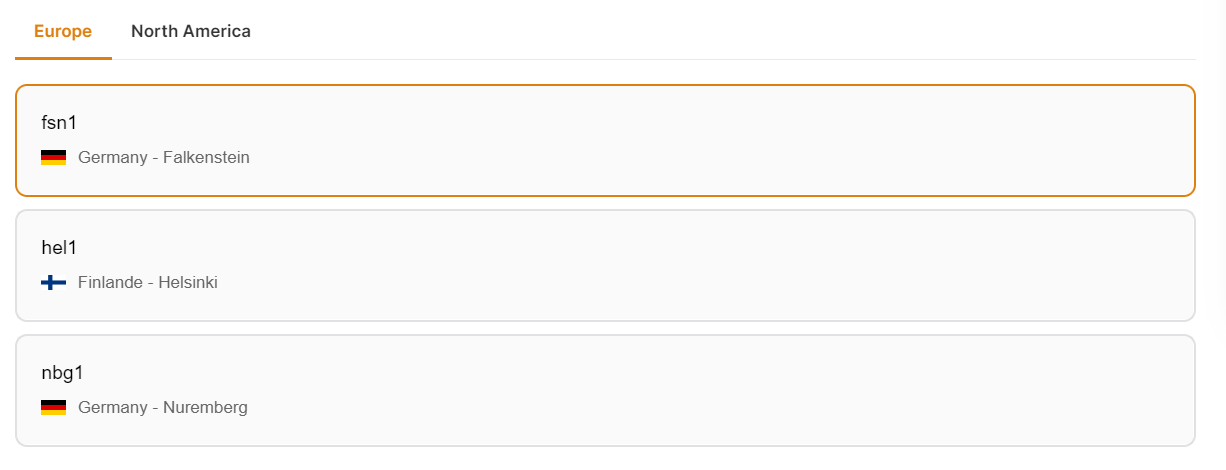](https://docs.elest.io/uploads/images/gallery/2022-11/screenshot-2022-11-02-194242.png)
-
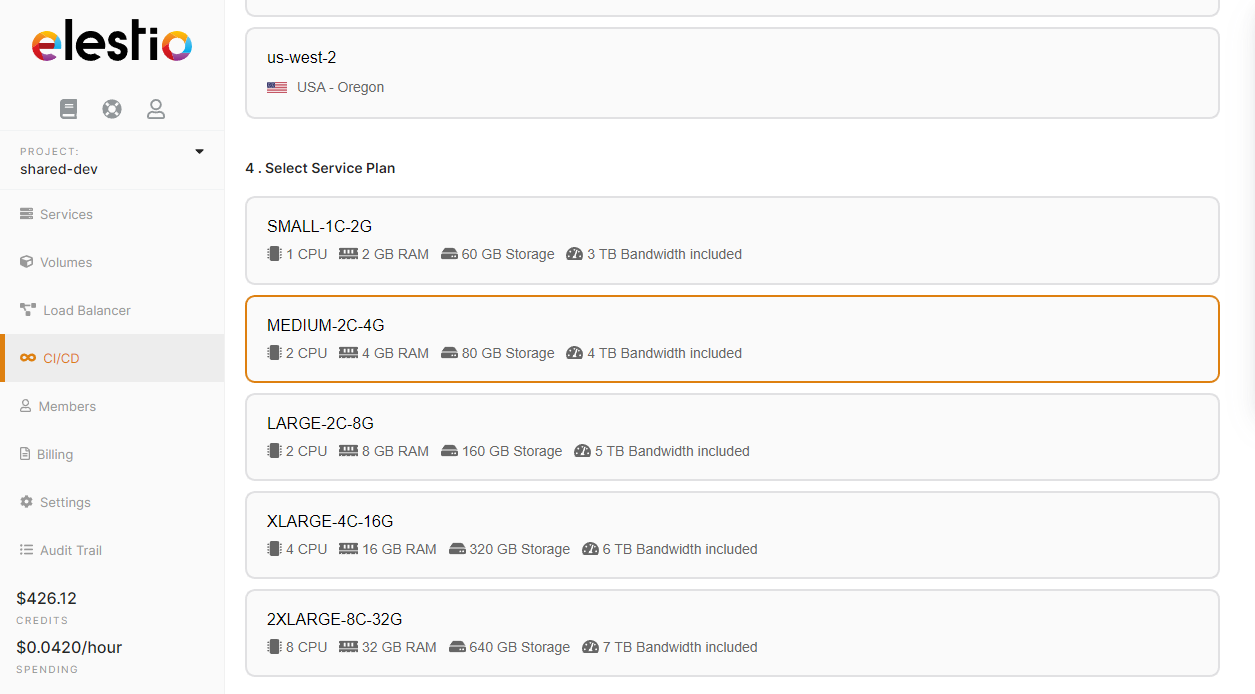
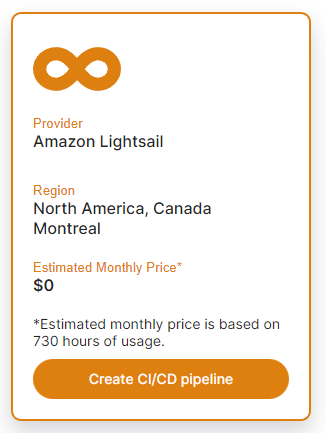
Select Service Plan[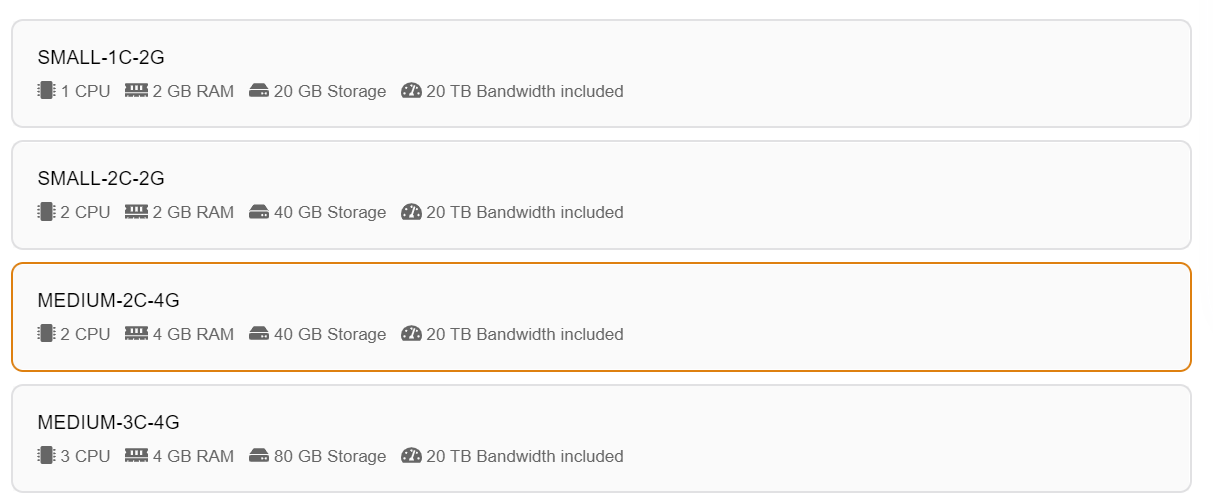](https://docs.elest.io/uploads/images/gallery/2022-11/screenshot-2022-11-02-194721.png)
- Now Customize the target name and project (where the CICD Target will be created).
[](https://docs.elest.io/uploads/images/gallery/2022-11/screenshot-2022-11-02-194857.png)
> If you want to deploy it with a different name and a different project, you can customize it. By default, we configure it with a dynamic target name and the current project.
#### Step 5:
Configure your Project docker image and other details.
[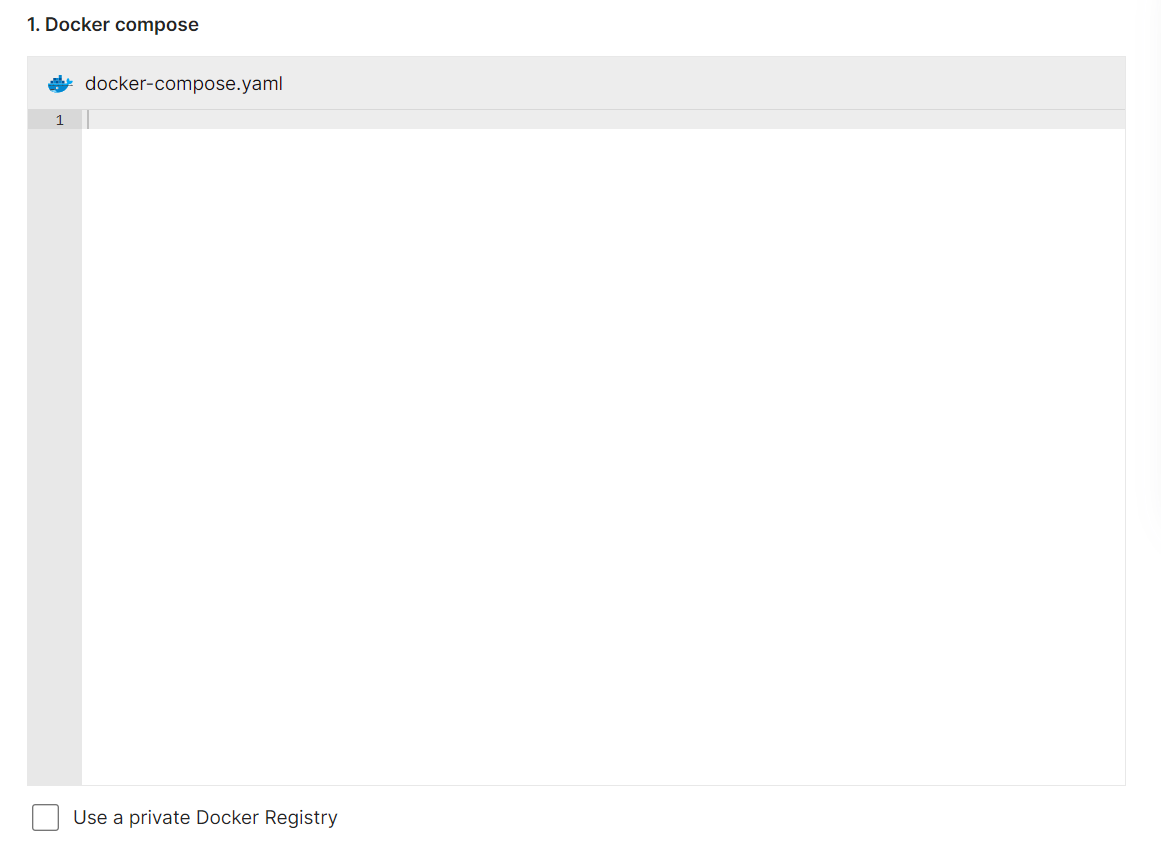](https://docs.elest.io/uploads/images/gallery/2022-11/screenshot-2022-11-02-195655.png)
Here, you can enter the information for your Docker image, and if your registry is private, you can configure registry credentials by checking the appropriate box ***Use a private Docker registry***.
[](https://docs.elest.io/uploads/images/gallery/2022-11/screenshot-2022-11-07-175250.png)
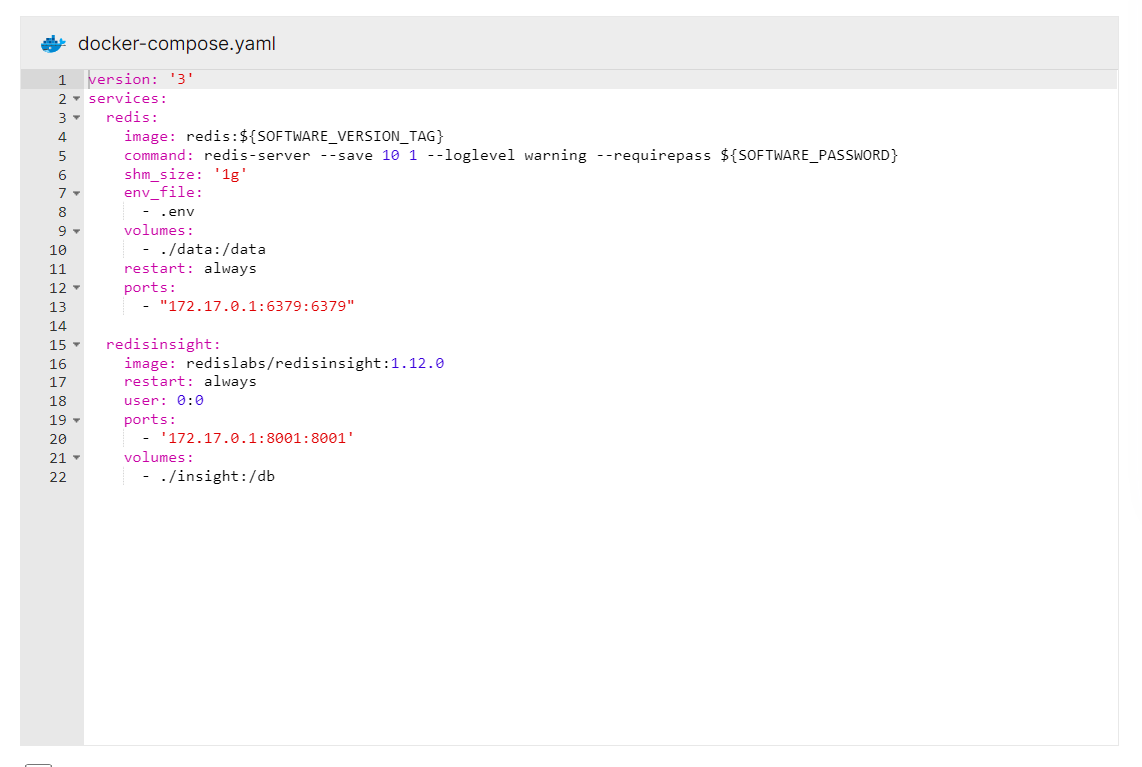
Similar to these, you can configure your docker image. I create the configuration for the Redis app docker image.
[](https://docs.elest.io/uploads/images/gallery/2022-11/screenshot-2022-11-07-175808.png)
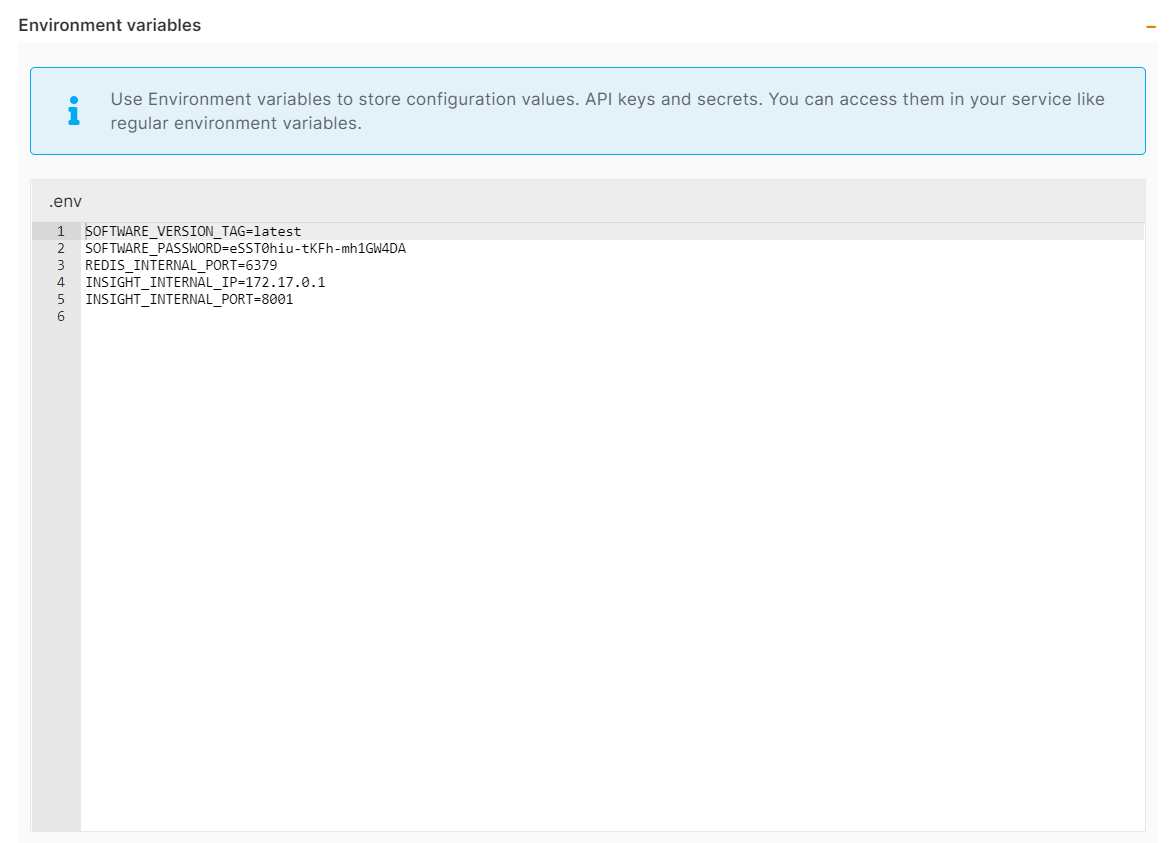
You can list all of your project's API keys and secrets here if they were saved in ENV
[](https://docs.elest.io/uploads/images/gallery/2022-11/screenshot-2022-11-07-175901.png)
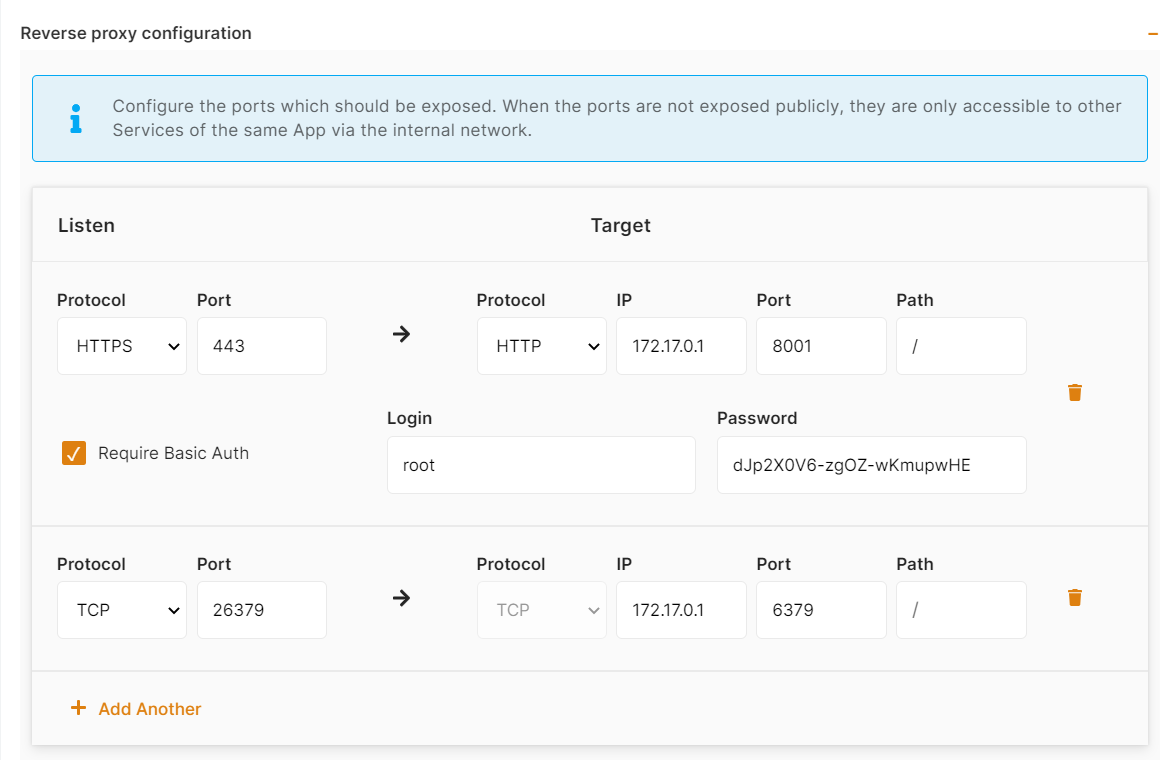
The final step is to configure the reverse proxy settings. You can specify the port on which your project will run here.
[](https://docs.elest.io/uploads/images/gallery/2022-11/screenshot-2022-11-07-180334.png)
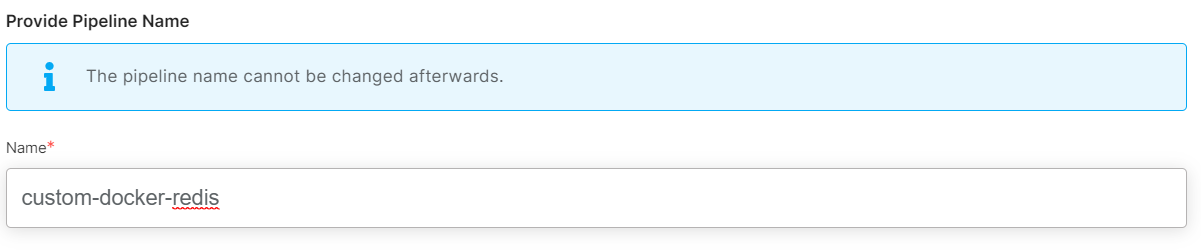
Your pipeline name will be filled in automatically by Elestio, but you are free to use another name for it in this context.
#### Step 6:
Click the ***Create CI/CD pipeline*** button to deploy your pipeline.
[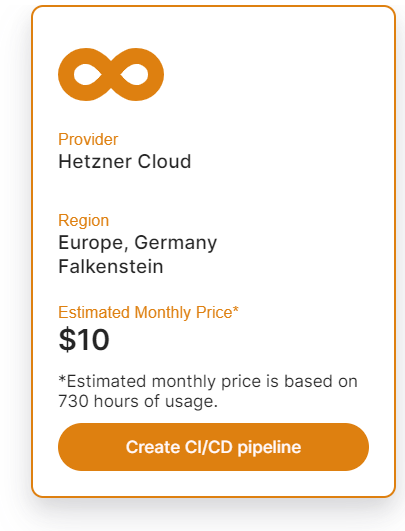](https://docs.elest.io/uploads/images/gallery/2022-11/screenshot-2022-11-02-203203.png)
*In a couple of moments, your application was successfully deployed on elestio 🚀.*
Please let us know by contacting our support [***email***](mailto:support@elest.io) or ***[ticketing](https://dash.elest.io/support/creation)*** system if you give it a shot and encounter any problems or if anything goes wrong.
Join us on [***discord***](https://discord.gg/4T4JGaMYrD) to know more.
# How to Deploy React App on Elestio
So you made a React web application and want to deploy it to the cloud 🚀
You probably heard about Kubernetes (and all its complexity) or various options to deploy your apps like Heroku, Render Fly, or Railways. They all have something in common, those products are building your own source code on every commit from your GIT repository.
Elestio is doing the same ... **but different!** Instead of deploying your app to a shared cluster, we deploy to dedicated VMs.
In this tutorial, we will deploy a simple ReactJS app that was created using the create-react-app command. You can use any existing application, create a new one with create-react-app, or simply fork and use our example by following the ***[link](https://github.com/elestio-examples/reactjs)***.
To learn more about the elestio CI-CD, go *[**here**](https://docs.elest.io/books/cicd-pipelines/page/overview).*
If you're new, sign up for *[Elestio](https://dash.elest.io/)*, otherwise, login to your existing account.
#### **Deploy a ReactJs web app with CI/CD to the cloud**
#### Step 1:
Go to CI/CD from the left sidebar.
#### Step 2:
Now, select the deployment source.
[](https://docs.elest.io/uploads/images/gallery/2022-11/screenshot-2022-11-02-185434.png)
In this tutorial, I'm deploying using GITHUB, but you can also use GITLAB if you have a project there.
#### Step 3:
Select the repository.
If you have already authenticated your GITHUB or GITLAB account in ci-cd for repository access, you can choose the desired repository to deploy directly. Otherwise, you must first authenticate your GIT account with elestio ci-cd for repository access.
[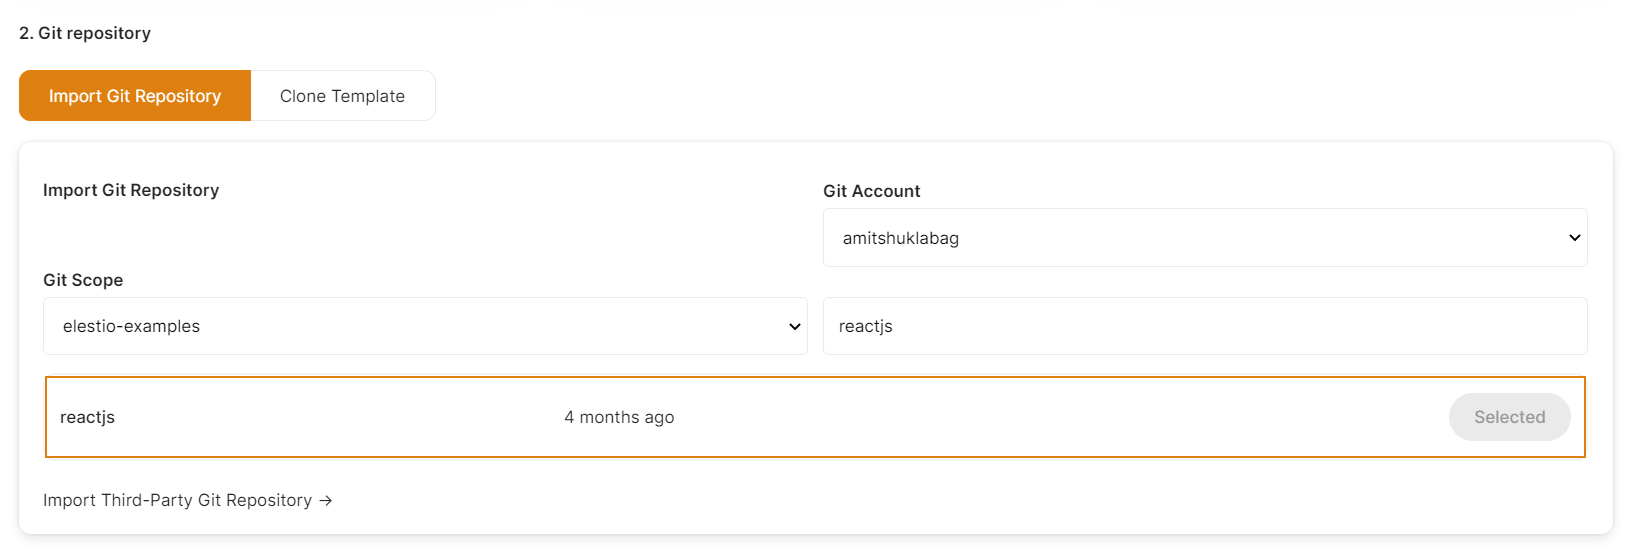](https://docs.elest.io/uploads/images/gallery/2022-11/imPscreenshot-2022-11-02-191248.png)
#### Step 4:
Choose Deployment Targets
[](https://docs.elest.io/uploads/images/gallery/2022-11/screenshot-2022-11-02-191657.png)
Elestio offers two types of deployment targets "**Deploy on a new VM**" and "**Deploy on an existing VM**".
You are allowed to set up n pipelines on each elestio Ci-CD target/VM. According to the project configuration you select and the project you're deploying, the number of pipelines varies.
If you want to deploy these projects as a pipeline on a new Target/VM or don't have any installed targets, choose "Deploy on a new VM." If you already have any installed or previously configured ci-cd targets/VMs, choose "Deploy on an existing VM," and then choose the existing target from the targets dropdown.
Follow the steps below only if you select "**Deploy on a new VM**," otherwise click the next button to proceed.
CI/CD Pipelines by Elestio are available with our 5 cloud partners (AWS Lightsail, Digital Ocean, Vultr, Linode & Hetzner) in 85 locations over 27 countries but also on any cloud (AWS, Azure, Google, Oracle, ...) and on-premise with [BYOVM.](https://doc.elest.io/books/cloud-providers/page/byovm-bring-your-own-vm)
- Select Service Cloud Region[](https://docs.elest.io/uploads/images/gallery/2022-11/screenshot-2022-11-02-194242.png)
-
Select Service Plan[](https://docs.elest.io/uploads/images/gallery/2022-11/screenshot-2022-11-02-194721.png)
- Now Customize the target name and project (where the CICD Target will be created).
[](https://docs.elest.io/uploads/images/gallery/2022-11/screenshot-2022-11-02-194857.png)
> If you want to deploy it with a different name and a different project, you can customize it. By default, we configure it with a dynamic target name and the current project.
#### Step 5:
Configure your Project
[](https://docs.elest.io/uploads/images/gallery/2022-11/screenshot-2022-11-02-195655.png)
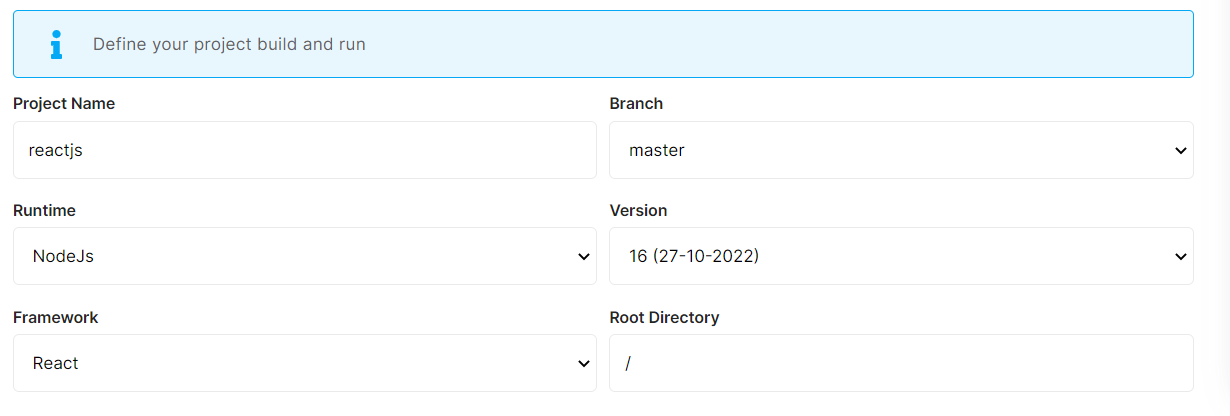
Here you can configure the project details by filling up the project name, branch, run time, version, framework, and root directory.
[](https://docs.elest.io/uploads/images/gallery/2022-11/screenshot-2022-11-02-200718.png)
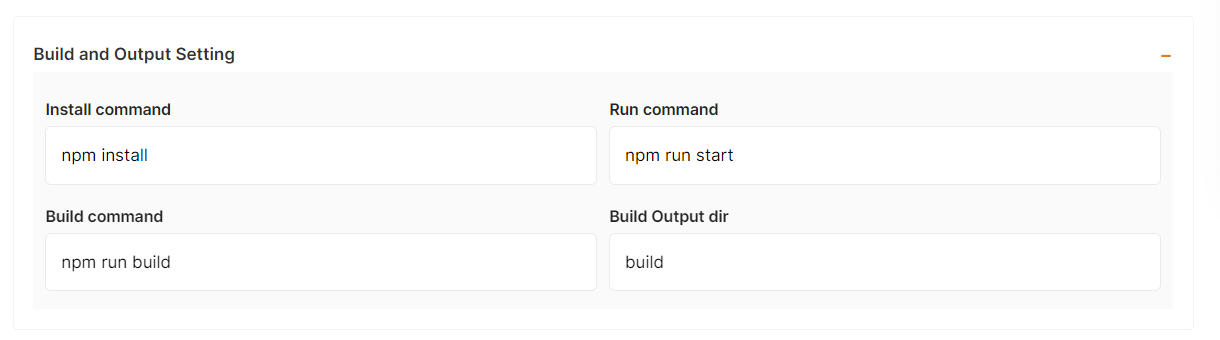
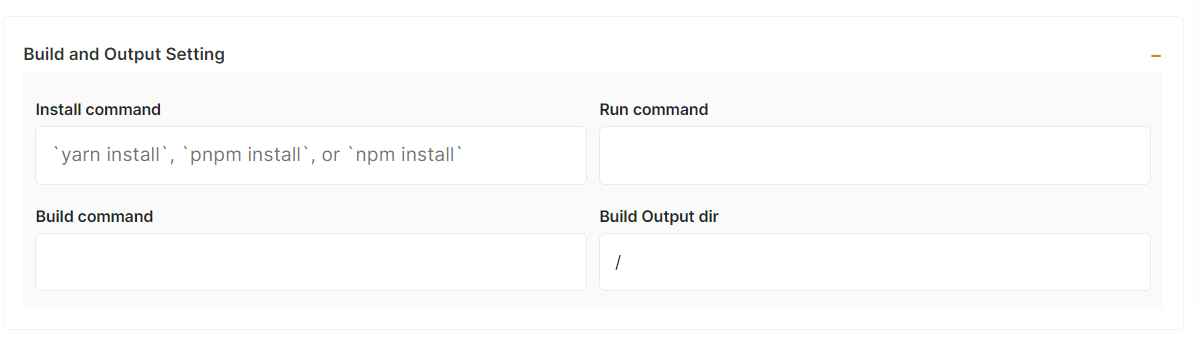
In the Build and output setting, you can configure your project install, run and build command.
[](https://docs.elest.io/uploads/images/gallery/2022-11/screenshot-2022-11-02-201628.png)
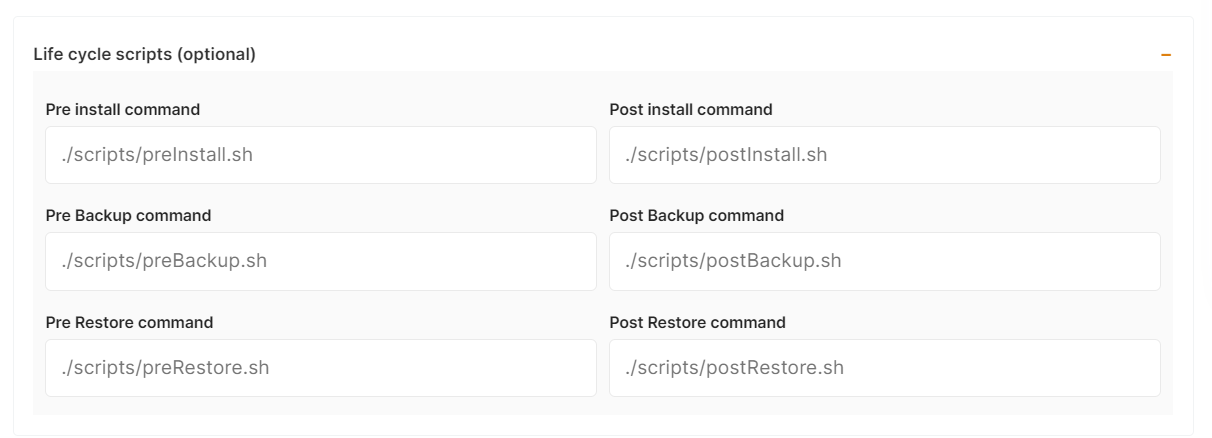
The configuration of life cycle scripts is always optional; they should only be used if you want to execute a specific command before and after building your project. Otherwise, leave them empty.
[](https://docs.elest.io/uploads/images/gallery/2022-11/screenshot-2022-11-02-201356.png)
You can list all of your project's API keys and secrets here if they were saved in ENV
[](https://docs.elest.io/uploads/images/gallery/2022-11/screenshot-2022-11-02-202142.png)
[](https://docs.elest.io/uploads/images/gallery/2022-11/screenshot-2022-11-02-202154.png)
The final step is to configure the exposed port and reverse proxy settings. You can specify the port on which your project will run here.
> If your project includes **elestio.yml**, Elestio will auto-fill all of these fields. As in this tutorial, we're using our ReactJs elestio example, so you can see in the above images that all of our fields are auto-filled.
Refer to these links to learn how to create our own ***[elestio.yml](https://docs.elest.io/books/cicd-pipelines/page/create-your-own-template-elestioyml)*** for the project.
A sample elestio.yml for ReactJs is shown below. check it out on ***[github](https://github.com/elestio-examples/reactjs/blob/master/elestio.yml)***
```yaml
config:
runTime: 'NodeJs'
version: '16'
framework: 'React'
buildCommand: 'npm run build'
buildDir: 'build'
runCommand: 'npm run start'
installCommand: "npm install"
icon: "src/logo.svg"
screenshot: "src/screenshot.png"
ports:
- protocol: "HTTPS"
targetProtocol: "HTTP"
listeningPort: "443"
targetPort: "3000"
targetIP: "172.17.0.1"
public: true
path: "/"
isAuth: false
login: ""
password: ""
environments:
- key: 'ENV'
value: 'production'
webUI:
- url: "https://[CI_CD_DOMAIN]"
label: "Website"
```
#### Step 6:
Click the ***Create CI/CD pipeline*** button to deploy your pipeline.
[](https://docs.elest.io/uploads/images/gallery/2022-11/screenshot-2022-11-02-203203.png)
*In a couple of moments, your application was successfully deployed on elestio 🚀.*
[](https://docs.elest.io/uploads/images/gallery/2022-11/screenshot-2022-11-02-205451.png)
[](https://docs.elest.io/uploads/images/gallery/2022-11/untitled-video-made-with-clipcha-2.gif)
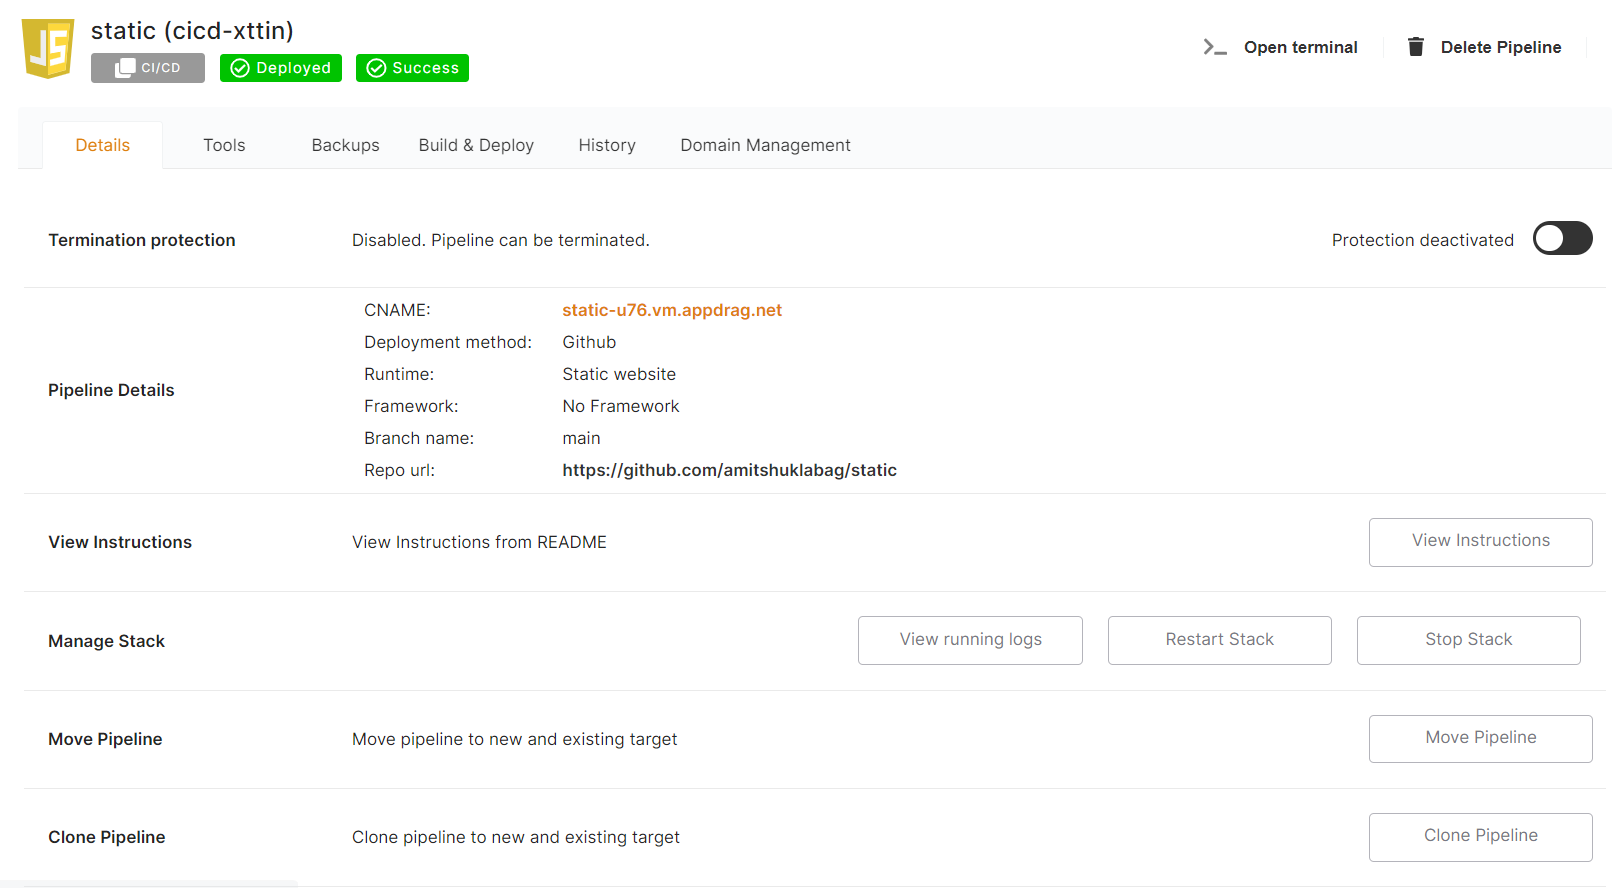
You can now view your deployed URL and access your application by going to desired application pipeline details.
Please let us know by contacting our support [***email***](mailto:support@elest.io)******or ***[ticketing](https://dash.elest.io/support/creation)****[ ](https://dash.elest.io/support/creation)*system if you give it a shot and encounter any problems or if anything goes wrong.
Join us on [***discord*** ](https://discord.gg/4T4JGaMYrD)to know more.
# How to Deploy NodeJs-express app with a static front-end in a pug on Elestio
So you made a static full stack frontend pug with nodejs backend application and want to deploy it to the cloud 🚀
You probably heard about Kubernetes (and all its complexity) or various options to deploy your apps like Heroku, Render Fly, or Railways. They all have something in common, those products are building your own source code on every commit from your GIT repository.
Elestio is doing the same ... **but different!** Instead of deploying your app to a shared cluster, we deploy to dedicated VMs.
In this tutorial, we will deploy a simple NodeJs-express app with a static front-end in a pug that the backend in nodejs was created using the npm init command. You can use any existing application, create a new one with npm init, or simply fork and use our example by following the ***[link](https://github.com/elestio-examples/nodejs-express-pug)***.
To learn more about the elestio CI-CD, go *[**here**](https://docs.elest.io/books/cicd-pipelines/page/overview).*
If you're new, sign up for *[Elestio](https://dash.elest.io/)*, otherwise, login to your existing account.
#### **Deploy a NodeJs-express app with a static front-end in a pug with CI/CD to the cloud**
#### Step 1:
Go to CI/CD from the left sidebar.
#### Step 2:
Now, select the deployment source.
[](https://docs.elest.io/uploads/images/gallery/2022-11/screenshot-2022-11-02-185434.png)
In this tutorial, I'm deploying using GITHUB, but you can also use GITLAB if you have a project there.
#### Step 3:
Select the repository.
If you have already authenticated your GITHUB or GITLAB account in ci-cd for repository access, you can choose the desired repository to deploy directly. Otherwise, you must first authenticate your GIT account with elestio ci-cd for repository access.
[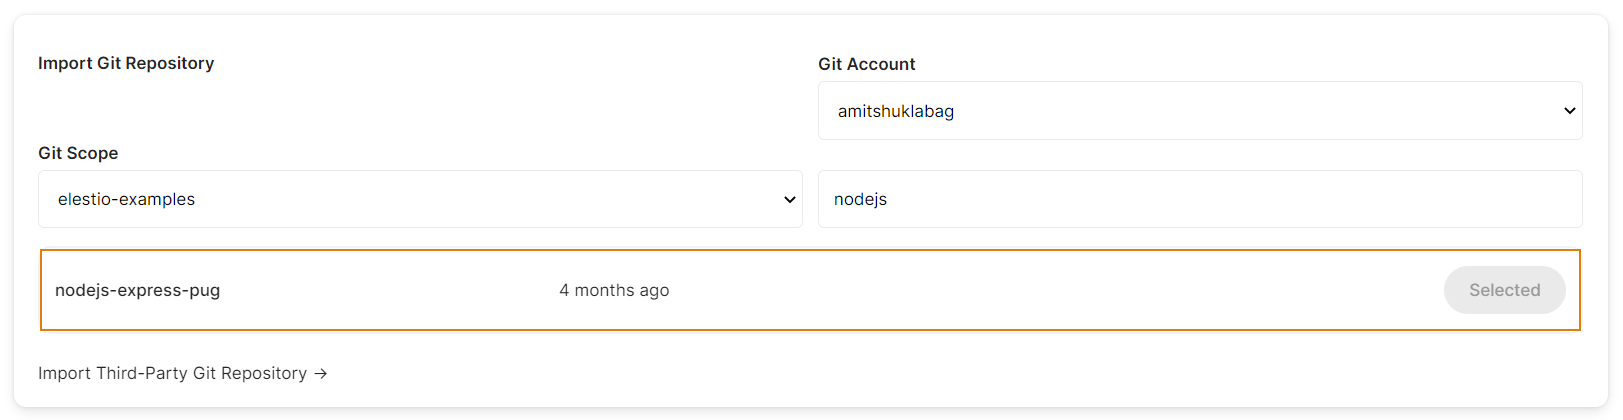](https://docs.elest.io/uploads/images/gallery/2022-11/imPscreenshot-2022-11-02-191248.png)
#### Step 4:
Choose Deployment Targets
[](https://docs.elest.io/uploads/images/gallery/2022-11/screenshot-2022-11-02-191657.png)
Elestio offers two types of deployment targets "**Deploy on a new VM**" and "**Deploy on an existing VM**".
You are allowed to set up n pipelines on each elestio Ci-CD target/VM. According to the project configuration you select and the project you're deploying, the number of pipelines varies.
If you want to deploy these projects as a pipeline on a new Target/VM or don't have any installed targets, choose "Deploy on a new VM." If you already have any installed or previously configured ci-cd targets/VMs, choose "Deploy on an existing VM," and then choose the existing target from the targets dropdown.
Follow the steps below only if you select "**Deploy on a new VM**," otherwise click the next button to proceed.
CI/CD Pipelines by Elestio are available with our 5 cloud partners (AWS Lightsail, Digital Ocean, Vultr, Linode & Hetzner) in 85 locations over 27 countries but also on any cloud (AWS, Azure, Google, Oracle, ...) and on-premise with [BYOVM.](https://doc.elest.io/books/cloud-providers/page/byovm-bring-your-own-vm)
- Select Service Cloud Region[](https://docs.elest.io/uploads/images/gallery/2022-11/screenshot-2022-11-02-194242.png)
-
Select Service Plan[](https://docs.elest.io/uploads/images/gallery/2022-11/screenshot-2022-11-02-194721.png)
- Now Customize the target name and project (where the CICD Target will be created).
[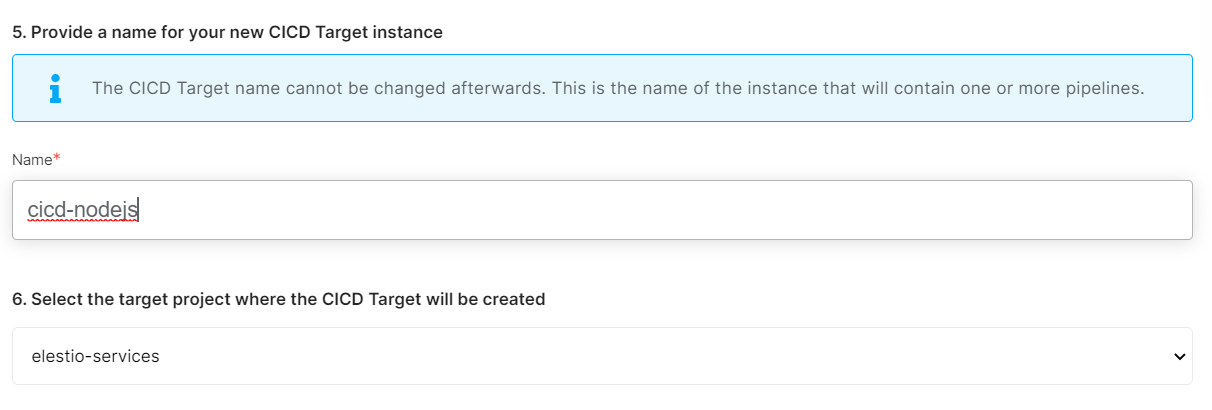](https://docs.elest.io/uploads/images/gallery/2022-11/screenshot-2022-11-02-194857.png)
> If you want to deploy it with a different name and a different project, you can customize it. By default, we configure it with a dynamic target name and the current project.
#### Step 5:
Configure your Project
[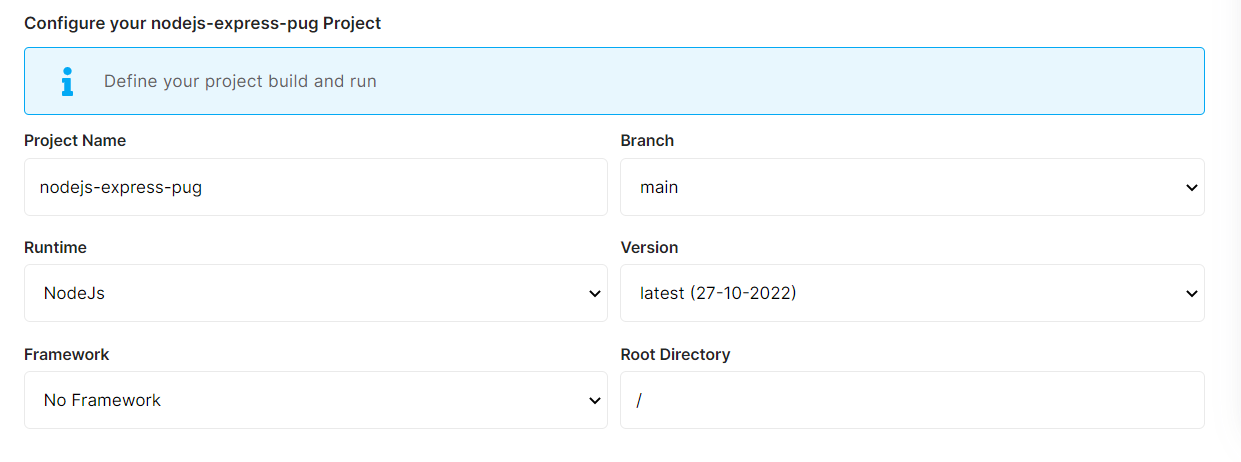](https://docs.elest.io/uploads/images/gallery/2022-11/screenshot-2022-11-02-195655.png)
You can configure the project details by filling up the project name, branch, run time, version, framework, and root directory.
[](https://docs.elest.io/uploads/images/gallery/2022-11/screenshot-2022-11-02-200718.png)
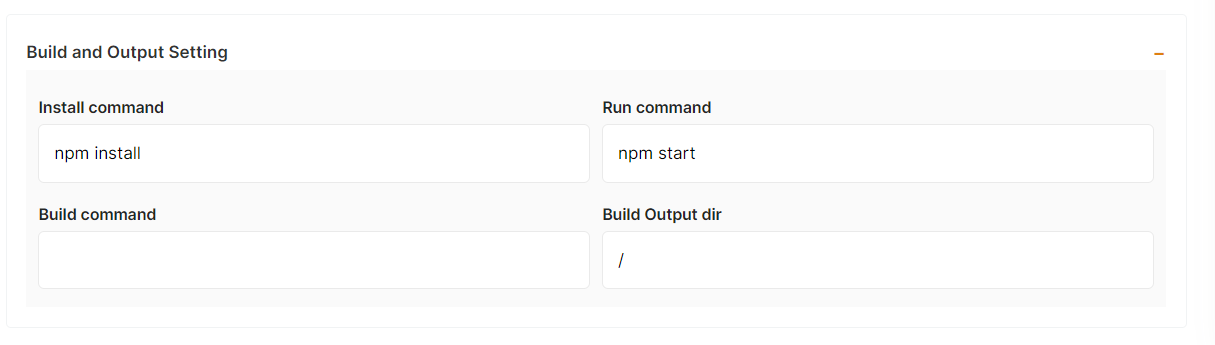
You can configure your project install, run, and build commands in the Build and output setting.
[](https://docs.elest.io/uploads/images/gallery/2022-11/screenshot-2022-11-02-201628.png)
The configuration of life cycle scripts is always optional; they should only be used if you want to execute a specific command before and after building your project. Otherwise, leave them empty.
[](https://docs.elest.io/uploads/images/gallery/2022-11/screenshot-2022-11-02-201356.png)
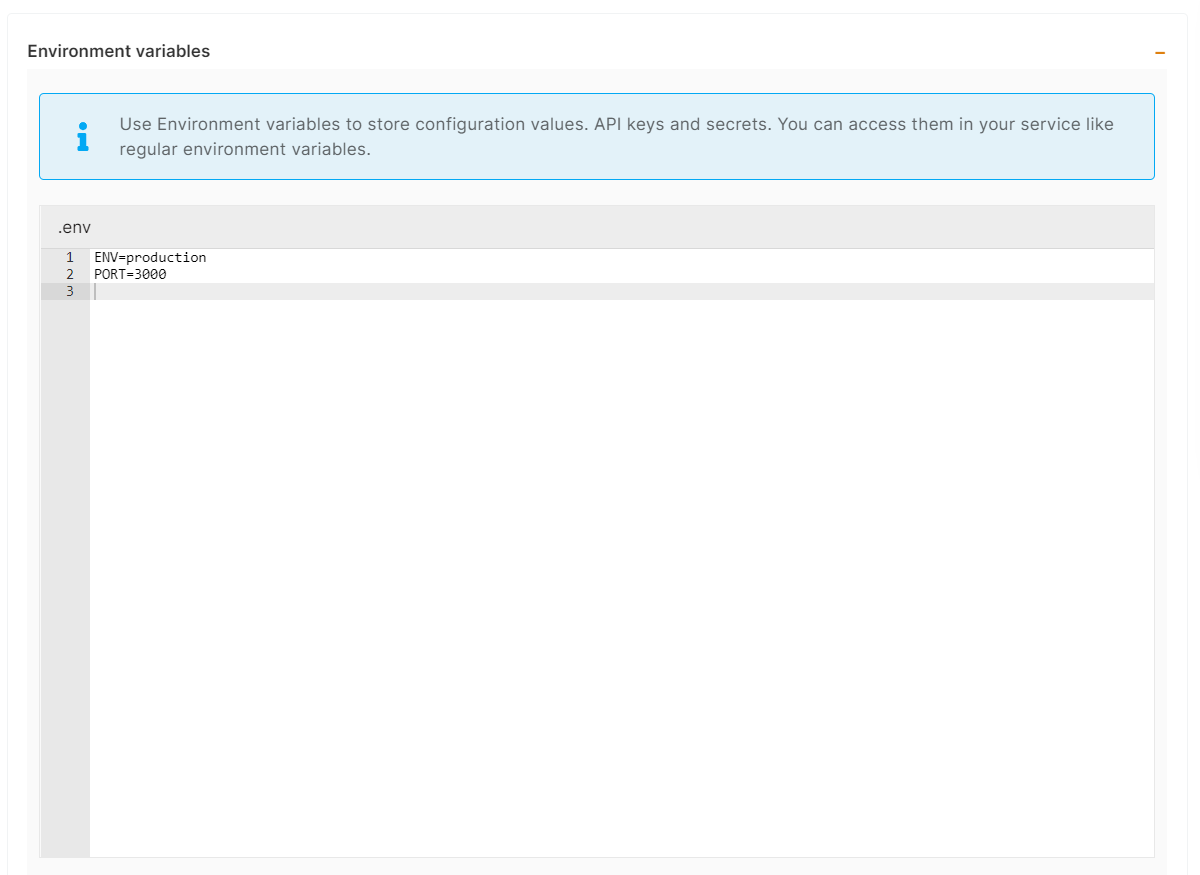
You can list all of your project's API keys and secrets here if they were saved in ENV
[](https://docs.elest.io/uploads/images/gallery/2022-11/screenshot-2022-11-02-202142.png)
[](https://docs.elest.io/uploads/images/gallery/2022-11/screenshot-2022-11-02-202154.png)
The final step is to configure the exposed port and reverse proxy settings. You can specify the port on which your project will run here.
> If your project includes **elestio.yml**, Elestio will auto-fill all of these fields. As in this tutorial, we're using our NodeJs elestio example, so you can see in the above images that all of our fields are auto-filled.
Refer to these links to learn how to create our own ***[elestio.yml](https://docs.elest.io/books/cicd-pipelines/page/create-your-own-template-elestioyml)*** for the project.
A sample elestio.yml for NodeJs is shown below. check it out on ***[github](https://github.com/elestio-examples/nodejs-express-pug/blob/main/elestio.yaml)***
```yaml
config:
runTime: 'NodeJs'
version: ''
framework: 'NoFramework'
buildCommand: ''
buildDir: ''
runCommand: 'npm start'
installCommand: 'npm install'
icon: "public/images/nodejs.svg"
screenshot: "public/images/screenshot.jpg"
ports:
- protocol: "HTTPS"
targetProtocol: "HTTP"
listeningPort: "443"
targetPort: "3000"
targetIP: "172.17.0.1"
public: true
path: "/"
isAuth: false
login: ""
password: ""
environments:
- key: 'ENV'
value: 'production'
- key: 'PORT'
value: '3000'
webUI:
- url: "https://[CI_CD_DOMAIN]"
label: "Website"
```
#### Step 6:
Click the ***Create CI/CD pipeline*** button to deploy your pipeline.
[](https://docs.elest.io/uploads/images/gallery/2022-11/screenshot-2022-11-02-203203.png)
*In a couple of moments, your application was successfully deployed on elestio 🚀.*
[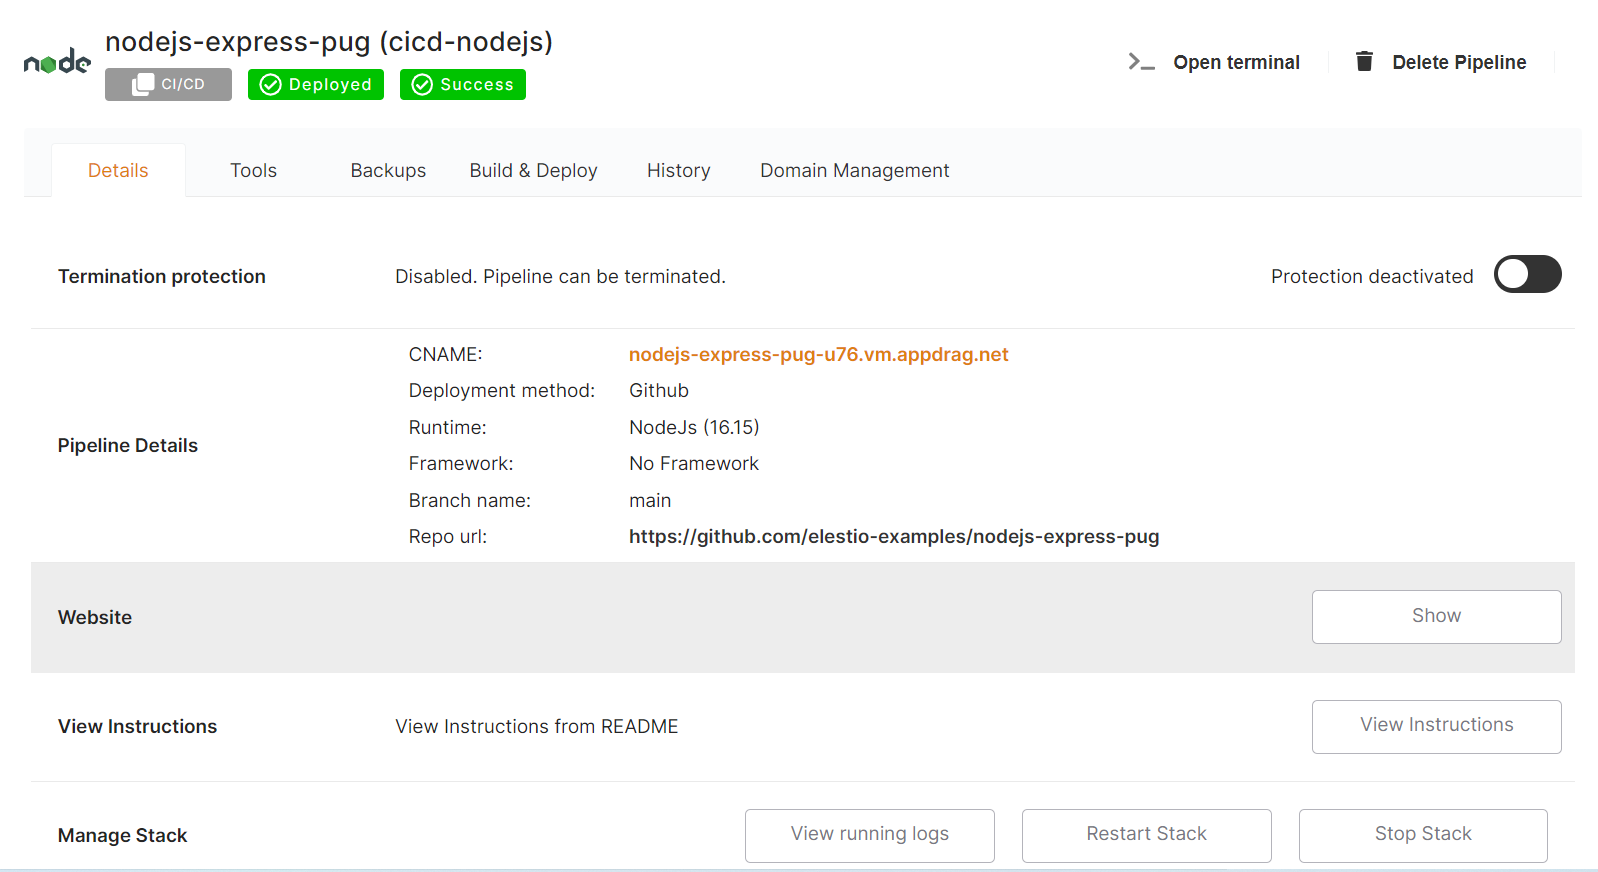](https://docs.elest.io/uploads/images/gallery/2022-11/screenshot-2022-11-02-205451.png)
[](https://docs.elest.io/uploads/images/gallery/2022-11/untitled-video-made-with-clipcha.gif)
You can now view your deployed URL and access your application by going to desired application pipeline details.
Please let us know by contacting our support [***email***](mailto:support@elest.io)******or ***[ticketing](https://dash.elest.io/support/creation)****[ ](https://dash.elest.io/support/creation)*system if you give it a shot and encounter any problems or if anything goes wrong.
Join us on [***discord*** ](https://discord.gg/4T4JGaMYrD)to know more.
# Deploy examples & apps on Elestio using the "clone template" feature
This tutorial will show you how to use our clone template feature in CI/CD. We're going to use a Simple Javascript web application, but you can use any template and deploy it in the same way. 🚀
The clone template feature was similar to forking our [***examples*** ](https://github.com/elestio-examples)from GITHUB and deploying it using an ***import git repository*** tab in Ci/CD, but using the ***clone template*** was easier because you didn't have to manually fork our template example and then deploy it using our import git repository tab. If you choose a template from the CI/CD clone template feature, Elestio will automatically create an example template repository in your git account and deploy it to the cloud. In this case, all you need to do is choose the template.
You probably heard about Kubernetes (and all its complexity) or various options to deploy your apps like Heroku, Render Fly, or Railways. They all have something in common, those products are building your own source code on every commit from your GIT repository.
Elestio is doing the same ... **but different!** Instead of deploying your app to a shared cluster, we deploy to dedicated VMs.
To learn more about the elestio CI/CD, go *[**here**](https://docs.elest.io/books/cicd-pipelines/page/overview).*
If you're new, sign up for *[Elestio](https://dash.elest.io/)*, otherwise, login to your existing account.
#### **Deploy Elestio apps to the cloud using the CI/CD Clone template feature.**
#### Step 1:
Go to CI/CD from the left sidebar.
#### Step 2:
Now, select the deployment source.
[](https://docs.elest.io/uploads/images/gallery/2022-11/screenshot-2022-11-02-185434.png)
In this tutorial, I'm deploying using GITHUB, but you can also use GITLAB if you have a project there.
#### Step 3:
Select the Clone Template Tab.
[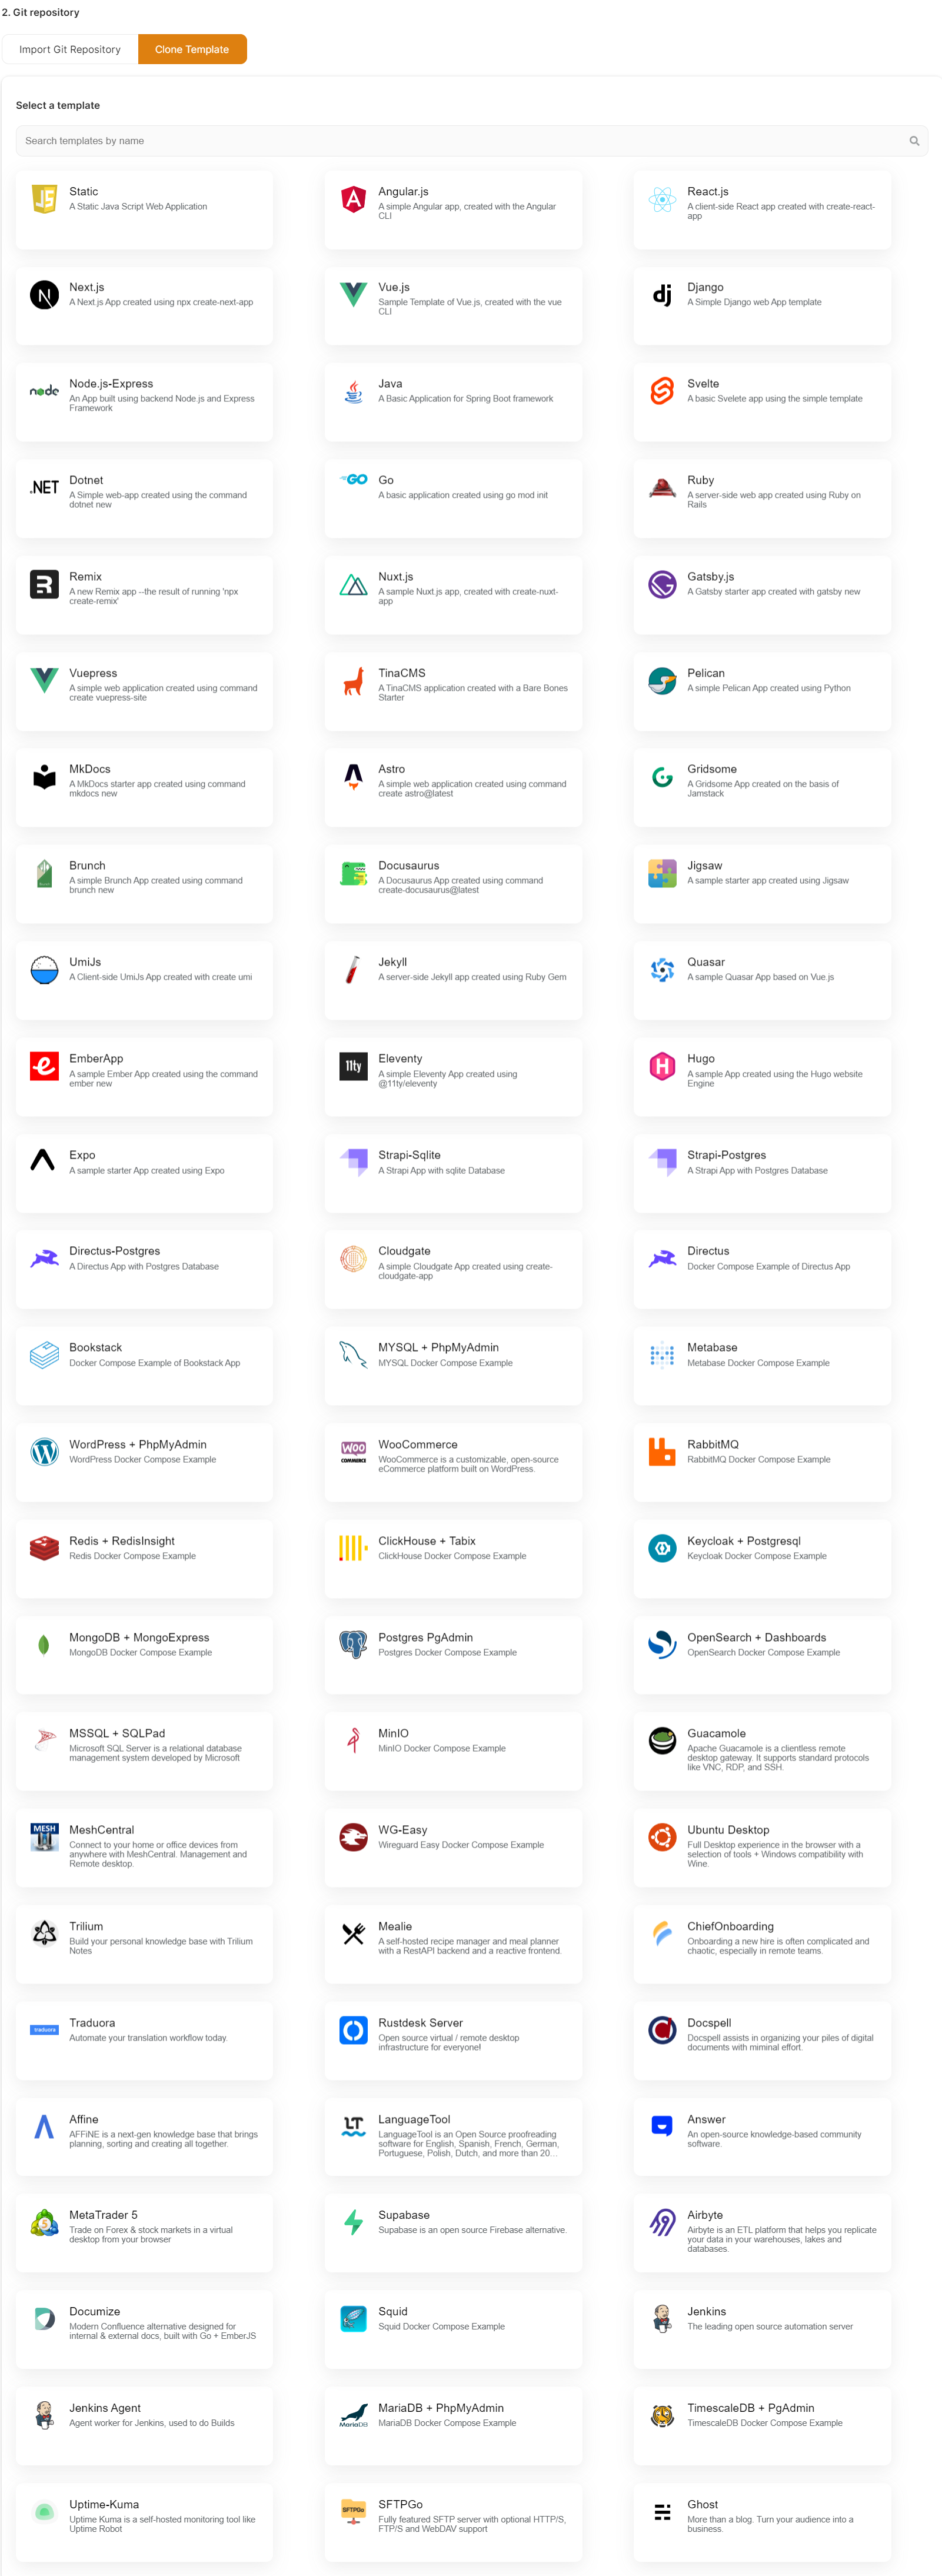](https://docs.elest.io/uploads/images/gallery/2022-11/managed-service-dashboard-13.png)
> ***Here you can see the most interesting and well-liked tech stacks' elestio templates.***
As I'm deploying a Static Java Script Web Application, I've chosen these, but you can adopt whatever you want.
[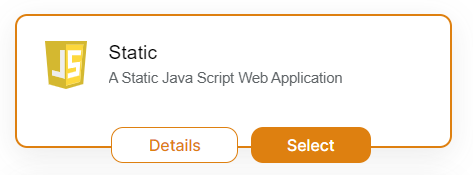](https://docs.elest.io/uploads/images/gallery/2022-11/screenshot-2022-11-04-195057.png)
Now click the ***Select* **button to proceed.
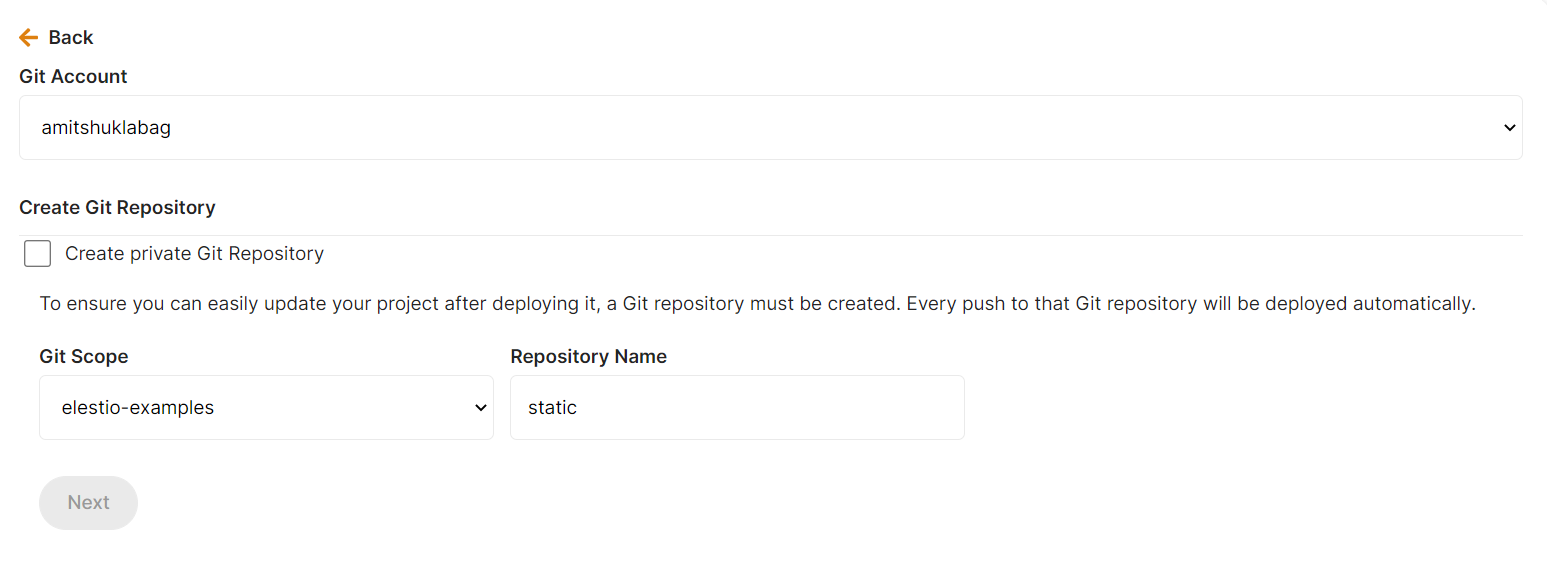
If you have already authenticated your GITHUB or GITLAB account in CI/CD for repository access, you can fill up the below details directly. Otherwise, you must first authenticate your GIT account with elestio CI/CD for repository creation into your account.
We require GIT authentication in order to create these example template repositories in your GIT account.
[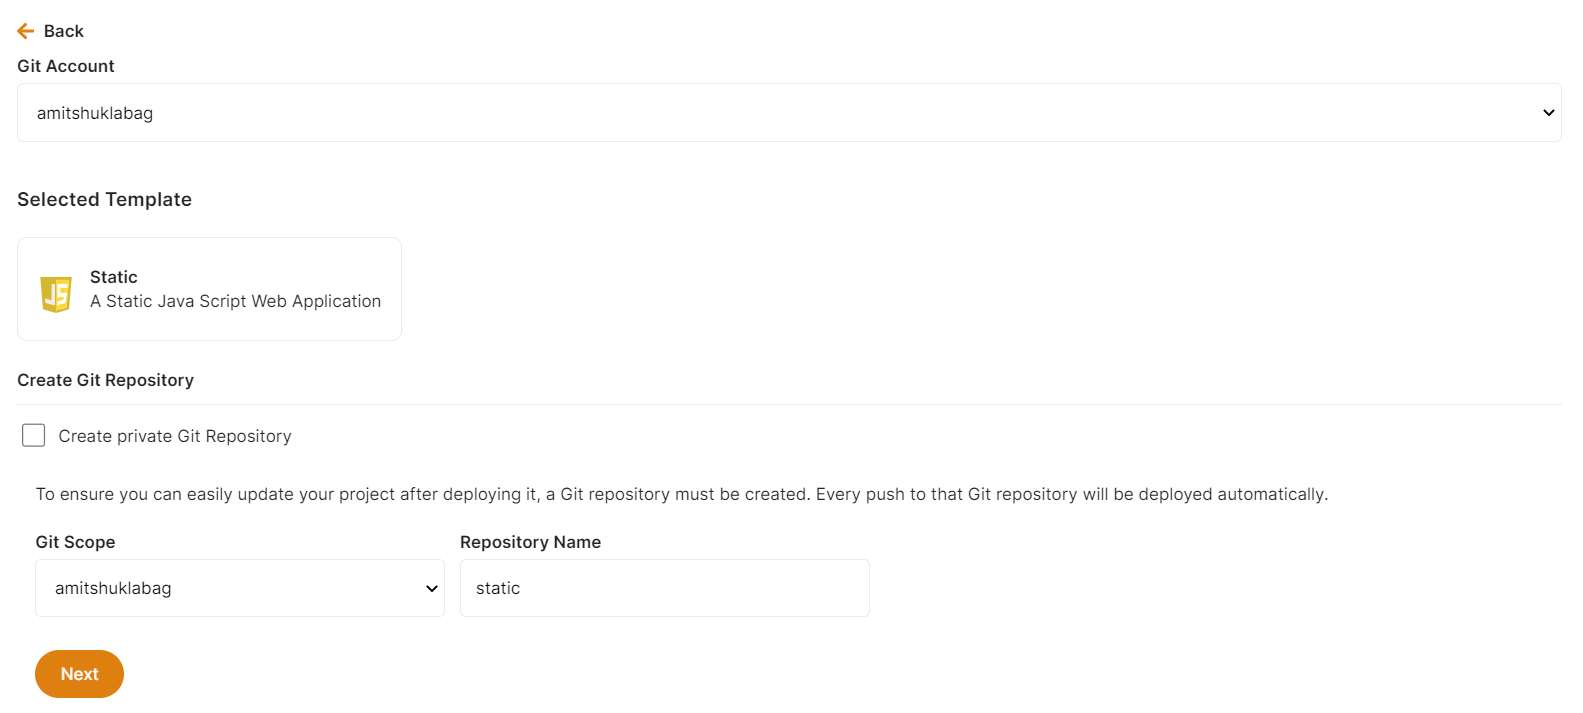](https://docs.elest.io/uploads/images/gallery/2022-11/screenshot-2022-11-04-200141.png)
Here you can check the checkbox ***Create private Git Repository** *if you want to make these repo private otherwise leave it unchecked and click the ***Next button*** for further steps.
#### Step 4:
Choose Deployment Targets
[](https://docs.elest.io/uploads/images/gallery/2022-11/screenshot-2022-11-02-191657.png)
Elestio offers two types of deployment targets "**Deploy on a new VM**" and "**Deploy on an existing VM**".
You are allowed to set up n pipelines on each elestio CI/CD target/VM. According to the project configuration you select and the project you're deploying, the number of pipelines varies.
If you want to deploy these projects as a pipeline on a new Target/VM or don't have any installed targets, choose "Deploy on a new VM." If you already have any installed or previously configured CI/CD targets/VMs, choose "Deploy on an existing VM," and then choose the existing target from the targets dropdown.
Follow the steps below only if you select "**Deploy on a new VM**," otherwise click the next button to proceed.
CI/CD Pipelines by Elestio are available with our 5 cloud partners (AWS Lightsail, Digital Ocean, Vultr, Linode & Hetzner) in 85 locations over 27 countries but also on any cloud (AWS, Azure, Google, Oracle, ...) and on-premise with [BYOVM.](https://doc.elest.io/books/cloud-providers/page/byovm-bring-your-own-vm)
- Select Service Cloud Region[](https://docs.elest.io/uploads/images/gallery/2022-11/screenshot-2022-11-02-194242.png)
-
Select Service Plan[](https://docs.elest.io/uploads/images/gallery/2022-11/screenshot-2022-11-02-194721.png)
- Now Customize the target name and project (where the CICD Target will be created).
[](https://docs.elest.io/uploads/images/gallery/2022-11/screenshot-2022-11-02-194857.png)
> If you want to deploy it with a different name and a different project, you can customize it. By default, we configure it with a dynamic target name and the current project.
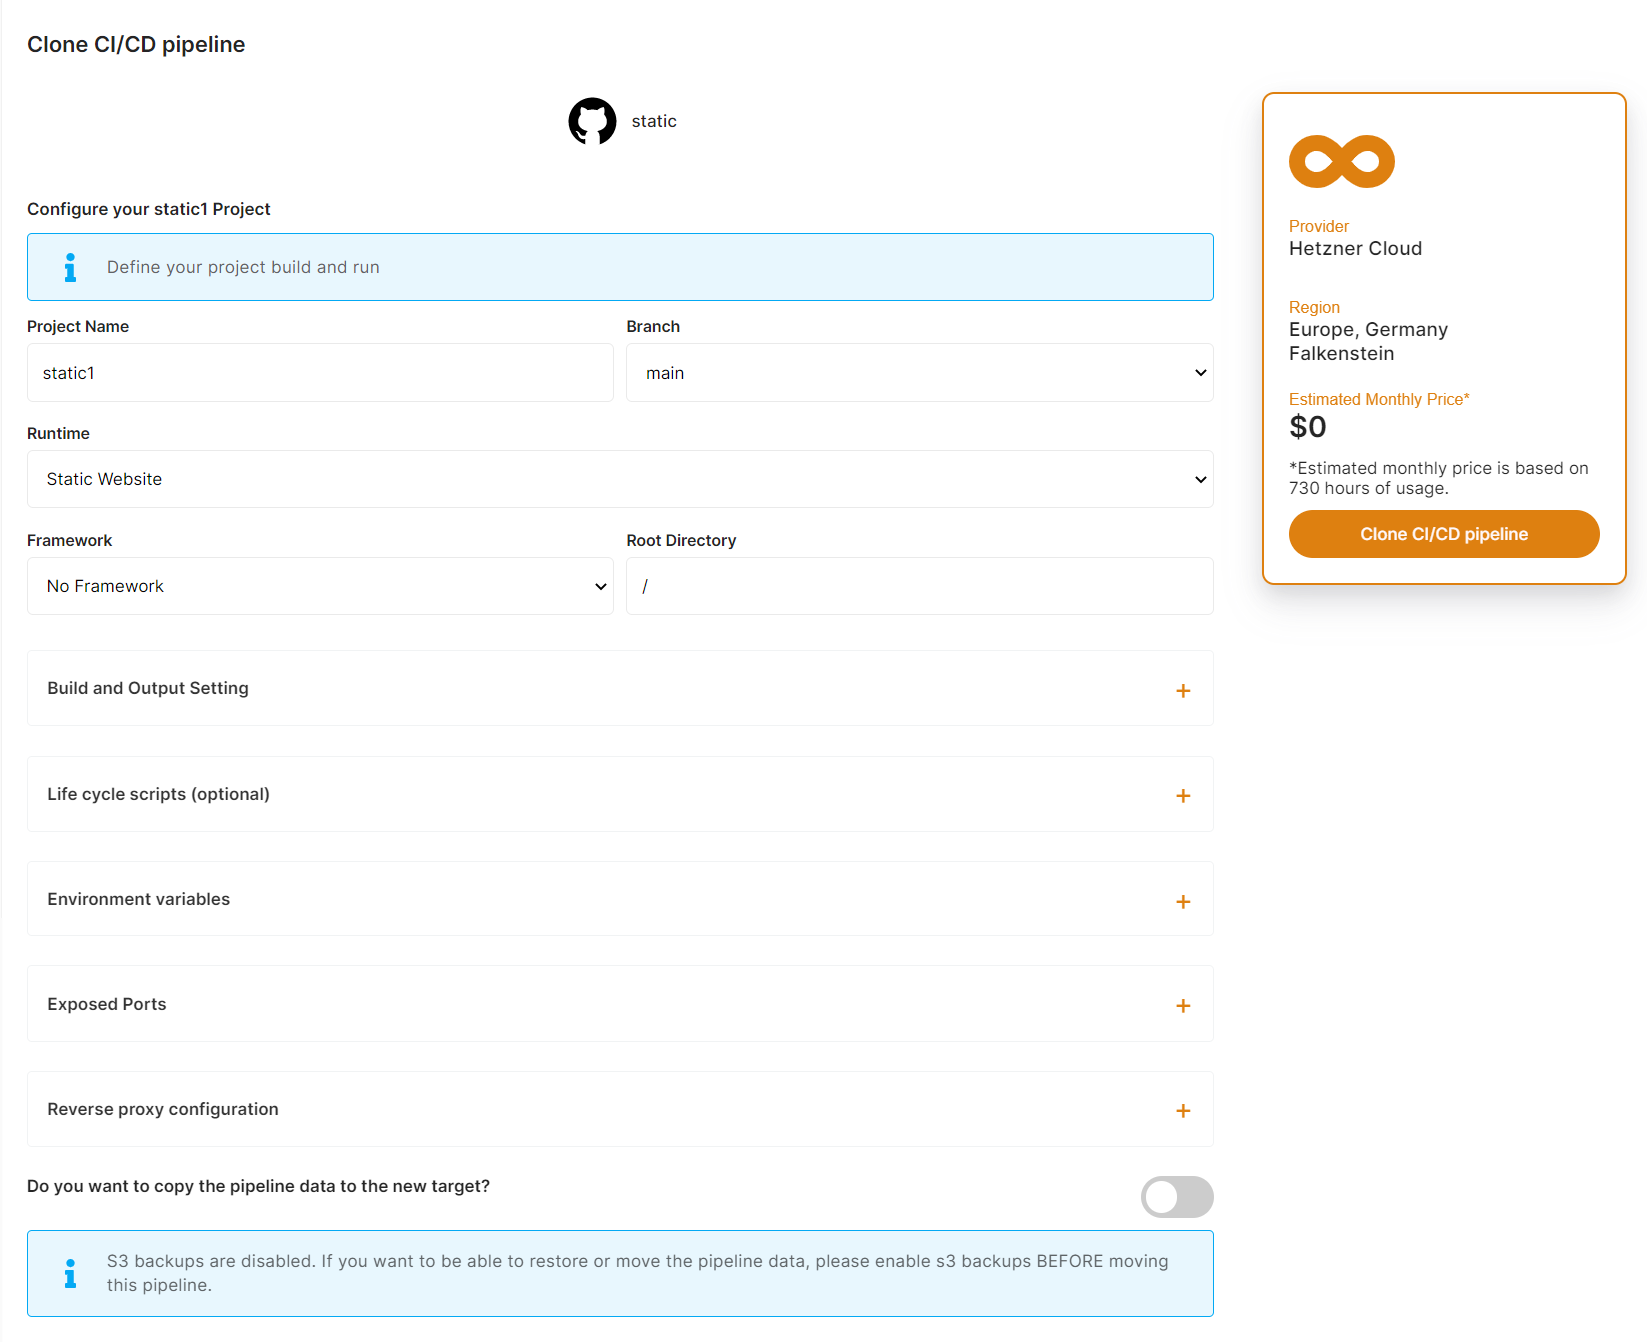
#### Step 5:
Configure your Project
[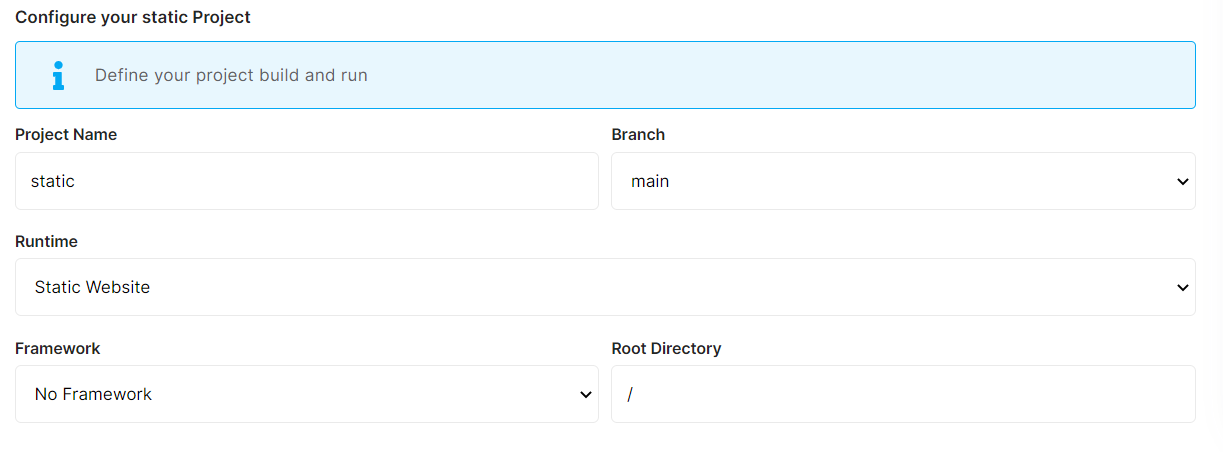](https://docs.elest.io/uploads/images/gallery/2022-11/screenshot-2022-11-02-195655.png)
You can configure the project details by filling up the project name, branch, run time, version, framework, and root directory.
[](https://docs.elest.io/uploads/images/gallery/2022-11/screenshot-2022-11-02-200718.png)
You can configure your project install, run, and build commands in the Build and output setting.
[](https://docs.elest.io/uploads/images/gallery/2022-11/screenshot-2022-11-02-201628.png)
The configuration of life cycle scripts is always optional; they should only be used if you want to execute a specific command before and after building your project. Otherwise, leave them empty.
[](https://docs.elest.io/uploads/images/gallery/2022-11/screenshot-2022-11-02-201356.png)
You can list all of your project's API keys and secrets here if they were saved in ENV
[](https://docs.elest.io/uploads/images/gallery/2022-11/screenshot-2022-11-02-202142.png)
[](https://docs.elest.io/uploads/images/gallery/2022-11/screenshot-2022-11-02-202154.png)
The final step is to configure the exposed port and reverse proxy settings. You can specify the port on which your project will run here.
> If your project includes **elestio.yml**, Elestio will auto-fill all of these fields. As in this tutorial, we're using our Simple Javascript web application elestio example, so you can see in the above images that all of our fields are auto-filled.
Refer to these links to learn how to create our own ***[elestio.yml](https://docs.elest.io/books/cicd-pipelines/page/create-your-own-template-elestioyml)*** for the project.
A sample elestio.yml for a Simple Javascript web application is shown below. check it out on ***[github](https://github.com/elestio-examples/static/blob/main/elestio.yml)***
```yaml
config:
runTime: "static"
version: ""
framework: ""
buildCommand: ""
buildDir: ""
runCommand: ""
ports:
- protocol: "HTTPS"
targetProtocol: "HTTP"
listeningPort: "443"
targetPort: "3000"
targetIP: "172.17.0.1"
public: true
path: "/"
isAuth: false
login: ""
password: ""
exposedPorts:
- protocol: "HTTP"
hostPort: "3000"
containerPort: "80"
interface: "172.17.0.1"
```
#### Step 6:
Click the ***Create CI/CD pipeline*** button to deploy your pipeline.
[](https://docs.elest.io/uploads/images/gallery/2022-11/screenshot-2022-11-02-203203.png)
*In a couple of moments, your application was successfully deployed on elestio 🚀.*
[](https://docs.elest.io/uploads/images/gallery/2022-11/screenshot-2022-11-02-205451.png)
[](https://docs.elest.io/uploads/images/gallery/2022-11/untitled-video-made-with-clipcha-2.gif)
You can now view your deployed URL and access your application by going to desired application pipeline details.
Please let us know by contacting our support [***email***](mailto:support@elest.io) or ***[ticketing](https://dash.elest.io/support/creation)*** system if you give it a shot and encounter any problems or if anything goes wrong.
Join us on [***discord***](https://discord.gg/4T4JGaMYrD) to know more.
# Custom domains on CI/CD pipelines
##### Prerequisites
If the firewall is enabled on your service, ensure that **port 80 is open**. This is required for SSL certificate creation and renewal.
---
##### Accessing the Configuration
1. 1. Go to the **Overview** tab of your pipeline dashboard.
2. Locate the **Custom Domain Names** section inside the **Domain Management** tab.
3. Click **Manage Domains**.
[](https://docs.elest.io/uploads/images/gallery/2026-04/cdeimage.png)
In this section, you will have two ways to configure custom domains.
---
##### **Method 1: Manual DNS Setup**
[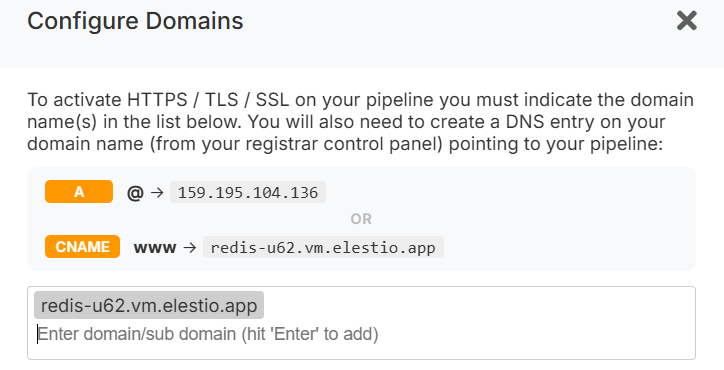](https://docs.elest.io/uploads/images/gallery/2026-04/wWximage.png)
1. In this step, enter your domain and press **Enter** to add it to the list of authorized domains.
2. Configure DNS records in your domain registrar panel.
**Required DNS Records**
- **A record**:
`@` → ``
(Points the root domain to your service IP)
- **CNAME record**:
`www` → ``
*(Recommended remains stable even if your IP changes, e.g., after migration.)*
3. Verify DNS propagation using a tool like: [https://dnschecker.org/](https://dnschecker.org/)
Once propagation is complete, the SSL certificate will be **automatically generated and renewed**, and HTTPS will start working.
---
##### **Method 2: One-Click DNS Setup via Cloudflare (Domain Connect)**
A **One-click DNS Setup** section is available if the domain name server or registrar is Cloudflare, allowing automatic DNS configuration via the Domain Connect protocol.
[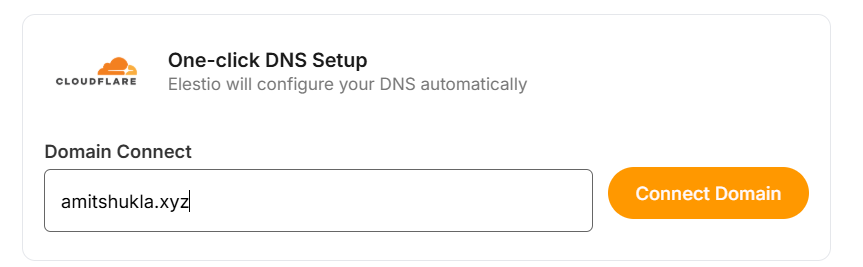](https://docs.elest.io/uploads/images/gallery/2026-04/q54image.png)
##### Steps
1. Enter your domain (e.g. `example.com`).
2. Click **Connect Domain**.
3. This action will redirect you to the Cloudflare dashboard for accepting the DNS record configuration.
---
##### **Cloudflare Reverse Proxy Users**
If you are using method 1 and want Cloudflare with the proxy enabled (orange cloud icon), refer to the detailed guide:
[https://docs.elest.io/books/security/page/using-cloudflare](https://docs.elest.io/books/security/page/using-cloudflare)
---
##### **Environment Variable Update**
Some applications require updating an environment variable to reflect the configured domain.
To update:
1. Go to the **Overview** page of your pipeline.
2. Click the **Build & Deploy** tab.
3. Open the **Environment variable** section.
4. Update the domain-related environment variable.
---
##### **Troubleshooting: SSL Not Generated**
**View Nginx Logs**
You can inspect logs using a terminal command:
```
cd /opt/elestio/nginx;
docker-compose logs -f;
```
Press `Ctrl + C` to stop live log output.
---
##### **Reset SSL Data Folder**
In some cases, the SSL data directory **/opt/elestio/nginx/ssl\_data** may become corrupted:
To fix:
1. Connect to your service via terminal.
2. Run the command below.
```
cd /opt/elestio/nginx/;
docker-compose down;
mv ./ssl_data/ ./ssl_data_old/;
mkdir ./ssl_data/;
chmod 777 ./ssl_data/;
docker-compose up -d
```
Once executed, just open your custom website URL again; your certificate should be generated, and your site served over SSL/TLS.
We recommend using CNAME records instead of A records; that way, if you later decide to move your pipeline in 1 click from our UI, it will work right away. If you used an A record, you will have to go back to your registrar to update the A record to point to the new IP address.
# Create your own template (elestio.yml)
You can **create your own template to be deployed on Elestio** for yourself (private repo) or for anyone (public repo).
We recommend that you fork one of our sample repositories as a base and modify it to meet your requirements:
[Samples repositories for the most popular stacks & frameworks (52 Apps & Frameworks)](https://github.com/orgs/elestio-examples/repositories)
To streamline the deployment process, the application stack must be defined in [elestio.yml](https://github.com/elestio-examples/reactjs/blob/master/elestio.yml). This file contains all details about the runtime, build/run commands, env vars, ports & reverse proxy.
Here is an example [elestio.yml](https://github.com/elestio-examples/docker-compose-redis) file about a Docker Compose-based stack (must be placed at the root of your repository)
```YAML
config:
runTime: "dockerCompose"
version: ""
framework: ""
installCommand: ""
buildCommand: "docker-compose build"
buildDir: "/"
runCommand: "docker-compose up -d"
isMonoRepoPackageInRoot: false
environments:
- key: "SOFTWARE_VERSION_TAG"
value: "latest"
- key: "SOFTWARE_PASSWORD"
value: "random_password"
- key: "ADMIN_EMAIL"
value: "[EMAIL]"
- key: "ADMIN_PASSWORD"
value: "random_password"
ports:
- protocol: "HTTPS"
targetProtocol: "HTTP"
listeningPort: "443"
targetPort: "8001"
targetIP: "172.17.0.1"
public: true
path: "/"
isAuth: true
login: "root"
password: "random_password"
- protocol: "TCP"
targetProtocol: "TCP"
listeningPort: "26379"
targetIP: "172.17.0.1"
targetPort: "6379"
public: true
lifeCycleConfig:
preInstallCommand: "./scripts/preInstall.sh"
postInstallCommand: "./scripts/postInstall.sh"
preBackupCommand: "./scripts/preBackup.sh"
postBackupCommand: "./scripts/postBackup.sh"
preRestoreCommand: "./scripts/preRestore.sh"
postRestoreCommand: "./scripts/postRestore.sh"
preUpdateCommand: "./scripts/preUpdateCommand.sh"
postUpdateCommand: "./scripts/postUpdateCommand.sh"
preDeployCommand: "./scripts/preDeployCommand.sh"
postDeployCommand: "./scripts/postDeployCommand.sh"
webUI:
- url: "https://[CI_CD_DOMAIN]"
label: "Redis Insight Web UI"
login: "[ADMIN_EMAIL]"
password: "[ADMIN_PASSWORD]"
monoRepoWorkSpaces: []
```
#####
##### **"config" section**
**Runtime:** Define the base runtime image used to build your app; possible values are **Node.js, Java, PHP, Ruby, Python, .NET, GO, static, dockerCompose, or docker**
**Version:** Define the version of the runtime image used to build your app. A list of available versions is provided in the dropdown in our dashboard, and you can find the corresponding values in Docker Hub.
**Framework:** Based on the selected framework, our UI will auto-populate build/run commands & output directory. This is optional.
**installCommand:** command to be executed only for the first deployment.
**buildCommand:** indicate the command to execute to build your code.
**runCommand:** indicate the command to execute to run your code.
**buildDir:** indicates the directory where the build output will be placed.
**isMonoRepoPackageInRoot:** Not necessary unless you want to deploy a yarn/npm mono repo workspace. (Boolean type true/false)
##### **"environments" section**
If your app requires env vars for configuration, you can define them one by one in the section. For each env var, you need to indicate the key and the value. Here is an example to define an env var named "DB\_TYPE" with a value "postgres":
```YAML
- key: "DB_TYPE"
value: "postgres"
```
You can use those variables in the "value" field:
**random\_password:** this will be replaced by a randomly generated password on deployment.
**\[EMAIL\]:** This will be replaced by the email address of the user deploying the pipeline on deployment.
**\[CI\_CD\_DOMAIN\]:** This will be replaced by the CNAME of the pipeline on deployment.
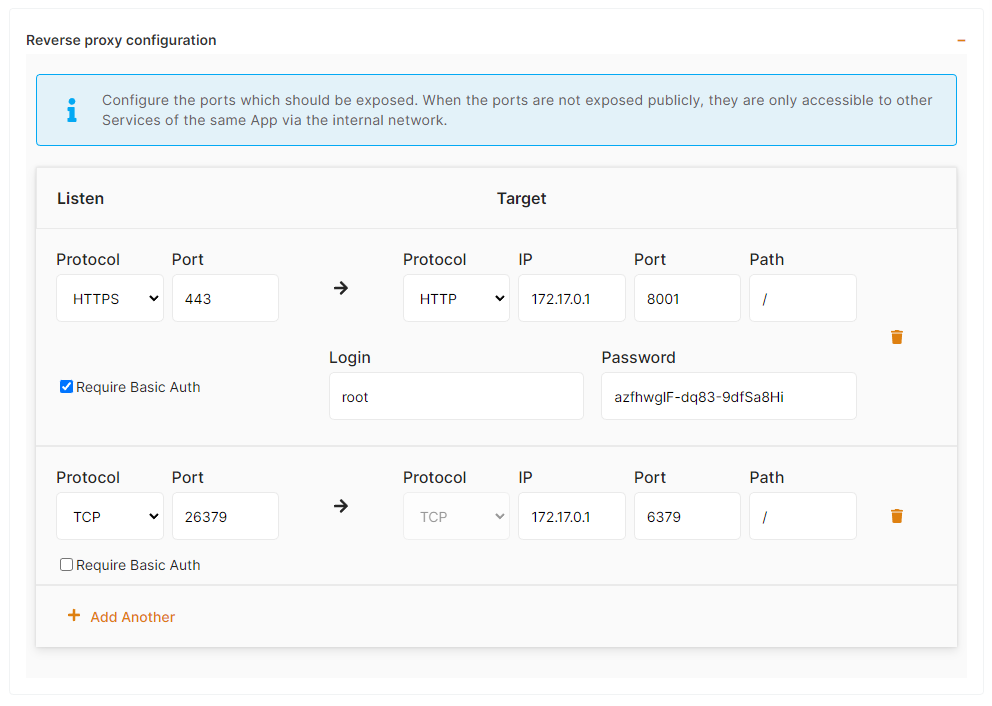
##### **"ports" section**
For each port exposed by your application, you need to define a few fields:
**protocol:** host protocol (exposed to the internet), which can be HTTP, HTTPS, TCP, or UDP.
**targetProtocol:** container protocol, which can be HTTP, HTTPS, TCP, or UDP.
**listeningPort:** host port (exposed to the internet), any port between 1 and 65535.
**targetPort:** container port, any port between 1 and 65535.
**targetIP:** container IP address used as a reverse proxy target. You should leave it to 172.17.0.1, except if you know what you are doing.
**public:** can be true or false; if true, the app is exposed on the public IPV4, if not, it's exposed only on the private ip address.
**path:** relative path to the service in the container. You should keep "/" except if you know what you are doing.
**public:** can be true or false; if true, the app will be exposed to the internet.
**isAuth:** can be true or false; if true, the app will require basic authentication (defined in login/password below)
**login:** login to be required to access the service
**password:** password to be required to access the service (can be any string, or **random\_password** described above**)**
Here is an example to define an inbound route with HTTPS on port 443 pointing to a container running on port 8001 on the Docker host with default IP 172.17.0.1; we also want the service to be protected with basic auth with the login "root" and a new random password generated at deploy time:
```YAML
- protocol: "HTTPS"
targetProtocol: "HTTP"
listeningPort: "443"
targetPort: "8001"
targetIP: "172.17.0.1"
public: true
path: "/"
isAuth: true
login: "root"
password: "random_password"
```
##### **"lifeCycleConfig" section**
Define custom scripts to be executed before or after installation, backup, or restore operations
```YAML
lifeCycleConfig:
preInstallCommand: "./scripts/preInstall.sh"
postInstallCommand: "./scripts/postInstall.sh"
preBackupCommand: "./scripts/preBackup.sh"
postBackupCommand: "./scripts/postBackup.sh"
preRestoreCommand: "./scripts/preRestore.sh"
postRestoreCommand: "./scripts/postRestore.sh"
preUpdateCommand: "./scripts/preUpdateCommand.sh"
postUpdateCommand: "./scripts/postUpdateCommand.sh"
preDeployCommand: "./scripts/preDeployCommand.sh"
postDeployCommand: "./scripts/postDeployCommand.sh"
```
This is optional; if you want to use it, just add the section and define the relative path from the root of your repository to the script to be executed when the event occurs.
##### **"copyCommandConfig" section**
Define shortcuts pointing to the web UI. They will appear in the Elestio dashboard.
```YAML
copyCommandConfig:
- ./myLocalFile1 .
- ./myLocalFile2 .
```
**\[CI\_CD\_DOMAIN\]** will be replaced at runtime with the pipeline CNAME address
**\[EMAIL\]** will be replaced at runtime with the email address of the user deploying the pipeline
In login and password, you can indicate the env vars to be used instead
##### **"monoRepoWorkSpaces" section**
It will be of an array type. example: \["workspace-a", "workspace-b"\]
Not necessary unless you want to deploy a Yarn/npm monorepo workspace and you're passing *true* for *isMonoRepoPackageInRoot* in the config section.
##### **"webUI" section**
Define shortcuts pointing to the web UI. They will appear in the Elestio dashboard.
```YAML
webUI:
- url: "https://[CI_CD_DOMAIN]/"
label: "Admin Web UI"
login: "[ADMIN_EMAIL]"
password: "[ADMIN_PASSWORD]"
```
**\[CI\_CD\_DOMAIN\]** will be replaced at runtime with the pipeline CNAME address
**\[EMAIL\]** will be replaced at runtime with the email address of the user deploying the pipeline
In login and password, you can indicate the env vars to be used instead.
# Clone CI/CD pipeline
When distributing your project pipeline across the Production, Staging, and Test environments, you might want to copy a deployed CI/CD pipeline from one target to another or the same target.
When using Elestio, you can safely clone a pipeline between identical, new, or existing targets even if it contains data.
#### To clone a CI/CD Pipeline, follow these steps:
1\) From the Elestio dashboard, click on *CI/CD* in the left menu then click on your pipeline to open the overview.
[](https://docs.elest.io/uploads/images/gallery/2022-07/hWaimage.png)
2\) Click on the **Clone Pipeline** button
[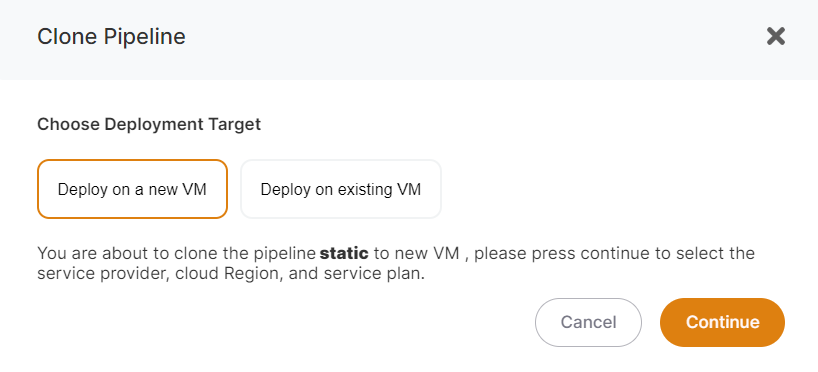](https://docs.elest.io/uploads/images/gallery/2022-07/oaNimage.png)
You can then identify whether you want to clone your pipeline to the same, new, or existing infrastructure or VM/target.
If you choose to *Deploy on an existing VM*, you must select the existing CI/CD target from the list; if you choose to *Deploy on a new* *VM*, you must specify the Provider / Region / VM Size to create; and if you want to clone on the same VM, choose to *Deploy on an* *existing VM* and select the same target name from the targets dropdown.
When cloning a pipeline for all VMs (same, new, or existing), make sure the new pipeline name differs from the source pipeline name.
[](https://docs.elest.io/uploads/images/gallery/2022-07/aEaimage.png)
Cloning a pipeline to another existing or identical CI/CD target is completely free.
When you clone a pipeline we are automating those operations:
1. Do a fresh backup of your data on S3 (Backups must be activated before cloning your pipeline) if you choose to copy the data.
2. (New VM only): Deploying a new VM that will be used as the new CI/CD target
3. Deploy the pipeline (from source or from docker registry) on the target
4. Restore the latest backup we took at step one from S3
5. Check if the pipeline is running correctly on the new target, if not cancel the operation and send a warning email
6. Send a confirmation email when the pipeline is cloned and ready
The whole process usually takes less than 3 minutes, but it can last longer in some cases.
# Pipelines migration, move pipelines between CI/CD targets safely
In several situations, you might want to move a deployed CI/CD pipeline from one target to another one. On Elestio, you can safely move a pipeline between targets even if the pipeline contains data.
Let's consider a few situations:
- Your CI/CD target is overloaded (too much CPU/RAM usage)
- You want to move a workload from one location to another
- Your CI/CD target is down
In all those situations you will want to move some or all of your pipelines to another CI/CD target (new or existing one).
##### Move a CI/CD Pipeline to another CI/CD Target
1\) From the Elestio dashboard, click on CI/CD in the left menu then click on your pipeline to open the overview.
[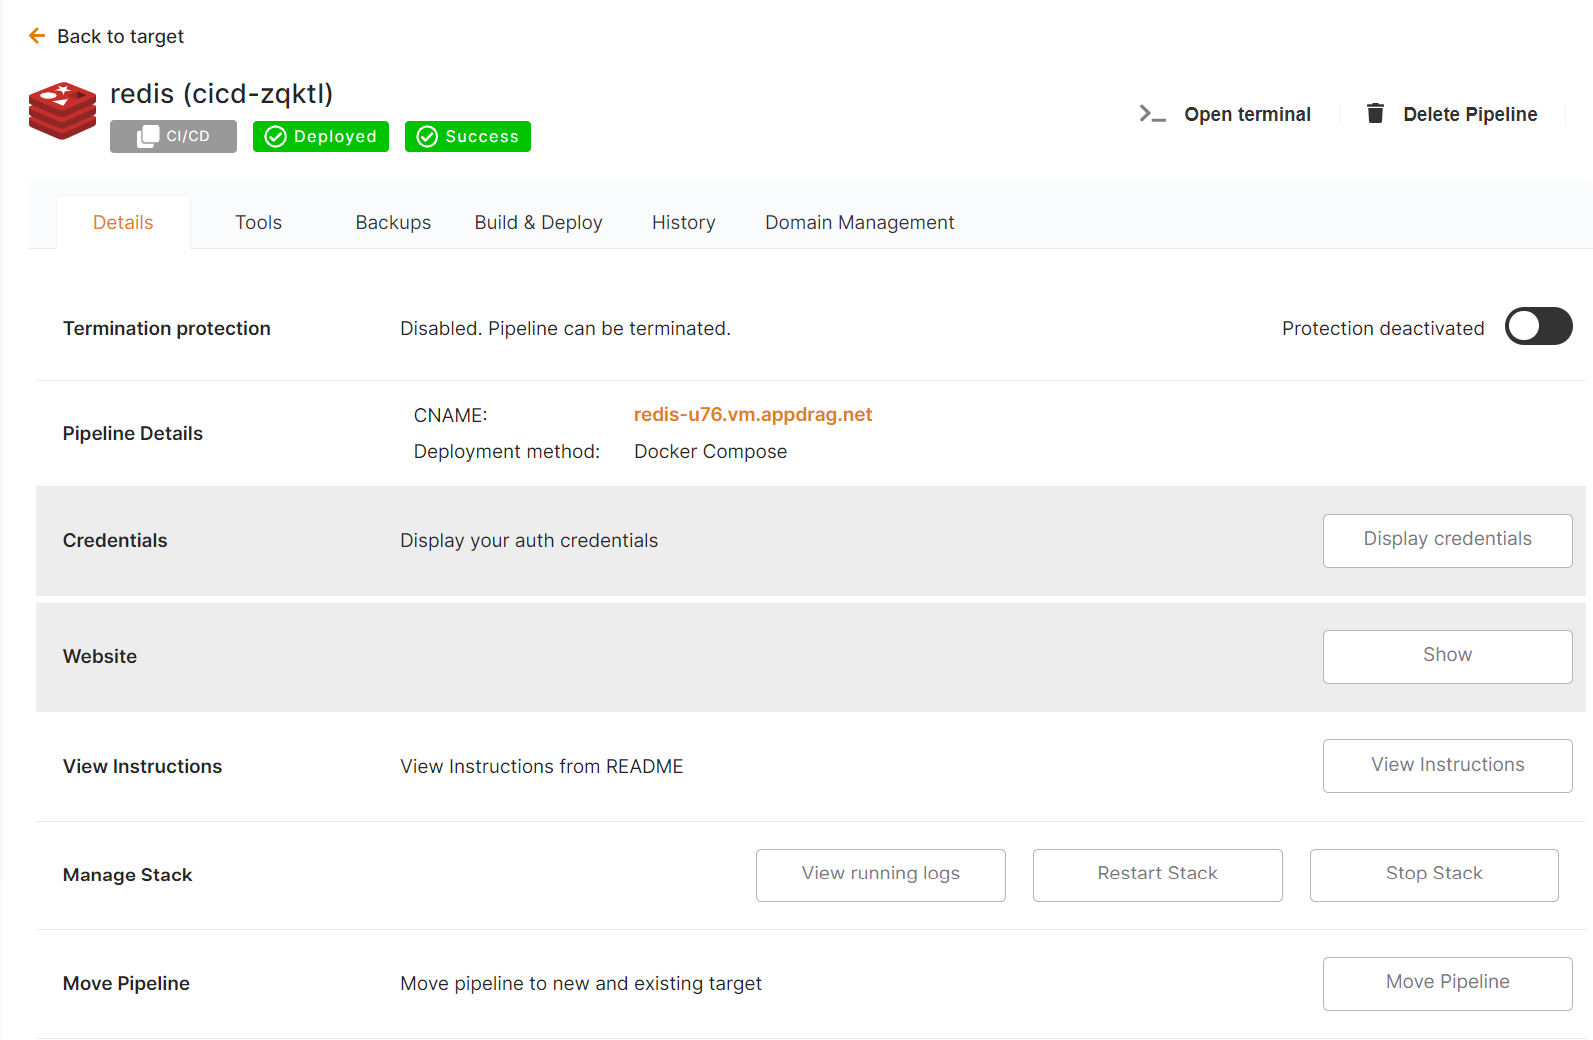](https://docs.elest.io/uploads/images/gallery/2022-07/hWaimage.png)
2\) Click on the **Move Pipeline** button
[](https://docs.elest.io/uploads/images/gallery/2022-07/oaNimage.png)
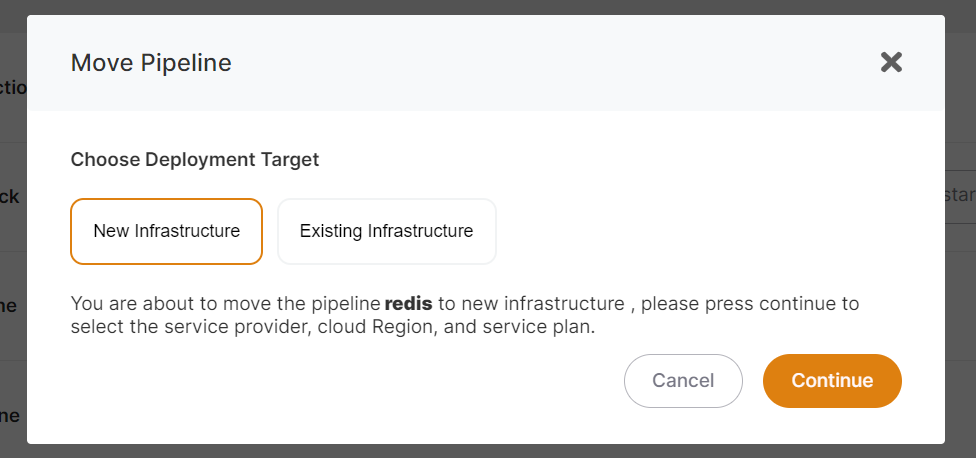
From there you can indicate if you want to move your pipeline to new infrastructure or existing infrastructure.
If you select Existing infrastructure you have to select in the list the existing CI/CD target, for a new infrastructure you will have to indicate the Provider / Region / VM Size to create.
[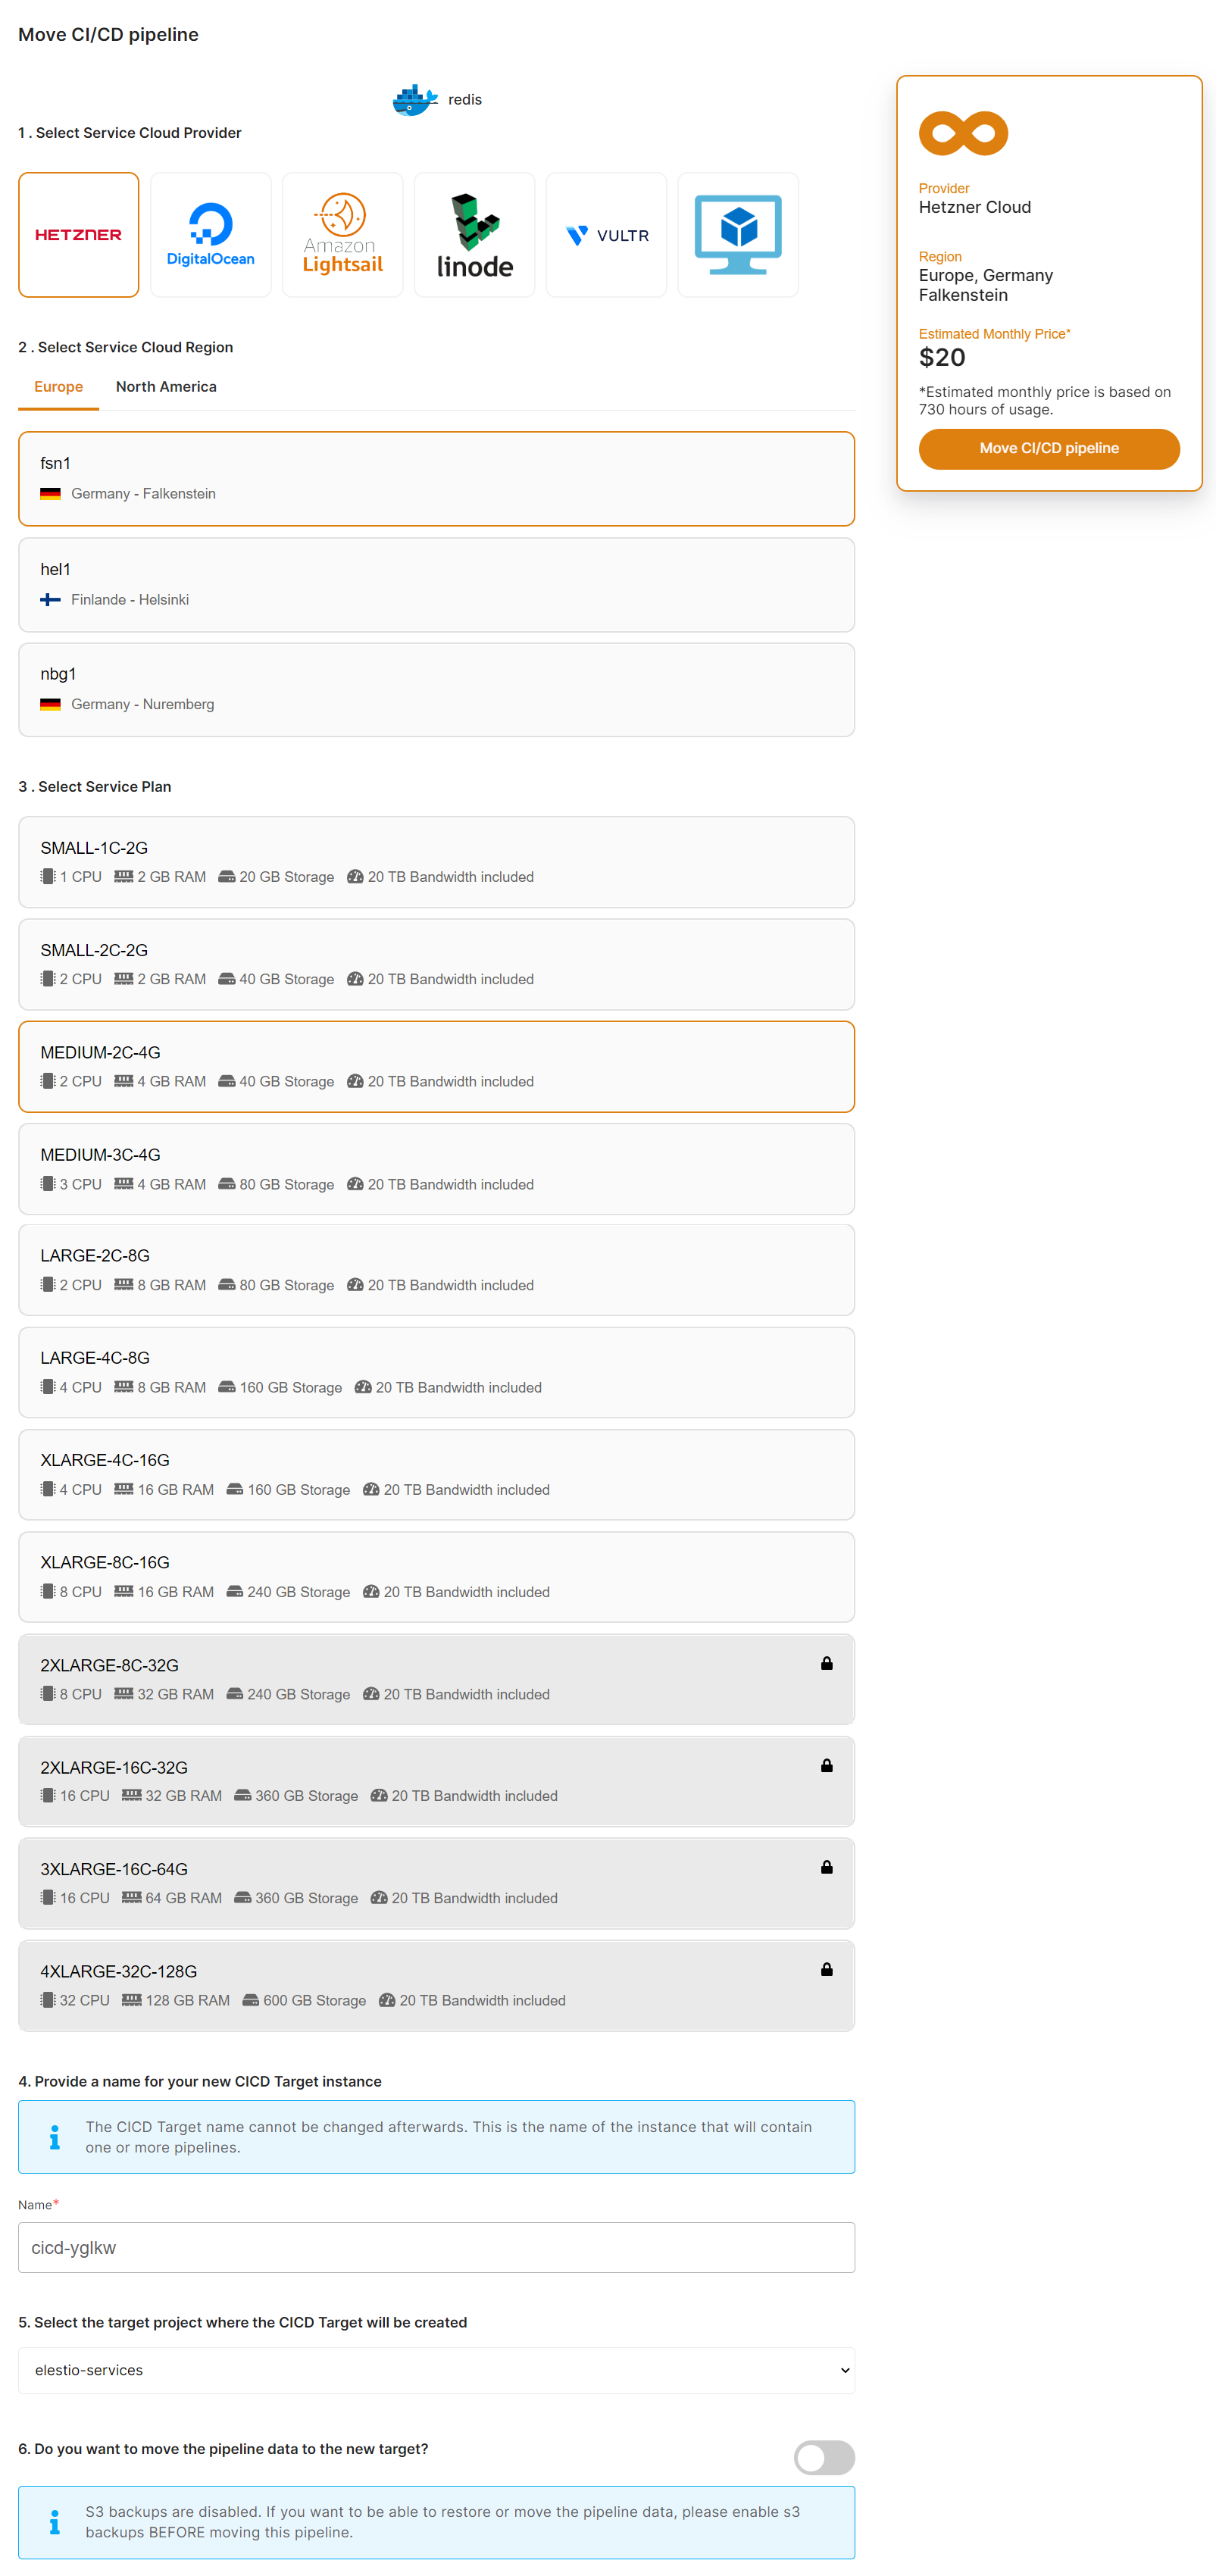](https://docs.elest.io/uploads/images/gallery/2022-07/aEaimage.png)
Moving a pipeline to an existing CI/CD target is FREE.
When you move a pipeline we are automating those operations:
1. Do a fresh backup of your data on S3 (Backups must be activated before moving your pipeline)
2. Shutting down the app stack of the pipeline.
3. (New infrastructure only): Deploying a new VM that will be used as the new CI/CD target
4. Deploy the pipeline (from source or from docker registry) on the new target
5. Restore the latest backup we took at step one from S3
6. Check if the pipeline is running correctly on the new target, if not cancel the operation and send a warning email
7. Change the DNS entry to point to the new target IP address
8. Send a confirmation email when the pipeline is restored and ready
The whole process usually takes less than 3 minutes, but it can last longer if there is a lot of data to back up/restore.
# Deploy examples & apps on Elestio using the "Import Third-Party Git Repository" feature
This tutorial will walk you through the process of deploying GitHub, GitLab, or Bitbucket public repositories in CI/CD using our **Import Third-Party Git Repository** feature. In our example, we'll use a Simple JavaScript web application public repository, but you can deploy it, in the same way, using any public repository from ***GitHub***, ***GitLab***, or ***Bitbucket***. 🚀
#### What is the Import Third-Party Git Repository?
A feature of Elestio's CI/CD **Import Third-Party Git Repository** lets you deploy any type of public git repository from *GitHub*, *GitLab*, or *Bitbucket* in the Elestio cloud.
#### What is the difference between Import Git Repository And Import Third-Party Git Repository?
Only public or private repositories that are already in your own git account can be deployed using the ***Import Git Repository*** feature. Depending on the deployment method you select—for example if you choose GITHUB—you can only deploy repositories that are already in your github account. On the other hand, you can deploy any only public repository from your or anyone else's account from github, gitlab, or bitbucket using the **Import Third-Party Git Repository** feature.
> In these **Import Third-Party Git Repository** features, Elestio will create a repository from your entered repository URL in your git account and deploy it to the cloud.
You probably heard about Kubernetes (and all its complexity) or various options to deploy your apps like Heroku, Render Fly, or Railways. They all have something in common, those products are building your own source code on every commit from your GIT repository.
Elestio is doing the same ... **but different!** Instead of deploying your app to a shared cluster, we deploy to dedicated VMs.
To learn more about the elestio CI/CD, go *[**here**](https://docs.elest.io/books/cicd-pipelines/page/overview).*
If you're new, sign up for *[Elestio](https://dash.elest.io/)*, otherwise, login to your existing account.
#### **Deploy Any Public repository Apps to the cloud using the CI/CD Import Third-Party Git Repository feature.**
#### Step 1:
Go to CI/CD from the left sidebar.
#### Step 2:
Now, select the deployment source.
[](https://docs.elest.io/uploads/images/gallery/2022-11/screenshot-2022-11-02-185434.png)
In this tutorial, I'm deploying using GITHUB, but you can also use GITLAB if you want to deploy your repository there.
#### Step 3:
Click the Import a Third-Party Git Repository
[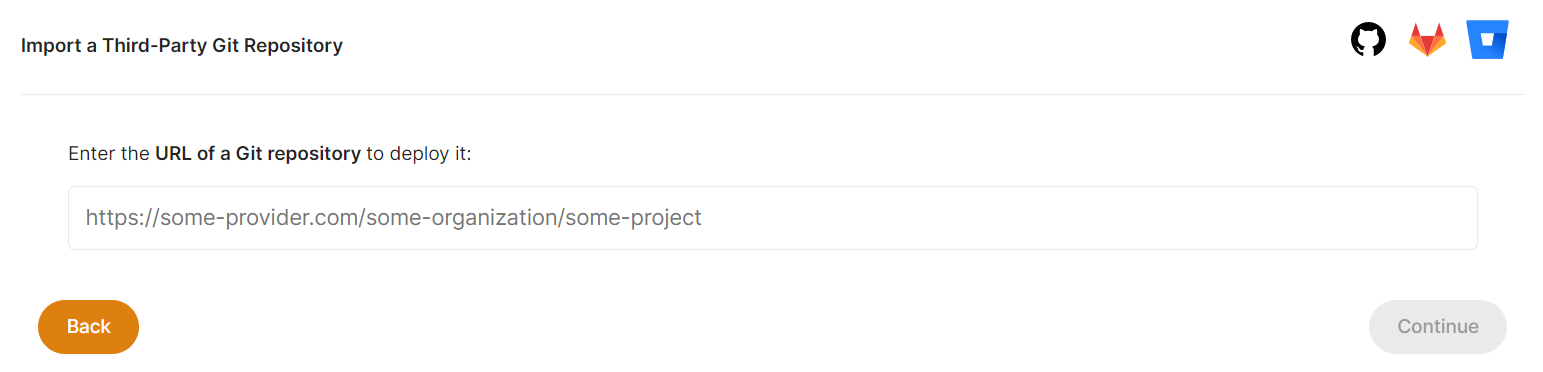](https://docs.elest.io/uploads/images/gallery/2022-11/screenshot-2022-11-16-202720.png)
The URL of the public repository you want to deploy should now be entered here.
Now click the ***Continue* **button to proceed.
If you have already authenticated your GITHUB or GITLAB account in CI/CD for repository access, you can fill up the below details directly. Otherwise, you must first authenticate your GIT account with elestio CI/CD for repository creation into your account.
We require GIT authentication in order to create these example template repositories in your GIT account.
[](https://docs.elest.io/uploads/images/gallery/2022-11/screenshot-2022-11-16-202936.png)
Here you can check the checkbox ***Create private Git Repository** *if you want to make these repo private otherwise leave it unchecked and click the ***Next button*** for further steps.
#### Step 4:
Choose Deployment Targets
[](https://docs.elest.io/uploads/images/gallery/2022-11/screenshot-2022-11-02-191657.png)
Elestio offers two types of deployment targets "**Deploy on a new VM**" and "**Deploy on an existing VM**".
You are allowed to set up n pipelines on each elestio CI/CD target/VM. According to the project configuration you select and the project you're deploying, the number of pipelines varies.
If you want to deploy these projects as a pipeline on a new Target/VM or don't have any installed targets, choose "Deploy on a new VM." If you already have any installed or previously configured CI/CD targets/VMs, choose "Deploy on an existing VM," and then choose the existing target from the targets dropdown.
Follow the steps below only if you select "**Deploy on a new VM**," otherwise click the next button to proceed.
CI/CD Pipelines by Elestio are available with our 5 cloud partners (AWS Lightsail, Digital Ocean, Vultr, Linode & Hetzner) in 85 locations over 27 countries but also on any cloud (AWS, Azure, Google, Oracle, ...) and on-premise with [BYOVM.](https://doc.elest.io/books/cloud-providers/page/byovm-bring-your-own-vm)
- Select Service Cloud Region[](https://docs.elest.io/uploads/images/gallery/2022-11/screenshot-2022-11-02-194242.png)
-
Select Service Plan[](https://docs.elest.io/uploads/images/gallery/2022-11/screenshot-2022-11-02-194721.png)
- Now Customize the target name and project (where the CICD Target will be created).
[](https://docs.elest.io/uploads/images/gallery/2022-11/screenshot-2022-11-02-194857.png)
> If you want to deploy it with a different name and a different project, you can customize it. By default, we configure it with a dynamic target name and the current project.
#### Step 5:
Configure your Project
[](https://docs.elest.io/uploads/images/gallery/2022-11/screenshot-2022-11-02-195655.png)
You can configure the project details by filling up the project name, branch, run time, version, framework, and root directory.
[](https://docs.elest.io/uploads/images/gallery/2022-11/screenshot-2022-11-02-200718.png)
You can configure your project install, run, and build commands in the Build and output setting.
[](https://docs.elest.io/uploads/images/gallery/2022-11/screenshot-2022-11-02-201628.png)
The configuration of life cycle scripts is always optional; they should only be used if you want to execute a specific command before and after building your project. Otherwise, leave them empty.
[](https://docs.elest.io/uploads/images/gallery/2022-11/screenshot-2022-11-02-201356.png)
You can list all of your project's API keys and secrets here if they were saved in ENV
[](https://docs.elest.io/uploads/images/gallery/2022-11/screenshot-2022-11-02-202142.png)
[](https://docs.elest.io/uploads/images/gallery/2022-11/screenshot-2022-11-02-202154.png)
The final step is to configure the exposed port and reverse proxy settings. You can specify the port on which your project will run here.
> If your project includes **elestio.yml**, Elestio will auto-fill all of these fields. As in this tutorial, we're using our Simple Javascript web application elestio example repository, so you can see in the above images that all of our fields are auto-filled.
Refer to these links to learn how to create our own ***[elestio.yml](https://docs.elest.io/books/cicd-pipelines/page/create-your-own-template-elestioyml)*** for the project.
A sample elestio.yml for our deploying Simple Javascript web application is shown below. check it out on ***[github](https://github.com/elestio-examples/static/blob/main/elestio.yml)***
```yaml
config:
runTime: "static"
version: ""
framework: ""
buildCommand: ""
buildDir: ""
runCommand: ""
ports:
- protocol: "HTTPS"
targetProtocol: "HTTP"
listeningPort: "443"
targetPort: "3000"
targetIP: "172.17.0.1"
public: true
path: "/"
isAuth: false
login: ""
password: ""
exposedPorts:
- protocol: "HTTP"
hostPort: "3000"
containerPort: "80"
interface: "172.17.0.1"
```
#### Step 6:
Click the ***Create CI/CD pipeline*** button to deploy your pipeline.
[](https://docs.elest.io/uploads/images/gallery/2022-11/screenshot-2022-11-02-203203.png)
*In a couple of moments, your application was successfully deployed on elestio 🚀.*
[](https://docs.elest.io/uploads/images/gallery/2022-11/screenshot-2022-11-02-205451.png)
[](https://docs.elest.io/uploads/images/gallery/2022-11/untitled-video-made-with-clipcha-2.gif)
You can now view your deployed URL and access your application by going to desired application pipeline details.
Please let us know by contacting our support [***email***](mailto:support@elest.io) or ***[ticketing](https://dash.elest.io/support/creation)*** system if you give it a shot and encounter any problems or if anything goes wrong.
Join us on [***discord***](https://discord.gg/4T4JGaMYrD) to know more.
# How to Create a Pipeline for Git Submodule Repo
Deploying code from a repository that includes Git submodules can be a bit more complex than a standard repository. This article will guide you through the process of deploying a submodule Git repository on the Elestio CI/CD pipeline.
Check out our [**example** ](https://github.com/elestio-examples/git-submodule "https://github.com/elestio-examples/git-submodule")repository to see how the process works.
The overall deployment process is similar to deploying a standard repository, as detailed in the **[Elestio documentation.](https://docs.elest.io/books/cicd-pipelines/page/how-to-deploy-react-app-on-elestio "https://docs.elest.io/books/cicd-pipelines/page/how-to-deploy-react-app-on-elestio")** However, there are a few additional considerations when deploying a submodule repository with Elestio.
#### Configuring .gitmodules
For a repository to handle submodules correctly, it must include a `.gitmodules` file. This file contains the configuration for each submodule, specifying its path, URL, and optionally the branch to be used.
If you want to deploy a submodule Git repository on a particular branch, you need to specify the branch in the `.gitmodules` file. Here’s an example configuration:
This configuration tells Git to check out the `master` branch of the `reactjs` repository.
#### Webhook Considerations
When working with submodules, it's important to note that Git only sends webhooks for changes in the main repository, not for changes only in the submodules.
Therefore, if you make any changes in the submodule repository, you need to sync and commit those changes in the main repository to trigger the webhook. Alternatively, if you commit any changes in the main repository as well, the Elestio automation will automatically fetch the latest changes from the submodule repository.
**Note:** In your pipeline, installing dependencies and starting the server will only affect the main repository. The submodule’s dependencies will not be installed, nor will its server be started by default. To manage this, you need to create a custom Dockerfile or Docker Compose configuration within the main repository. This setup will ensure that the pipeline deployment accounts for both the main repository and its submodules. Select either Docker or Docker Compose as the runtime environment based on your project's configuration.
# How to Run a Nuxt App with preinstall script in Elestio
When running a Nuxt.js application using runtime `NodeJs`, particularly with a `preinstall` script, you may encounter issues related to missing dependencies or commands not being found. In this guide, we'll walk you through how to set up a pipeline to run a Nuxt app, ensuring that all necessary dependencies (including Nuxt itself) are properly installed and that any `preinstall` scripts run smoothly.
We're considering your `package.json` to have something like this kind of script:
```javascript
"scripts": {
"preinstall": "echo 'Running preinstall script...'",
"build:icons": "tsx plugins/iconify/build-icons.ts",
"build": "nuxt generate",
"start": "nuxt start"
},
```
If you run this type of script with our current `NodeJs` runtime, it may not work as expected. To resolve this issue, you need to switch to our `Docker` runtime and use the Dockerfile provided below. Before deploying the pipeline, please ensure that you place the Dockerfile in your code's root folder file named `Dockerfile`.
In this example, we assume the client(frontend) code is located in the `app` directory, so I reference `app`.
However, if your repository structure differs, make sure to adjust the paths accordingly.
```yaml
FROM node:22
# Add a work directory
WORKDIR /app
# Copy entire application files before installing dependencies
COPY ./app/ .
# Install dependencies
RUN npm install --legacy-peer-deps
# .env Source destination argument
ARG source_file=./.env
ARG destination_dir=./app/.env
# .env copying management
RUN if [ -f "$source_file" ]; then \
if [ "$source_file" != "$destination_dir" ]; then \
echo "Copying $source_file to $destination_dir"; \
cp "$source_file" "$destination_dir"; \
else \
echo "Source and destination paths are the same; skipping copy."; \
fi \
else \
echo ".env has been added to dockerignore; skipping copy; if you want to copy it, remove it from dockerignore."; \
fi
# Change the working directory
# WORKDIR ./app/
# Build the app (Make sure to use the local Nuxt binary from node_modules)
RUN npx nuxt generate
# Expose port
EXPOSE 3000
# Start the app (Make sure to use the local Nuxt binary from node_modules)
CMD HOST=0.0.0.0 npx nuxt start
```
Once your Dockerfile is copied to the root directory of your repository, you can create a pipeline from our dashboard and select the `Docker` runtime for it.
# Disable or Enable Webhook Trigger for CI/CD Pipelines
Elestio CI/CD pipelines can automatically trigger a deployment when new commits are pushed to your Git repository. This is handled through a webhook integration.
You now have full control over this behavior directly from the Elestio dashboard. You can temporarily disable the webhook trigger to prevent automatic builds and re-enable it at any time.
This is useful when:
- You want to pause deployments during maintenance
- You are testing changes without triggering builds
- You want to control deployments manually
---
#### How It Works
##### When the webhook trigger is enabled:
- Every new commit pushed to the connected repository automatically triggers the pipeline.
##### When the webhook trigger is disabled:
- New commits will **not** trigger any pipeline execution.
- You can still run the pipeline manually from the dashboard.
#### Disable Webhook Trigger
Follow these steps to disable automatic pipeline triggers:
1. Go to your service in the Elestio dashboard
2. Navigate to the **CI/CD Pipeline** section
3. Select the **Pipeline** that you need to update.
4. Locate the **Webhook Trigger** option
5. Toggle the setting to **Disabled**
Once disabled:
- The pipeline will no longer run on new commits
- Existing webhook configuration remains intact but inactive
---
#### Enable Webhook Trigger
To re-enable automatic triggering:
1. Go to your service in the Elestio dashboard
2. Open the **CI/CD Pipeline** section
3. Select the **Pipeline** that you need to update.
4. Find the **Webhook Trigger** option
5. Toggle the setting to **Enabled**
Once enabled:
- New commits will again automatically trigger the pipeline
---
#### Manual Pipeline Execution
Even when the webhook trigger is disabled, you can still run the pipeline manually:
1. Go to the **CI/CD Pipeline** section
2. Navigate to the **Build and Deploy** tab.
3. Click on **Resync Pipeline**
This allows you to deploy changes only when needed.
---
#### Best Practices
- Disable webhook triggers during major debugging sessions to avoid unnecessary builds
- Re-enable the trigger once your changes are stable
- Use manual runs to validate deployments before reactivating automatic triggers
---
#### Notes
- Disabling the webhook does **not** remove it from your Git provider
- No changes are required on GitHub/GitLab side
- The feature is reversible at any time without side effects
# GitLab Self-Hosted Personal Access Token Setup
When connecting a self-hosted GitLab instance to Elestio CI/CD, you must provide a **Personal Access Token (PAT)** with the `api` scope. This guide explains exactly how to create it and why that specific scope is required.
---
##### Step-by-step: Create a Personal Access Token
1. Sign in to your self-hosted GitLab instance.
2. Click your avatar (top-right) → **Preferences** → **Access Tokens**
*(or go directly to `/-/profile/personal_access_tokens`)*
3. Fill in:
- **Token name** — e.g. `elestio-cicd`
- **Expiration date** — optional, depending on your team’s policy
4. Under **"Select scopes,"** enable **only** the `api` scope (details below).
5. Click **Create personal access token**.
6. **Copy the token immediately** — GitLab will not display it again.
[](https://docs.elest.io/uploads/images/gallery/2026-05/image.png)
---
##### Required scope: `api` (mandatory, no substitutes)
Scope
Why it is needed
`api`
**Mandatory.** Grants full REST API read/write access. Elestio requires this for creating and deleting **webhooks** (to track pushes), managing **deploy keys** (SSH access for CI runners), creating **projects from templates**, listing projects and groups, reading repository content, and performing git-over-HTTPS operations (`oauth2:@...`) during deployments.
---
##### Why narrower scopes are not enough
It may seem possible to combine smaller scopes, but in practice, they do not cover what CI/CD needs:
Scope
What it covers
What it is missing
`read_api`
Read-only REST API
No write access
`read_repository`
`git clone` over HTTPS
No API access
`write_repository`
`git push` over HTTPS
No API access
`read_user`
Basic user info (`GET /api/v4/user`)
No repo/project access
Even combining all of the above **still does not allow the following:**
- Creating webhooks
- Managing deploy keys
- Creating projects
These require **REST API write permissions**, which are only available via the `api` scope.
If you attempt to use limited scopes, deployments will fail with the following:
```
insufficient_scope
```
---
##### GitLab version note
Elestio verifies token scopes using the following:
```
GET /api/v4/personal_access_tokens/self
```
This endpoint was introduced in **GitLab 13.5 (October 2020)**.
- On newer versions → scope is validated directly
- On older versions → validation is skipped
However, **the `api` scope is still required** for CI/CD to function correctly, regardless of version.
---
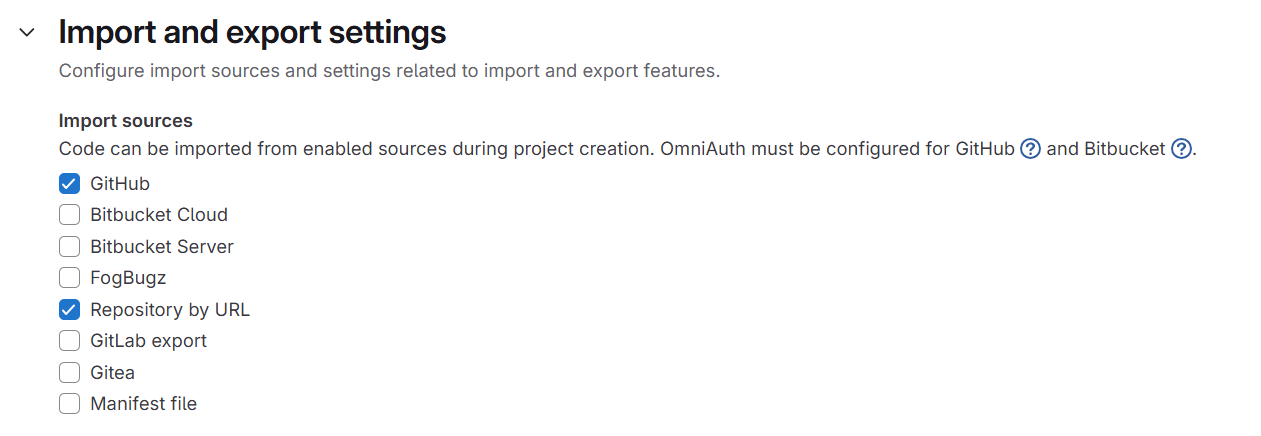
##### Admin settings required for template-based project creation
If you use **“Create repo from Elestio template,"** GitLab must allow imports from external URLs.
##### Enable this setting:
1. Go to **Admin Area**
2. Navigate to **Settings → General**
3. Expand **Import and export settings**
4. Enable **Allow imports from external URLs**
5. Save changes
[](https://docs.elest.io/uploads/images/gallery/2026-05/N2nimage.png)
If disabled, GitLab may return the following:
- `insufficient_scope`
- `404`
Even when your token is correctly configured.
👉 This is **not a token issue**, but a GitLab instance configuration restriction.
---
##### Troubleshooting
Symptom
Likely cause
Fix
`AUTH_FAILED` at connection
Wrong token or instance URL
Verify URL format (`http://` or `https://`, no trailing slash) and re-copy token
`INSUFFICIENT_SCOPES` at connection
Missing `api` scope
Edit or recreate the token with only `api`
`insufficient_scope` during deployment (project creation)
Using limited scopes
Recreate the token with `api`
`insufficient_scope` during template import
Import setting disabled
Enable “Allow imports from external URLs."
Repositories not loading
Missing or expired token
Reconnect with a valid token
Webhook not created
No `api` scope
`read_api` is not sufficient
Deploy fails at git clone
Missing `api` scope
Use `api` (covers HTTPS git access too)
---
##### Key takeaway
For GitLab + Elestio CI/CD integrations:
> **Always use a Personal Access Token with the `api` scope nothing else will fully work.**
Trying to minimize scopes here will break core deployment functionality.
# Deploy a CI/CD Pipeline via GitLab Self-Hosted
This guide walks you through deploying a CI/CD pipeline using a self-hosted GitLab instance on Elestio.
---
##### Prerequisites
Before you begin, make sure you have:
- A running self-hosted GitLab instance (e.g. `https://gitlab.example.com`)
- A **Personal Access Token (PAT)** with the **`api` scope** *(see note below)*
- A repository hosted on your GitLab instance
- An active project in Elestio
> ⚠️ **Important:** Only the `api` scope is required. Additional scopes like `read_repository` or `read_user` are not necessary when `api` is enabled.
You can follow our [documentation ](https://docs.elest.io/books/cicd-pipelines/page/gitlab-self-hosted-personal-access-token-setup)to generate the PAT.
---
##### Step 1: Select Deployment Method
1. Open your project in the Elestio dashboard
2. Navigate to **CI/CD → Create Pipeline**
3. Under **Deployment Method**, select **GitLab**
[](https://docs.elest.io/uploads/images/gallery/2026-05/m83image.png)
---
##### Step 2: Choose Hosting Type
After selecting GitLab, choose your hosting type:
Option
Description
**Cloud**
Connect to GitLab.com via OAuth
**Self-Hosted**
Connect using your own GitLab instance and PAT
Select **Self-Hosted** to continue.
[](https://docs.elest.io/uploads/images/gallery/2026-05/KB4image.png)
> Switching between Cloud and Self-Hosted will reset previously selected repositories and settings.
---
##### Step 3: Connect Your Self-Hosted GitLab Instance
Enter your connection details:
1. **GitLab Instance URL**
- Example: `https://gitlab.example.com`
- Must include protocol (`http://` or `https://`)
- No trailing slash
2. **Personal Access Token (PAT)**
- Paste your token (`glpat-xxxxxxxxxxxx`)
- Field is masked for security
3. Click **Connect**
[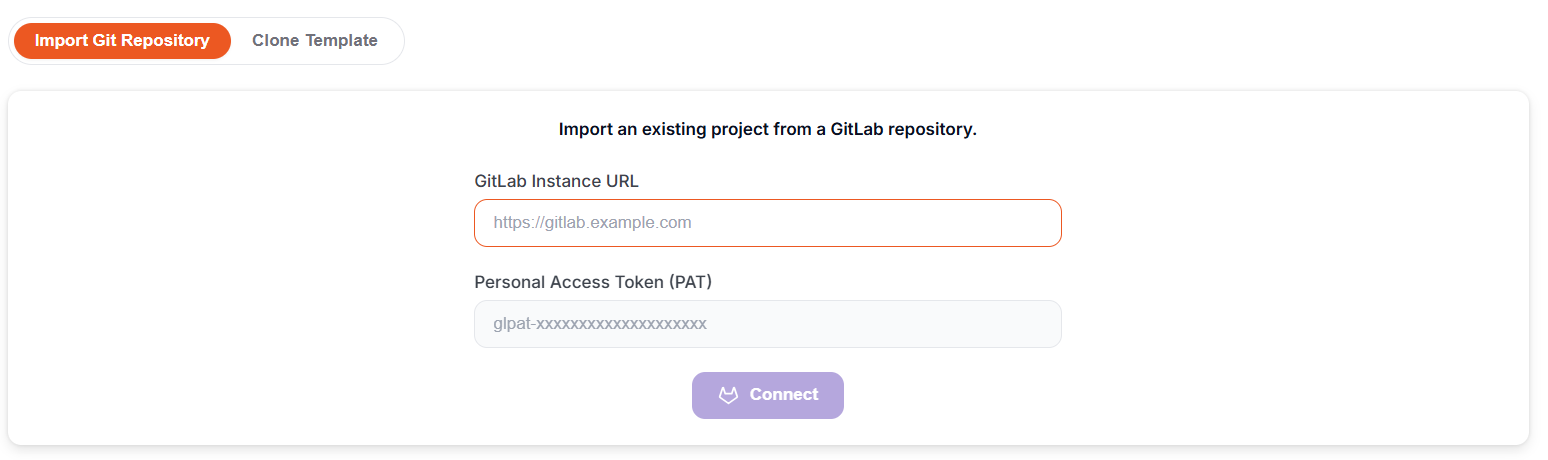](https://docs.elest.io/uploads/images/gallery/2026-05/hOzimage.png)
##### Expected result
- ✅ Connected message:
**“Connected as \[username\] on \[instance URL\]."**
- Repository selection UI loads automatically
##### If connection fails
Check:
- Instance is publicly reachable
- Token includes `api` scope
- Token has not expired
---
##### Step 4: Select a Repository
Once connected, the **Import Git Repository** section appears.
1. **Git Account**
- Your connected account is pre-selected
- Use **Add Git Account** to connect another instance
2. **Git Scope** *(if available)*
- Select a user, group, or organization
3. **Repository List**
- Search or browse repositories
- Private repos show a 🔒 icon
- Click **"Import"** on your chosen repository
[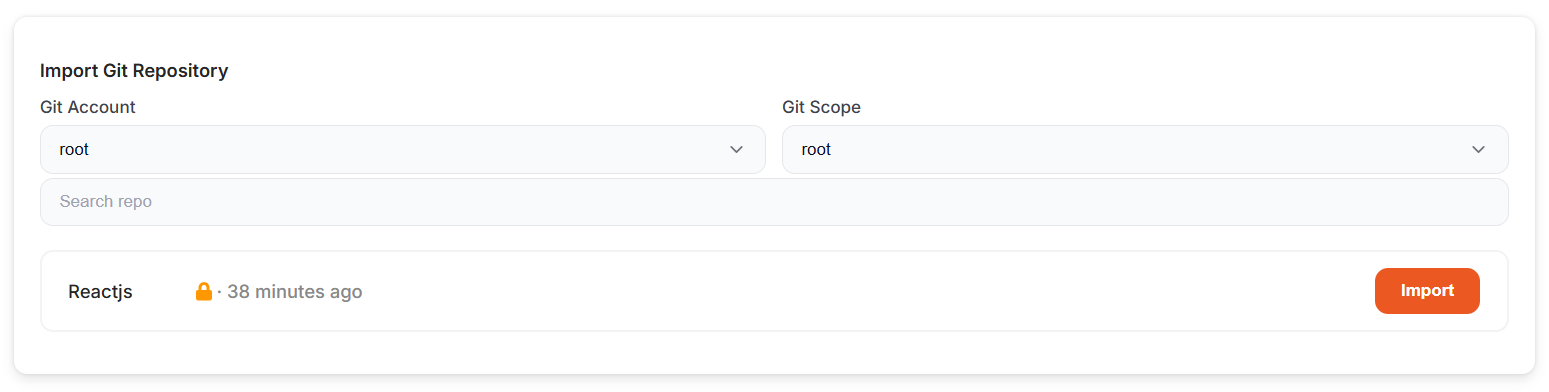](https://docs.elest.io/uploads/images/gallery/2026-05/hN3image.png)
> Now, click **"Next,"** then choose the cloud provider, region, and plan. After that, configure the pipeline settings by selecting the application type, runtime, and port configuration to proceed with the deployment.
---
##### Adding Additional Self-Hosted Accounts
To connect another GitLab instance:
1. Open the **Git Account** dropdown
2. Click **Add Git Account**
3. Enter:
- Instance URL
- Personal Access Token (`api` scope)
4. Click **Connect**
The new account becomes active immediately.
[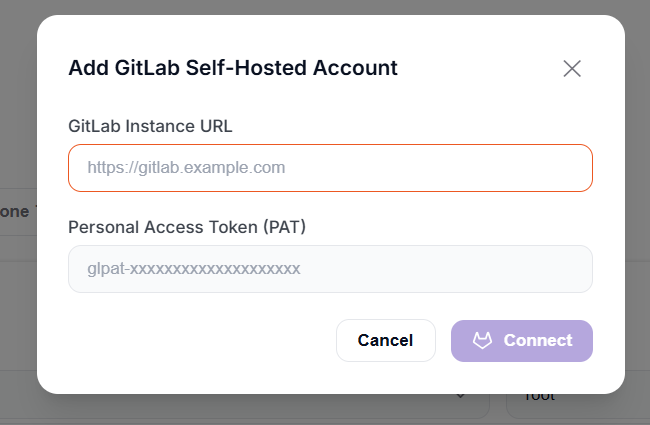](https://docs.elest.io/uploads/images/gallery/2026-05/vtZimage.png)
---
##### Troubleshooting