# Deploy own docker-compose image using Elestio "Custom docker-compose"

This tutorial will walk you through the process of deploying your own custom Docker image to the Elestio cloud.

Use cases:

- Deploy one or multiple instances of stateful apps like Wordpress / Directus / MySQL / Redis / RabbitMQ / ...
- Deploy an internal service available only to your private network
- Deploy an application that was created elsewhere and published to a private Docker registry.

<p class="callout info">To learn more about the elestio CI/CD, go *<span style="color: rgb(35, 111, 161);">[**here**](https://docs.elest.io/books/cicd-pipelines/page/overview).</span>*</p>

If you're new, sign up for <span style="text-decoration: underline;">*<span style="color: rgb(35, 111, 161); text-decoration: underline;">[Elestio](https://dash.elest.io/)</span>*</span>, otherwise, login to your existing account.


#### **Deploy a custom docker-compose image to the Elestio cloud using the CI/CD custom docker-compose template.**

#### Step 1:

Go to CI/CD from the left sidebar.

#### Step 2:

Now, select the **<span style="color: rgb(224, 62, 45);">*Docker compose*</span>** as the deployment source.

[![Screenshot 2022-11-07 144754.png](https://docs.elest.io/uploads/images/gallery/2022-11/screenshot-2022-11-07-144754.png)
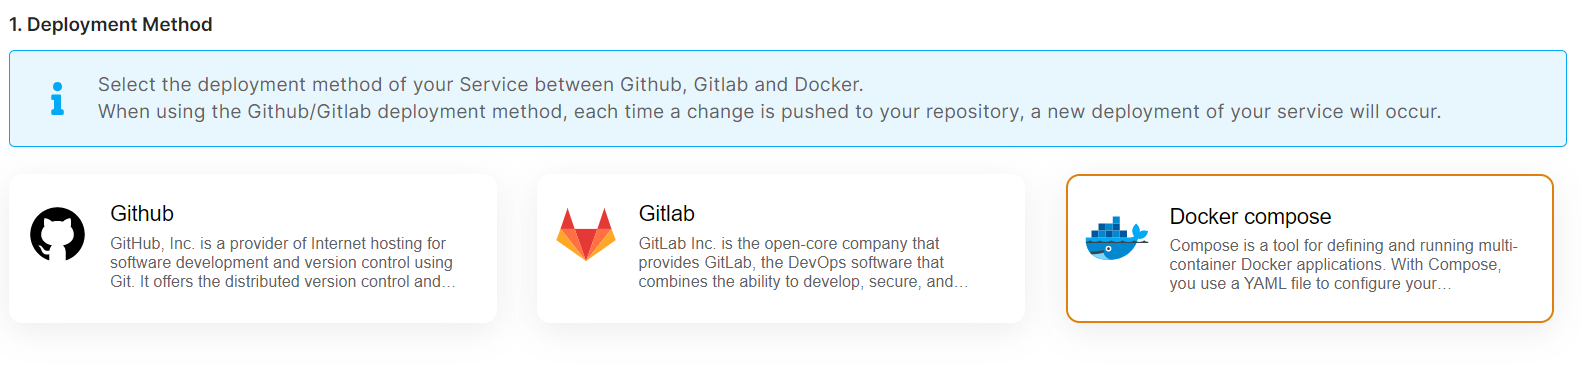
](https://docs.elest.io/uploads/images/gallery/2022-11/screenshot-2022-11-02-185434.png)

#### Step 3:

> **<span style="color: rgb(230, 126, 35);">*Here you can see the most interesting and well-liked tech stacks' elestio templates.*</span>**

[![Managed Service Dashboard (15).png](https://docs.elest.io/uploads/images/gallery/2022-11/managed-service-dashboard-15.png)
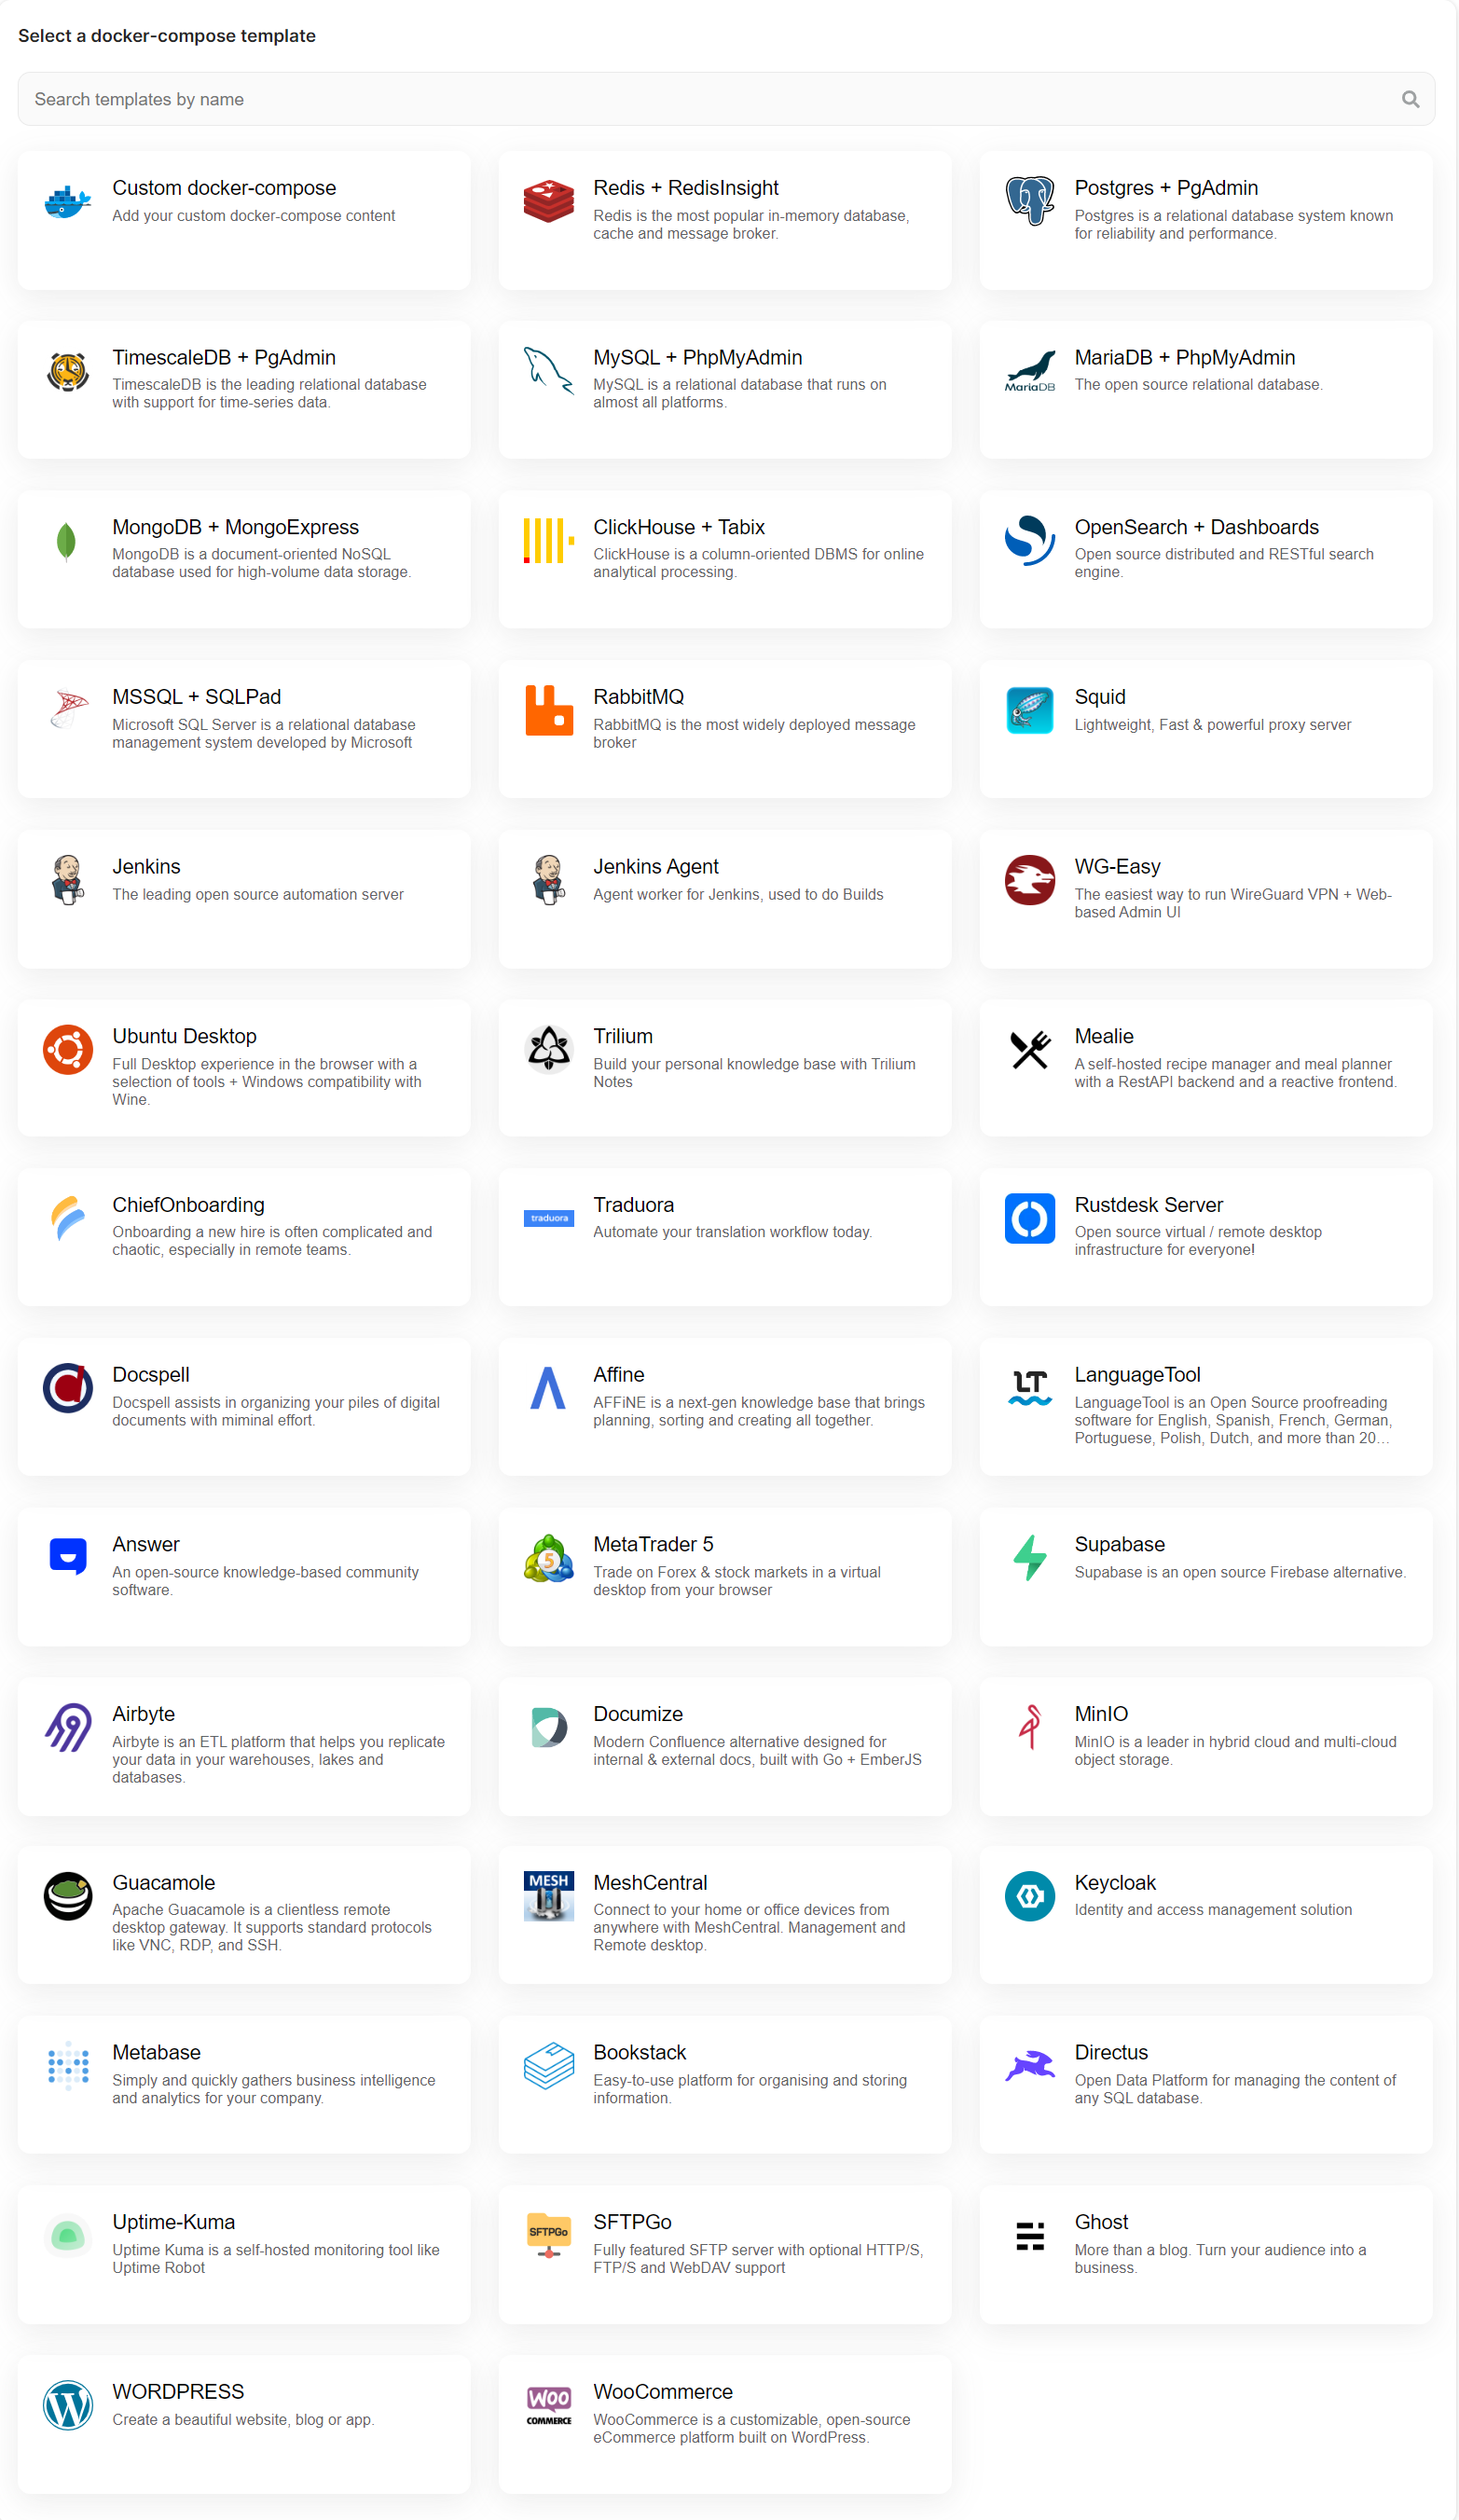
](https://docs.elest.io/uploads/images/gallery/2022-11/managed-service-dashboard-13.png)

Now, for deploying customer docker images, select <span style="color: rgb(230, 126, 35);">***Custom docker-compose***</span> template; otherwise, if you want to deploy from <span style="color: rgb(230, 126, 35);">***elestio example***</span> templates, select the template you want to deploy and follow the <span style="text-decoration: underline;">[***steps***](https://docs.elest.io/books/cicd-pipelines/page/deploy-docker-compose-apps-wordpress-mysql-redis-keycloak)</span>.

[![Screenshot 2022-11-07 160729.png](https://docs.elest.io/uploads/images/gallery/2022-11/screenshot-2022-11-07-160729.png)
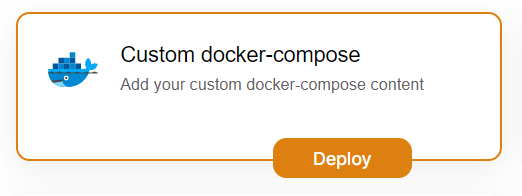
](https://docs.elest.io/uploads/images/gallery/2022-11/screenshot-2022-11-04-195057.png)

Now click the **<span style="color: rgb(230, 126, 35);">*Deploy* </span>**button to proceed.

#### Step 4:

Choose Deployment Targets

[![Screenshot 2022-11-02 191657.png](https://docs.elest.io/uploads/images/gallery/2022-11/scaled-1680-/screenshot-2022-11-02-191657.png)
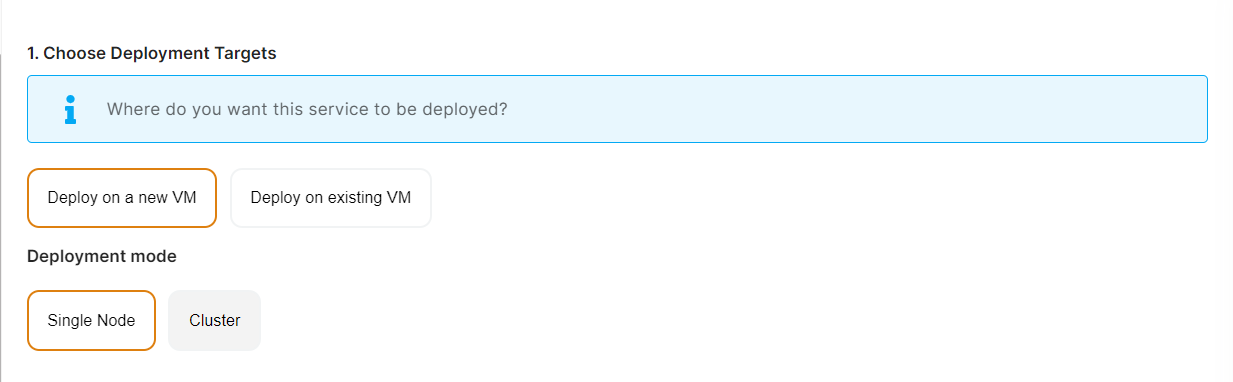
](https://docs.elest.io/uploads/images/gallery/2022-11/screenshot-2022-11-02-191657.png)

Elestio offers two types of deployment targets "**Deploy on a new VM**" and "**Deploy on an existing VM**".

<p class="callout info">You are allowed to set up n pipelines on each elestio CI/CD target/VM. According to the project configuration you select and the project you're deploying, the number of pipelines varies.</p>

If you want to deploy these projects as a pipeline on a new Target/VM or don't have any installed targets, choose "Deploy on a new VM." If you already have any installed or previously configured CI/CD targets/VMs, choose "Deploy on an existing VM," and then choose the existing target from the targets dropdown.

Follow the steps below only if you select "**Deploy on a new VM**," otherwise click the next button to proceed.

<p class="callout success">CI/CD Pipelines by Elestio are available with our 5 cloud partners (AWS Lightsail, Digital Ocean, Vultr, Linode &amp; Hetzner) in 85 locations over 27 countries but also on any cloud (AWS, Azure, Google, Oracle, ...) and on-premise with [BYOVM.](https://doc.elest.io/books/cloud-providers/page/byovm-bring-your-own-vm)</p>

- <div class="creation__subtitle">Select Service Cloud Provider</div>[![Screenshot 2022-11-02 194154.png](https://docs.elest.io/uploads/images/gallery/2022-11/scaled-1680-/screenshot-2022-11-02-194154.png)](https://docs.elest.io/uploads/images/gallery/2022-11/screenshot-2022-11-02-194154.png)

<div class="creation__block providers" id="bkmrk--5"></div><div class="creation__warning mb-0" id="bkmrk-select-service-cloud-0"><div class="creation__warning mb-0"><div class="creation__warningContainer"><div class="creation__warningText">- Select Service Cloud Region[![Screenshot 2022-11-02 194242.png](https://docs.elest.io/uploads/images/gallery/2022-11/scaled-1680-/screenshot-2022-11-02-194242.png)](https://docs.elest.io/uploads/images/gallery/2022-11/screenshot-2022-11-02-194242.png)
- <div class="creation__subtitle"> Select Service Plan[![Screenshot 2022-11-02 194721.png](https://docs.elest.io/uploads/images/gallery/2022-11/scaled-1680-/screenshot-2022-11-02-194721.png)](https://docs.elest.io/uploads/images/gallery/2022-11/screenshot-2022-11-02-194721.png)</div><div class="creation__subSection"><div class="templateRow">  
    </div></div>
- Now Customize the target name and project (where the CICD Target will be created).

</div></div></div></div>[![Screenshot 2022-11-02 194857.png](https://docs.elest.io/uploads/images/gallery/2022-11/scaled-1680-/screenshot-2022-11-02-194857.png)](https://docs.elest.io/uploads/images/gallery/2022-11/screenshot-2022-11-02-194857.png)

> If you want to deploy it with a different name and a different project, you can customize it. By default, we configure it with a dynamic target name and the current project.

#### Step 5:

Configure your Project docker image and other details.

[![Screenshot 2022-11-07 161048.png](https://docs.elest.io/uploads/images/gallery/2022-11/screenshot-2022-11-07-161048.png)](https://docs.elest.io/uploads/images/gallery/2022-11/screenshot-2022-11-02-195655.png)

Here, you can enter the information for your Docker image, and if your registry is private, you can configure registry credentials by checking the appropriate box <span style="color: rgb(186, 55, 42);">***Use a private Docker registry***</span>.

[![Screenshot 2022-11-07 175250.png](https://docs.elest.io/uploads/images/gallery/2022-11/scaled-1680-/screenshot-2022-11-07-175250.png)](https://docs.elest.io/uploads/images/gallery/2022-11/screenshot-2022-11-07-175250.png)

Similar to these, you can configure your docker image. I create the configuration for the Redis app docker image.

[![Screenshot 2022-11-07 175808.png](https://docs.elest.io/uploads/images/gallery/2022-11/scaled-1680-/screenshot-2022-11-07-175808.png)](https://docs.elest.io/uploads/images/gallery/2022-11/screenshot-2022-11-07-175808.png)

You can list all of your project's API keys and secrets here if they were saved in ENV

[![Screenshot 2022-11-07 175901.png](https://docs.elest.io/uploads/images/gallery/2022-11/scaled-1680-/screenshot-2022-11-07-175901.png)](https://docs.elest.io/uploads/images/gallery/2022-11/screenshot-2022-11-07-175901.png)

The final step is to configure the reverse proxy settings. You can specify the port on which your project will run here.

[![Screenshot 2022-11-07 180334.png](https://docs.elest.io/uploads/images/gallery/2022-11/scaled-1680-/screenshot-2022-11-07-180334.png)](https://docs.elest.io/uploads/images/gallery/2022-11/screenshot-2022-11-07-180334.png)

Your pipeline name will be filled in automatically by Elestio, but you are free to use another name for it in this context.

#### Step 6:

Click the ***Create CI/CD pipeline*** button to deploy your pipeline.

[![Screenshot 2022-11-02 203203.png](https://docs.elest.io/uploads/images/gallery/2022-11/scaled-1680-/screenshot-2022-11-02-203203.png)](https://docs.elest.io/uploads/images/gallery/2022-11/screenshot-2022-11-02-203203.png)

*In a couple of moments, your application was successfully deployed on elestio 🚀.*

Please let us know by contacting our support [<span style="text-decoration: underline; color: rgb(35, 111, 161);">***email***</span>](mailto:support@elest.io) or <span style="color: rgb(35, 111, 161);">**<span style="text-decoration: underline;">*[ticketing](https://dash.elest.io/support/creation)*</span>**</span> system if you give it a shot and encounter any problems or if anything goes wrong.

Join us on <span style="color: rgb(35, 111, 161);">[<span style="text-decoration: underline;">***discord***</span>](https://discord.gg/4T4JGaMYrD)</span> to know more.