Cloud Providers
- Hetzner
- Netcup
- Digital Ocean
- AWS Lightsail
- Vultr
- Linode
- BYOVM (Bring Your Own VM)
- AWS EC2 or BYOAWS (Bring Your Own AWS Account)
- Microsoft Azure or BYO-AZURE (Bring Your Own Azure Account)
- BYOVM with AWS EC2
- BYOVM with AWS EC2 (Beta AWS UI)
- Open Telekom Cloud (OTC) or BYO-TCloud (Bring Your Own TCloud Account)
Hetzner
Hetzner is an award-winning provider, born and based in Germany. They are one of our favorite providers because they are reliable and cost effective. Most of the time, you get twice the CPU & RAM for the same price compared to other providers.
We also love Hetzner for their commitment to promoting an energy-efficient use of the internet. All of their datacenters are powered by renewable energy.
20 TB of bandwidth is included with all VM sizes.
Supported Services
| Compute | ✅ |
| Private network | ✅ |
| Firewall | ✅ |
| Volumes | ✅ |
| Floating IP |
✅ |
| Snapshots |
✅ |
Supported Regions
| Continent | Country | City | Datacenter |
| Europe | Germany | Falkenstein | FSN1 |
| Europe | Germany | Nuremberg | NBG1 |
| Europe | Finland | Helsinki | HEL1 |
| America | USA | Ashburn, Virginia | ASH1 |
VM Sizes
| Size | Cores | Ram | HDD | Bandwidth |
| SMALL-1C-2G | 1 | 2GB | 20GB NVME | 20 TB |
| MEDIUM-2C-4G | 2 | 4GB | 40GB NVME | 20 TB |
| LARGE-2C-8G | 2 | 8GB | 80GB NVME | 20 TB |
| XLARGE-4C-16G | 4 | 16GB | 160GB NVME | 20 TB |
| 2XLARGE-8C-32G | 8 | 32GB | 240GB NVME | 20 TB |
| 3XLARGE-16C-64G | 16 | 64GB | 360GB NVME | 20 TB |
| 4XLARGE-32C-128G | 32 | 128GB | 600GB NVME | 20 TB |
Netcup
Netcup is a well-established German hosting provider known for their high-performance virtual servers at competitive prices. They offer powerful AMD EPYC-based infrastructure with excellent value, especially in Europe. Netcup provides fully managed services with included remote backups, making them a solid choice for teams looking for reliability without the operational overhead.
20 TB of bandwidth is included with all VM sizes.
Supported Services
| Service | Status |
|---|---|
| Compute | ✅ |
| Private Network | ✅ |
| Firewall | ✅ |
| Volumes | ❌ |
| Floating IP | ❌ |
| Snapshots | ❌ |
| Remote Backups | ✅ (7 included) |
Supported Regions
| Continent | Country | City | Datacenter |
|---|---|---|---|
| Europe | Germany | Nuremberg | NBG |
| North America | United States | Manassas, Virginia | MNS |
VM Sizes
All VMs run on AMD EPYC 9645 processors and include 20 TB bandwidth and 7 remote backups.
Europe (Germany - Nuremberg)
| Size | Cores | RAM | Storage | Monthly Price |
|---|---|---|---|---|
| MEDIUM-2C-4G | 2 | 4 GB | 60 GB NVMe | $14 |
| LARGE-4C-8G | 4 | 8 GB | 100 GB NVMe | $26 |
| XLARGE-8C-16G ⭐ | 8 | 16 GB | 200 GB NVMe | $49 |
| 2XLARGE-16C-32G | 16 | 32 GB | 400 GB NVMe | $99 |
| 3XLARGE-16C-64G | 16 | 64 GB | 600 GB NVMe | $149 |
North America (United States - Manassas)
| Size | Cores | RAM | Storage | Monthly Price |
|---|---|---|---|---|
| MEDIUM-2C-4G | 2 | 4 GB | 60 GB NVMe | $16 |
| LARGE-4C-8G | 4 | 8 GB | 100 GB NVMe | $29 |
| XLARGE-8C-16G ⭐ | 8 | 16 GB | 200 GB NVMe | $59 |
| 2XLARGE-16C-32G | 16 | 32 GB | 400 GB NVMe | $119 |
| 3XLARGE-16C-64G | 16 | 64 GB | 600 GB NVMe | $179 |
⭐ = Best Value
Features
- Fully Managed: All servers come with full management included
- AMD EPYC 9645: Latest generation AMD server processors
- 7 Remote Backups: Automatic backup retention included
- 20 TB Bandwidth: Generous bandwidth allocation on all plans
- NVMe Storage: Fast SSD storage on all VM sizes
Digital Ocean
Digital Ocean is a great cloud provider with a large number of regions and datacenters available. They provide good network and overall reliability.
Supported Services
| Compute | ✅ High Frequency CPU |
| Private network | ✅ |
| Firewall | ✅ |
| Volumes | ✅ |
| Floating IP | ✅ |
| Snapshots |
✅ |
Supported Regions
| Continent | Country | City | Datacenter |
| Asia | Singapore | Singapore | sgp1 |
| Asia | India | Bangalore | blr1 |
| Europe | Netherlands | Amsterdam | ams2 |
| Europe | Netherlands | Amsterdam | ams3 |
| Europe | United Kingdom | London | lon1 |
| Europe | Germany | Frankfurt | fra1 |
| North America | USA | New York City | nyc1 |
| North America | USA | New York City | nyc2 |
| North America | USA | New York City | nyc3 |
| North America | USA | San Francisco | sfo1 |
| North America | USA | San Francisco | sfo2 |
| North America | USA | San Francisco | sfo3 |
| North America | Canada | Toronto | tor1 |
VM Sizes
| Size | Cores | Ram | HDD | Bandwidth |
| MICRO-1C-1G | 1 | 1GB | 25GB NVME | 1 TB |
| SMALL-1C-2G | 1 | 2GB | 50GB NVME | 2 TB |
| MEDIUM-2C-4G | 2 | 4GB | 80GB NVME | 4 TB |
| LARGE-4C-8G | 4 | 8GB | 160GB NVME | 5 TB |
| XLARGE-8C-16G | 8 | 16GB | 320GB NVME | 6 TB |
AWS Lightsail
AWS is the largest cloud provider with one of the best network available and a large number of regions and datacenters.
Supported Services
| Compute | ✅ |
| Private network | ✅ |
| Firewall | ✅ |
| Volumes | ✅ |
| Floating IP | ✅ |
| Snapshots |
✅ |
SMTP Services are not supported in AWS LIghtsail (Mailcow, Postal, etc.).
Supported Regions
| Continent | Country | City | Datacenter |
| Asia | India | Mumbai | ap-south-1 |
| Asia | South Korea | Seoul | ap-northeast-2 |
| Asia | Singapore | Singapore | ap-southeast-1 |
| Asia | Australia | Sydney | ap-southeast-2 |
| Asia | Japan | Tokyo | ap-northeast-1 |
| Europe | Germany | Frankfurt | eu-central-1 |
| Europe | Ireland | Dublin | eu-west-1 |
| Europe | United Kingdom | London | eu-west-2 |
| Europe | France | Paris | eu-west-3 |
| Europe | Sweden | Stockholm | eu-north-1 |
| North America | USA | Ohio | us-east-2 |
| North America | USA | N. Virginia | us-east-1 |
| North America | USA | Oregon | us-west-2 |
| North America | Canada | Montreal | ca-central-1 |
VM Sizes
| Size | Cores | Ram | HDD | Bandwidth |
| MICRO-1C-1G | 1 | 1GB | 40GB SSD | 2 TB |
| SMALL-1C-2G | 1 | 2GB | 60GB SSD | 3 TB |
| MEDIUM-2C-4G | 2 | 4GB | 80GB SSD | 4 TB |
| LARGE-2C-8G | 2 | 8GB | 160GB SSD | 5 TB |
| XLARGE-4C-16G | 4 | 16GB | 320GB SSD | 6 TB |
| 2XLARGE-8C-32G | 8 | 32GB | 640GB SSD | 7 TB |
Vultr
VULTR is a great cloud provider with a large number of regions and datacenters available. They provide good network and overall reliability.
Supported Services
| Compute | ✅ High Frequency CPU |
| Private network | ✅ |
| Firewall | ✅ |
| Volumes | ✅ |
| Floating IP | ✅ |
| Snapshots |
✅ |
Supported Regions
| Continent | Country | City | Datacenter |
| Asia | Germany | Seoul | icn |
| Asia | Japan | Tokyo | nrt |
| Asia | Singapore | Singapore | sgp |
| Asia | Australia | Sydney | syd |
| Europe | Netherlands | Amsterdam | ams |
| Europe | France | Paris | cdg |
| Europe | Germany | Frankfurt | fra |
| Europe | United Kingdom | London | lhr |
| North America | USA | Atlanta | atl |
| North America | USA | Dallas | dfw |
| North America | USA | New Jersey | ewr |
| North America | USA | Los Angeles | lax |
| North America | USA | Miami | mia |
| North America | USA | Chicago | ord |
| North America | USA | Seattle | sea |
| North America | USA | Silicon Valley | sjc |
| North America | Canada | Toronto | yto |
VM Sizes
| Size | Cores | Ram | HDD | Bandwidth |
| MICRO-1C-1G | 1 | 1GB | 32GB SSD | 1 TB |
| SMALL-1C-2G | 1 | 2GB | 64GB SSD | 2 TB |
| MEDIUM-2C-4G | 2 | 4GB | 128GB SSD | 3 TB |
| LARGE-4C-16G | 4 | 16GB | 384GB SSD | 5 TB |
| XLARGE-8C-32G | 8 | 32GB | 512GB SSD | 7 TB |
| 2XLARGE-12C-48G | 12 | 48GB | 768GB SSD | 8 TB |
Linode
Linode is a great cloud provider with a large number of regions and datacenters available. They provide good network and overall reliability.
Supported Services
| Compute | ✅ |
| Private network | ✅ |
| Firewall | ✅ |
| Volumes | ✅ |
| Floating IP | ✅ |
| Snapshots |
❌ |
Supported Regions
| Continent | Country | City | Datacenter |
| Asia | India | Mumbai | ap-west |
| Asia | Australia | Sydney | ap-southeast |
| Asia | Singapore | Singapore | ap-south |
| Asia | Japan | Tokyo | ap-northeast |
| Europe | United Kingdom | London | eu-west |
| Europe | Germany | Frankfurt | eu-central |
| North America | Canada | Toronto | ca-central |
| North America | USA | Dallas | us-central |
| North America | USA | Fremont | us-west |
| North America | USA | Atlanta | us-southeast |
| North America | USA | Newark | us-east |
VM Sizes
| Size | Cores | Ram | HDD | Bandwidth |
| MICRO-1C-1G | 1 | 1GB | 25GB SSD | 1 TB |
| SMALL-1C-2G | 1 | 2GB | 50GB SSD | 2 TB |
| MEDIUM-2C-4G | 2 | 4GB | 80GB SSD | 4 TB |
| LARGE-4C-8G | 4 | 8GB | 160GB SSD | 5 TB |
| XLARGE-6C-16G | 6 | 16GB | 320GB SSD | 8 TB |
| 2XLARGE-8C-32G | 8 | 32GB | 640GB SSD | 16 TB |
| 3XLARGE-16C-64G | 16 | 64GB | 1280GB SSD | 20 TB |
| 4XLARGE-24C-128G | 24 | 128GB | 2560GB SSD | 20 TB |
BYOVM (Bring Your Own VM)
You can also deploy to your own cloud account from any cloud provider (Azure, GCP, Alibaba, Oracle, etc.) or from a VM hosted on-premises. You handle your provider relationship while we manage things.
Pricing
Pricing is based on the specification of the VM you are connecting to:
$5 per vCPU, $2.50 per GB of RAM, and $0.25 per 10 GB of disk.
Example: if you are connecting a VM with 2 vCPU + 4GB RAM + 40GB Disk, the cost per month will be
(5*2) + (2.5*4) + (0.25*4) = ~$21/mo
Price per hour is then calculated like this: $21/730h = $0.02876/h
You can calculate your VM pricing using our tool here: https://elest.io/bring-your-own-vm
AWS EC2 or BYOAWS (Bring Your Own AWS Account)
AWS is the largest cloud provider, boasting one of the best networks available, as well as a vast number of regions and data centers.
Supported Services
| Compute | ✅ |
| Private network | ✅ |
| Firewall | ✅ |
| Volumes | ✅ |
| Elastic IP | ✅ |
| Snapshots |
✅ |
SMTP Services are not supported in BYOAWS (Mailcow, Postal, etc.).
Supported Regions
| Continent | Country | City | Datacenter |
| Africa | South Africa | Cape Town | af-south-1 |
| Asia | Australia | Sydney | ap-southeast-2 |
| Asia | Australia | Melbourne | ap-southeast-4 |
| Asia | Hong Kong | Hong Kong | ap-east-1 |
| Asia | India | Mumbai | ap-south-1 |
| Asia | India | Hyderabad | ap-south-2 |
| Asia | Indonesia | Jakarta | ap-southeast-3 |
| Asia | Japan | Tokyo | ap-northeast-1 |
| Asia | Japan | Osaka | ap-northeast-3 |
| Asia | Korea | Seoul | ap-northeast-2 |
| Asia | Singapore | Singapore | ap-southeast-1 |
| Europe | France | Paris | eu-west-3 |
| Europe | Germany | Frankfurt | eu-central-1 |
| Europe | Ireland | Dublin | eu-west-1 |
| Europe | Italy | Milan | eu-south-1 |
| Europe | Spain | Spain | eu-south-2 |
| Europe | Sweden | Stockholm | eu-north-1 |
| Europe | Switzerland | Zurich | eu-central-2 |
| Europe | United Kingdom | London | eu-west-2 |
| Middle East | Bahrain | Bahrain | me-south-1 |
| Middle East | United Arab Emirates | UAE | me-central-1 |
| North America | Canada | Montreal | ca-central-1 |
| North America | USA | N. Virginia | us-east-1 |
| North America | USA | Ohio | us-east-2 |
| North America | USA | N. California | us-west-1 |
| North America | USA | Oregon | us-west-2 |
| South America | Brazil | Sao Paulo | sa-east-1 |
VM Sizes
| Size | Cores | Ram | HDD |
| MICRO-2C-1G | 2 | 1GB | 10 GB to 10 TB |
| SMALL-2C-2G | 2 | 2GB | 10 GB to 10 TB |
| MEDIUM-2C-4G | 2 | 4GB | 10 GB to 10 TB |
| LARGE-2C-8G | 2 | 8GB | 10 GB to 10 TB |
| XLARGE-4C-16G | 4 | 16GB | 10 GB to 10 TB |
| 2XLARGE-8C-32G | 8 | 32GB | 10 GB to 10 TB |
| 3XLARGE-16C-64G | 16 | 64GB | 10 GB to 10 TB |
| 4XLARGE-32C-128G | 32 | 128GB | 10 GB to 10 TB |
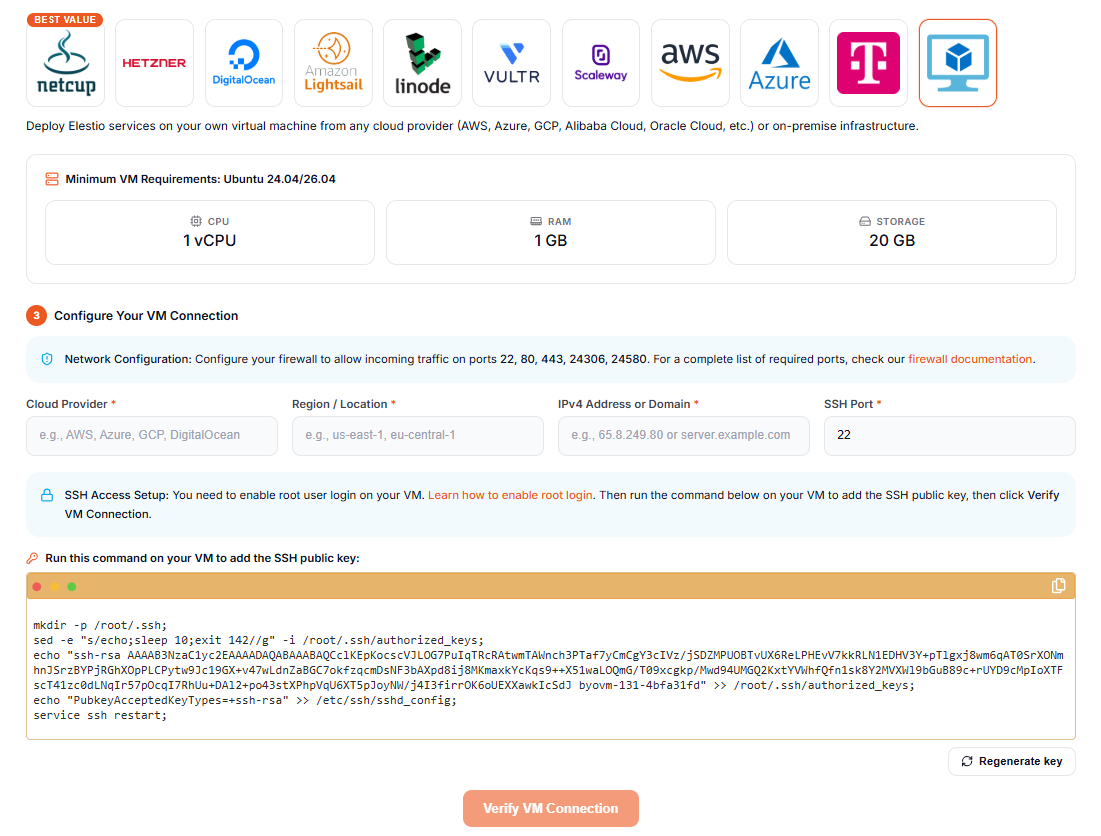
Microsoft Azure or BYO-AZURE (Bring Your Own Azure Account)
This guide explains the Azure permissions and configuration required for customers who want to deploy Elestio services in their own Azure subscription. By connecting your Azure account, Elestio will create and manage resources directly in your Azure environment.
Prerequisites
Before connecting your Azure subscription to Elestio, ensure you have:
-
An active Azure subscription
-
Global Administrator, Privileged Role Administrator, or Application Administrator role in Azure AD
-
Contributor role on the target Azure subscription (or ability to assign it)
Required Azure Permissions
Minimum Required Role
-
Role:
Contributor -
Scope: Subscription level
Why:
This role allows Elestio to create, manage, and delete resources in your subscription while preventing it from modifying access controls or role assignments.
Alternative: Custom Role (Advanced)
If your organization requires granular permissions, you can create a custom role with the following permissions:
{
"Name": "Elestio Service Manager",
"Description": "Custom role for Elestio to manage cloud resources",
"Actions": [
"Microsoft.Resources/subscriptions/resourceGroups/*",
"Microsoft.Compute/virtualMachines/*",
"Microsoft.Compute/disks/*",
"Microsoft.Network/virtualNetworks/*",
"Microsoft.Network/networkInterfaces/*",
"Microsoft.Network/networkSecurityGroups/*",
"Microsoft.Network/publicIPAddresses/*",
"Microsoft.Storage/storageAccounts/*",
"Microsoft.RecoveryServices/vaults/*",
"Microsoft.RecoveryServices/register/action",
"Microsoft.Authorization/locks/*"
],
"NotActions": [],
"AssignableScopes": [
"/subscriptions/{your-subscription-id}"
]
}
What Resources Will Elestio Create?
When you deploy services through Elestio using your Azure subscription, the following resources are created:
| Resource Type | Purpose |
|---|---|
| Resource Groups | Logical containers for all resources (elestio-{region}) |
| Virtual Machines | Compute instances for your applications |
| Managed Disks | OS and data storage for VMs |
| Virtual Networks | Network isolation |
| Network Interfaces | VM network connectivity |
| Public IP Addresses | IPv4 and IPv6 external access |
| Network Security Groups | Firewall rules |
| Storage Accounts | Backups and object storage |
| Recovery Services Vaults | Backup and disaster recovery |
| Resource Locks | Prevent accidental deletion |
OAuth Scope Required
Elestio uses the following OAuth 2.0 scope:
https://management.azure.com/user_impersonationThis allows Elestio to act on your behalf via Azure Resource Manager.
Step-by-Step Setup Guide
Step 1: Assign Contributor Role
-
Sign in to the Azure Portal
-
Go to Subscriptions
-
Select your subscription
-
Open Access control (IAM)
-
Click + Add → Add role assignment
-
Select Contributor
-
Assign it to your user account
-
Click Review + assign
You can assign the role in the Azure portal by following the steps outlined in the Microsoft documentation.
Verification:
Your account should appear under Role assignments with the Contributor role.
Step 2: Register Elestio Application in Azure AD
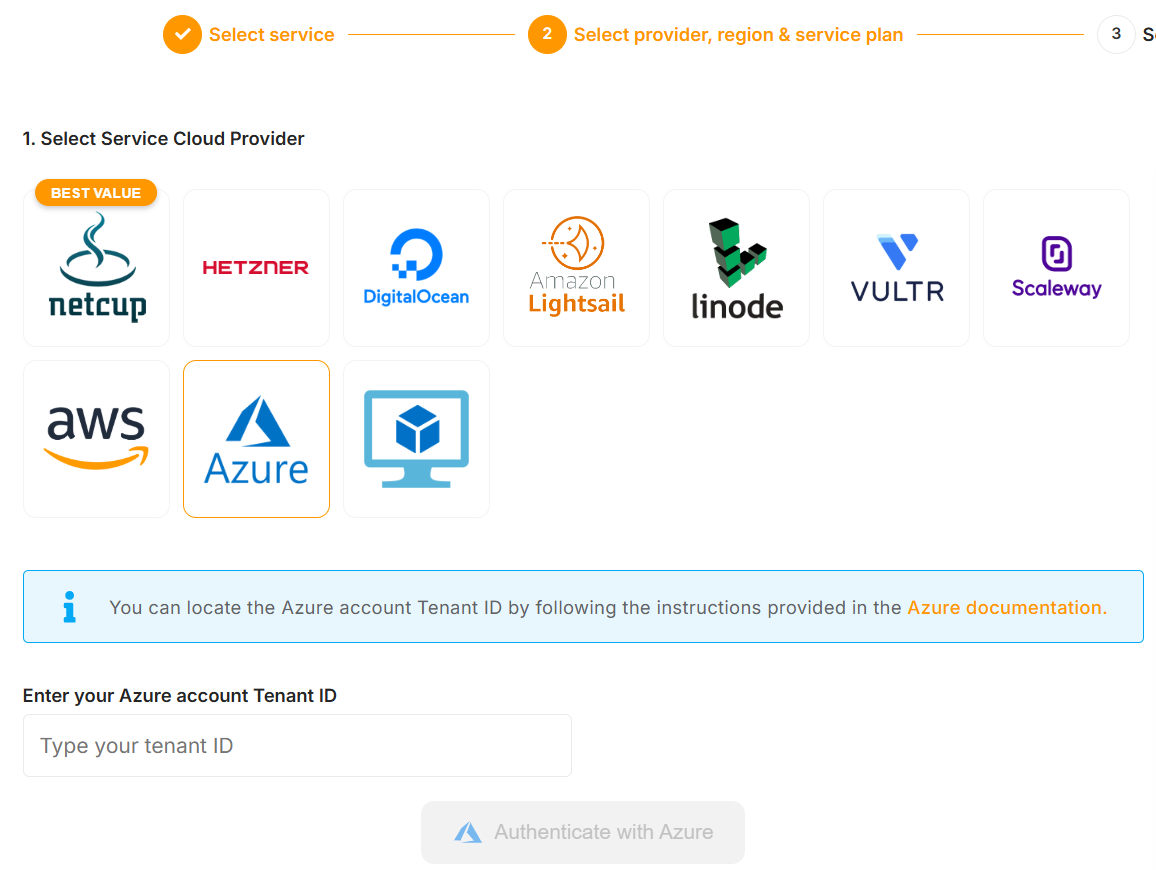
-
Log in to the Elestio dashboard
-
Select Software inside Services.
-
Go to Cloud Providers → Azure
-
Enter your Azure Tenant ID (see how to find it in the Azure portal)
-
Click Authenticate with Azure
You will be redirected to the Microsoft login page.
Step 3: Grant Admin Consent
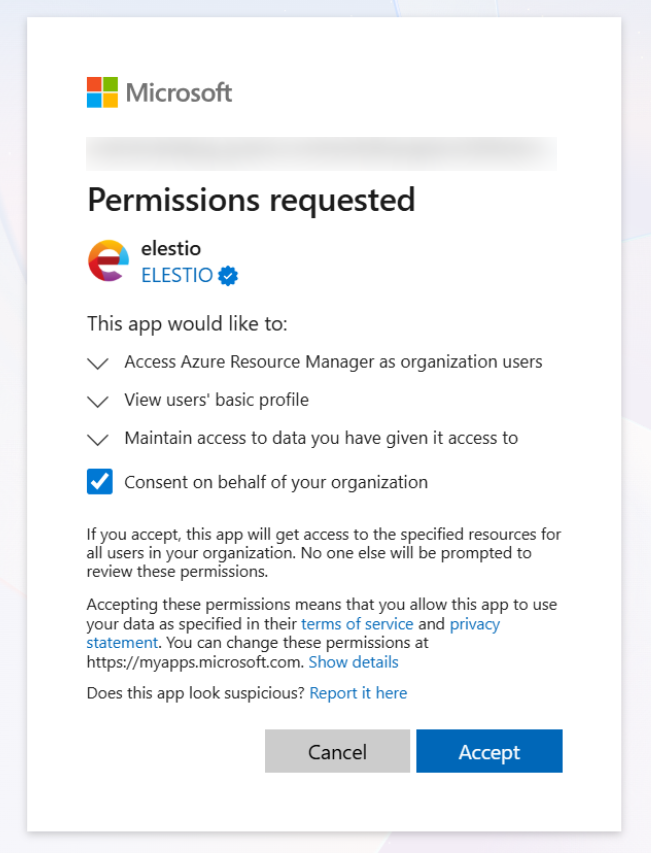
-
Review requested permissions:
-
Access Azure Service Management as you (
user_impersonation)
-
-
Sign in with an admin account if required
-
Click Accept
Note: If you lack privileges, your Azure AD administrator must grant consent.
Step 4: Select Subscription
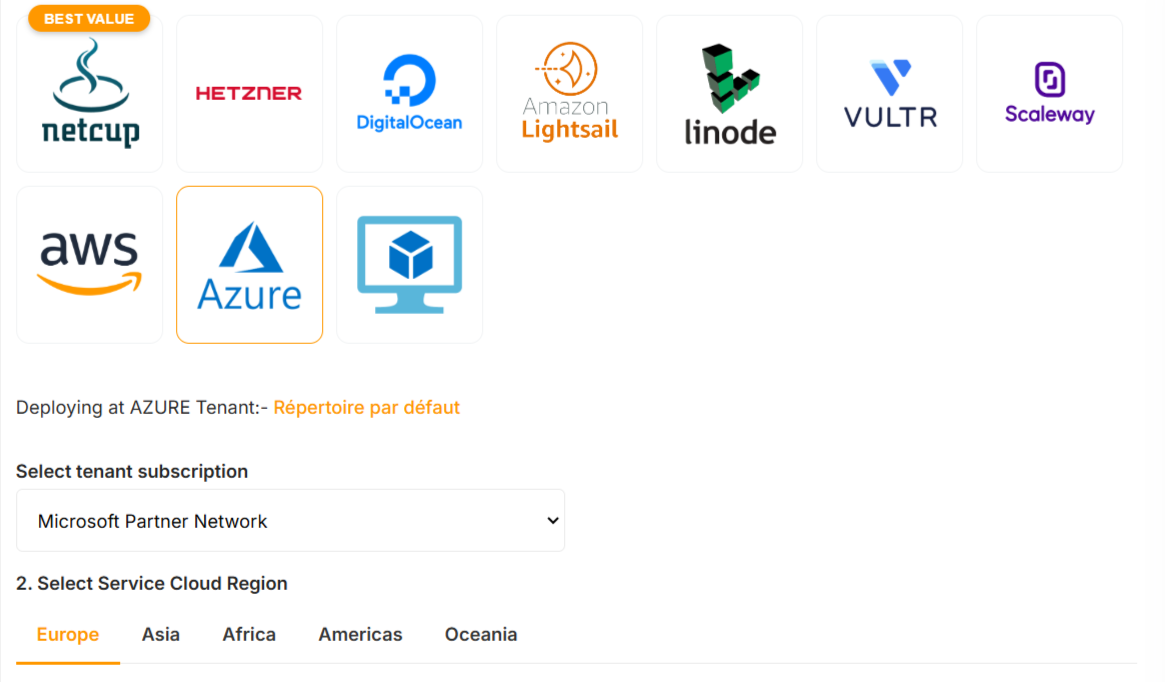
-
Return to the Elestio dashboard
-
Select the Azure subscription.
Your Azure account is now connected.
Security Best Practices
Use Dedicated Subscriptions
Recommended for production to ensure:
-
Clear cost tracking
-
Workload isolation
-
Easier audits and compliance
Resource Naming Conventions
| Resource | Pattern | Example |
|---|---|---|
| Resource Group | elestio-{region} |
elestio-eastus |
| VM | {service-name} |
my-postgres-db |
| Public IPv4 | {service-name}_ipv4 |
my-postgres-db_ipv4 |
| Public IPv6 | {service-name}_ipv6 |
my-postgres-db_ipv6 |
| Virtual Network | elestio_{region}_vnet |
elestio_eastus_vnet |
| Backup Policy | elestioBackup |
elestioBackup |
Troubleshooting
Insufficient Permissions
Cause: Missing Contributor role
Fix:
-
Assign Contributor at subscription level
-
Wait 5–10 minutes for propagation
Admin Consent Required
Cause: Azure AD consent missing
Fix:
-
Ask an admin to approve permissions
Provider Not Registered
Fix:
-
Subscriptions → Resource providers
-
Register
Microsoft.RecoveryServices
Quota Exceeded
Fix:
-
Check Usage + quotas
-
Request an increase via Azure Support
BYOVM with AWS EC2
You can deploy an Elestio service on your own AWS account with BYOVM
To do it, you will need to create a VM on AWS EC2, first connect to AWS EC2 dashboard:
https://console.aws.amazon.com/ec2/v2/home#Instances:instanceState=running
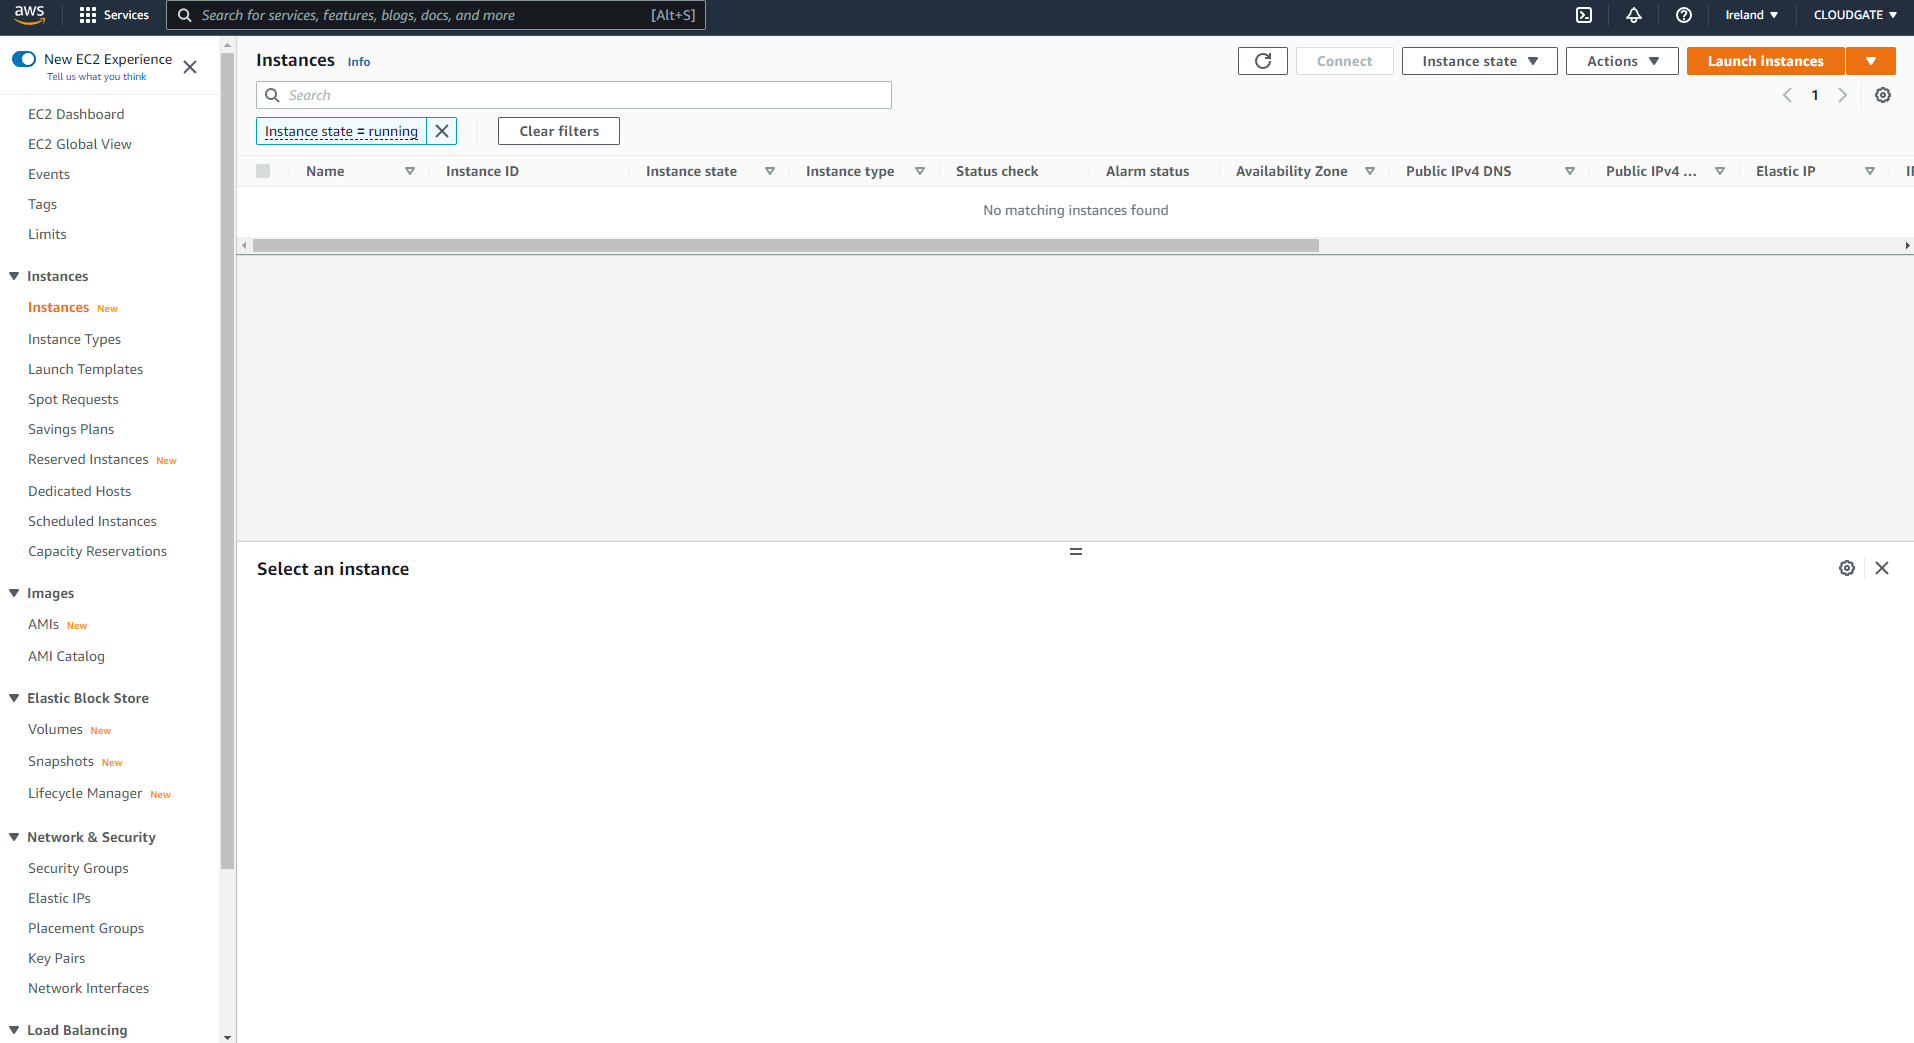
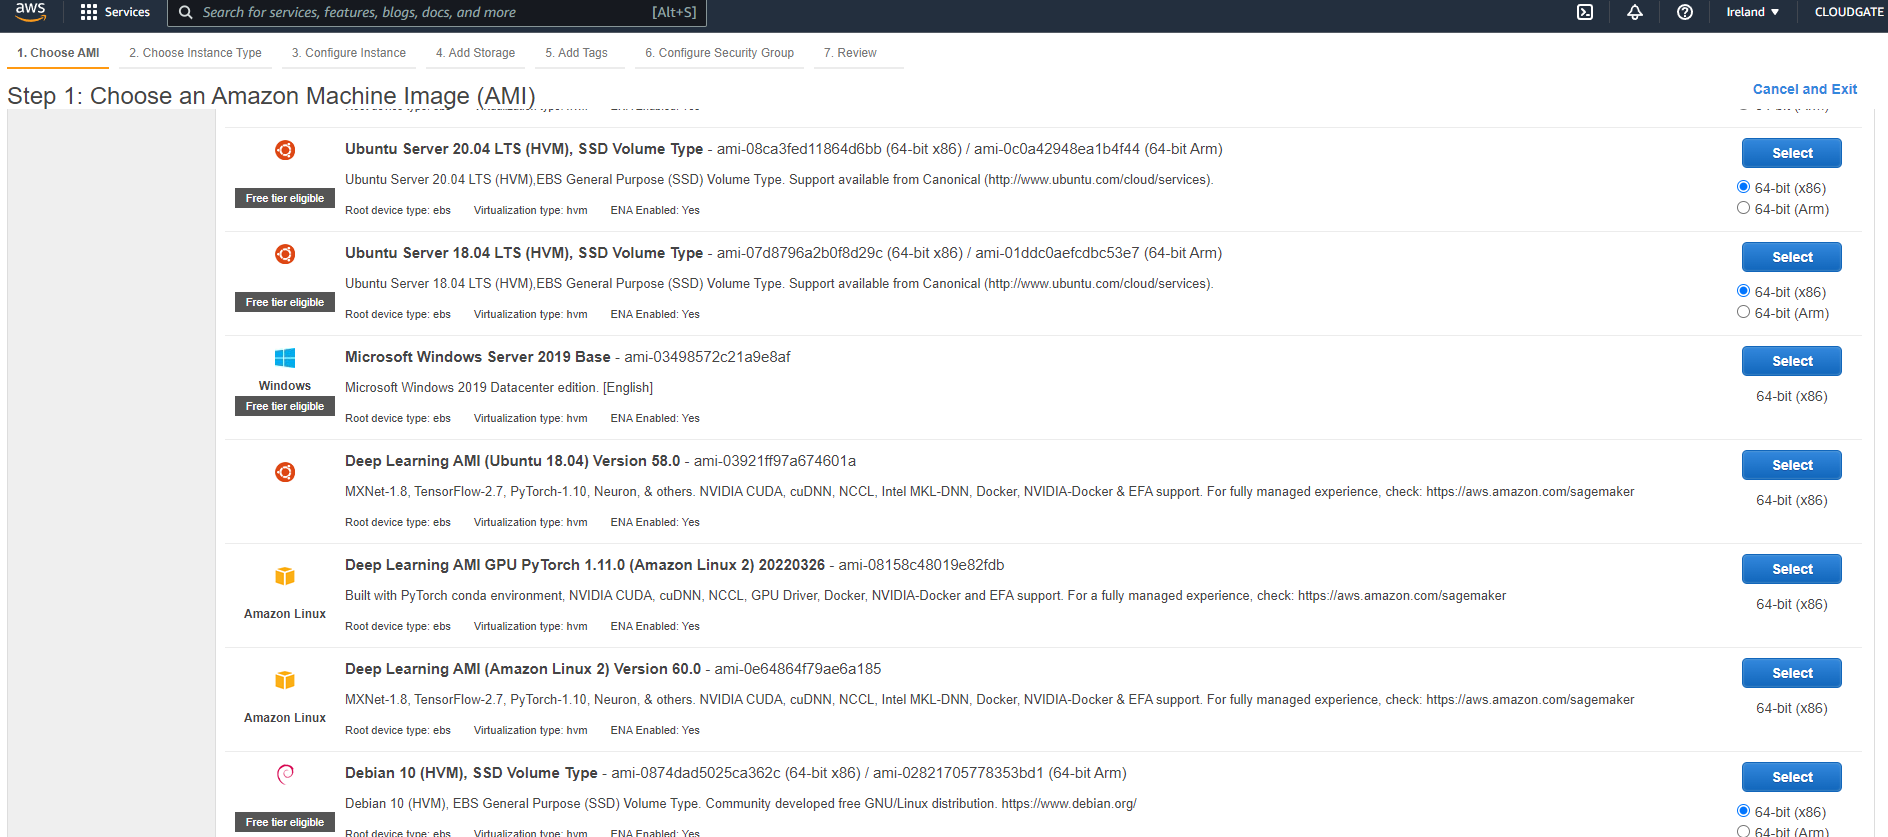
There click on "Launch instances" button and click on the select button on the row with Ubuntu 26.04 LTS
Next Choose an Instance type based on your needs (T3 Medium is a good base if you don't know yet what you will need)
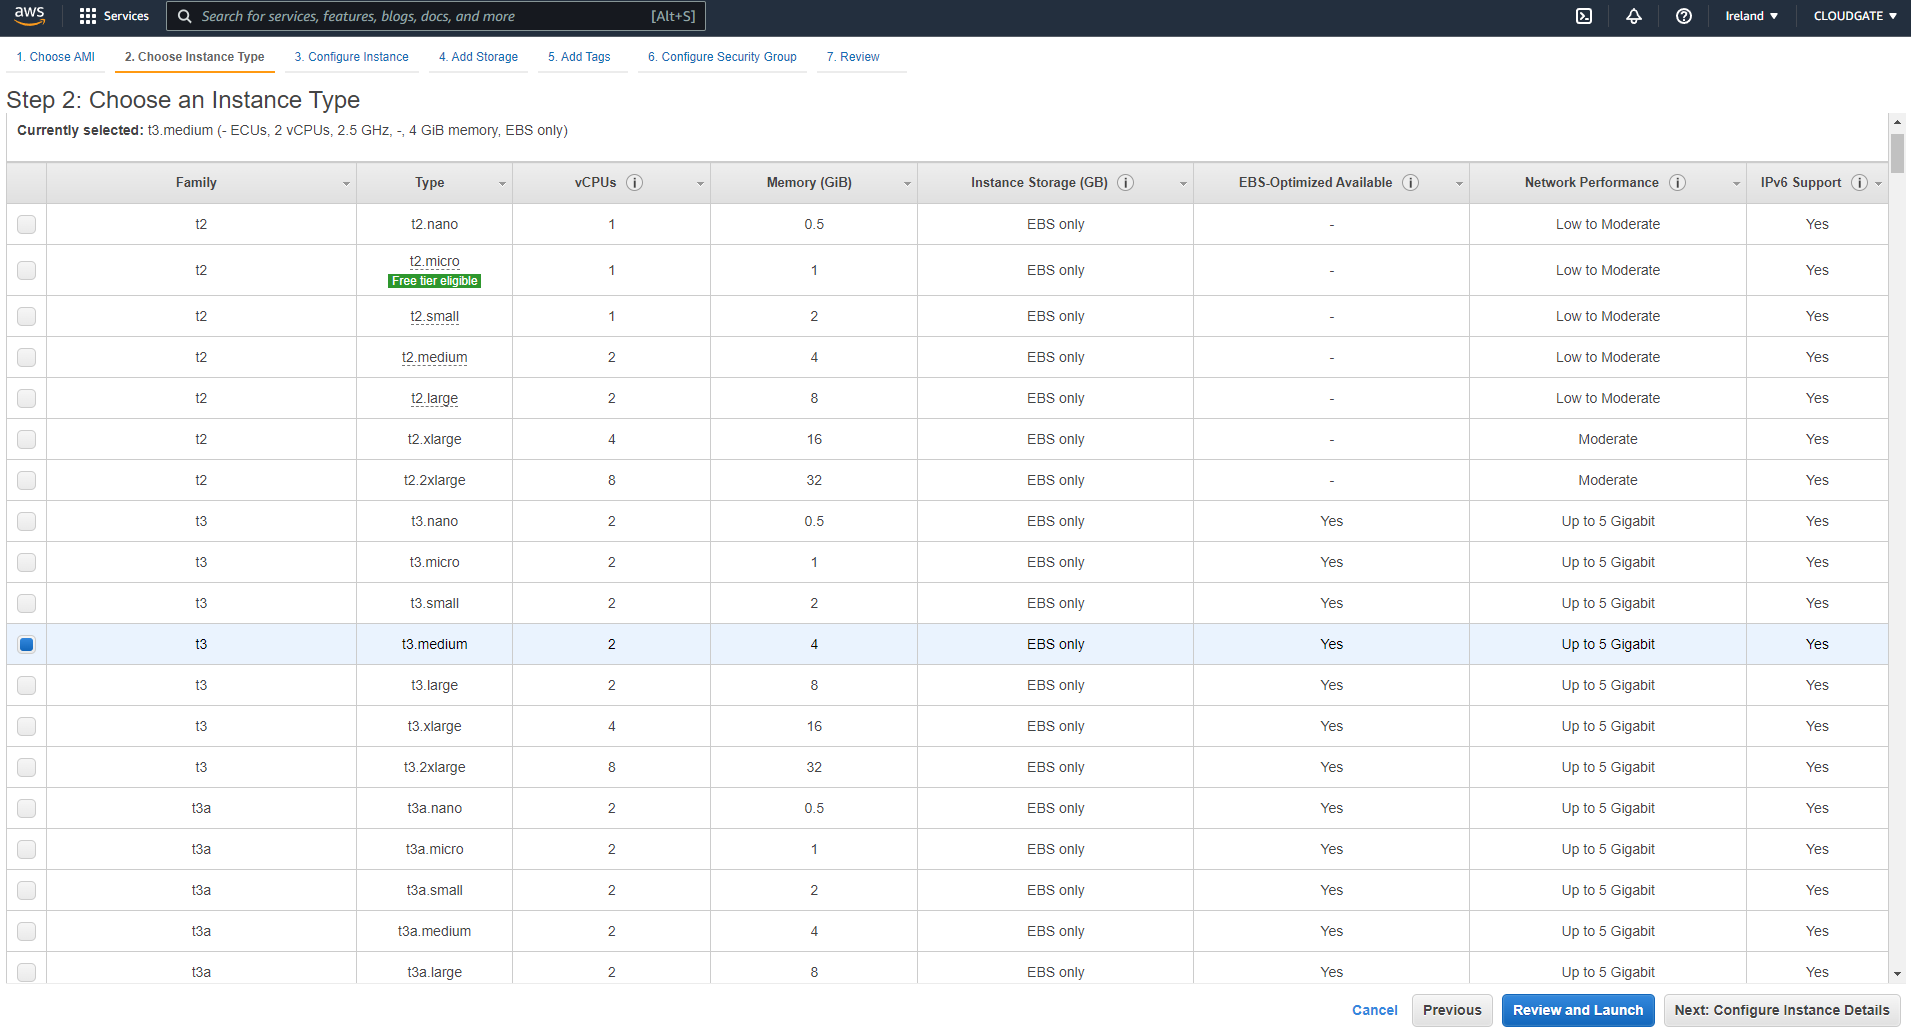
Then click on NEXT (configure instance details) button

There is nothing to do, just click on "Next: add storage" button

In the disk size configure at least 20GB then click on the Next button again, you will arrive on the Step 5 with tags, nothing to do there, click again on Next to go to security groups configuration
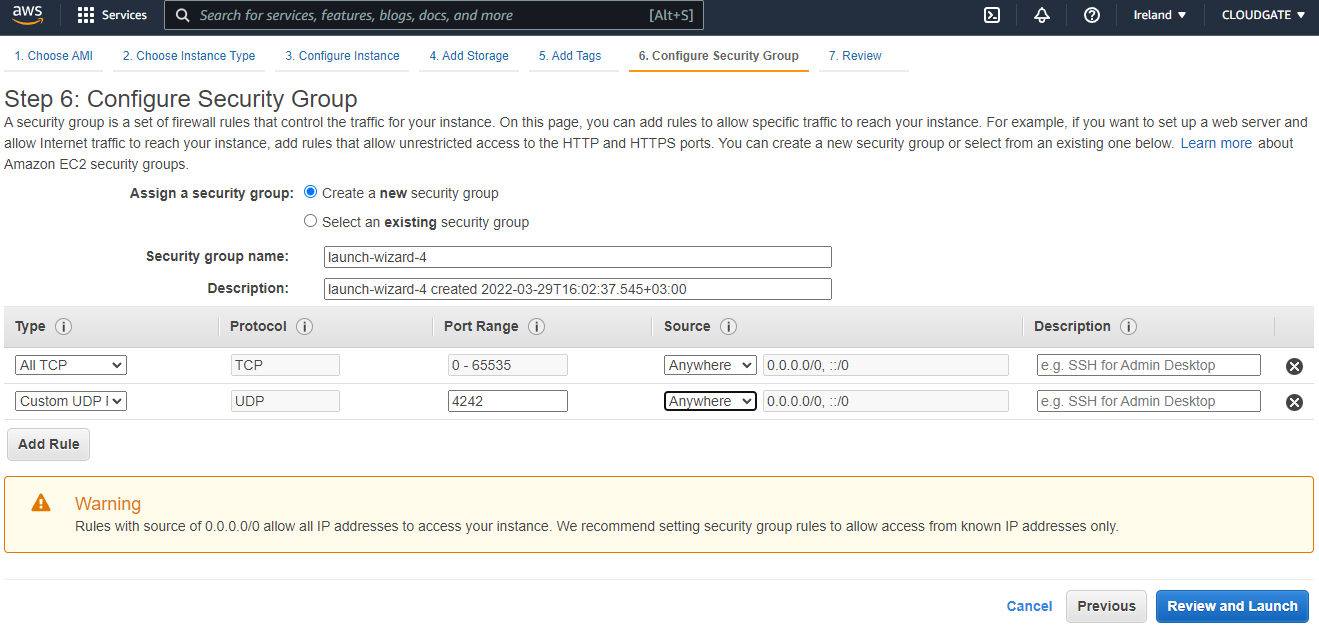
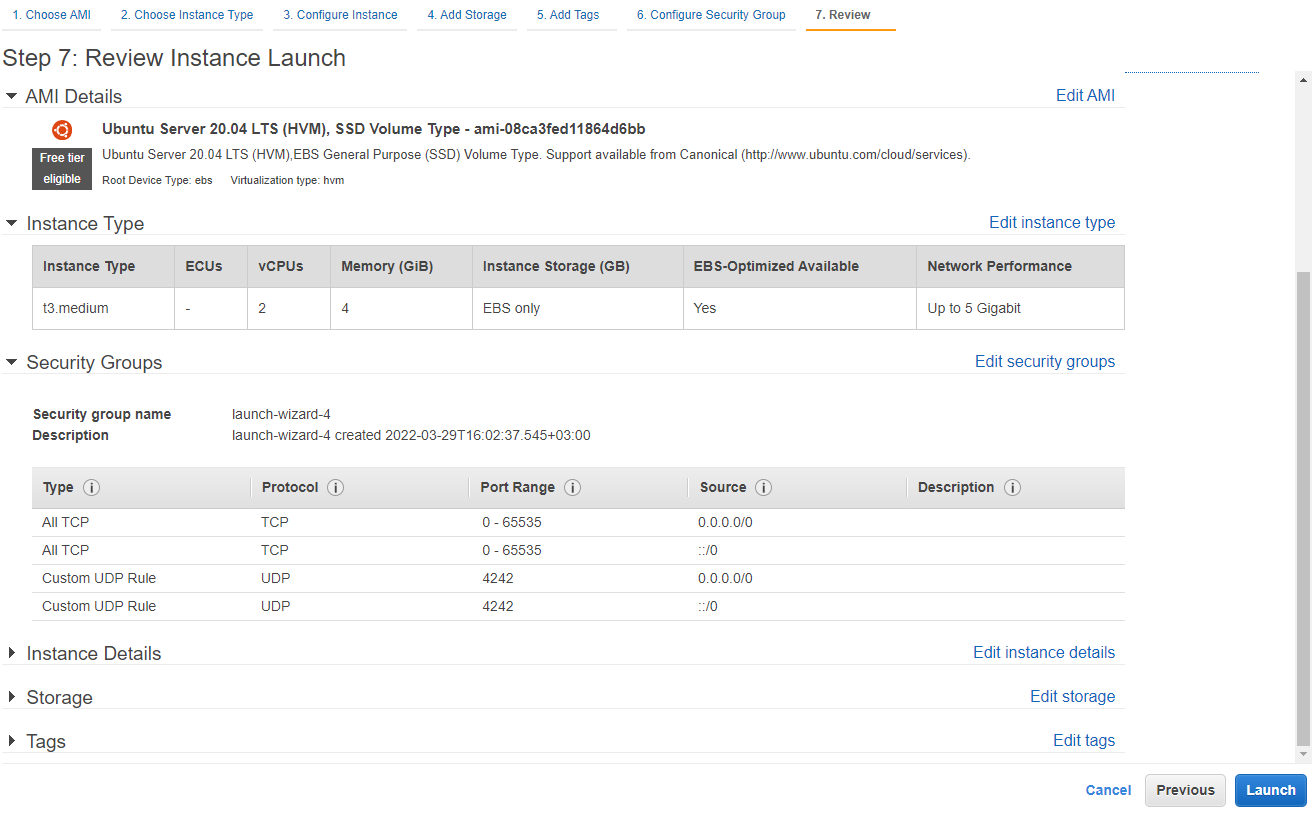
You need to create 2 rules in the security group to open the traffic from internet to the VM:
- ALL TCP, for ports 0-65535, with source anywhere
- Custom UDP, for port 4242, with source anywhere
Then click on "Review and Launch" button
Alternatively you can open just a selection of ports based on your needs, at least ports TCP: 22, 80, 443 for basic usage. To allow Elestio tools (File Explorer, VS Code, web terminal) you should also open ports TCP: 18345,18374,18445. If you want to use our global private ip network you should also allow port UDP: 4242. Finally some specific ports are required based on the app template you have selected, you can find them in the activation email of the software or in our documentation here.
Finally click on Launch, after few seconds will see a confirmation message:
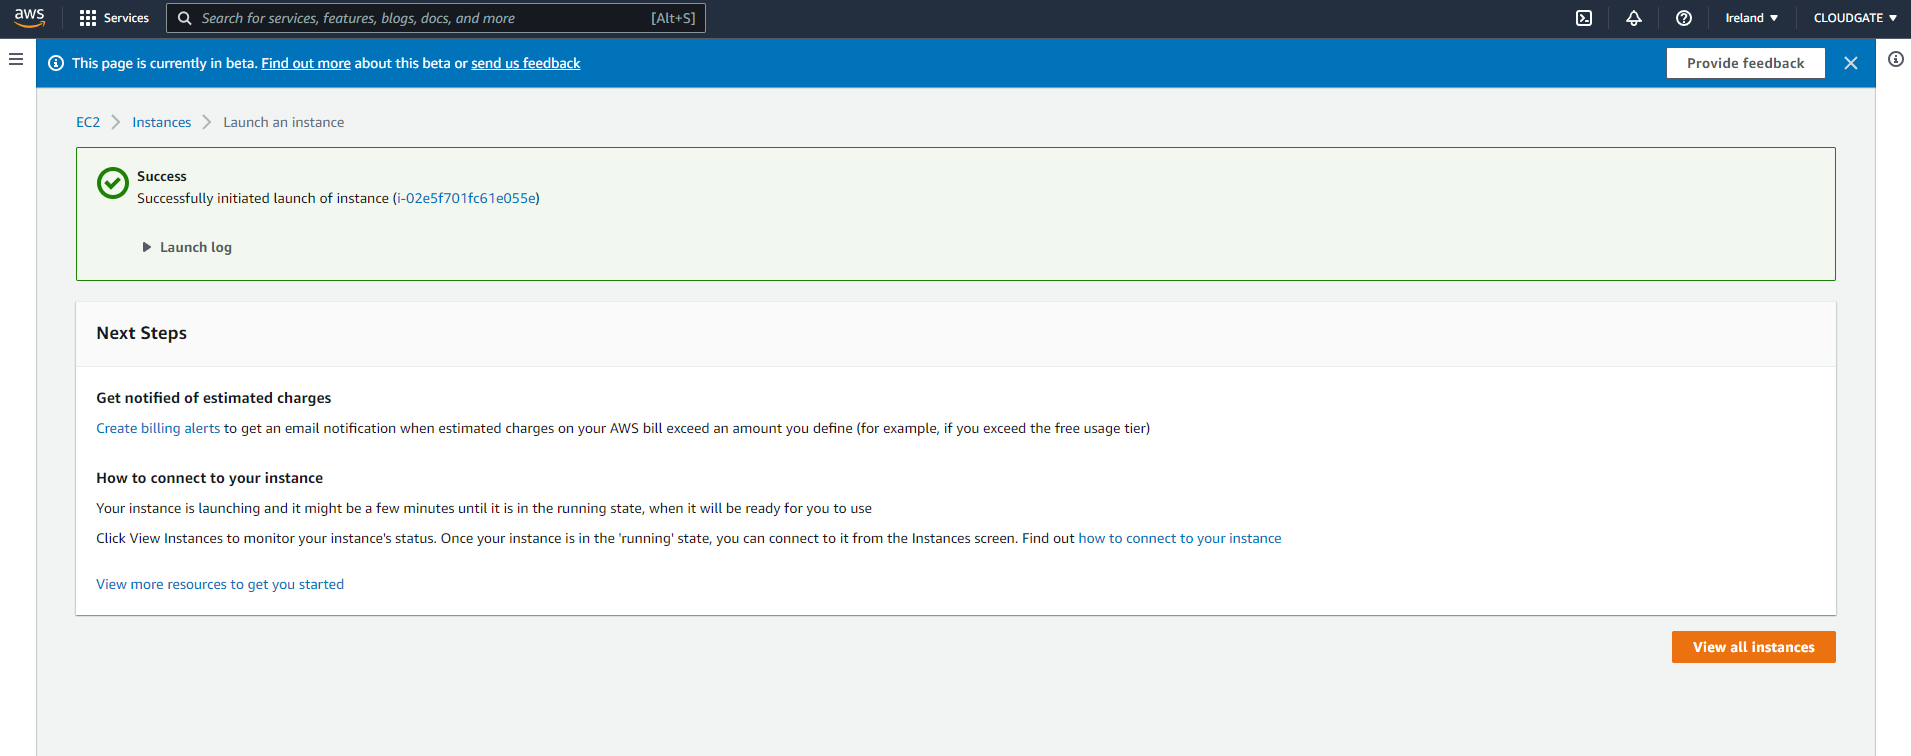
There click on View all instances button

We recommend that you allocate & attach an Elastic IP address to your instance, so the IP address will never change in case you stop the server. Click here to allocate an Elastic IP and then attach it to your VM in EC2.
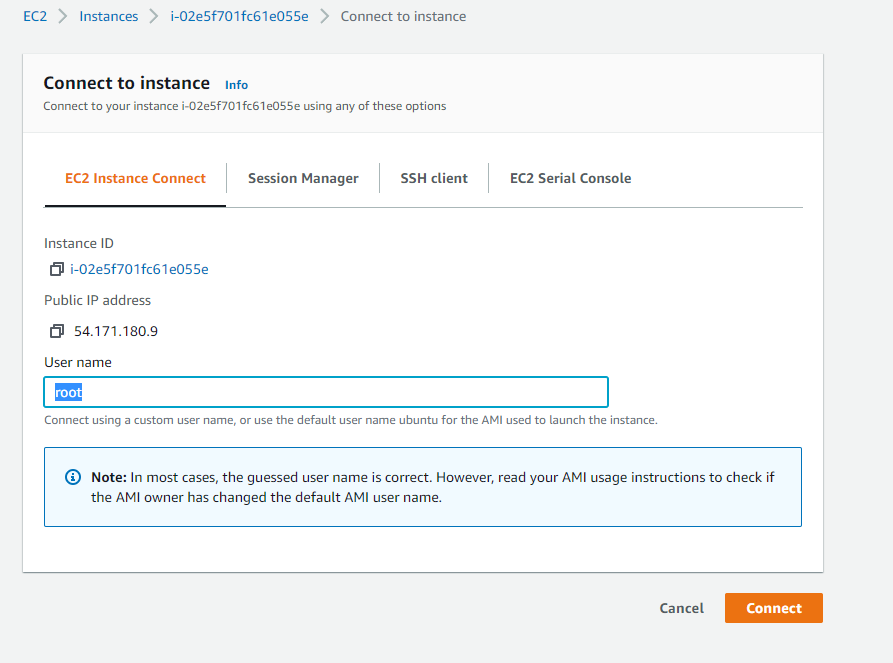
We are now back on the list of all VMs in EC2, from here right click on your new instance and click on Connect in the sub menu

There change the user name to root then click on Connect button
You should then see a terminal shell like this
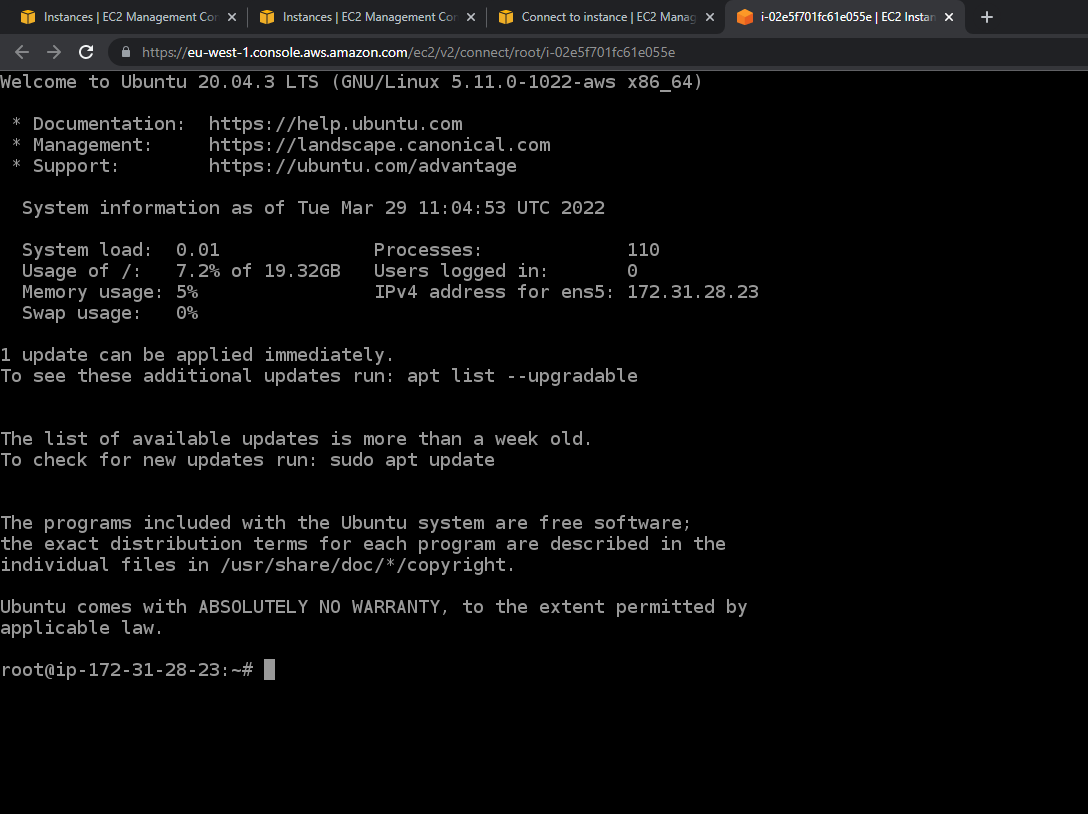
There paste this command into the terminal to activate the remote management for Elestio (This is a temporary key used for the deployment phase, it's automatically removed from the VM right after the deployment)
sudo mkdir -p /root/.ssh/ && sudo echo "ssh-rsa AAAAB3NzaC1yc2EAAAABJQAAAQEAmAlfBn8fy00sHq4DV2lUDNJ73XNwCtSDgHAAEjVt8lVcPOyb+drHK7TmHtF6mIhax/qeFdS/27bqmuu2/+QyXuvG98WL47cJinVkuUNR1bqKfpjwvlGtPkVQTiz2aN9ktY8+RaKoJUg6YrL23wiRgqibRuRYJgG1tIx7O4pUAK8XPsIVw2kvTuaVWu+iQq968KozJP8t1C6U8eqwbV2H8xpMLAsuIA82S1vGkqx42TBLo8XOgQo1ZIoY4dsO+ElvJZ5sqxAg4GB57OIgpaav/2SkKau6Oh4ndkKTJms5kTc2wUm96VVea2eOrOL0TPNQOhb1uy2MgxS9LLFxm2psmQ== elestio-prod-key" >> /root/.ssh/authorized_keys
Then go back to Elestio Dashboard to create a new BYOVM service
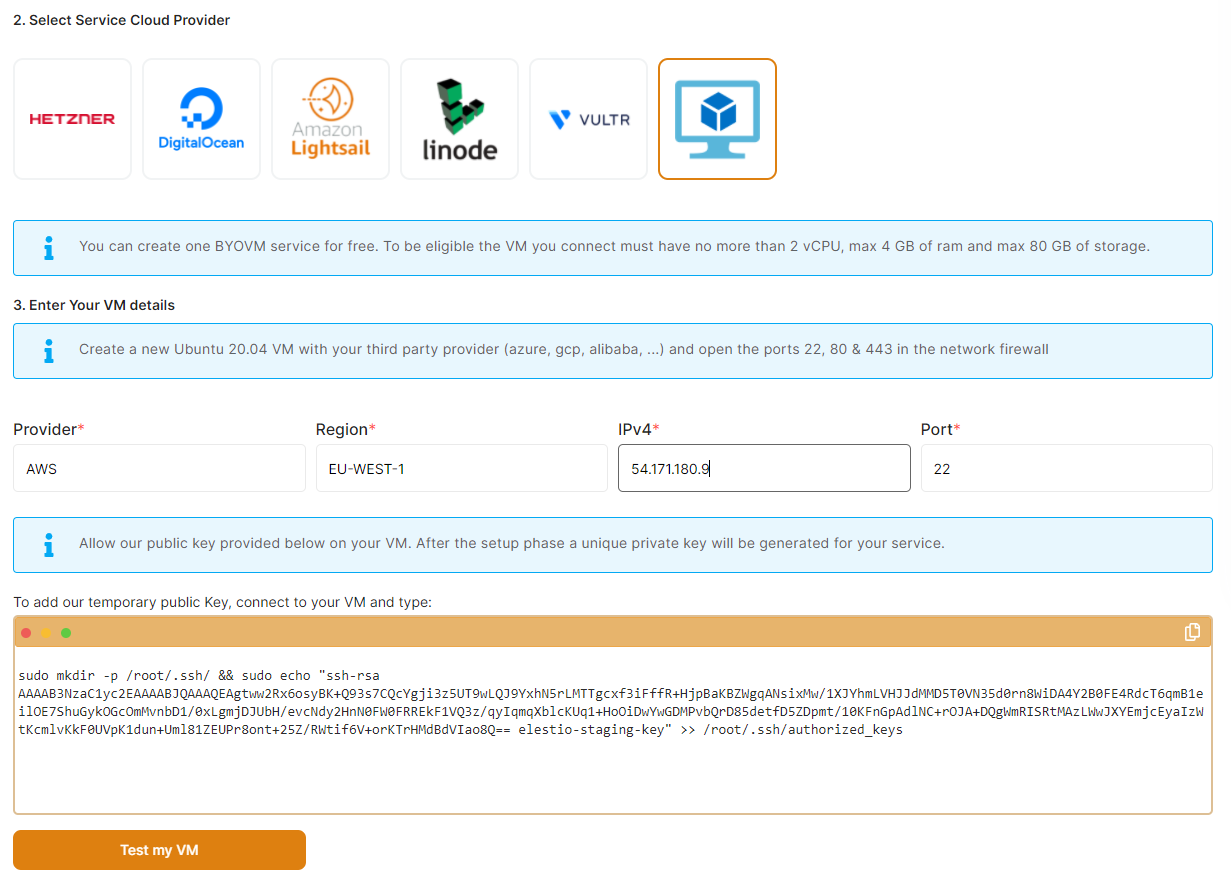
Indicate the provider name, region name and Public IPV4 found in the AWS dashboard then click on "Test my VM"
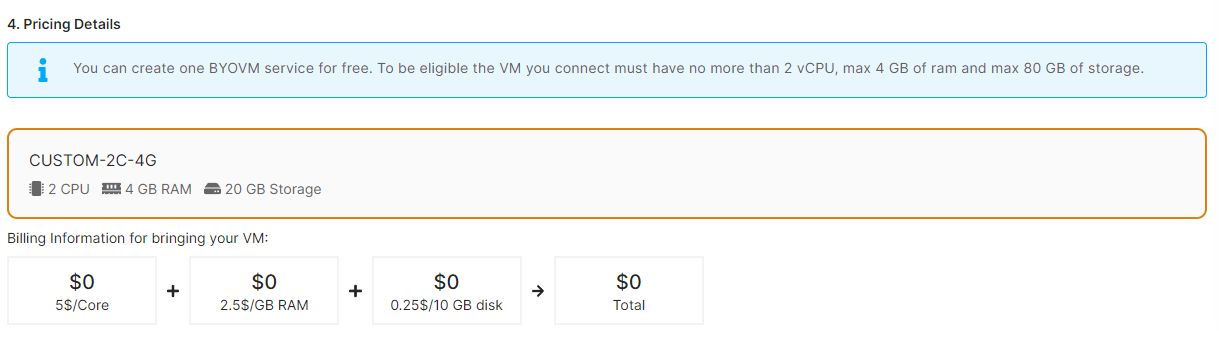
You'll see the pricing calculated based on the number of CPU/RAM/DISK of your AWS EC2 VM, the first BYOVM service is free!
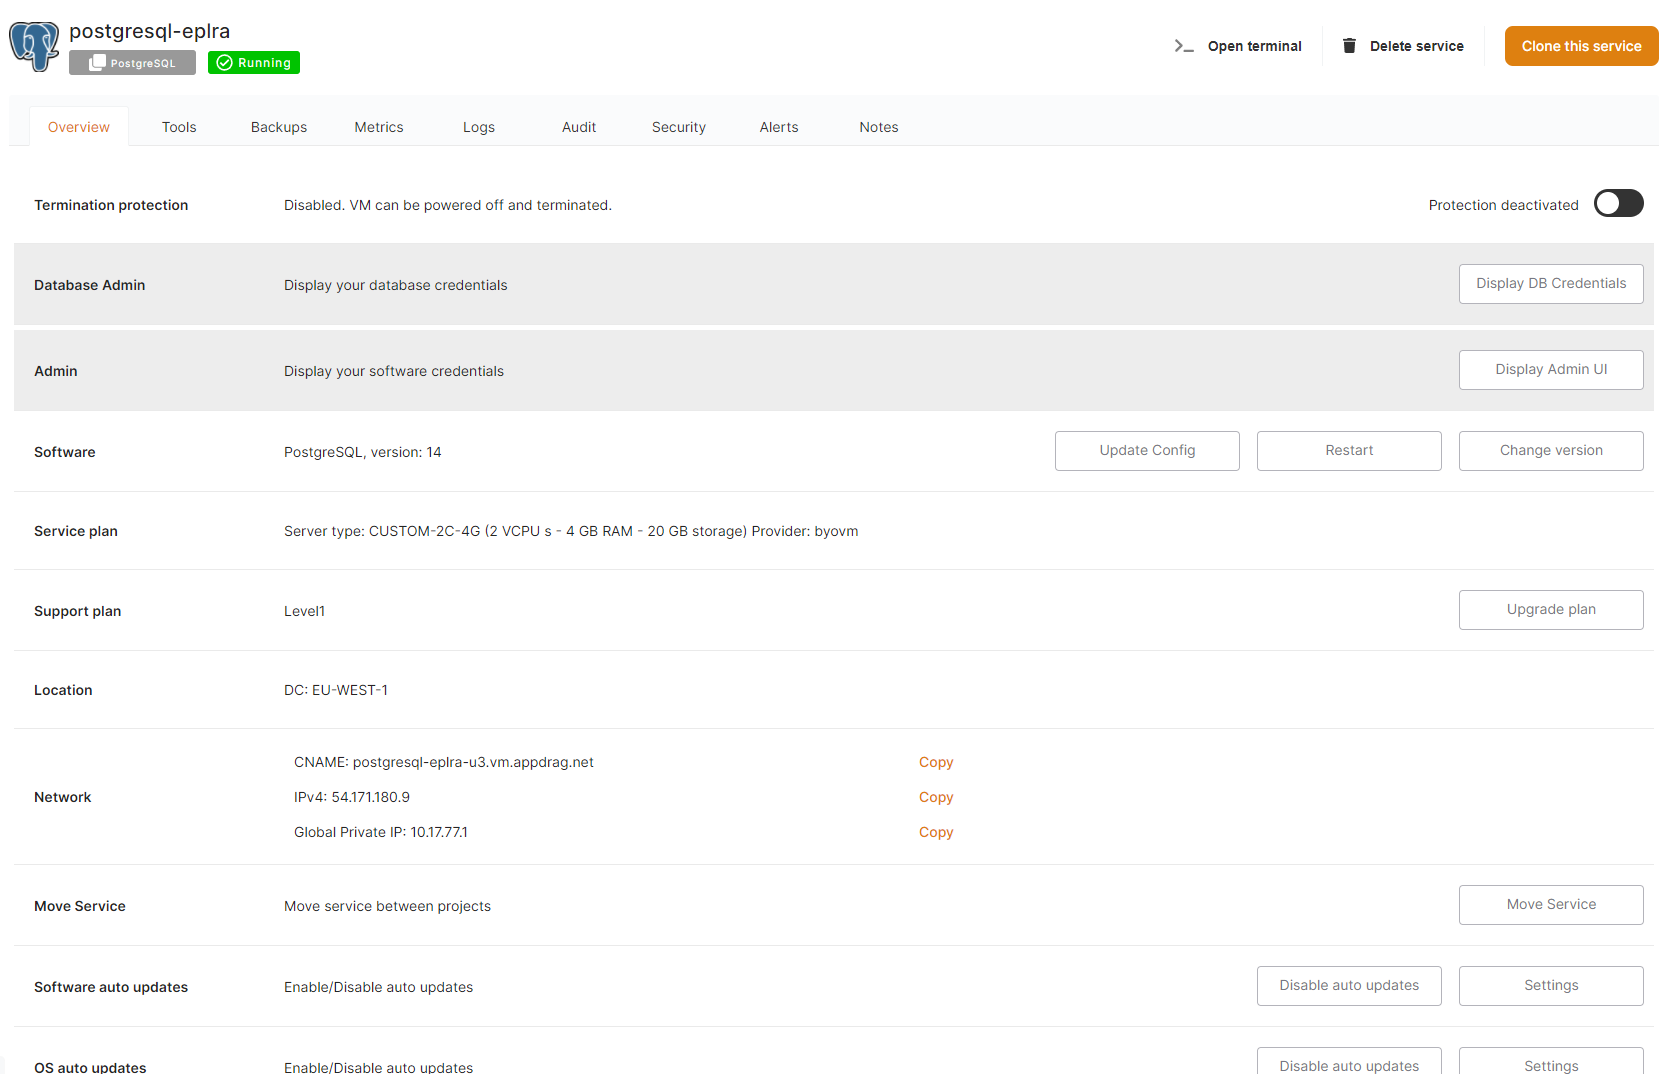
You can then click on "Create service" and you are done! Your service will be deployed in less than 3 minutes and you will receive an email with instructions but of course the service is also accessible in the dashboard.

From there we will take care of backups, monitoring/alerts, OS/software updates and security for you.
BYOVM with AWS EC2 (Beta AWS UI)
This approach is outdated. Instead, you can use our Bring Your Own AWS Account(BYO-AWS) provider option.
You can deploy an Elestio service on your own AWS account with BYOVM
To do it, you will need to create a VM on AWS EC2, first connect to the AWS EC2 dashboard:
https://console.aws.amazon.com/ec2/v2/home#Instances:instanceState=running
There click on "Launch instances" button and select Ubuntu 26
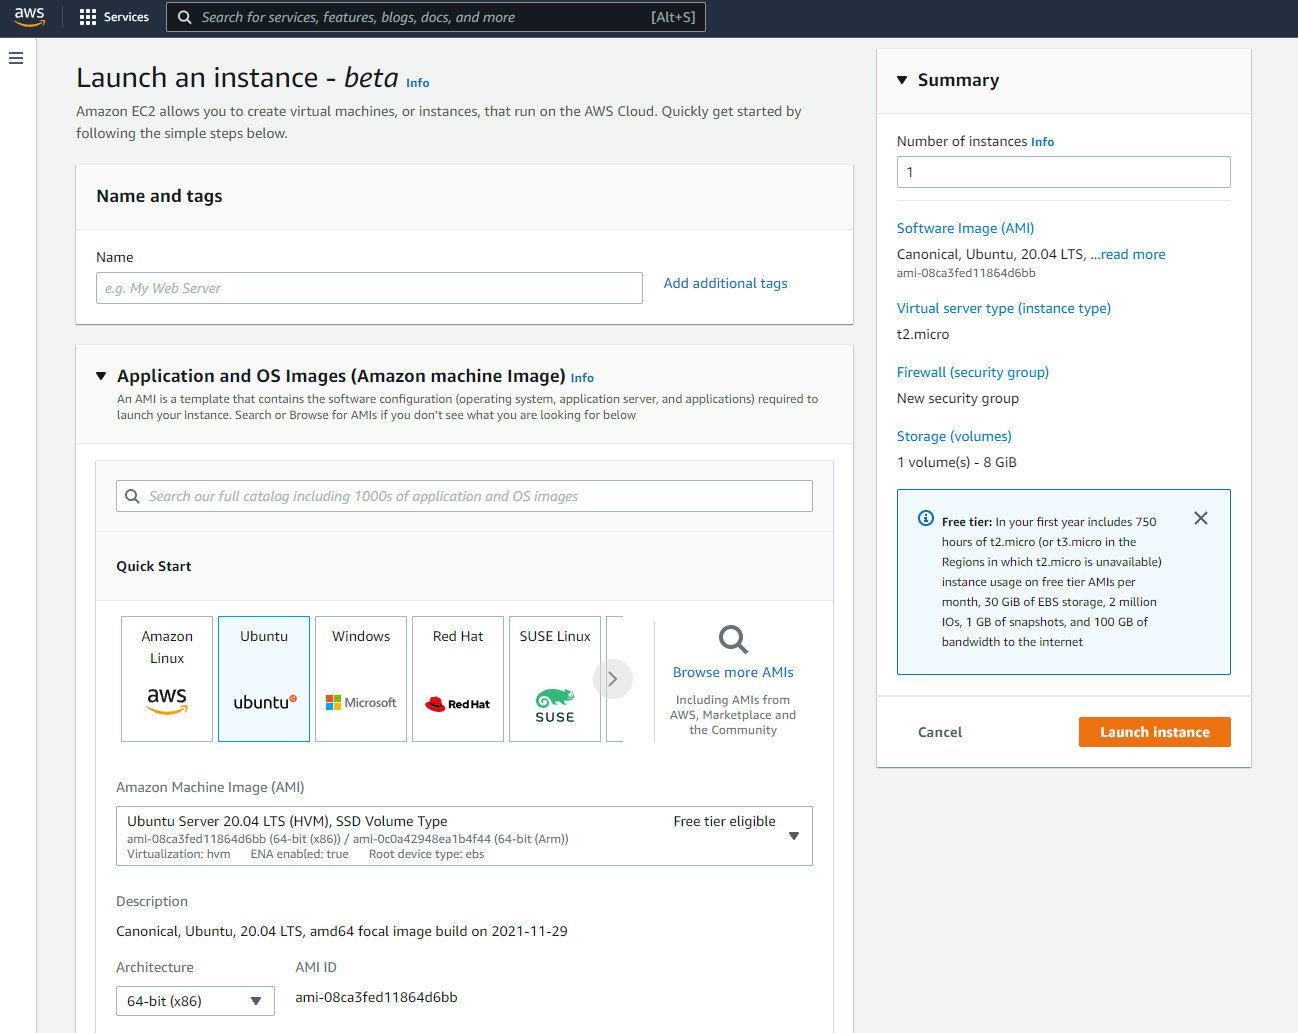
Scroll down to Instance type to select your VM size based on your needs
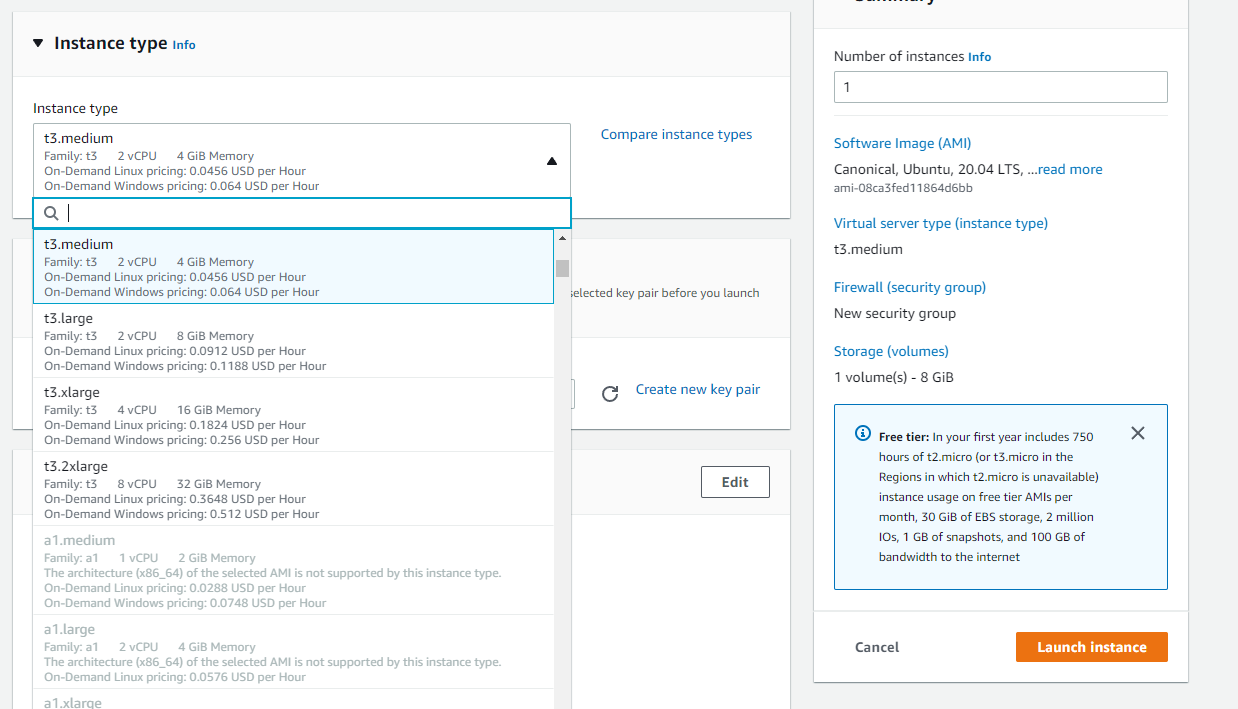
then scroll down to configure network settings and storage
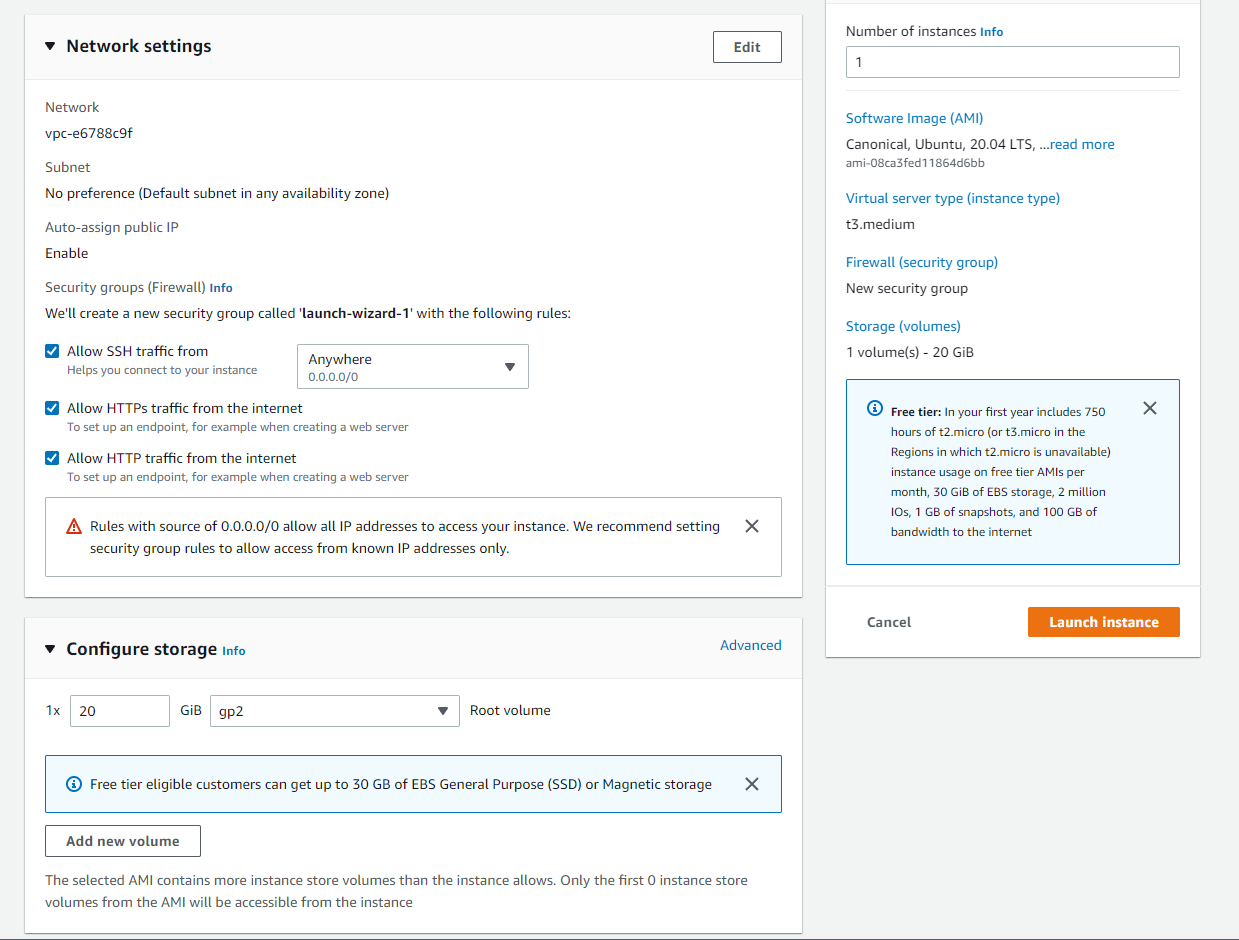
In network settings you should check the 3 checkboxes to allow SSH, HTTP and HTTPS traffic from the internet.
In Storage, you can indicate any disk size above 20GB
If you need to provision multiple VMs, you can change the number of instances in the top right column
Finally click on Launch instance button
If it's your first time deploying a VM you will be asked to create a new key pair
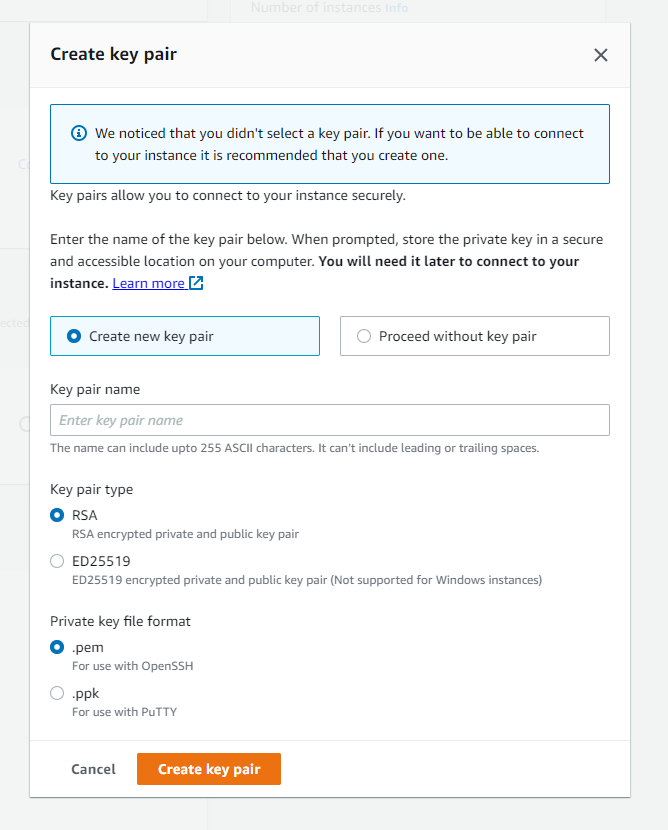
give any key pair name then click on "Create key pair" and SAVE the PEM file preciously on your computer
After a few seconds you will see a confirmation message:
There click on View all instances button
We recommend that you allocate & attach an Elastic IP address to your instance, so the IP address will never change in case you stop the server. Click here to allocate an Elastic IP and then attach it to your VM in EC2.
We are now back on the list of all VMs in EC2, from here right click on your new instance and click on Connect in the sub menu
There change the user name to root, then click on Connect button
You should then see a terminal shell like this
There paste this command into the terminal to activate the remote management for Elestio (This is a temporary key used for the deployment phase, it's automatically removed from the VM right after the deployment)
sudo mkdir -p /root/.ssh/ && sudo echo "ssh-rsa AAAAB3NzaC1yc2EAAAABJQAAAQEAmAlfBn8fy00sHq4DV2lUDNJ73XNwCtSDgHAAEjVt8lVcPOyb+drHK7TmHtF6mIhax/qeFdS/27bqmuu2/+QyXuvG98WL47cJinVkuUNR1bqKfpjwvlGtPkVQTiz2aN9ktY8+RaKoJUg6YrL23wiRgqibRuRYJgG1tIx7O4pUAK8XPsIVw2kvTuaVWu+iQq968KozJP8t1C6U8eqwbV2H8xpMLAsuIA82S1vGkqx42TBLo8XOgQo1ZIoY4dsO+ElvJZ5sqxAg4GB57OIgpaav/2SkKau6Oh4ndkKTJms5kTc2wUm96VVea2eOrOL0TPNQOhb1uy2MgxS9LLFxm2psmQ== elestio-prod-key" >> /root/.ssh/authorized_keys
We also need to allow all traffic to the VM in the AWS EC2 instance list click on your instance, then click on the security tab

There click on the Security group in blue (launch-wizard-1 in the screenshot above)

Click on "Edit inbound rules" to be able to allow all traffic on the VM
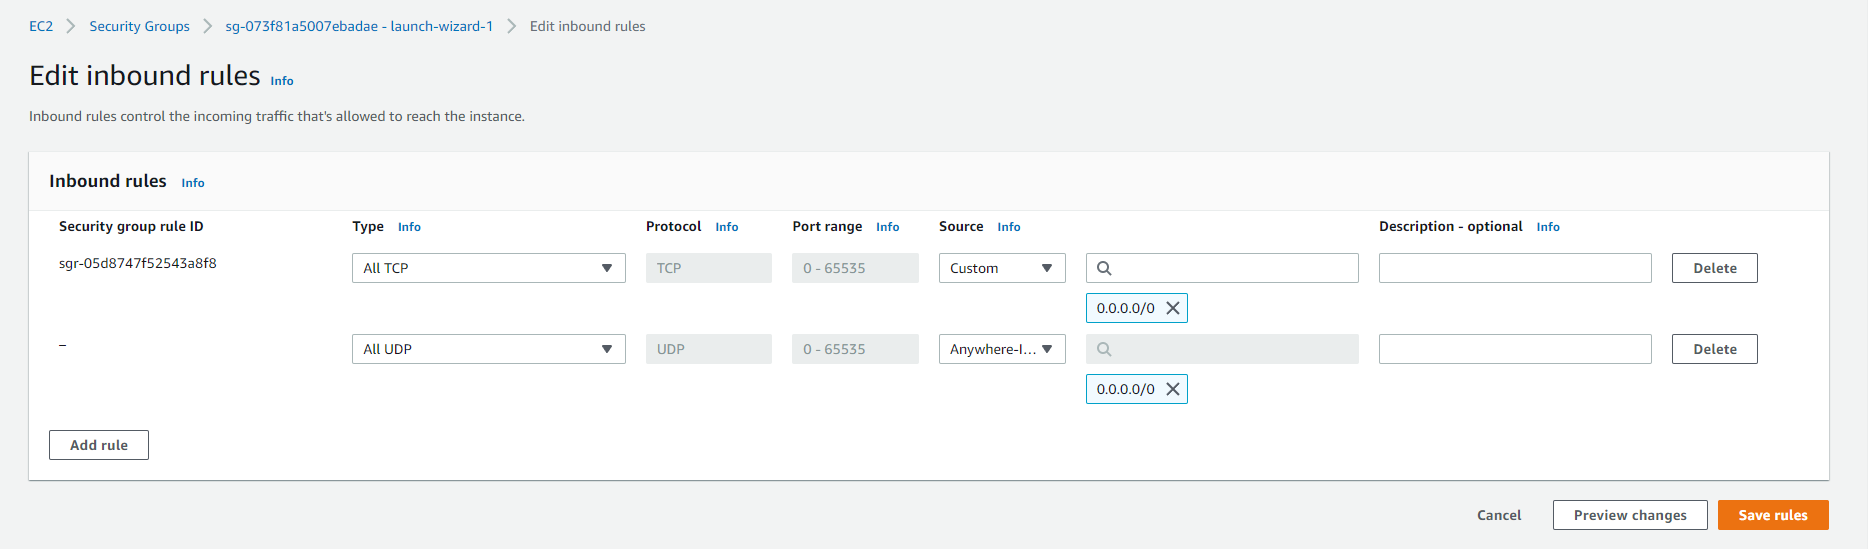
Here change the rule to allow ALL TCP traffic & ALL UDP traffic from anywhere
Alternatively, you can open just a selection of ports based on your needs, at least ports TCP: 22, 80, 443 for basic usage. To allow Elestio tools (File Explorer, VS Code, web terminal) you should also open ports TCP: 18345,18374,18445.
If you want to use our global private ip network you should also allow port UDP: 4242
Finally, some specific ports are required based on the template you have selected; you can find them in the activation email of the software or in our documentation here.
Then go back to Elestio Dashboard to create a new BYOVM service
Indicate the provider name, region name and Public IPV4 found in the AWS dashboard then click on "Test my VM."
You'll see the pricing calculated based on the number of CPU/RAM/DISK of your AWS EC2 VM;
You can then click on "Create service," and you are done! Your service will be deployed in less than 3 minutes and you will receive an email with instructions but of course the service is also accessible in the dashboard.
From there we will take care of backups, monitoring/alerts, OS/software updates and security for you.
Open Telekom Cloud (OTC) or BYO-TCloud (Bring Your Own TCloud Account)
Elestio supports Open Telekom Cloud (OTC) as a Bring Your Own Cloud (BYO-TCloud) provider. This allows you to deploy and manage services directly on your own OTC infrastructure while Elestio handles automation, provisioning, monitoring, and operations.
This guide explains how to prepare your OTC account and connect it to Elestio.
What You Will Need
Before starting, make sure you have the following credentials:
| Credential | Description | Example |
|---|---|---|
| Access Key (AK) | OTC IAM user access key | JDIXXXXXXXXXXXXXXXXXXX |
| Secret Key (SK) | OTC IAM user secret key | wJalrXUtnFEMI... |
| Domain Name | OTC account domain identifier | OTC00000000001 |
Where to find Domain Name:
Log in to the OTC Console → click your account name (top-right) → open My Account / Account Info. The domain name is listed there and typically starts withOTC00.
Step 1: Create a Dedicated IAM User
We strongly recommend creating a dedicated IAM user for Elestio instead of using root credentials.
-
Log in to the OTC Console: https://console.otc.t-systems.com
-
Go to IAM (Identity and Access Management)
-
Open Users from the sidebar
-
Click Create User
-
Fill in:
-
Username:
elestio-service(or any preferred name) -
Access Type: Programmatic access
-
Password: Not required
-
-
Click Next → Create
-
Copy or download:
-
Access Key (AK)
-
Secret Key (SK)
-
⚠️ The Secret Key is shown only once. Store it securely.
Step 2: Assign Required IAM Permissions
Elestio requires permissions to provision and manage cloud infrastructure.
Go to:
IAM → User Groups → Create Group (or use existing group)
Then assign the following policies with scope:
Scope must be: All resources [Existing and future projects]
Required Policies / Scope
1. ECS Admin
Provides full control over Elastic Cloud Servers.
Used for:
-
Creating and deleting VMs
-
Managing server lifecycle
-
Keypair management for SSH access
2. ECS FullAccess
Extends ECS Admin with deeper instance operations.
Used for:
-
Reboot, power control, and resizing
-
Instance state management APIs
3. EVS FullAccess
Provides full access to Elastic Volume Service (block storage).
Used for:
-
Creating and attaching root volumes
-
Managing snapshots and backups
-
Expanding and deleting storage volumes
4. VPC Administrator
Provides full network management permissions.
Used for:
-
VPC and subnet creation
-
Security group configuration
-
Elastic IP (EIP) management
-
Firewall rule automation
5. KMS CMKReadOnlyAccess
Read-only access to Key Management Service (KMS).
Used for:
-
Fetching
evs/defaultencryption key -
Encrypting root volumes at creation time
⚠️ Ensure the
evs/defaultkey exists in: OTC Console → DEW → Key Management Service
If missing, create a key with the alias: evs/default
6. DNS Administrator
Provides full control over DNS and reverse DNS (PTR) records.
Used for:
-
Automatic PTR record configuration
-
Email deliverability support
-
SSL validation compatibility
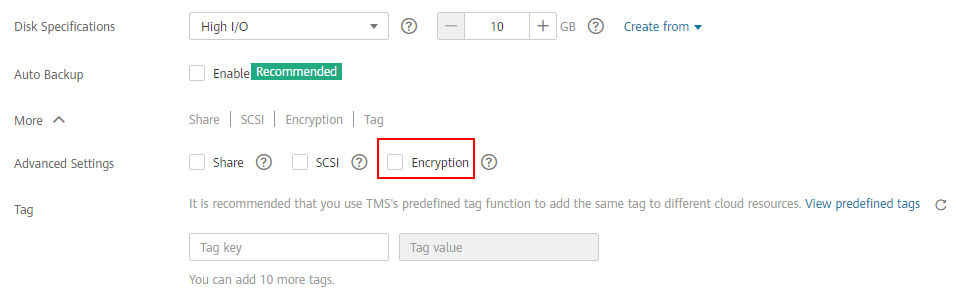
Step 3: Enable Encrypted Disk Support (One-Time Setup per region)
Elestio uses encrypted EVS volumes by default. We do not create encryption keys ourselves; instead, we use the default encryption key that already exists in your OTC account.
For first-time use of encrypted disks, OTC requires a service agency to be created before encrypted volumes can be provisioned.
Create the Required Agency
If this is the first encrypted disk being created in your OTC account:
-
Log in to the OTC Console.
-
Navigate to Elastic Volume Service (EVS).
-
Click Create Disk.
-
Enable the Encryption checkbox.

-
When prompted, accept the confirmation dialog to create the required agency by selecting the button "OK."
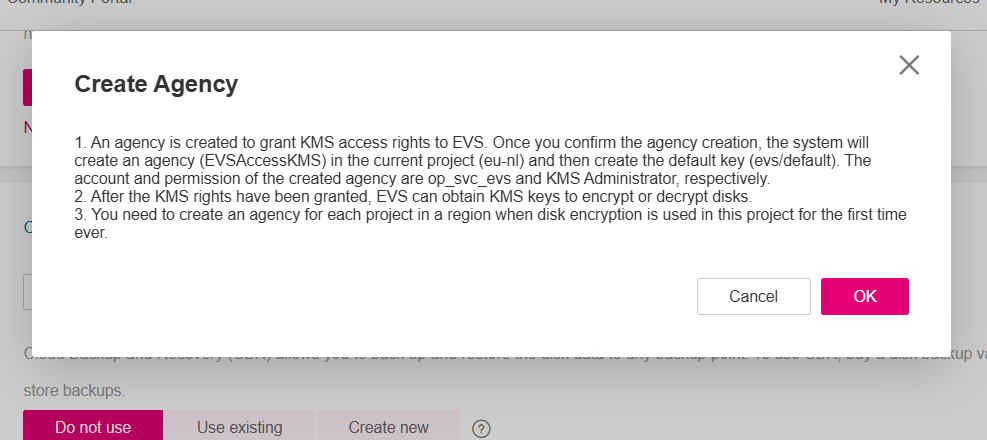
Once the agency has been created, you can close the process, and encrypted EVS volumes can be provisioned successfully by Elestio.
Important: This is a one-time setup per OTC account and per region. After the agency has been created, no further action is required. If you plan to deploy resources in multiple OTC regions, repeat this process once in each region you intend to use.
Reference:
These same instructions are documented in the OTC EVS documentation under Figure 2:
Step 4: Create or Retrieve Access Keys
If you didn’t save credentials during user creation:
-
Go to IAM → Users
-
Select your
elestio-serviceuser -
Open Security Credentials
-
Click Create Access Key
-
Copy:
-
Access Key (AK)
-
Secret Key (SK)
-
⚠️ Secret Key cannot be retrieved again after creation.
Step 5: Find Your OTC Domain Name
-
Log in to OTC Console
-
Click your account name (top-right)
-
Open My Credentials / Account Info
-
Copy the Domain Name
Example:
OTC00000000001Step 6: Connect OTC to Elestio
-
Log in to your Elestio dashboard https://dash.elest.io
- Select the service that you want to deploy.
-
Go to Cloud Provider
-
Select BYO-TCloud Open Telekom Cloud (OTC)
-
Enter:
-
Access Key (AK)
-
Secret Key (SK)
-
Domain Name
-
-
Click Verify Config
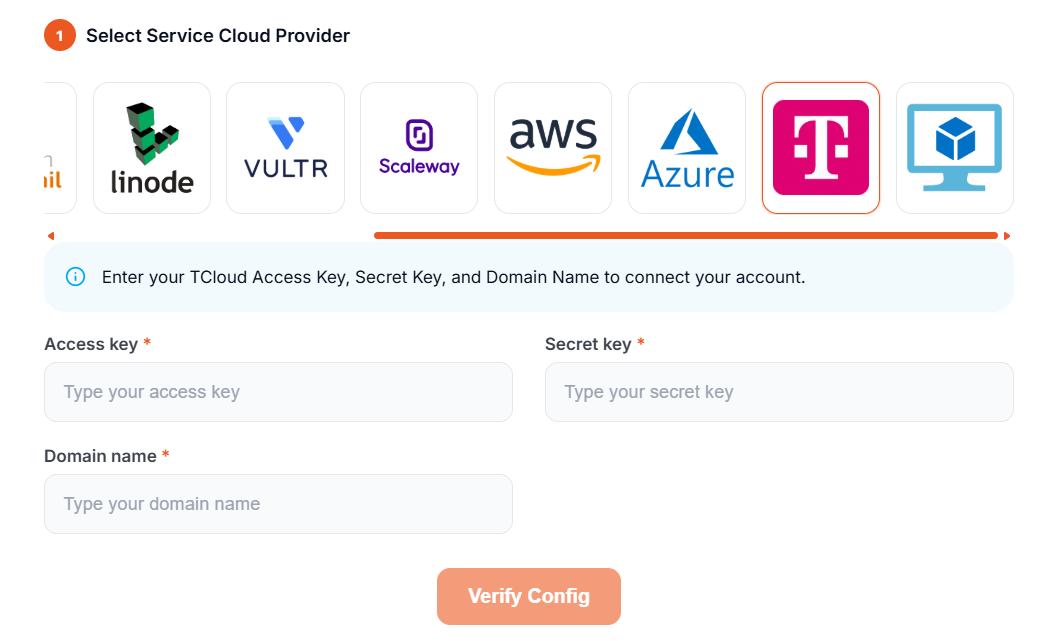
Elestio will validate your credentials and permissions automatically.
Troubleshooting
Invalid credentials
-
Ensure no extra spaces in AK/SK
-
Verify Domain Name matches OTC console
-
Confirm IAM user is active
Missing permissions
-
Ensure all 6 policies are assigned
-
Check scope:
All resources [Existing and future projects]
No OTC projects found
-
Ensure at least one region project is enabled (e.g., eu-de and eu-nl)
-
Contact OTC support if missing
Missing EVS/default key
-
Go to DEW → Key Management Service
-
Create a key with alias:
evs/default
Existing services are inaccessible after the update
-
Ensure IAM user has access to all regions
-
Verify region mapping for existing resources
Summary
| Step | Action |
|---|---|
| 1 | Create an IAM user with programmatic access |
| 2 | Assign required IAM policies |
| 3 | Generate Access Key & Secret Key |
| 4 | Retrieve Domain Name |
| 5 | Connect in Elestio and verify |
Once connected, Elestio will fully manage provisioning, scaling, backups, and lifecycle operations on your OTC infrastructure.