DB Migration service
- MySQL Database Migration to Elestio
- PostgreSQL Database Migration to Elestio
- MariaDB Database Migration to Elestio
- ColumnStore Database Migration to Elestio
- Redis Database Migration to Elestio
- KeyDB Database Migration to Elestio
- Valkey Database Migration to Elestio
- MongoDB Database Migration to Elestio
- TimescaleDB Database Migration to Elestio
- Hydra Database Migration to Elestio
MySQL Database Migration to Elestio
Elestio provides a robust and user-friendly platform for managing your database migrations seamlessly. Whether you are migrating from an on-premises MySQL database or from another cloud provider, Elestio's migration tool simplifies the process. By following a few straightforward steps, you can securely and efficiently move your MySQL databases to Elestio, ensuring minimal downtime and disruption to your operations.
This guide will walk you through the process of migrating your MySQL database from an external source to Elestio. We will cover everything from configuring your migration settings, validating the connection to your source database, and finally starting the migration process while monitoring its progress.
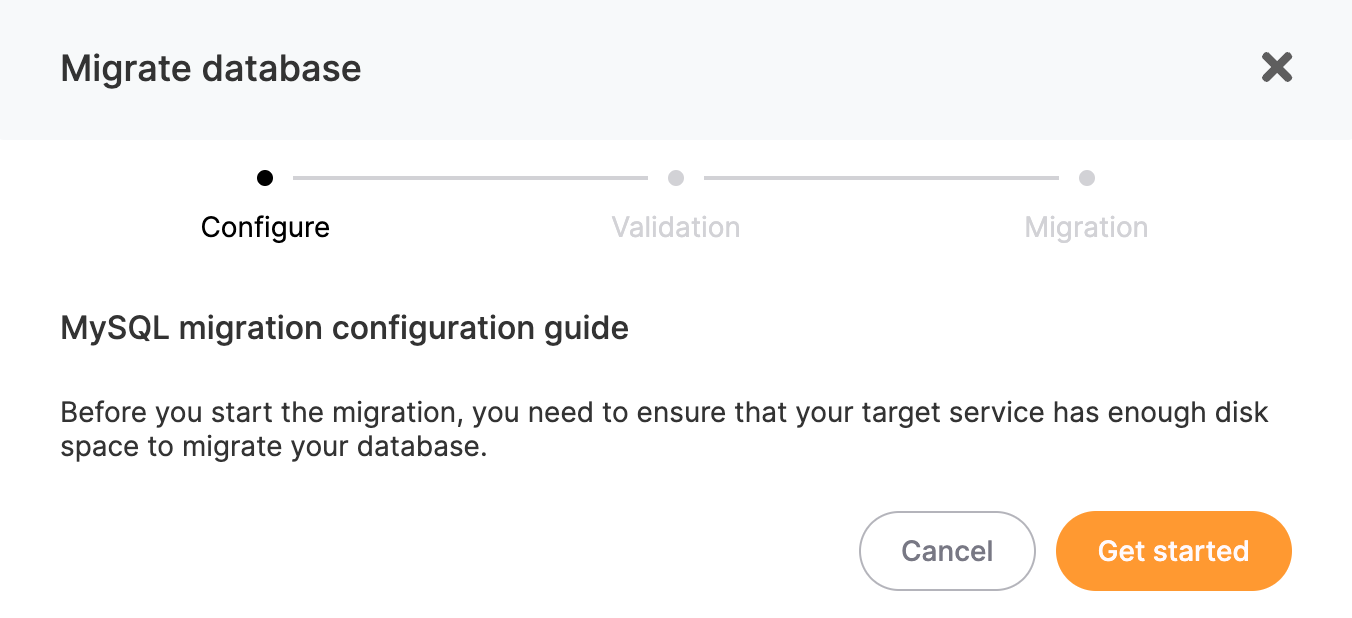
Step 1 - Configure
- Go to the overview of your MySQL service on Elestio.

- Click on the Migrate Database button.
- A modal window will open, ensure that your target service has enough disk space to accommodate your database
- Click on Get started button.

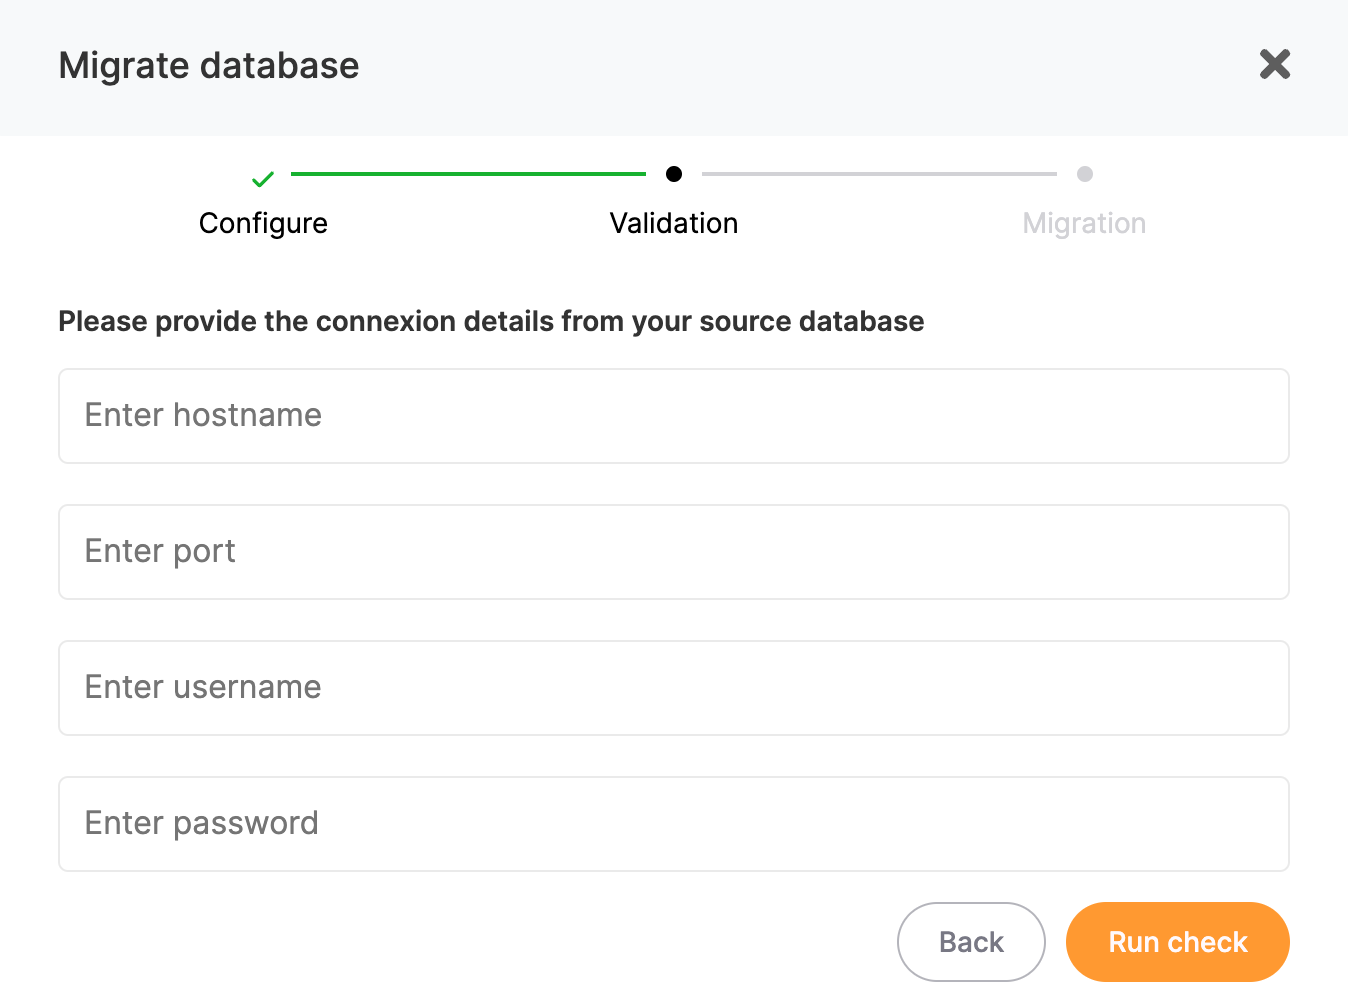
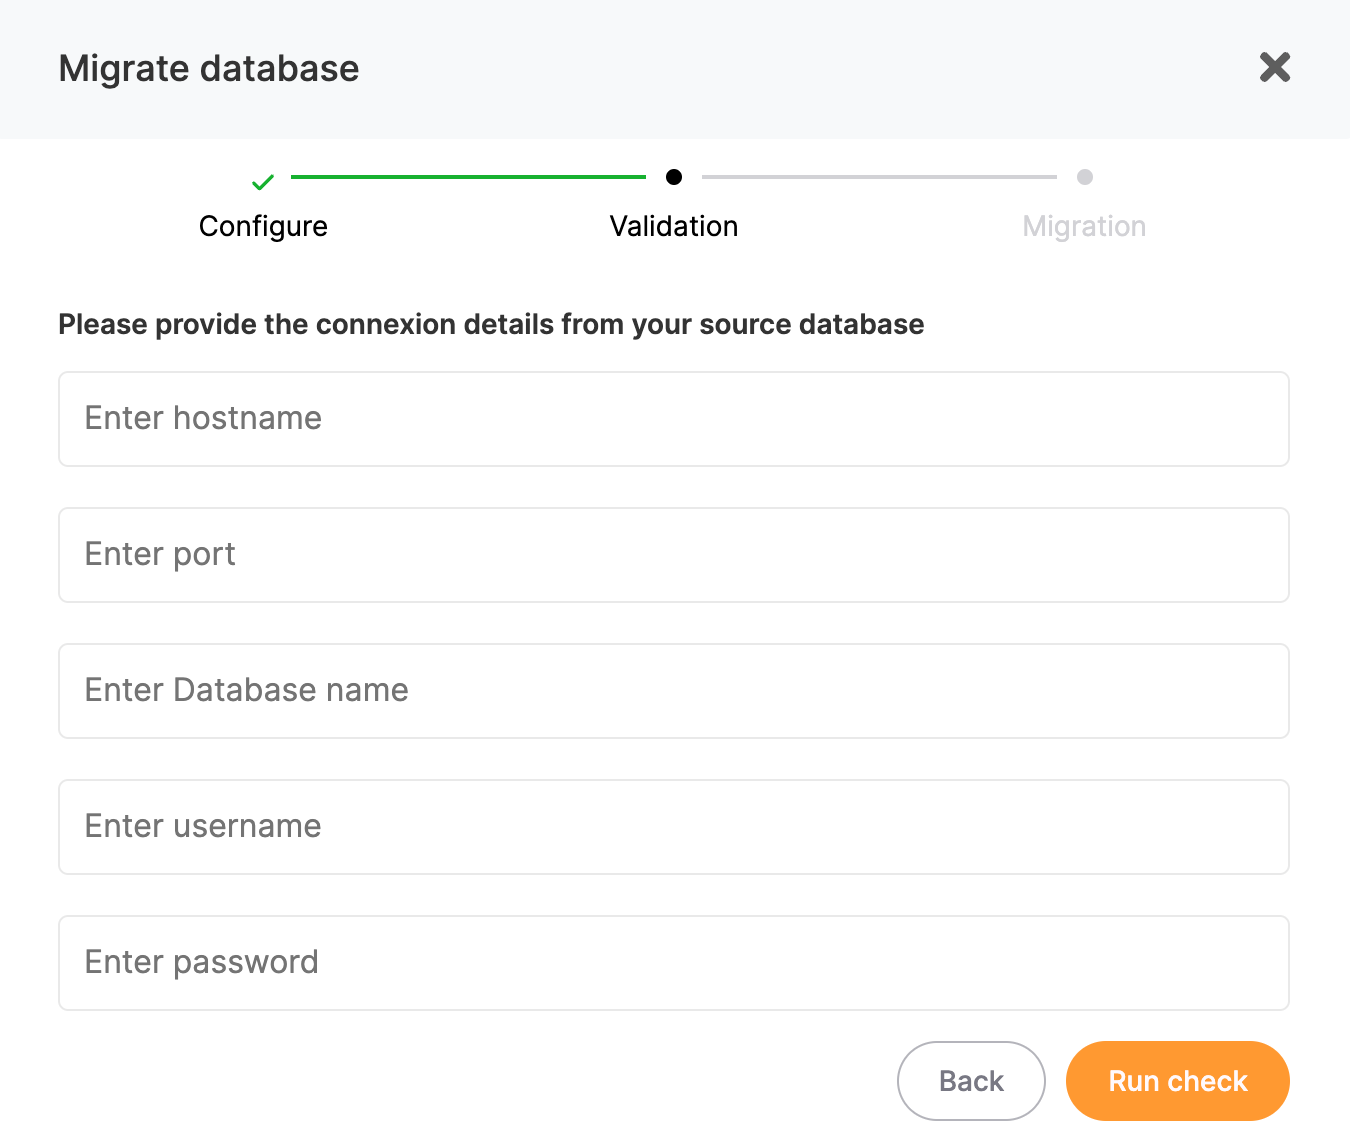
Step 2 - Validation
- You need to provide the connection details to establish a connection to your source database, enter the required details:
- Hostname
- Port
- Username
- Password
- Click on Run Check to validate the connection.
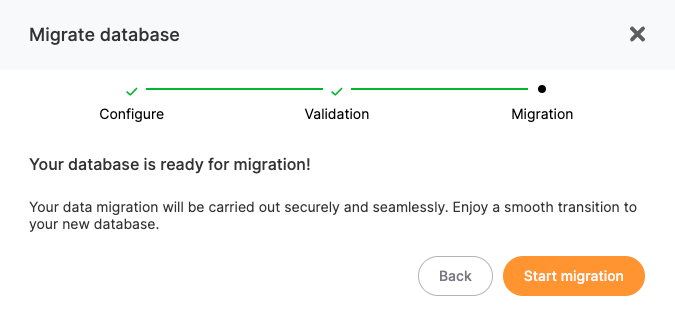
Step 3 - Migration
- If all checks pass with no errors, you can trigger the migration by selecting Start migration.
- Once the migration starts, you can monitor the progress through the migration logs displayed in real-time.

PostgreSQL Database Migration to Elestio
Elestio provides a robust and user-friendly platform for managing your database migrations seamlessly. Whether you are migrating from an on-premises PostgreSQL database or from another cloud provider, Elestio's migration tool simplifies the process. By following a few straightforward steps, you can securely and efficiently move your PostgreSQL databases to Elestio, ensuring minimal downtime and disruption to your operations.
This guide will walk you through the process of migrating your PostgreSQL database from an external source to Elestio. We will cover everything from configuring your migration settings, validating the connection to your source database, and finally starting the migration process while monitoring its progress.
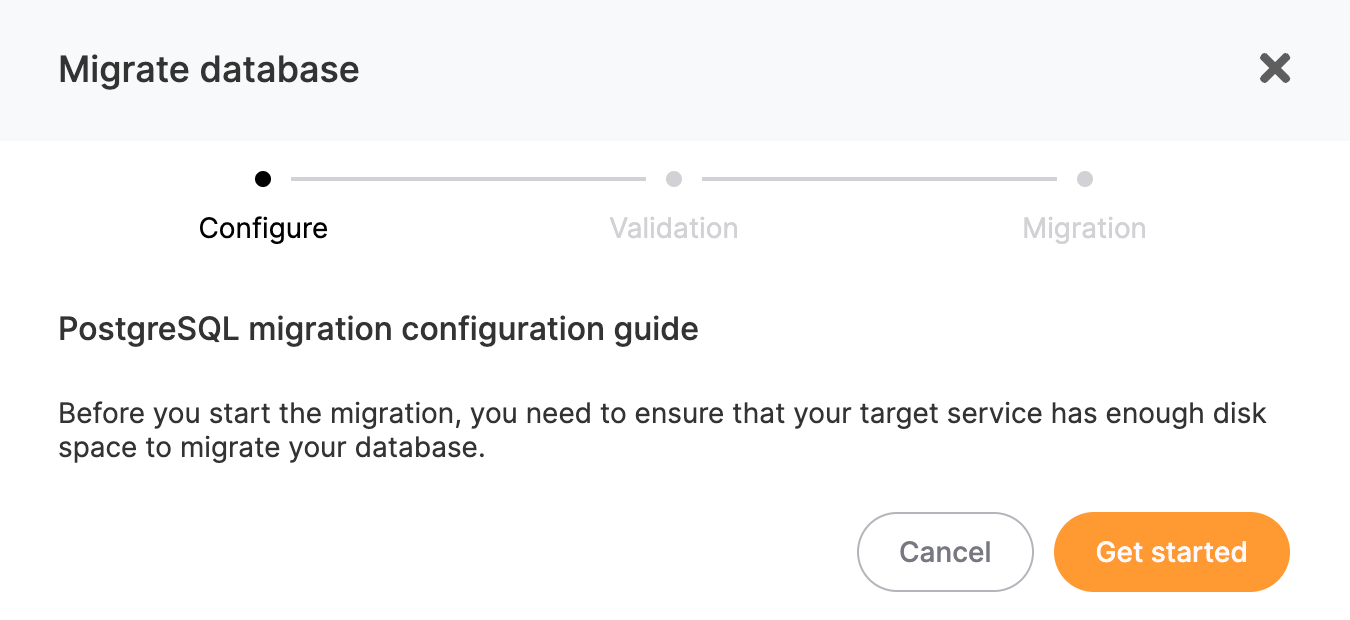
Step 1 - Configure
- Go to the overview of your PostgreSQL service on Elestio.
- Click on the Migrate Database button.
- A modal window will open, ensure that your target service has enough disk space to accommodate your database
- Click on Get started button.
Step 2 - Validation
- You need to provide the connection details to establish a connection to your source database, enter the required details:
- Hostname
- Port
- Database Name
- Username
- Password
- Click on Run Check to validate the connection.
Step 3 - Migration
- If all checks pass with no errors, you can trigger the migration by selecting Start migration.
- Once the migration starts, you can monitor the progress through the migration logs displayed in real-time.
MariaDB Database Migration to Elestio
Elestio provides a robust and user-friendly platform for managing your database migrations seamlessly. Whether you are migrating from an on-premises MariaDB database or from another cloud provider, Elestio's migration tool simplifies the process. By following a few straightforward steps, you can securely and efficiently move your MariaDB databases to Elestio, ensuring minimal downtime and disruption to your operations.
This guide will walk you through the process of migrating your MariaDB database from an external source to Elestio. We will cover everything from configuring your migration settings, validating the connection to your source database, and finally starting the migration process while monitoring its progress.
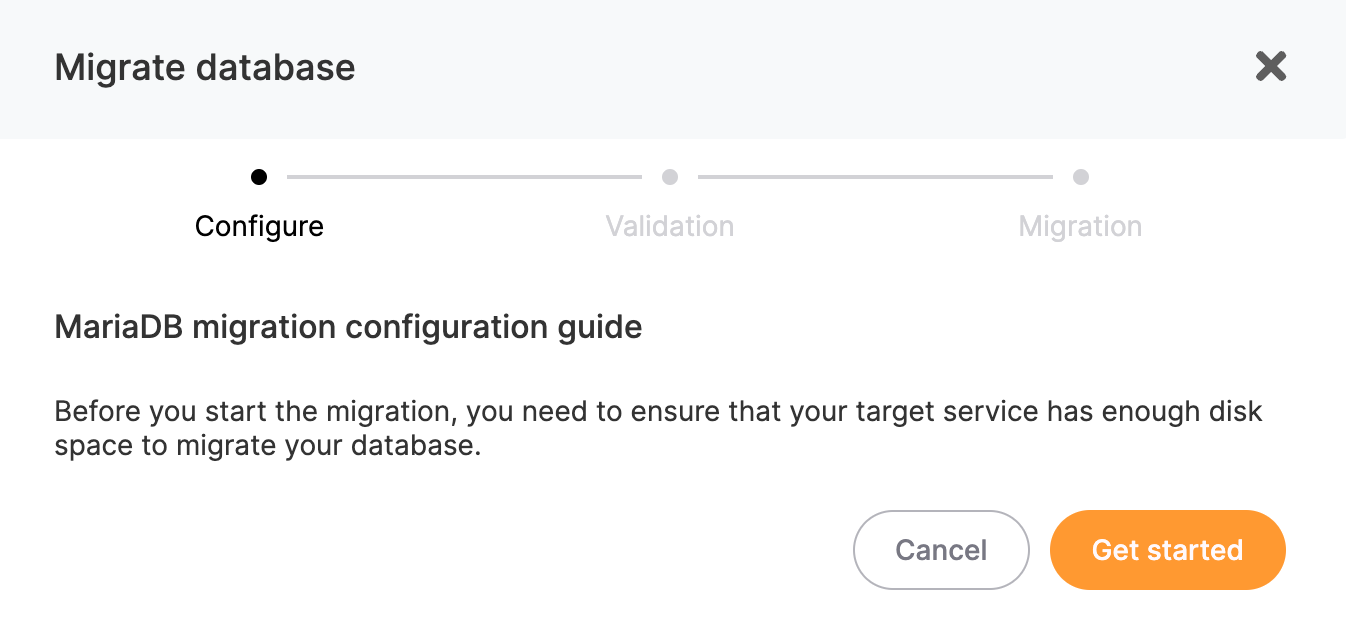
Step 1 - Configure
- Go to the overview of your MariaDB service on Elestio.
- Click on the Migrate Database button.
- A modal window will open, ensure that your target service has enough disk space to accommodate your database
- Click on Get started button.
Step 2 - Validation
- You need to provide the connection details to establish a connection to your source database, enter the required details:
- Hostname
- Port
- Username
- Password
- Click on Run Check to validate the connection.
Step 3 - Migration
- If all checks pass with no errors, you can trigger the migration by selecting Start migration.
- Once the migration starts, you can monitor the progress through the migration logs displayed in real-time.
ColumnStore Database Migration to Elestio
Elestio provides a robust and user-friendly platform for managing your database migrations seamlessly. Whether you are migrating from an on-premises ColumnStore database or from another cloud provider, Elestio's migration tool simplifies the process. By following a few straightforward steps, you can securely and efficiently move your ColumnStore databases to Elestio, ensuring minimal downtime and disruption to your operations.
This guide will walk you through the process of migrating your ColumnStore database from an external source to Elestio. We will cover everything from configuring your migration settings, validating the connection to your source database, and finally starting the migration process while monitoring its progress.
Step 1 - Configure
- Go to the overview of your ColumnStore service on Elestio.
- Click on the Migrate Database button.
- A modal window will open, ensure that your target service has enough disk space to accommodate your database
- Click on Get started button.

Step 2 - Validation
- You need to provide the connection details to establish a connection to your source database, enter the required details:
- Hostname
- Port
- Database name
- Username
- Password
- Click on Run Check to validate the connection.

Step 3 - Migration
- If all checks pass with no errors, you can trigger the migration by selecting Start migration.
- Once the migration starts, you can monitor the progress through the migration logs displayed in real-time.
Redis Database Migration to Elestio
Elestio provides a robust and user-friendly platform for managing your database migrations seamlessly. Whether you are migrating from an on-premises Redis database or from another cloud provider, Elestio's migration tool simplifies the process. By following a few straightforward steps, you can securely and efficiently move your Redis databases to Elestio, ensuring minimal downtime and disruption to your operations.
This guide will walk you through the process of migrating your Redis database from an external source to Elestio. We will cover everything from configuring your migration settings, validating the connection to your source database, and finally starting the migration process while monitoring its progress.
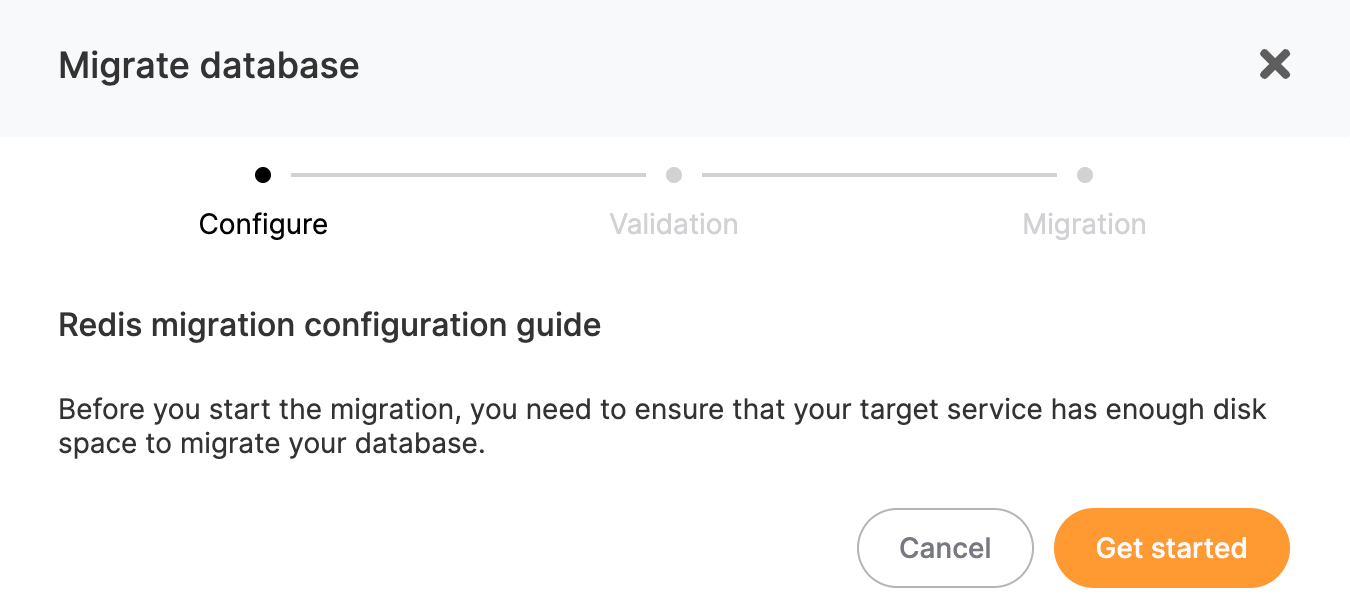
Step 1 - Configure
- Go to the overview of your Redis service on Elestio.
- Click on the Migrate Database button.
- A modal window will open, ensure that your target service has enough disk space to accommodate your database
- Click on Get started button.
Step 2 - Validation
- You need to provide the connection details to establish a connection to your source database, enter the required details:
- Hostname
- Port
- Username
- Password
- Click on Run Check to validate the connection.
Step 3 - Migration
- If all checks pass with no errors, you can trigger the migration by selecting Start migration.
- Once the migration starts, you can monitor the progress through the migration logs displayed in real-time.
KeyDB Database Migration to Elestio
Elestio provides a robust and user-friendly platform for managing your database migrations seamlessly. Whether you are migrating from an on-premises KeyDB database or from another cloud provider, Elestio's migration tool simplifies the process. By following a few straightforward steps, you can securely and efficiently move your KeyDB databases to Elestio, ensuring minimal downtime and disruption to your operations.
This guide will walk you through the process of migrating your KeyDB database from an external source to Elestio. We will cover everything from configuring your migration settings, validating the connection to your source database, and finally starting the migration process while monitoring its progress.
Step 1 - Configure
- Go to the overview of your KeyDB service on Elestio.
- Click on the Migrate Database button.
- A modal window will open, ensure that your target service has enough disk space to accommodate your database
- Click on Get started button.

Step 2 - Validation
- You need to provide the connection details to establish a connection to your source database, enter the required details:
- Hostname
- Port
- Username
- Password
- Click on Run Check to validate the connection.
Step 3 - Migration
- If all checks pass with no errors, you can trigger the migration by selecting Start migration.
- Once the migration starts, you can monitor the progress through the migration logs displayed in real-time.
Valkey Database Migration to Elestio
Elestio provides a robust and user-friendly platform for managing your database migrations seamlessly. Whether you are migrating from an on-premises Valkey database or from another cloud provider, Elestio's migration tool simplifies the process. By following a few straightforward steps, you can securely and efficiently move your Valkey databases to Elestio, ensuring minimal downtime and disruption to your operations.
This guide will walk you through the process of migrating your Valkey database from an external source to Elestio. We will cover everything from configuring your migration settings, validating the connection to your source database, and finally starting the migration process while monitoring its progress.
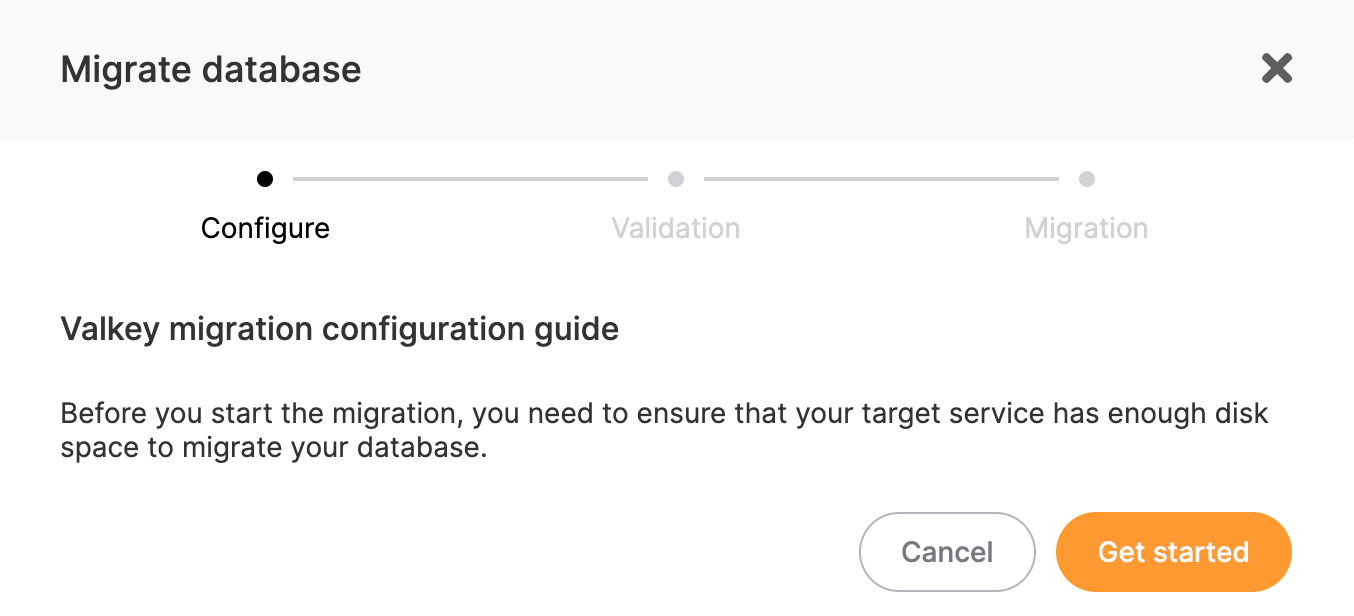
Step 1 - Configure
- Go to the overview of your Valkey service on Elestio.
- Click on the Migrate Database button.
- A modal window will open, ensure that your target service has enough disk space to accommodate your database
- Click on Get started button.
Step 2 - Validation
- You need to provide the connection details to establish a connection to your source database, enter the required details:
- Hostname
- Port
- Username
- Password
- Click on Run Check to validate the connection.
Step 3 - Migration
- If all checks pass with no errors, you can trigger the migration by selecting Start migration.
- Once the migration starts, you can monitor the progress through the migration logs displayed in real-time.
MongoDB Database Migration to Elestio
Elestio provides a robust and user-friendly platform for managing your database migrations seamlessly. Whether you are migrating from an on-premises MongoDB database or from another cloud provider, Elestio's migration tool simplifies the process. By following a few straightforward steps, you can securely and efficiently move your MongoDB databases to Elestio, ensuring minimal downtime and disruption to your operations.
This guide will walk you through the process of migrating your MongoDB database from an external source to Elestio. We will cover everything from configuring your migration settings, validating the connection to your source database, and finally starting the migration process while monitoring its progress.
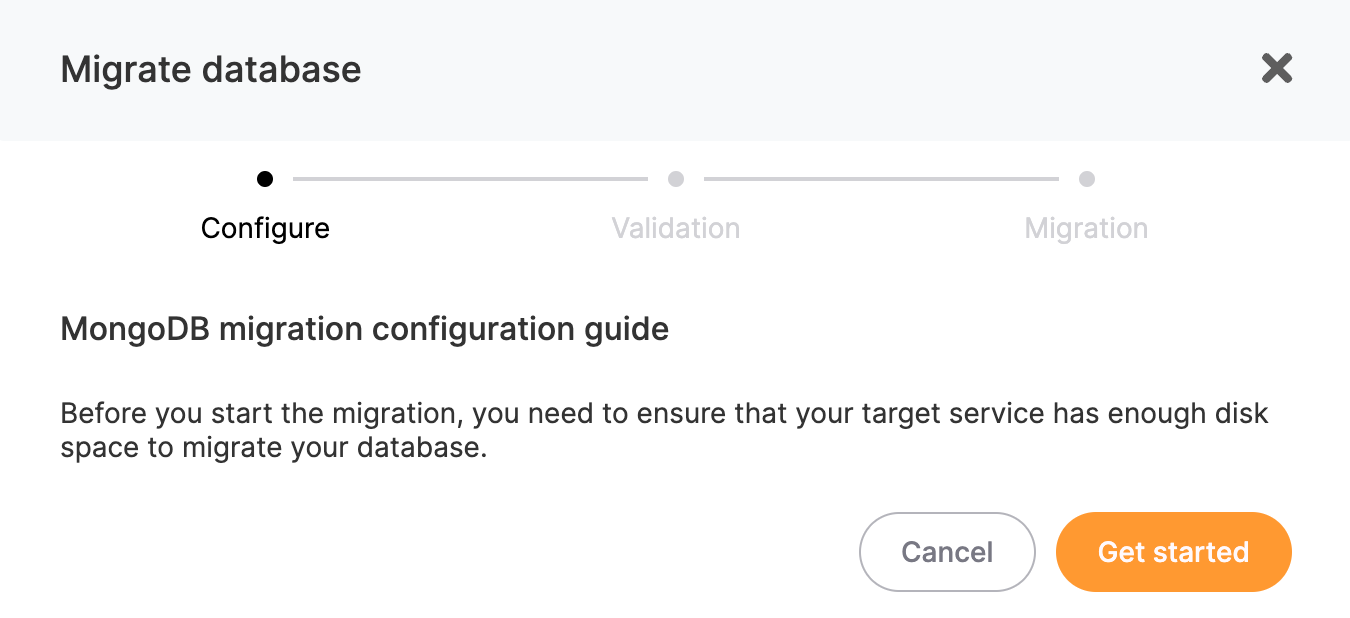
Step 1 - Configure
- Go to the overview of your MongoDB service on Elestio.
- Click on the Migrate Database button.
- A modal window will open, ensure that your target service has enough disk space to accommodate your database
- Click on Get started button.
Step 2 - Validation
- You need to provide the connection details to establish a connection to your source database, enter the required details:
- Hostname
- Port
- Username
- Password
- Click on Run Check to validate the connection.
Step 3 - Migration
- If all checks pass with no errors, you can trigger the migration by selecting Start migration.
- Once the migration starts, you can monitor the progress through the migration logs displayed in real-time.
TimescaleDB Database Migration to Elestio
Elestio provides a robust and user-friendly platform for managing your database migrations seamlessly. Whether you are migrating from an on-premises TimescaleDB database or from another cloud provider, Elestio's migration tool simplifies the process. By following a few straightforward steps, you can securely and efficiently move your TimescaleDB databases to Elestio, ensuring minimal downtime and disruption to your operations.
This guide will walk you through the process of migrating your TimescaleDB database from an external source to Elestio. We will cover everything from configuring your migration settings, validating the connection to your source database, and finally starting the migration process while monitoring its progress.
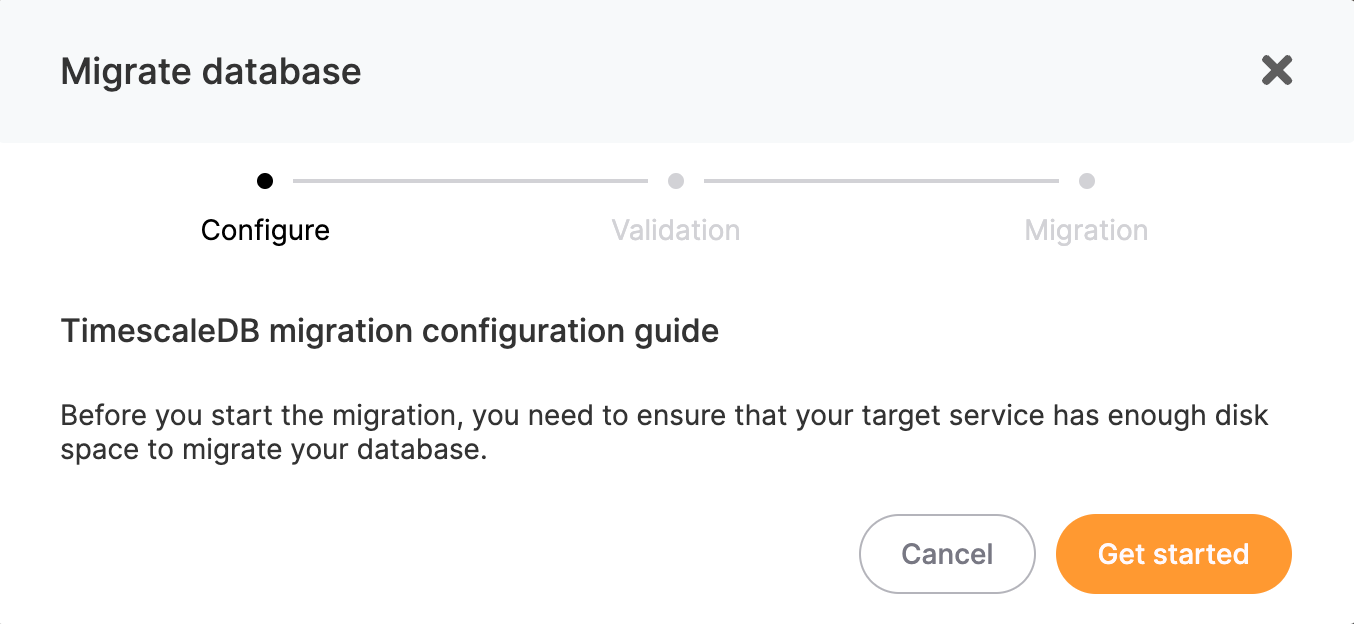
Step 1 - Configure
- Go to the overview of your TimescaleDB service on Elestio.
- Click on the Migrate Database button.
- A modal window will open, ensure that your target service has enough disk space to accommodate your database
- Click on Get started button.
Step 2 - Validation
- You need to provide the connection details to establish a connection to your source database, enter the required details:
- Hostname
- Port
- Database Name
- Username
- Password
- Click on Run Check to validate the connection.
Step 3 - Migration
- If all checks pass with no errors, you can trigger the migration by selecting Start migration.
- Once the migration starts, you can monitor the progress through the migration logs displayed in real-time.
Hydra Database Migration to Elestio
Elestio provides a robust and user-friendly platform for managing your database migrations seamlessly. Whether you are migrating from an on-premises Hydra database or from another cloud provider, Elestio's migration tool simplifies the process. By following a few straightforward steps, you can securely and efficiently move your Hydra databases to Elestio, ensuring minimal downtime and disruption to your operations.
This guide will walk you through the process of migrating your Hydra database from an external source to Elestio. We will cover everything from configuring your migration settings, validating the connection to your source database, and finally starting the migration process while monitoring its progress.
Step 1 - Configure
- Go to the overview of your Hydra service on Elestio.
- Click on the Migrate Database button.
- A modal window will open, ensure that your target service has enough disk space to accommodate your database
- Click on Get started button.

Step 2 - Validation
- You need to provide the connection details to establish a connection to your source database, enter the required details:
- Hostname
- Port
- Database Name
- Username
- Password
- Click on Run Check to validate the connection.
Step 3 - Migration
- If all checks pass with no errors, you can trigger the migration by selecting Start migration.
- Once the migration starts, you can monitor the progress through the migration logs displayed in real-time.