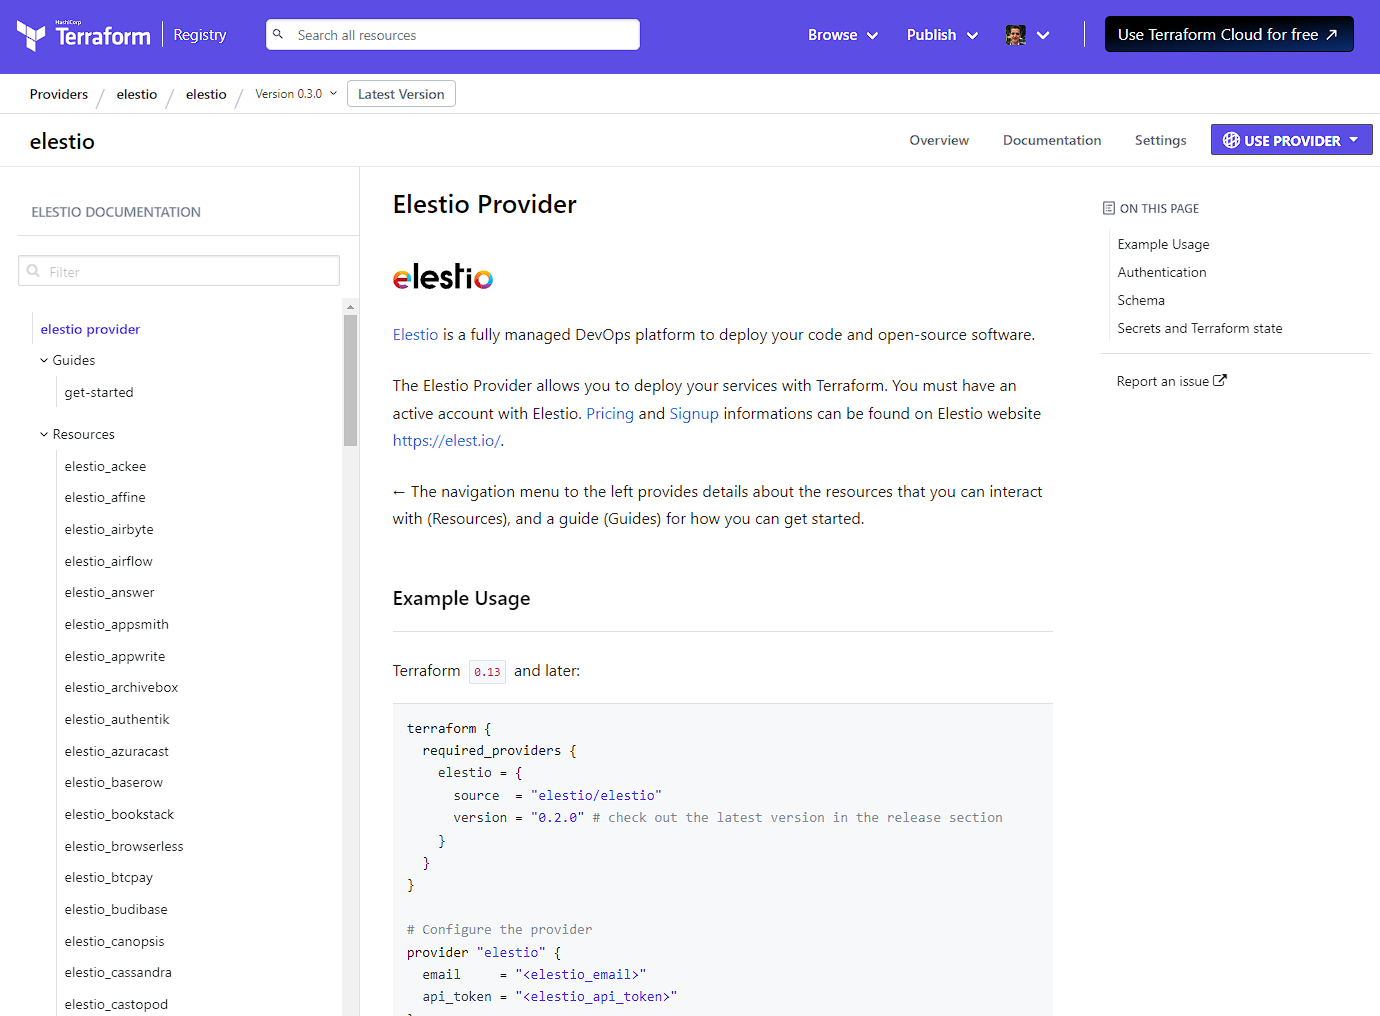
# Elestio Terraform provider
The Elestio Terraform provider is a plugin that enables users to manage resources on the Elestio platform using Terraform.
Terraform is a tool that allows users to define and manage infrastructure as code, enabling them to automate the process of creating, updating, and deleting resources such as virtual machines, networks, and containers. It is open-source and developed by HashiCorp.
# Documentation
With Elestio’s [Terraform](https://www.terraform.io/) provider, you can use an open-source infrastructure as code software tool to declare and manage your cloud services.
[](https://registry.terraform.io/providers/elestio/elestio/latest/docs)
See the [Elestio Terraform provider documentation](https://registry.terraform.io/providers/elestio/elestio/latest/docs) to learn about the services and resources,
and visit the [GitHub repository](https://github.com/elestio/terraform-provider-elestio) to report any issues or contribute to the project.
# Get started
### Build your first Elestio Terraform project
This exemple shows the setup for a Terraform project containing a single PostgreSQL service, and shows off some useful commands to stand up (and destroy) your Elestio infrastructure.
You can check this repository [elestio-terraform-scratch](https://github.com/elestio-examples/elestio-terraform-scratch) that contain the final code of this guide.
#### Prepare the dependencies
- [Sign up for Elestio if you haven't already](https://dash.elest.io/signup)
- [Get your API token in the security settings page of your account](https://dash.elest.io/account/security)
- [Download and install Terraform](https://www.terraform.io/downloads)
You need a Terraform CLI version equal or higher than v0.14.0.
To ensure you're using the acceptable version of Terraform you may run the following command:
```bash
terraform -v
```
Your output should resemble:
```bash
Terraform v0.14.0 # any version >= v0.14.0 is OK
...
```
#### Configure your project and services
Terraform files are used to define the structure and configuration of your infrastructure. It is generally a good idea to keep these definitions in **separate files** rather than combining them all in one file.
This section will explain how to organize a basic Terraform project :
1. **Create and move to an empty folder**
Here is an overview of the files we will create together :
```bash
|- outputs.tf # Defines the outputs you want terraform extract
|- postgres.tf # Defines the PostgreSQL service
|- project.tf # Defines the Elestio project that will contain the PostgreSQL service
|- provider.tf # Defines the Elestio provider for Terraform
|- secret.tfvars # Defines the sensitive variables values
|- variables.tf # Defines the variables required in other .tf files
```
2. **Create a file `provider.tf` and declare the provider adding the following lines :**
```bash
# provider.tf
terraform {
required_providers {
elestio = {
source = "elestio/elestio"
version = "0.3.0" # check out the latest version available
}
}
}
# Configure the Elestio Provider
provider "elestio" {
email = var.elestio_email
api_token = var.elestio_api_token
}
```
As you can see, the email and API token are assigned to variables.
You should never put sensitive information directly in `.tf` files.
3. **Create a file `variables.tf` and declare variables adding the following lines :**
```bash
# variables.tf
variable "elestio_email" {
description = "Elestio Email"
type = string
}
variable "elestio_api_token" {
description = "Elestio API Token"
type = string
sensitive = true
}
```
This file does not contain the values of these variables. We will have to declare them in another file.
4. **Create a file `secret.tfvars` and fill it with your values :
```bash
# secret.tfvars
elestio_email = "YOUR-EMAIL"
elestio_api_token = "YOUR-API-TOKEN"
```
**Do **not commit with Git this file !** **Sensitive information such as an API token should never be pushed.
For more information on how to securely authenticate, please read the [authentication documentation](https://registry.terraform.io/providers/elestio/elestio/latest/docs#authentication).
5. **Create a file `project.tf` and add the following lines :**
```bash
# project.tf
# Create a Project
resource "elestio_project" "pg_project" {
name = "PostgreSQL Project"
description = "Contains a postgres database"
technical_emails = var.elestio_email
}
```
To contain our PostgreSQL service, we will have to create a new project on Elestio.
Instead of using the web interface, we can also declare it via terraform.
6. **Create a file `postgres.tf` and add the following lines :**
```bash
# postgres.tf
# Create a PostgreSQL Service
resource "elestio_postgresql" "pg_service" {
project_id = elestio_project.pg_project.id
server_name = "pg-service"
server_type = "SMALL-1C-2G"
provider_name = "hetzner"
datacenter = "fsn1"
support_level = "level1"
admin_email = var.elestio_email
}
```
Terraform takes care of managing the dependencies and creating the different resources in the right order. As you can see, `project_id` will be filled with the value of the Project Resource that will be created with the previously `project.tf` file.
7. ****Create a file `outputs.tf` and add the following lines :**** ```bash
# outputs.tf
output "pg_service_psql_command" {
value = elestio_postgresql.pg_service.database_admin.command
description = "The PSQL command to connect to the database."
sensitive = true
}
```
#### Apply the Terraform configuration
1. **Download and install the Elestio provider defined in the configuration :**
```bash
terraform init
```
2. **Ensure the configuration is syntactically valid and internally consistent:**
```bash
terraform validate
```
3. **Apply the configuration :**
```bash
terraform apply -var-file="secret.tfvars"
```
Deployment time varies by service, provider, datacenter and server type.
4. **Voila, you have created a Project and PostgreSQL Service using Terraform !**
You can visit the [Elestio web dashboard](https://dash.elest.io/) to see these ressources.
#### (Optional) Access to the database
Let's try to connect to the database to see if everything worked well
First, you need to [install psql. ](https://www.timescale.com/blog/how-to-install-psql-on-mac-ubuntu-debian-windows/)
After that, run this command :
```shell
eval "$(terraform output -raw pg_service_psql_command)"
```
**Note:** The command to leave psql terminal is `\q`
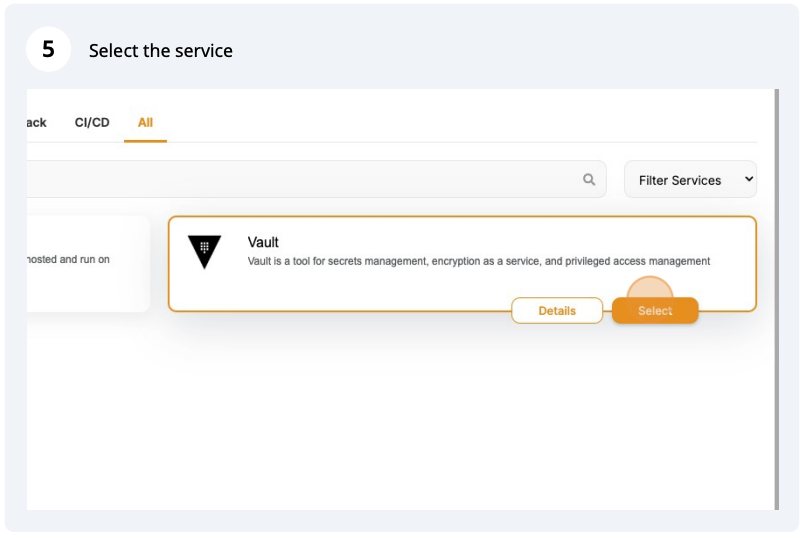
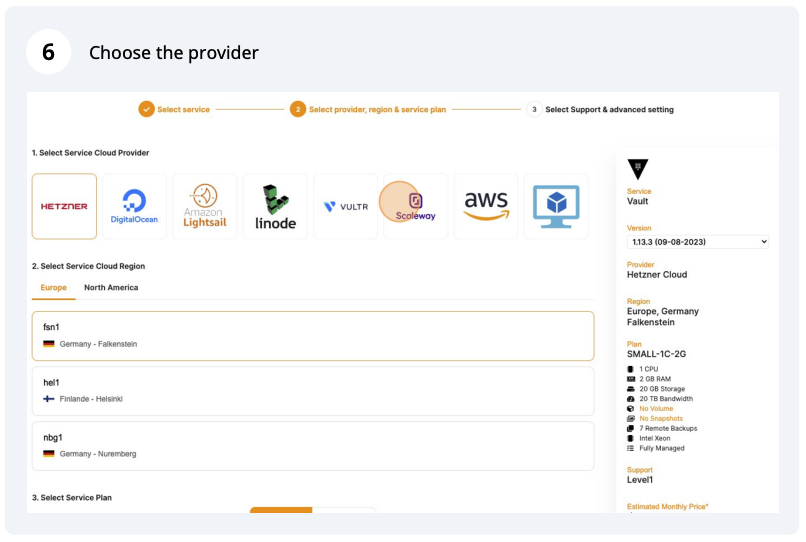
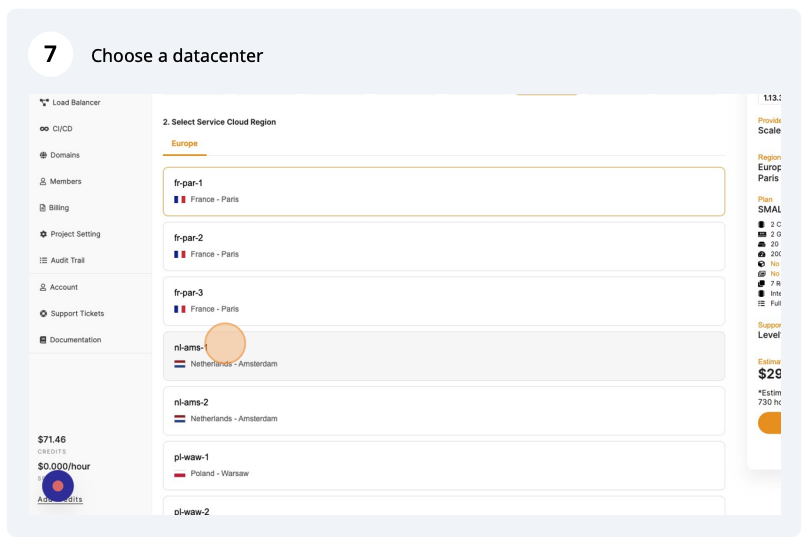
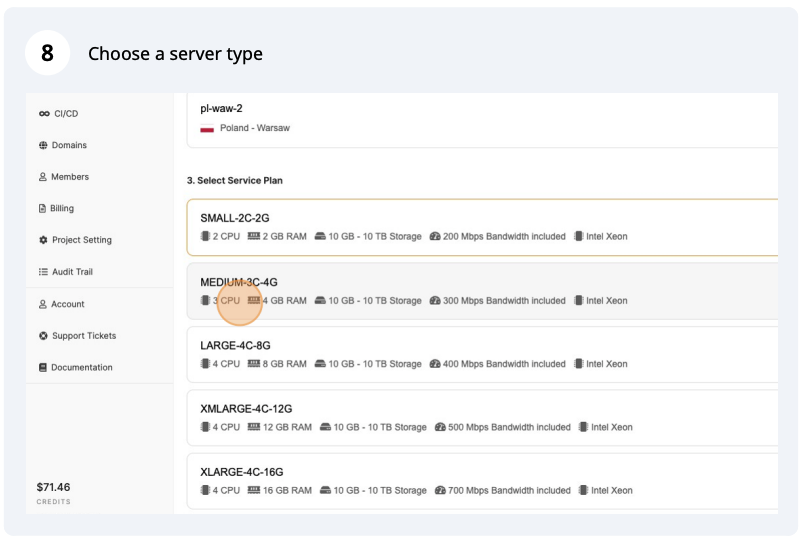
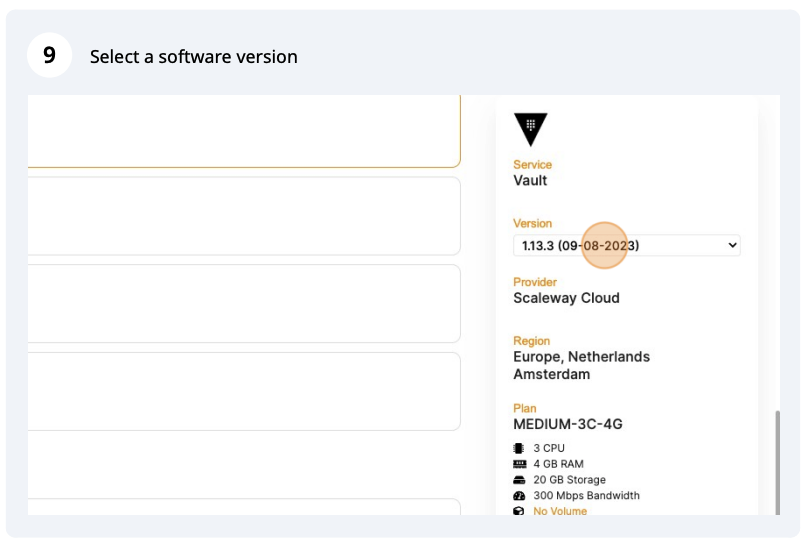
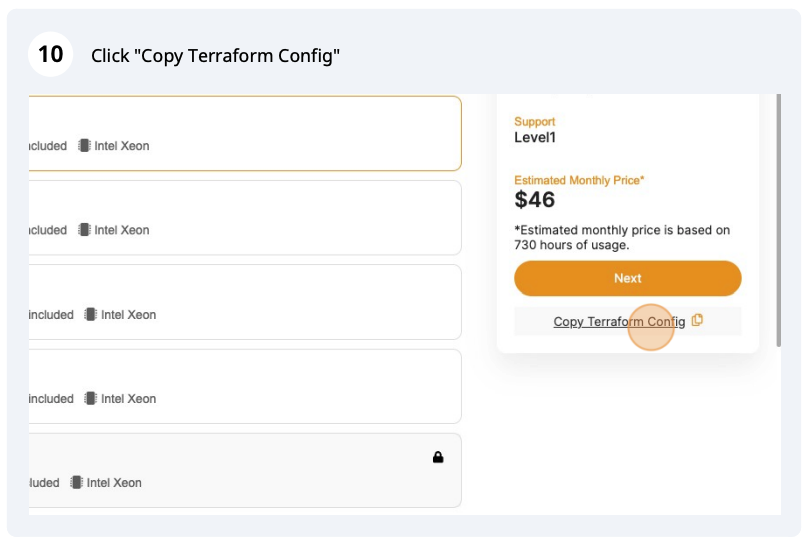
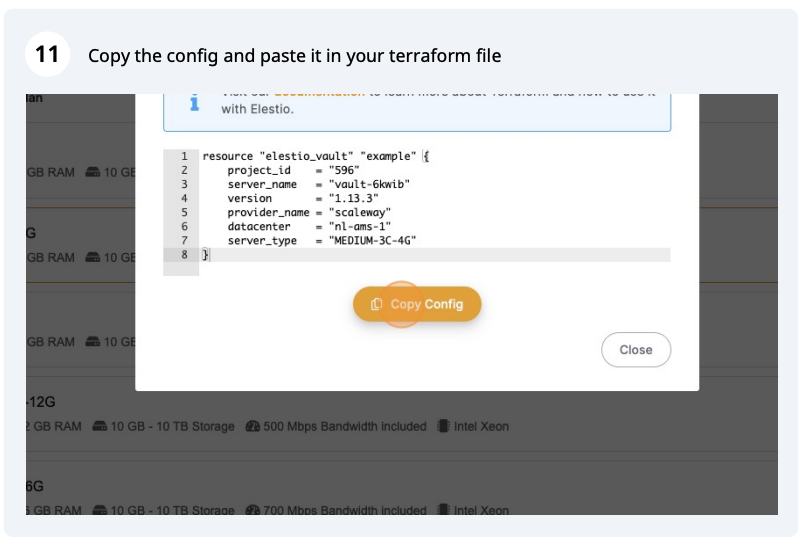
This guide explain how to find available options for **provider\_name**, **datacenter** and **server\_type** variables when you want to manage a service resource with terraform :
```bash
resource "elestio_vault" "my_vault" {
...
provider_name = "hetzner"
datacenter = "fsn1"
server_type = "SMALL-1C-2G"
...
}
```
#### Instructions
When you create a service via the website, all three pieces of information (**providers**, **data centers,** and **server types**) **are listed on a single page**. You can copy the configuration from there and paste it into your Terraform file.
[](https://elest.io/)
[](https://docs.elest.io/uploads/images/gallery/2023-10/cleanshot-2023-10-03-at-12-57-20.png)
# Import an existing resource
You can use the `terraform import` command to import in the Elestio state an existing project or service already running.
#### Project
```bash
# Import a project by specifying the project ID.
terraform import elestio_project.myawesomeproject project_id
```
1. **Declare the resource in your terraform file**
```bash
resource "elestio_project" "example_project" {
name = "example-project"
...
}
```
2. **Retrieve your ProjectID on the [projects list page](https://dash.elest.io/projects).
[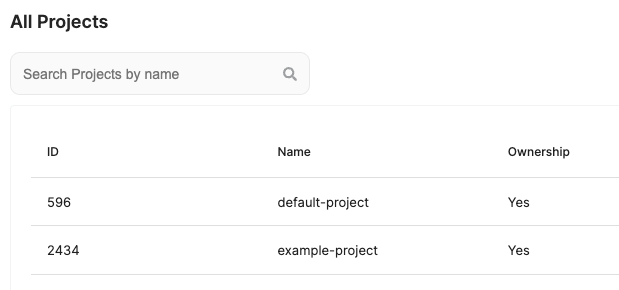](https://docs.elest.io/uploads/images/gallery/2023-01/screenshot-2023-01-08-at-02-01-12.png)**
3. **Execute the import command**
```shell
terraform import elestio_project.exemple_project 2434
```
Then you can run a `terraform apply` command and Terraform will handle your project resource as an update and not a new resource to create.
####
#### Service
```shell
# Import a service by specifying the Project ID it belongs to, and the service ID (spaced by a comma).
terraform import elestio_service.myawesomeservice project_id,service_id
```
1. **Declare the resource in your terraform file**
```bash
resource "elestio_postgres" "exemple_postgres" {
project_id = elestio_project.exemple_project.id
...
}
```
2. **Retrieve your ProjectID on the [projects list page](https://dash.elest.io/projects).**
3. **Retrieve your ServiceID on the service page.**
[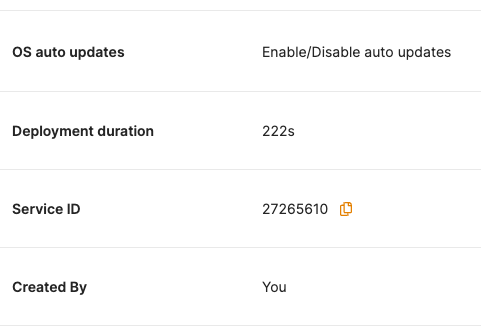](https://docs.elest.io/uploads/images/gallery/2023-01/screenshot-2023-01-08-at-02-04-26.png)
4. **Execute the import command**
```bash
terraform import elestio_postgres.exemple_postgres 2434,27265610
```
Then you can run a `terraform apply` command and Terraform will handle your service resource as an update and not a new resource to create.