How-To Guides
- Creating a Realm in Keycloak
- Adding and Managing Users in Keycloak
- Creating and Configuring Clients in Keycloak
- Setting Up Roles and Permissions in Keycloak
- Enabling Identity Federation in Keycloak
- Enabling Two-Factor Authentication (2FA) in Keycloak
- Resetting User Passwords in KeycloakNew Page
Creating a Realm in Keycloak
A realm in Keycloak is the top-level container for managing users, roles, groups, identity providers, and applications. It provides complete logical isolation, making it ideal for multi-tenant systems or staging/production splits. This guide explains different ways to create a realm via the Admin Console, REST API, and Docker CLI while covering permissions, best practices, and troubleshooting.
Creating a Realm via Keycloak Admin Console
The Admin Console is the most straightforward way to create and manage realms using a web-based UI.
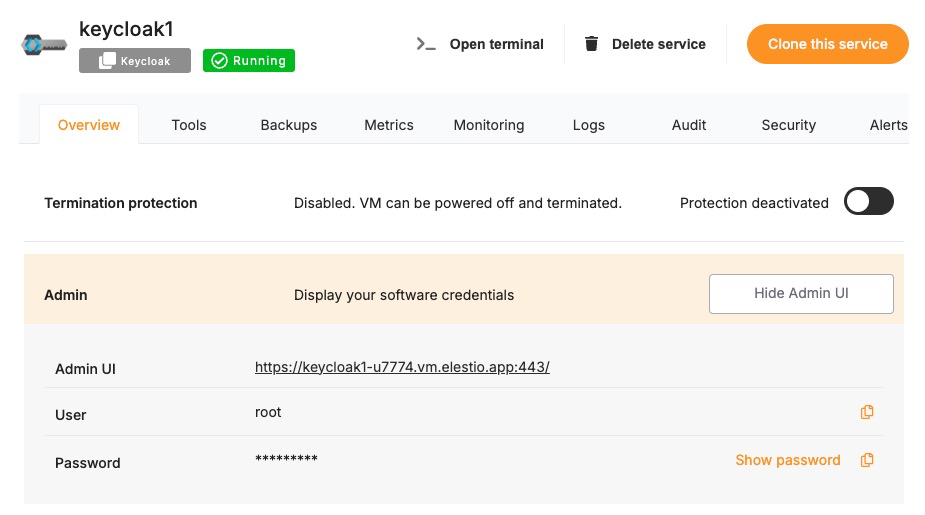
Access the Admin Console
Log in to your Keycloak Admin Console:
http://<your-keycloak-domain>/admin/Use the admin account created during setup or one with realm management privileges.
Create a New Realm
-
Click the realm dropdown in the top-left corner (default is master).
-
Click Create Realm.
-
Enter the following details:
-
Realm Name: A unique name like customer-portal or internal-tools.
-
Display Name: Optional friendly name shown on login screens.
-
-
Click Create.
Configure Realm Settings
Once created, you can adjust behavior by navigating to
-
Realm Settings > Login: Enable email verification, OTP, remember-me, etc.
-
Realm Settings > Themes: Set custom themes for login and account pages
Creating a Realm via Keycloak REST API
For automation and CI/CD pipelines, use the Admin REST API.
Get Access Token
Use the master realm or a privileged realm with an admin user.
curl -X POST "https://<keycloak-domain>/realms/master/protocol/openid-connect/token" \
  -H "Content-Type: application/x-www-form-urlencoded" \
  -d "username=admin" \
  -d "password=admin-password" \
  -d "grant_type=password" \
  -d "client_id=admin-cli"
Save the access_token from the response.
Create the Realm
curl -X POST "https://<keycloak-domain>/admin/realms" \
  -H "Content-Type: application/json" \
  -H "Authorization: Bearer <access_token>" \
  -d '{
    "realm": "newrealm",
    "enabled": true,
    "displayName": "New Realm"
  }'
This creates a new realm called newrealm with default settings.
Creating a Realm via Docker CLI
If Keycloak is running inside a Docker container:
Access the Container
docker exec -it keycloak bashCreate Realm Using Import File
-
Create a JSON realm file (e.g., myrealm.json):
{
  "realm": "myrealm",
  "enabled": true
}-
Run Keycloak with the import flag:
kc.sh import --file /opt/keycloak/data/import/myrealm.jsonOr via Docker:
docker run -v $PWD:/opt/keycloak/data/import \
  quay.io/keycloak/keycloak:latest \
  import --file /opt/keycloak/data/import/myrealm.json
Required Permissions for Realm Creation
-
Users must have manage-realm or admin roles in the master realm.
-
If using the REST API, token must be obtained using admin-cli.
To grant permissions:
# From master realm
Users > admin > Role Mappings > Realm Roles > Assign 'admin'
Best Practices for Creating Realms
- Use Descriptive Realm Names: Avoid generic names like test or default. Use environment- or tenant-specific names like dev-project-x, production-client123.
- Enable Login Hardening Features: Under Realm Settings > Login:
-
Enable email verification
-
Disable user registration (unless required)
-
Enable OTP for 2FA
-
- Use Theme Branding: Upload and assign a custom login theme under Themes to reflect client or environment branding.
- Automate via REST or Terraform: For CI/CD deployments, automate realm provisioning using REST API or tools like Terraform (mrparkers/keycloak provider).
Common Issues and Troubleshooting
|
Issue |
Possible Cause |
Solution |
|---|---|---|
|
403 Forbidden when creating via API |
Access token lacks permission |
Ensure token is generated from a user with admin role in master realm |
|
Realm already exists |
Attempting to recreate an existing realm |
Use a different realm name or delete existing one before re-creating |
|
Realm not listed in dropdown |
Misconfiguration or missing role |
Refresh UI or check admin user’s permissions |
|
Docker import doesn’t create realm |
File format error or wrong path |
Ensure JSON is valid and mounted correctly in /opt/keycloak/data/import |
|
Login page shows default theme |
Custom theme not set |
Go to Realm Settings > Themes and set your theme manually |
Adding and Managing Users in Keycloak
Users in Keycloak represent the individuals or system accounts that authenticate and interact with your applications. This guide explains multiple methods to create and manage users via the Admin Console, REST API, and Docker CLI while covering required roles, best practices, and common issues.
Creating Users via Keycloak Admin Console
The Admin Console is the most user-friendly method to manage users and assign roles.
Access the Admin Console
Log in to your Keycloak Admin Console:
http://<your-keycloak-domain>/admin/Choose the realm where you want to manage users.
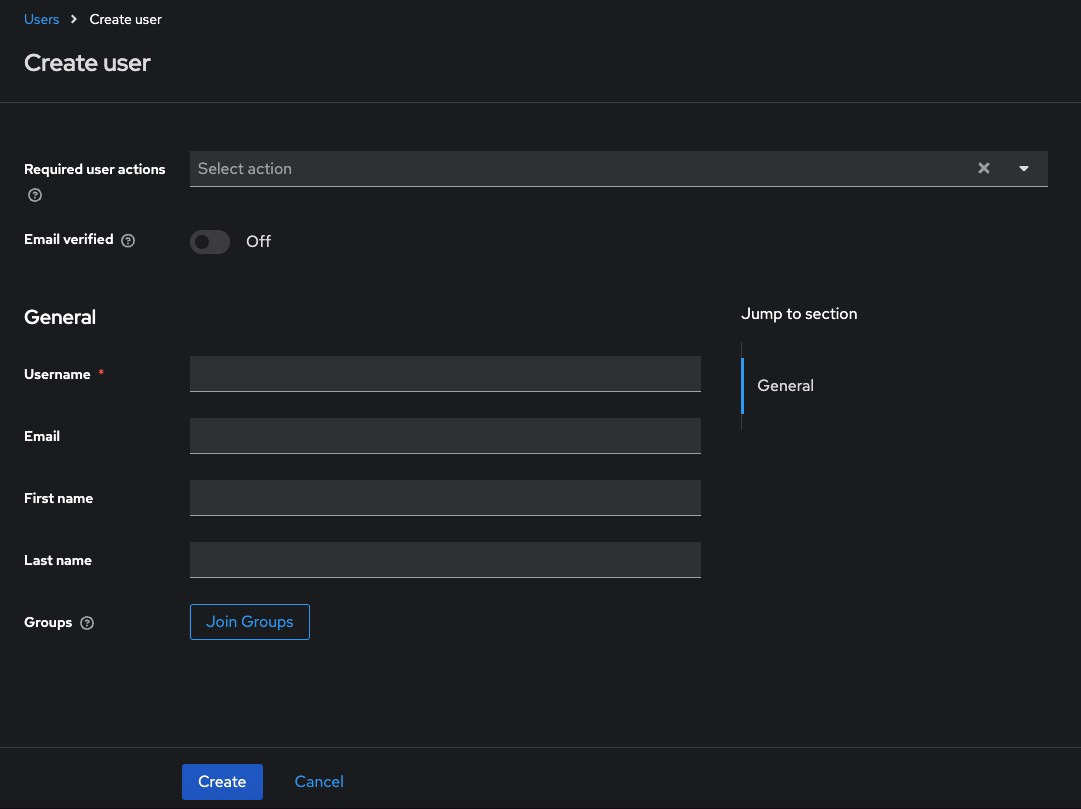
Add a New User
-
Go to Users > Add User
-
Fill in the following:
-
Username (required)
-
Email, First Name, Last Name (optional but recommended)
-
Set Email Verified if applicable
-
-
Click Create
Set Credentials
After creating the user:
-
Go to the Credentials tab
-
Set a password
-
Toggle Temporary to OFF if you don’t want the user to reset on first login
-
Click Set Password
Creating Users via Keycloak REST API
This method is suitable for CI/CD pipelines or automated scripts.
Get Access Token
curl -X POST "https://<keycloak-domain>/realms/master/protocol/openid-connect/token" \
  -H "Content-Type: application/x-www-form-urlencoded" \
  -d "username=admin" \
  -d "password=admin-password" \
  -d "grant_type=password" \
  -d "client_id=admin-cli"
Copy the access_token from the response.
Create User
curl -X POST "https://<keycloak-domain>/admin/realms/<realm>/users" \
  -H "Content-Type: application/json" \
  -H "Authorization: Bearer <access_token>" \
  -d '{
    "username": "johndoe",
    "email": "johndoe@example.com",
    "enabled": true,
    "emailVerified": true,
    "firstName": "John",
    "lastName": "Doe"
  }'
Set Password
curl -X PUT "https://<keycloak-domain>/admin/realms/<realm>/users/<user-id>/reset-password" \
  -H "Authorization: Bearer <access_token>" \
  -H "Content-Type: application/json" \
  -d '{
    "type": "password",
    "value": "StrongPassword123!",
    "temporary": false
  }'
To get <user-id>, call:
curl -H "Authorization: Bearer <access_token>" \
  https://<keycloak-domain>/admin/realms/<realm>/users?username=johndoe
Creating Users via Docker CLI
Step into the Container
docker exec -it keycloak bashUse Admin CLI Script
/opt/keycloak/bin/kcadm.sh config credentials --server http://localhost:8080 \
  --realm master --user admin --password admin

/opt/keycloak/bin/kcadm.sh create users -r <realm> -s username=jane -s enabled=true
Set Password
/opt/keycloak/bin/kcadm.sh set-password -r <realm> --username jane --new-password "SecurePass!123"Required Permissions for User Management
-
Requires manage-users role in the realm.
-
Admin token used via CLI or REST must be scoped with user management privileges.
To assign permission via Admin Console:
Users > admin > Role Mappings > Realm Roles > Assign 'manage-users'Best Practices for Managing Users
Use Verified Emails
Ensure emailVerified is set to true for pre-created users to skip email confirmation.
Avoid Temporary Passwords for API Imports
If scripting user creation, set temporary: false to avoid forcing password reset on first login.
Group Users by Role or Department
Organize users into groups (e.g., devs, sales, ops) for easier role management and policy application.
Monitor Login History
Enable event logging to track user login activity under Events > Settings.
Enforce Strong Passwords
Go to Authentication > Password Policy and configure rules like minimum length, digits, special chars, etc.
Common Issues and Troubleshooting
|
Issue |
Possible Cause |
Solution |
|---|---|---|
|
409 Conflict: User exists |
Username already taken |
Use a unique username or search existing users |
|
403 Forbidden on API |
Missing permission or token scope |
Ensure admin has manage-users in the correct realm |
|
User not able to log in |
Password not set or user is disabled |
Check status under the user’s profile and verify credentials |
|
Password reset fails |
Temporary password not set correctly |
Use "temporary": false if you want permanent password via API |
|
Email not received for verification |
SMTP not configured |
Go to Realm Settings > Email and add SMTP server details |
Creating and Configuring Clients in Keycloak
A client in Keycloak represents an application or service that uses Keycloak to authenticate users. Clients can be web apps, REST APIs, mobile apps, or even CLI tools. This guide explains how to create and configure clients through the Admin Console, REST API, and CLI (Docker), and also includes roles, best practices, and common troubleshooting steps.
Creating Clients via Keycloak Admin Console
This is the simplest way to register and configure a client visually.
Access the Admin Console
Log in to:
http://<your-keycloak-domain>/admin/Choose the realm where the client should be added.
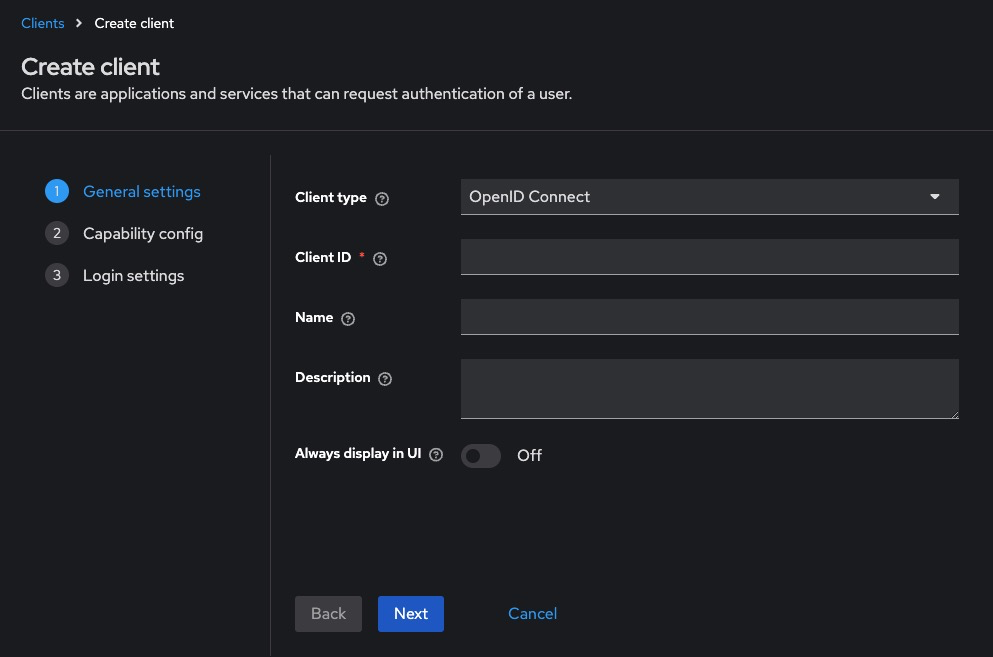
Add a New Client
-
Go to Clients > Create
-
Fill in the fields:
-
Client ID: A unique name, e.g., frontend-app or api-service
-
Client Type: Choose between OpenID Connect (default) or SAML
-
Root URL: The application base URL (e.g., http://localhost:3000)
-
-
Click Next, then Save

Configure Client Settings
-
Go to the Settings tab for the client:
-
Access Type: Choose public, confidential, or bearer-only
-
Valid Redirect URIs: Add allowed redirect URLs (e.g., http://localhost:3000/*)
-
Web Origins: Add * or specific origins allowed to call this client
-
Standard Flow Enabled: Enable for browser-based login
-
Direct Access Grants: Enable if using password grant from API
-
-
Save the changes
Creating Clients via Keycloak REST API
Get Access Token
curl -X POST "https://<keycloak-domain>/realms/master/protocol/openid-connect/token" \
  -H "Content-Type: application/x-www-form-urlencoded" \
  -d "username=admin" \
  -d "password=admin-password" \
  -d "grant_type=password" \
  -d "client_id=admin-cli"
Save the access_token.
Create a Client
curl -X POST "https://<keycloak-domain>/admin/realms/<realm>/clients" \
  -H "Authorization: Bearer <access_token>" \
  -H "Content-Type: application/json" \
  -d '{
    "clientId": "my-app",
    "enabled": true,
    "publicClient": false,
    "redirectUris": ["http://localhost:3000/*"],
    "webOrigins": ["http://localhost:3000"],
    "protocol": "openid-connect"
  }'
This creates a confidential client named my-app.
Creating Clients via Docker CLI
Step into the Container
docker exec -it keycloak bashAuthenticate and Create Client
/opt/keycloak/bin/kcadm.sh config credentials \
  --server http://localhost:8080 \
  --realm master --user admin --password admin

/opt/keycloak/bin/kcadm.sh create clients -r <realm> \
  -s clientId=my-cli-client \
  -s enabled=true \
  -s publicClient=false \
  -s redirectUris='["http://localhost:3000/*"]' \
  -s webOrigins='["http://localhost:3000"]'
Required Permissions for Client Management
-
Requires manage-clients or admin role in the realm
-
Token used via REST or CLI must be scoped to allow client creation
To grant roles via Admin Console:
Users > admin > Role Mappings > Realm Roles > Assign 'manage-clients'Best Practices for Client Configuration
- Use Confidential Clients for Backends: Set publicClient = false and use client_secret for server-to-server communication.
- Use Public Clients for SPAs: Frontend apps using redirect flows should be marked as publicClient = true.
- Set Narrow Redirect URIs: Avoid using wildcards like * unless absolutely necessary. Use precise URIs for better security.
- Limit Token Lifespans: Go to Realm Settings > Tokens and configure access and refresh token lifetimes.
- Rotate Client Secrets Regularly: Manually rotate secrets or use automation for higher security compliance.
- Use Roles and Mappers for RBAC: Assign client roles and use protocol mappers to inject them into access tokens for authorization checks.
Common Issues and Troubleshooting
|
Issue |
Possible Cause |
Solution |
|---|---|---|
|
Invalid redirect URI |
Redirect URI doesn’t match registered value |
Ensure exact match in Valid Redirect URIs |
|
Client not visible after creation |
UI or API delay |
Refresh or re-login to see updated clients |
|
Access token doesn’t include roles |
Missing mappers |
Add protocol mapper for client roles under Client > Mappers |
|
403 Forbidden when using client credentials |
Client type is public or secret is wrong |
Verify publicClient=false and check the client secret |
|
Invalid client credentials error |
Wrong client ID or secret |
Verify spelling and match values from Admin Console |
Setting Up Roles and Permissions in Keycloak
Roles and permissions in Keycloak define what users and applications are allowed to do. Roles can be assigned to users, groups, or clients, and are embedded into access tokens to enforce authorization. This guide explains how to define and manage roles via the Admin Console, REST API, and CLI, with best practices and common issues.
Creating Roles via Keycloak Admin Console
This is the easiest way to create and manage roles visually.
Access the Admin Console
Log in to:
http://<your-keycloak-domain>/admin/Choose the appropriate realm.
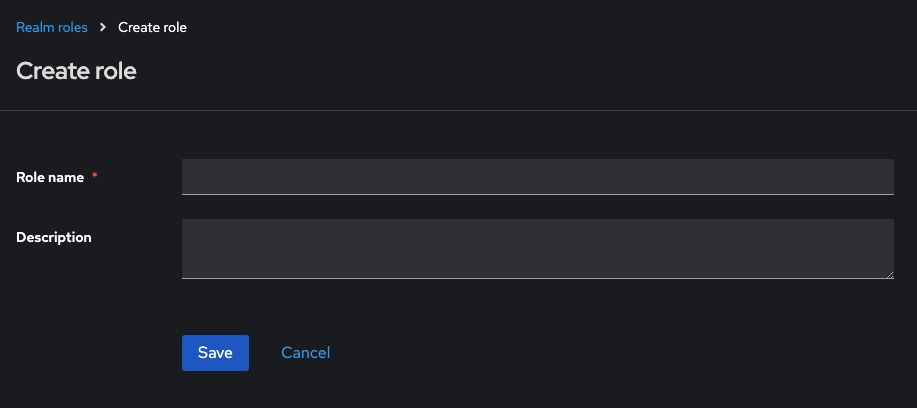
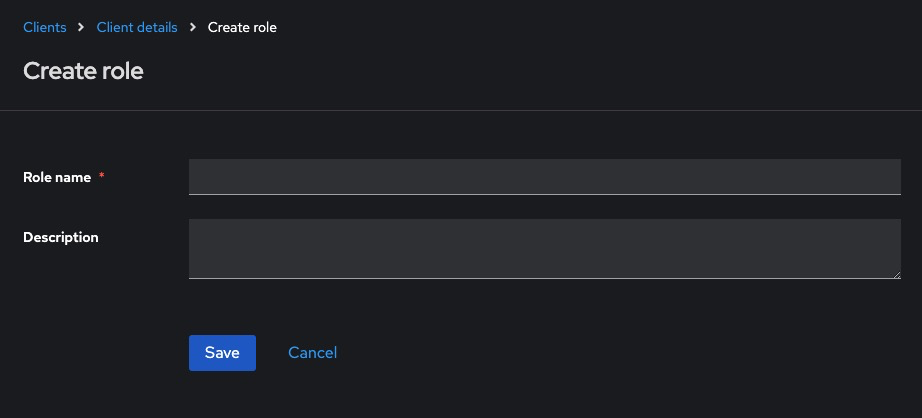
Create Realm Roles
-
Go to Roles > Add Role
-
Enter:
-
Role Name: e.g., admin, viewer, editor
-
Description: Optional but recommended
-
-
Click Save
Create Client Roles
-
Go to Clients > [client-name] > Roles > Create Role
-
Fill in the Role Name and optional Description
-
Save the role
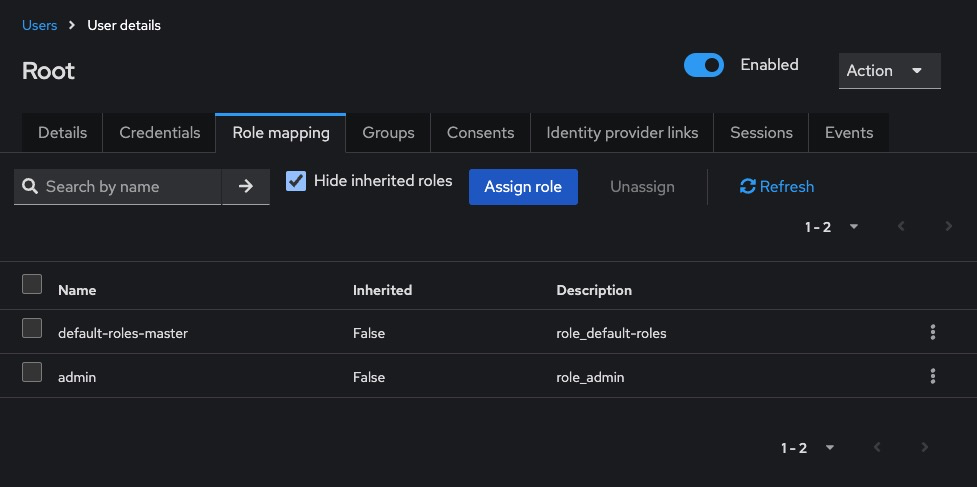
Assign Roles to Users
-
Go to Users > [username] > Role Mappings
-
In Available Roles, choose from:
-
Realm roles (top-left dropdown)
-
Client roles (select client under “Client Roles”)
-
-
Click Add selected
Creating Roles via Keycloak REST API
Get Access Token
curl -X POST "https://<keycloak-domain>/realms/master/protocol/openid-connect/token" \
  -H "Content-Type: application/x-www-form-urlencoded" \
  -d "username=admin" \
  -d "password=admin-password" \
  -d "grant_type=password" \
  -d "client_id=admin-cli"
Save the access_token.
Create Realm Role
curl -X POST "https://<keycloak-domain>/admin/realms/<realm>/roles" \
  -H "Authorization: Bearer <access_token>" \
  -H "Content-Type: application/json" \
  -d '{
    "name": "viewer",
    "description": "Read-only access"
  }'
Create Client Role
curl -X POST "https://<keycloak-domain>/admin/realms/<realm>/clients/<client-id>/roles" \
  -H "Authorization: Bearer <access_token>" \
  -H "Content-Type: application/json" \
  -d '{
    "name": "api-user",
    "description": "API access for clients"
  }'
To get the client ID:
curl -H "Authorization: Bearer <access_token>" \
  "https://<keycloak-domain>/admin/realms/<realm>/clients"
Creating Roles via Docker CLI
Access the Container
docker exec -it keycloak bashCreate Roles via CLI
/opt/keycloak/bin/kcadm.sh config credentials \
  --server http://localhost:8080 --realm master \
  --user admin --password admin

/opt/keycloak/bin/kcadm.sh create roles -r <realm> \
  -s name=auditor -s description="Can view reports"
To create client roles:
/opt/keycloak/bin/kcadm.sh create clients/<client-id>/roles -r <realm> \
  -s name=external-api -s description="Role for external apps"
Required Permissions for Managing Roles
To manage roles, users need:
-
manage-realm role for realm roles
-
manage-clients role for client-specific roles
To assign via Admin Console:
Users > [admin-user] > Role Mappings > Realm Roles > Add 'manage-realm' or 'manage-clients'Best Practices for Roles and Permissions
- Use Fine-Grained Role Names: Use names like invoice_viewer, invoice_editor, or admin_dashboard for clarity.
- Use Groups to Assign Roles in Bulk: Create groups such as managers, sales, or auditors, then assign roles to groups.
- Map Roles to Access Tokens: Use Client > Mappers to include role names in the access_token or id_token.
- Prefer Client Roles for Application Permissions: Client roles are scoped to individual apps and help separate responsibilities.
- Use Composite Roles Sparingly: Composite roles combine multiple roles into one but may add complexity if overused.
Common Issues and Troubleshooting
|
Issue |
Possible Cause |
Solution |
|---|---|---|
|
Role doesn’t appear in token |
Missing protocol mapper |
Add a role mapper in Client > Mappers |
|
User not authorized despite role assignment |
Role not assigned to the correct client/realm |
Verify if the role is client-scoped or realm-wide |
|
403 Forbidden despite valid login |
Role not embedded in access token |
Ensure token includes required roles via protocol mappers |
|
REST API: 409 Conflict when creating role |
Role with same name already exists |
Use a unique name or update existing role |
|
Cannot assign role to user |
User lacks manage-users privilege |
Ensure admin has role assignment rights |
Enabling Identity Federation in Keycloak
Identity federation allows you to delegate authentication to external identity providers (IdPs) like Google, GitHub, Facebook, or enterprise systems such as LDAP and Active Directory. This guide explains how to integrate identity providers using the Keycloak Admin Console, REST API, and Docker CLI (kcadm.sh). It includes configuration examples, permission requirements, best practices, and common issues.
Adding Identity Providers via Keycloak Admin Console
This method supports most popular providers like Google, GitHub, Facebook, and SAML/LDAP.
Access the Admin Console
Log in to your Keycloak Admin Console:
http://<your-keycloak-domain>/admin/Select the realm where you want to add the identity provider.
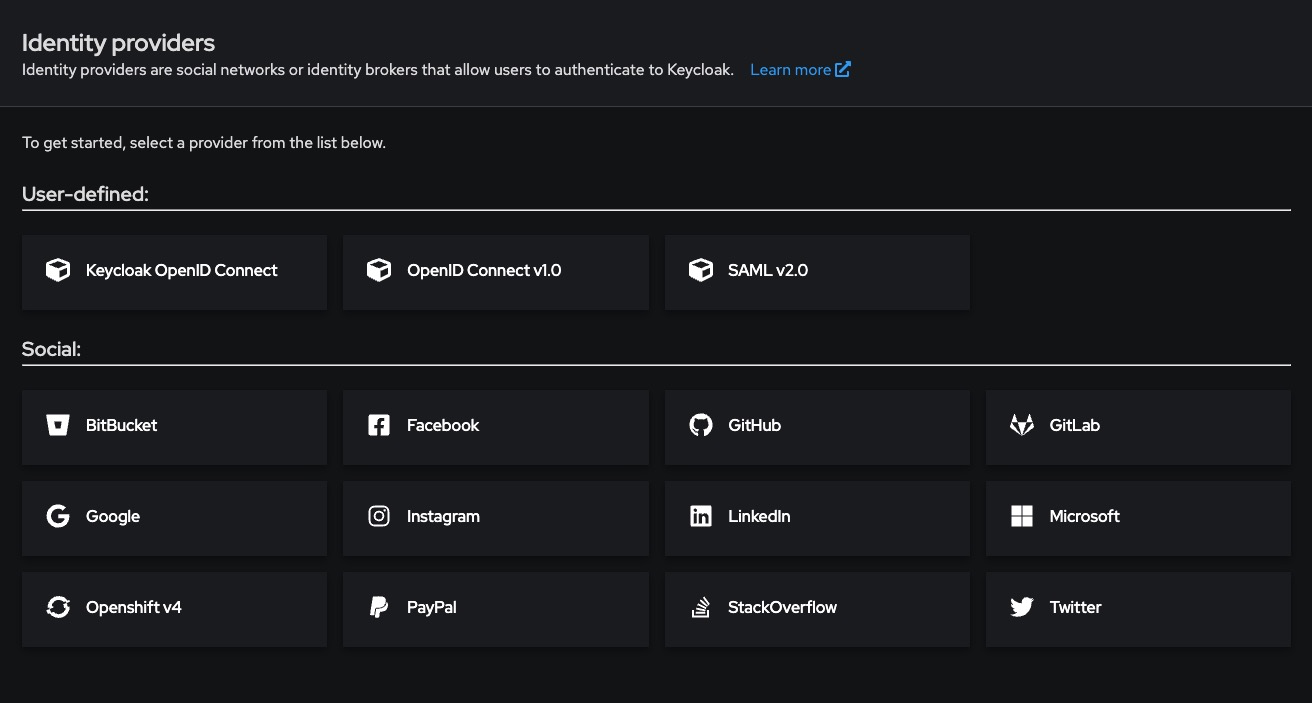
Add an Identity Provider (OIDC-based)
-
Go to Identity Providers > Add Provider
-
Choose an option like Google, GitHub, or OpenID Connect v1.0
-
Fill in the following:
-
Alias: A unique name like google or github
-
Client ID: From the external IdP
-
Client Secret: From the external IdP
-
Authorization URL, Token URL, User Info URL: Auto-filled for well-known providers
-
-
Set Sync Mode (e.g., IMPORT, FORCE, or LEGACY)
-
Enable Store Tokens if you want offline access
-
Click Save
Test the Identity Provider
-
Go to the realm login page
-
You’ll now see a “Login with Google” or equivalent option
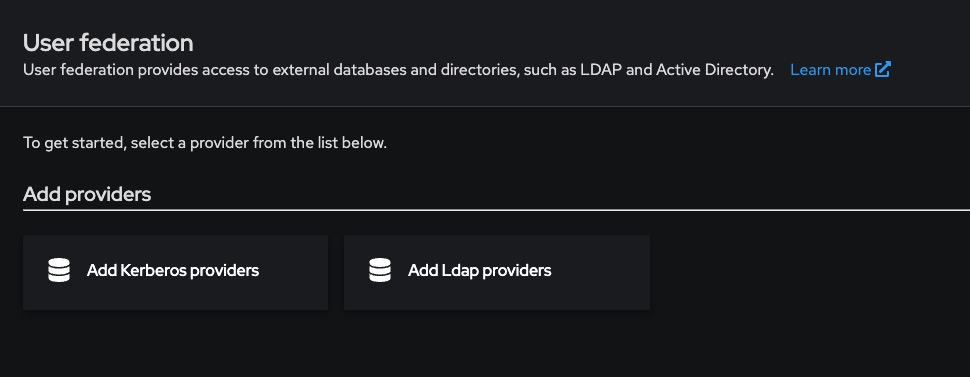
Adding LDAP or Active Directory
-
Go to User Federation > Add Provider → LDAP
-
Fill in connection details:
|
Field |
Example |
|---|---|
|
Connection URL |
ldap://ldap.mycompany.com |
|
Users DN |
ou=users,dc=mycompany,dc=com |
|
Bind DN |
cn=admin,dc=mycompany,dc=com |
|
Bind Credential |
Your LDAP password |
|
Vendor |
Active Directory, Other, etc. |
-
Choose Edit Mode: READ_ONLY, WRITABLE, or UNSYNCED
-
Enable Periodic Sync if needed
-
Save and test the connection
Adding Identity Providers via REST API
Get Access Token
curl -X POST "https://<keycloak-domain>/realms/master/protocol/openid-connect/token" \
  -H "Content-Type: application/x-www-form-urlencoded" \
  -d "username=admin" \
  -d "password=admin-password" \
  -d "grant_type=password" \
  -d "client_id=admin-cli"
Save the access_token.
Add OIDC Identity Provider
curl -X POST "https://<keycloak-domain>/admin/realms/<realm>/identity-provider/instances" \
  -H "Authorization: Bearer <access_token>" \
  -H "Content-Type: application/json" \
  -d '{
    "alias": "google",
    "providerId": "google",
    "enabled": true,
    "trustEmail": true,
    "storeToken": false,
    "addReadTokenRoleOnCreate": false,
    "firstBrokerLoginFlowAlias": "first broker login",
    "config": {
      "clientId": "GOOGLE_CLIENT_ID",
      "clientSecret": "GOOGLE_CLIENT_SECRET"
    }
  }'
Adding Identity Providers via Docker CLI
Access the Container
docker exec -it keycloak bashAdd Provider
/opt/keycloak/bin/kcadm.sh config credentials \
  --server http://localhost:8080 \
  --realm master --user admin --password admin

/opt/keycloak/bin/kcadm.sh create identity-provider/instances -r <realm> \
  -s alias=github -s providerId=github \
  -s enabled=true \
  -s config.clientId=GITHUB_CLIENT_ID \
  -s config.clientSecret=GITHUB_CLIENT_SECRET
Required Permissions for Identity Federation
-
Requires manage-identity-providers or admin role in the target realm
-
REST tokens must come from a user with these privileges
To assign via Admin Console:
Users > [admin-user] > Role Mappings > Realm Roles > Add 'manage-identity-providers'Best Practices for Identity Federation
- Use Standard Broker Flows: Leverage First Broker Login flow to prompt for email verification or account linking.
- Map External Claims to Roles: Use Identity Provider Mappers to assign roles or sync attributes (like email, groups, org) automatically.
- Avoid Using Public Client IDs in Backend: Always use confidential clients when configuring from the backend or REST API.
- Enable Logging During Setup: Use Keycloak’s Events > Settings to track login attempts and errors for debugging.
- Test With Separate Test Realm First: Validate your configuration in a dev/test realm before enabling in production.
Common Issues and Troubleshooting
|
Issue |
Possible Cause |
Solution |
|---|---|---|
|
Login button not showing on login page |
Provider not enabled |
Ensure enabled=true and alias is correct |
|
Invalid client_id error |
Client ID mismatch |
Verify credentials from the IdP provider dashboard |
|
User not found after login |
No email or username claim returned |
Check mappers and ensure email or preferred_username is mapped |
|
LDAP users not visible in UI |
Wrong base DN or invalid bind credentials |
Test connection under User Federation settings |
|
403 Forbidden on REST call |
Missing role or token scope |
Ensure token has manage-identity-providers |
Enabling Two-Factor Authentication (2FA) in Keycloak
Two-Factor Authentication (2FA) adds an extra layer of security to user logins by requiring something the user knows (password) and something they have (typically an OTP via a mobile app). This guide explains how to enable and enforce OTP-based 2FA for all or specific users in Keycloak, using the Admin Console, authentication flows, and best practices.
Enabling 2FA via the Admin Console
Log in to the Admin Console
http://<your-keycloak-domain>/admin/Choose the realm where you want to enable 2FA.
Enable OTP in Authentication Flow
-
Go to Authentication > Flows
-
Select the Browser flow (or copy it if you want a custom flow)
-
Locate the Browser execution list:
-
Ensure that OTP Form is listed and set to REQUIRED
-
If it’s not listed:
-
Click Add Execution
-
Choose OTP Form, then set its requirement to REQUIRED
-
-
-
Click Save
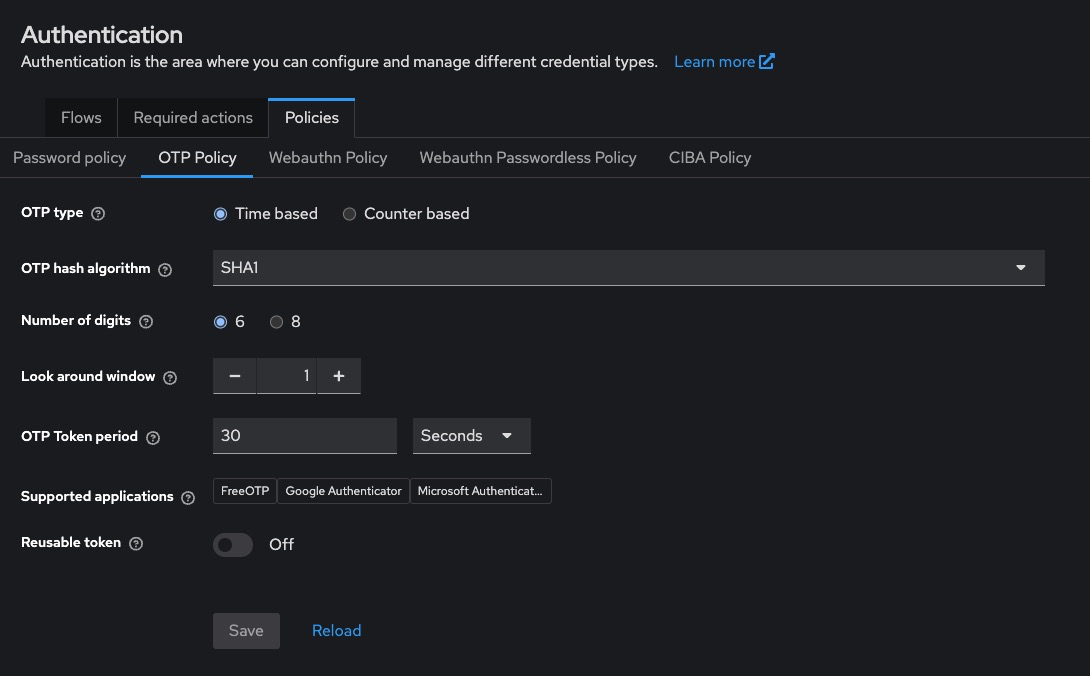
Configure OTP Policy
Go to Realm Settings > OTP and configure:
-
OTP Type: TOTP (time-based, most common)
-
Period: 30 seconds (default)
-
Digits: 6
-
Algorithm: SHA1
-
Look Ahead Window: 1 or 2
Click Save
Enforcing 2FA for Specific Users
2FA is optional by default. To make it required for a specific user:
-
Go to Users > [username]
-
Open the Credentials tab
-
Click Set Up Required Action
-
Choose Configure OTP from the dropdown
-
Click Save
The user will be prompted to set up 2FA on their next login.

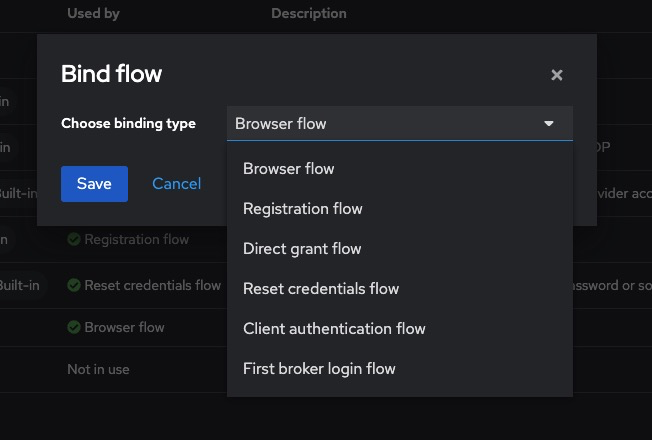
Enforcing 2FA for All Users
To enforce 2FA globally:
-
Go to Authentication > Bindings
-
Set Browser Flow to a flow where OTP Form is REQUIRED
-
All users will be required to configure 2FA on their next login if not already done
Enabling 2FA via REST API
Get Admin Access Token
curl -X POST "https://<keycloak-domain>/realms/master/protocol/openid-connect/token" \
  -H "Content-Type: application/x-www-form-urlencoded" \
  -d "username=admin" \
  -d "password=admin-password" \
  -d "grant_type=password" \
  -d "client_id=admin-cli"
Assign “Configure OTP” Required Action to a User
curl -X PUT "https://<keycloak-domain>/admin/realms/<realm>/users/<user-id>" \
  -H "Authorization: Bearer <access_token>" \
  -H "Content-Type: application/json" \
  -d '{"requiredActions": ["CONFIGURE_TOTP"]}'
To get the user ID:
curl -H "Authorization: Bearer <access_token>" \
  https://<keycloak-domain>/admin/realms/<realm>/users?username=<username>
Enabling 2FA via Docker CLI
Authenticate and Set OTP Action
docker exec -it keycloak bash

/opt/keycloak/bin/kcadm.sh config credentials \
  --server http://localhost:8080 \
  --realm master --user admin --password admin

/opt/keycloak/bin/kcadm.sh update users/<user-id> -r <realm> \
  -s 'requiredActions=["CONFIGURE_TOTP"]'
Required Permissions for 2FA Management
-
Requires manage-users role
-
REST API calls must use a token with manage-users permission in the realm
To assign via Admin Console:
Users > [admin-user] > Role Mappings > Realm Roles > Add 'manage-users'Best Practices for 2FA
- Use Time-Based OTP (TOTP): TOTP is compatible with standard apps like Google Authenticator, Authy, or FreeOTP.
- Customize OTP Setup Page: Modify the otp.ftl page inside your theme to reflect your brand and offer setup instructions.
- Inform Users Before Enforcing: Enable OTP as a required action with communication ahead of rollout to avoid login issues.
- Use Conditional 2FA Flows: Use conditional executions (e.g., only require OTP from outside a trusted network/IP range).
- Back Up OTP Configuration: Encourage users to back up their OTP seed or enable recovery codes for critical accounts.
Common Issues and Troubleshooting
|
Issue |
Possible Cause |
Solution |
|---|---|---|
|
Users not prompted for 2FA |
OTP Form not set to REQUIRED in flow |
Set requirement to REQUIRED in the Browser flow |
|
OTP setup skips |
Configure OTP not added as required action |
Manually assign it to users or enforce via default flow |
|
“Invalid TOTP” error on login |
Wrong time sync or wrong app |
Ensure mobile device clock is correct and app supports TOTP |
|
OTP works once then fails |
Look-ahead window too small |
Increase look-ahead window under Realm Settings > OTP |
|
No OTP page shown after password |
Flow misconfigured |
Review order and requirement levels of all executions in the flow |
Resetting User Passwords in KeycloakNew Page
Password resets are a critical part of account lifecycle management. Keycloak provides multiple secure methods for resetting a user’s password manually through the Admin Console, programmatically via REST API, or via user self-service workflows using email links. This guide walks through all these approaches, including configuration steps, best practices, and common issues.
Resetting Password via Admin Console
This is the most direct method for administrators to reset passwords.
Access the Admin Console
Log in to:
http://<your-keycloak-domain>/admin/Select the desired realm.
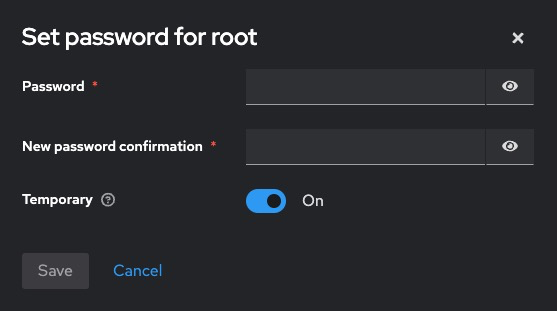
Reset a User’s Password
-
Go to Users > [username] > Credentials
-
Under Set Password:
-
Enter a new password
-
Confirm it
-
Toggle Temporary:
-
ON = user will be forced to change it on next login
-
OFF = permanent change
-
-
-
Click Set Password
The new password takes effect immediately.
Resetting Password via REST API
Get Admin Access Token
curl -X POST "https://<keycloak-domain>/realms/master/protocol/openid-connect/token" \
  -H "Content-Type: application/x-www-form-urlencoded" \
  -d "username=admin" \
  -d "password=admin-password" \
  -d "grant_type=password" \
  -d "client_id=admin-cli"
Set New Password for a User
curl -X PUT "https://<keycloak-domain>/admin/realms/<realm>/users/<user-id>/reset-password" \
  -H "Authorization: Bearer <access_token>" \
  -H "Content-Type: application/json" \
  -d '{
    "type": "password",
    "value": "SecurePassword123!",
    "temporary": false
  }'
To get <user-id>:
curl -H "Authorization: Bearer <access_token>" \
  https://<keycloak-domain>/admin/realms/<realm>/users?username=<username>
Resetting Password via Docker CLI
Inside the Container
docker exec -it keycloak bashReset User Password
/opt/keycloak/bin/kcadm.sh config credentials \
  --server http://localhost:8080 \
  --realm master --user admin --password admin

/opt/keycloak/bin/kcadm.sh set-password -r <realm> \
  --username <username> --new-password "SecurePassword123!" --temporary=false
Resetting Password via Email (Self-Service)
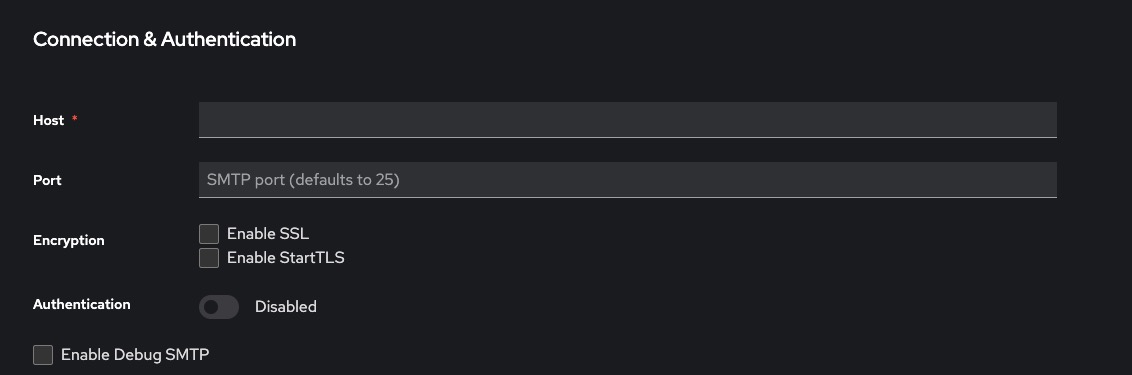
Configure SMTP
-
Go to Realm Settings > Email
-
Enter your SMTP configuration:
-
Host
-
Port
-
From address
-
Username/password
-
-
Click Test Connection
-
Click Save
Enable “Forgot Password” Option
-
Go to Authentication > Flows > Browser
-
Ensure Reset Credentials subflow is present
- Under Realm Settings > Login, enable:
-
-
Forgot Password
-
Email as Username (optional)
-
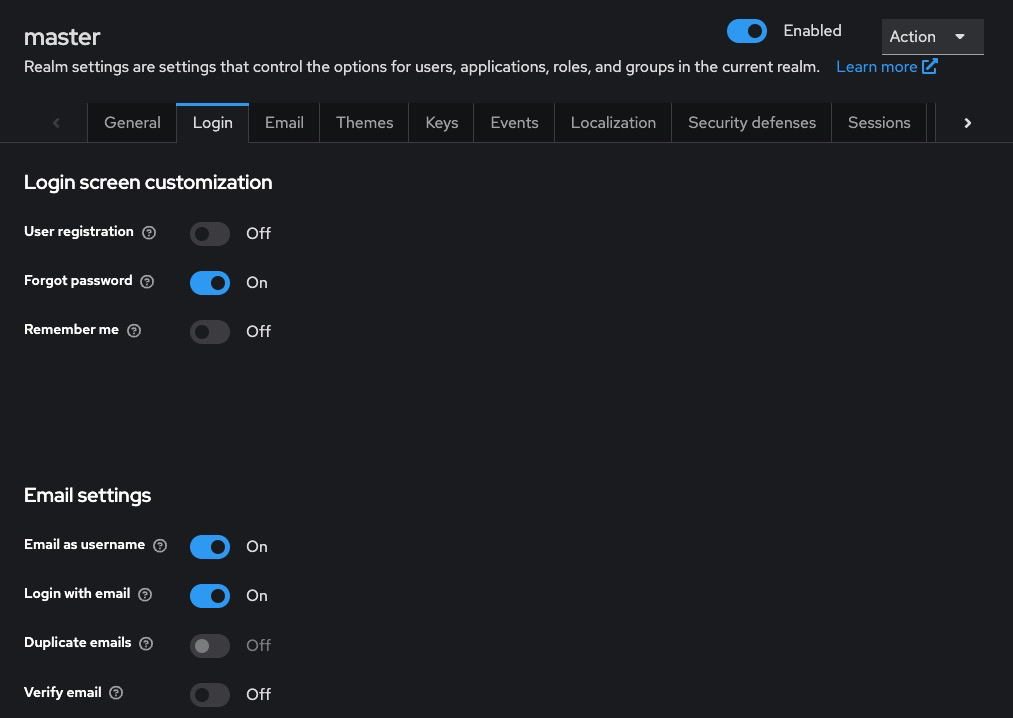
Trigger Reset Link (User Side)
Users can go to the login page, click Forgot Password, and receive a reset link via email.
Required Permissions
-
Admin Console: Must have manage-users role
-
REST API: Token must have manage-users in the target realm
To assign via Admin Console:
Users > [admin-user] > Role Mappings > Realm Roles > Add 'manage-users'Best Practices for Password Resets
- Always Use Temporary Passwords for Manual Resets: For admin-initiated resets, mark passwords as temporary to enforce user re-entry.
- Secure SMTP Configuration: Always use TLS/SSL for SMTP and avoid using free/public SMTP providers in production.
- Limit Password Reset Frequency: Use brute-force protection under Realm Settings > Security Defenses > Brute Force Detection.
- Log and Audit Password Resets: Enable Events > Settings to log password reset events and maintain an audit trail.
- Inform Users of Security Practices: Add disclaimers to reset emails and verify request intent using short-lived links.
Common Issues and Troubleshooting
|
Issue |
Possible Cause |
Solution |
|---|---|---|
|
Password reset link not received |
SMTP not configured or invalid |
Set up SMTP under Realm Settings > Email |
|
Reset link expired |
Time limit exceeded |
Increase Reset Link Lifespan under Realm Settings > Tokens |
|
User not prompted to change password |
Password not marked as temporary |
Enable temporary: true or configure as required action |
|
REST API returns 403 Forbidden |
Missing permissions |
Ensure admin token has manage-users role |
|
User not found error |
Wrong realm or username |
Confirm realm and check Users > View all users |