Database Migration
- Database Migration Service for KeyDB
- Cloning a Service to Another Provider or Region
- Manual Migration Using keydb-cli and Dump Files
Database Migration Service for KeyDB
Elestio provides a structured approach for migrating KeyDB databases from various environments, such as self-hosted servers, on-premises infrastructure, or other cloud platforms, to its managed services. This process ensures data integrity and minimizes downtime, facilitating a smooth transition to a high-performance, Redis-compatible environment.
Key Steps in Migrating to Elestio
Pre-Migration Preparation
Before initiating the migration process, it’s essential to undertake thorough preparation to ensure a smooth transition:
- Create an Elestio Account: Register on the Elestio platform to access their suite of managed services. This account will serve as the central hub for managing your KeyDB instance and related infrastructure.
-
Deploy the Target KeyDB Service:
Set up a new KeyDB instance on Elestio to serve as the destination for your data. Ensure the configuration and Redis protocol version of the target instance match your source to avoid compatibility issues during data transfer. Detailed prerequisites and guidance can be found in Elestio’s migration documentation.
Initiating the Migration Process
With the preparatory steps completed, you can proceed to migrate your KeyDB database to Elestio:
-
Access the Migration Tool:
Navigate to the overview of your KeyDB service on the Elestio dashboard. Click on the “Migrate Database” button to initiate the migration process. This tool is designed to streamline the procedure by guiding you through each stage.
-
Configure Migration Settings:
A modal window will appear, prompting you to verify that your target KeyDB instance has adequate disk space to accommodate your current dataset. Adequate storage helps prevent interruptions or data truncation. Once confirmed, click on the “Get started” button to proceed.
-
Validate Source Database Connection:
Provide the connection details for your existing KeyDB or Redis-compatible database, including:
-
Hostname: The address of your current KeyDB or Redis server.
-
Port: The port number used by your KeyDB service (default is 6379).
-
Password (if applicable): The password used for authenticating access to your database.
-
Database Number (Optional): If you are using numbered databases (e.g., db 0, db 1, etc.), indicate which one you wish to migrate.
After entering the necessary details, click on “Run Check” to validate the connection. This step ensures that Elestio can securely and accurately connect to the source database. These details can also be found in your existing hosting or container environment settings.

-
Execute the Migration
If all checks pass without errors, initiate the migration by selecting “Start migration.” Monitor the progress via real-time logs displayed on the dashboard. This transparency helps you detect and resolve any issues immediately, ensuring uninterrupted and consistent data transfer.
Post-Migration Validation and Optimization
After completing the migration, it’s essential to perform a series of validation and optimization tasks to ensure the integrity and performance of your database in the new environment:
-
Verify Data Integrity:
Run data integrity checks to confirm successful migration. This may include comparing key counts, verifying TTLs (time-to-live), or querying sample keys to ensure consistency between the source and target.
-
Test Application Functionality:
Ensure all applications depending on KeyDB can connect and operate normally with the new Elestio instance. Update any environment variables, DNS records, or connection URIs to reflect the new service endpoint.
-
Optimize Performance:
Leverage Elestio’s monitoring dashboard to tune performance. Enable slow log tracking, monitor memory usage, and adjust max memory policies or eviction strategies if needed. Elestio’s infrastructure is optimized for high throughput and low latency.
-
Implement Security Measures:
Review and update security configurations. This includes setting a strong access password, enabling TLS if supported, and managing firewall rules to limit access. Use the Elestio dashboard to rotate credentials and enforce access restrictions.
Benefits of Using Elestio for KeyDB
Migrating your KeyDB database to Elestio offers several advantages:
- Simplified Management: Elestio automates essential database maintenance tasks such as service restarts, backups, updates, and uptime monitoring. The platform provides a real-time dashboard for CPU usage, memory utilization, disk I/O, and more. Users can update environment variables, scale services, and view system logs from a unified interface.
- Security: Elestio keeps KeyDB instances secure by applying timely security patches and enforcing best practices. All deployments are protected by randomly generated access credentials, and backups are encrypted to safeguard data at rest and in transit. Users can define firewall rules to control inbound traffic and enable TLS-based access where needed.
- Performance: KeyDB on Elestio is pre-configured for high performance. The platform takes advantage of KeyDB’s multithreaded architecture, enabling faster throughput than traditional Redis. This setup supports a variety of workloads, from caching layers and session stores to high-speed Pub/Sub systems.
- Scalability: Elestio allows dynamic scaling of your KeyDB service to match evolving resource needs. You can upgrade CPU, RAM, and disk space with minimal downtime. Additionally, Elestio supports persistent volume resizing and load-based scaling to meet future growth demands.
Cloning a Service to Another Provider or Region
Migrating or cloning services across cloud providers or geographic regions is a critical part of modern infrastructure management. Whether you’re optimizing for latency, preparing for disaster recovery, meeting regulatory requirements, or simply switching providers, a well-planned migration ensures continuity, performance, and data integrity. This guide outlines a structured methodology for service migration, applicable to most cloud-native environments.
Pre-Migration Preparation
Before initiating a migration, thorough planning and preparation are essential. This helps avoid unplanned downtime, data loss, or misconfiguration during the move:
- Evaluate the Current Setup: Begin by documenting the existing KeyDB instance’s configuration. This includes runtime environments (KeyDB version, memory policies), persistence settings (RDB, AOF, or both), custom configurations (keydb.conf), authentication credentials, and client connection settings. Make note of the current deployment region, storage volumes, instance sizing, and IP/firewall rules.
- Define the Migration Target: Choose the new cloud provider or region you plan to migrate to. Confirm that KeyDB is supported in the target environment with equivalent or better resources. Validate compatibility in terms of KeyDB version, persistence format, and disk I/O performance. Ensure the target region meets your latency and compliance requirements, and verify that TLS, backup policies, and access controls can be replicated in the new environment.
- Provision the Target Environment: Set up a new KeyDB service in the desired target region or provider. This involves deploying a new instance with the same resource allocation, runtime version, and configuration as the original. If you’re using Elestio, simply create a new KeyDB service and select the same software version. Configure access credentials, private/public networking, and any required firewall or IP rules at this stage.
- Backup the Current Service: Always create a full backup of the current KeyDB data before migration. For RDB-based persistence, this involves triggering a BGSAVE operation and extracting the dump.rdb file from the instance. If AOF is enabled, copy the appendonly.aof file to ensure complete recovery. Use tools like scp or rsync over SSH to securely transfer these files to the target environment. If the instance is containerized, use persistent volume snapshots or mounted volume copies to extract backup data. This backup serves as a rollback point and is essential for recovery in case of data corruption or migration failure.
Cloning Execution
The cloning process begins with restoring the backed-up data into the new KeyDB environment. Connect to the target instance and stop the KeyDB process temporarily to allow safe file replacement. Move the dump.rdb or appendonly.aof file into the correct storage location, typically /var/lib/keydb/, ensuring that file permissions match the expected user and group settings. Once the data is in place, restart the KeyDB service and monitor logs to confirm a successful startup and key load.
After restoring data, verify the integrity and structure of the new instance. Use redis-cli or an equivalent client to query the dataset, confirm key counts, TTLs, and persistence settings. If your service uses custom modules, Lua scripts, or pub/sub channels, ensure they are functioning as expected. Review the configuration files (keydb.conf) to confirm replication, memory limits, eviction policies, and authentication are all consistent with the original service. For TLS-enabled instances, validate certificate paths, key permissions, and client connection behavior.
Test the service in isolation to validate correctness. This includes read/write operations, key expiration, background tasks, or pub/sub behavior. Simulate application queries and ensure that memory allocation, CPU usage, and persistence behavior match your expectations. Use observability tools to monitor performance and identify discrepancies. This is also the stage to update client configurations or environment variables if the connection endpoint or credentials have changed.
Once validation is complete, route live traffic to the new KeyDB instance. This may involve updating DNS records to point to the new IP address, reconfiguring load balancers, or modifying firewall rules. If you’re using managed DNS with short TTLs, the switchover can be nearly instantaneous. For high-availability environments, consider running both instances in parallel temporarily and shifting client traffic gradually. Monitor logs, metrics, and connected clients throughout the transition to detect and resolve issues early.
Post-Migration Validation and Optimization
Once the new environment is live and receiving traffic, focus on optimizing and securing the setup:
- Validate Application Functionality: Ensure that all applications relying on the KeyDB instance function correctly. Check integration with authentication systems, session stores, queues, or caching logic. Review logs for connection failures, timeouts, or permission errors. Confirm that all services have been updated to use the new endpoint and that no application is attempting to write to the old instance.
- Monitor Performance: Track memory usage, CPU load, disk I/O, and connection counts on the new instance. KeyDB performance characteristics may vary across cloud providers or instance types, so tune your memory policy, eviction settings, and save intervals accordingly. Enable alerts for key metrics to proactively detect performance degradation. If autoscaling is supported in your environment, configure thresholds to manage traffic spikes.
- Secure the Environment: Enforce access controls via IP allowlists, firewall settings, and encrypted transport. Rotate access credentials or ACL tokens post-migration to eliminate any risk associated with exposed keys. If TLS was not previously enabled, consider enabling it on the new instance to improve data-in-transit security. Review KeyDB-specific security hardening such as disabling dangerous commands and isolating the instance from public access.
- Cleanup and Documentation: Once the migration is stable, decommission the old KeyDB instance and revoke any associated credentials. Ensure all monitoring, backups, and failover routines are redirected to the new service. Update internal documentation to reflect the new region, access endpoints, and runtime configuration. Log the migration steps and outcomes for future reference and audit trails
Benefits of Cloning
Cloning a KeyDB service enables safer testing, faster failover, and region-based redundancy. Teams can use cloned environments to stage changes, simulate workloads, or test application compatibility with newer KeyDB versions without impacting production. Clones are also useful for development and QA workflows that require access to near-real datasets without write permission to production.
In disaster recovery planning, a cloned instance in a separate region can act as a ready-to-promote failover node. If the primary region becomes unavailable, DNS can be redirected to the backup instance with minimal delay. Additionally, analytics or reporting workloads can run against a cloned read-only copy to isolate them from critical workloads, ensuring consistent performance for real-time applications.
Additionally, rather than building a new environment from scratch, you can clone the database into another provider, validate it, and cut over with minimal disruption. This helps maintain operational continuity and reduces the effort needed for complex migrations.
Manual Migration Using keydb-cli and Dump Files
Manual migrations using KeyDB’s native tools are ideal for users who prefer full control over data export and import, particularly during provider transitions, environment duplication, or when importing an existing self-managed KeyDB dataset into Elestio’s managed environment. This guide walks through the process of performing a manual migration to and from Elestio KeyDB services using command-line tools, ensuring that your data remains portable, auditable, and consistent.
KeyDB is fully compatible with Redis tooling, including redis-cli, redis.conf, and snapshot formats (dump.rdb, appendonly.aof). For clarity, this guide uses keydb-cli and keydb-server where applicable. If you’re using a Redis-compatible CLI installed with your system, the commands remain the same.
When to Use Manual Migration
Manual migration using keydb-cli is well-suited for scenarios where full control over the data export and import process is required. This method is particularly useful when migrating from an existing KeyDB or Redis-compatible setup, whether self-hosted, on-premises, or on another cloud provider, into Elestio’s managed KeyDB service. It allows for one-time imports without requiring continuous connectivity between source and target systems.
This approach is also ideal when dealing with version upgrades, as KeyDB’s dump-based backups can be restored into newer versions without compatibility issues. In situations where Elestio’s built-in snapshot or replication tools aren’t applicable, such as migrations from isolated environments or selective key imports, manual migration becomes the most practical option. Additionally, this method enables users to retain portable, versioned backups outside of Elestio’s infrastructure, which can be archived, validated offline, or re-imported into future instances.
Performing the Migration
Prepare the Environments
Before initiating a migration, verify that KeyDB is properly installed and configured on both the source system and your Elestio service. On the source, you need an active KeyDB instance with the ability to persist data using either RDB or AOF files. The user must also be allowed to connect over TCP if the server is remote.
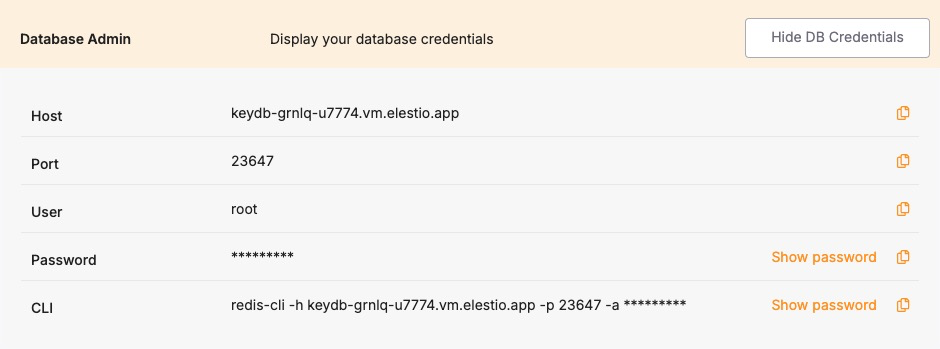
On the Elestio side, provision a KeyDB service from the dashboard. Once deployed, retrieve the connection information from the Database admin tab. This includes the hostname, port, and password. You’ll use these credentials to connect during the restore step. Ensure that your IP is allowed to connect under the Cluster Overview > Security > Limit access per IP section; otherwise, the KeyDB port will be unreachable during the migration.
Create a Backup Dump
In this step, you generate a snapshot of the source KeyDB database. If persistence is enabled, the file dump.rdb will be automatically created in the working directory of the KeyDB server. You can trigger a manual save using the CLI to ensure the most recent in-memory state is written to disk.
keydb-cli -h <source_host> -p <source_port> SAVEAlternatively, to extract the RDB file via CLI, use:
keydb-cli --rdb dump.rdbThis command generates an RDB file compatible with KeyDB versions and saves it to the current directory. The resulting file is portable and version-aware. If the source instance uses AOF instead of RDB, you may want to disable AOF temporarily and force an RDB snapshot before migration.
Transfer the Dump File to the Target
If your source and target environments are on different hosts, the dump file must be transferred securely. This step ensures the snapshot is available on the system from which you’ll perform the restore. You can use secure copy (scp), rsync, or any remote file transfer method.
scp dump.rdb your_user@your_workstation:/path/to/local/If restoring from your local machine to Elestio, ensure the dump file is stored in a location readable by your current shell user. Elestio does not require the file to be uploaded to its servers; the restore is performed by connecting over the network or using a compatible Docker container. At this point, your backup is isolated from the source environment and ready for import.
Create the Target Container or Instance
To perform the restore locally before importing into Elestio, you can start a KeyDB instance using Docker. Mount the directory containing dump.rdb as a volume so the server automatically loads the snapshot on boot.
docker run -v /path/to/backup:/data --name keydb-restore -p 6379:6379 eqalpha/keydbThis command runs a local KeyDB container with the dump file mounted at /data. When the container starts, it detects dump.rdb and loads the dataset into memory. This provides an environment where you can inspect the data or transfer it into Elestio over the network.
If you’re directly importing into Elestio without this intermediate step, skip to the next section and connect using keydb-cli.
Restore the Data into Elestio
With the dump file available and the target instance deployed on Elestio, you can restore the data using keydb-cli and a live copy command. First, connect to the Elestio KeyDB instance using the credentials from the dashboard:
keydb-cli -h <elestio_host> -p <elestio_port> -a <elestio_password>Once connected, you can either use redis-cli --pipe to import a key-by-key export, or if restoring from a container, use a sync-based migration. In most cases, however, you’ll want to configure dump.rdb in a containerized KeyDB instance and then use replication to send data to Elestio:
keydb-cli -h localhost -p 6379 SLAVEOF <elestio_host> <elestio_port>Then authenticate with:
keydb-cli -h localhost -p 6379 -a <elestio_password>KeyDB will stream its contents into Elestio. Once the synchronization is complete, you can break replication and make Elestio the new primary.
keydb-cli -h localhost -p 6379 SLAVEOF NO ONEThis method is ideal for large datasets or when no direct dump import is supported.
Validate the Migration
Once the restore completes, you must validate the accuracy and completeness of the migration. Connect to the Elestio database using keydb-cli and inspect the dataset:
keydb-cli -h <elestio_host> -p <elestio_port> -a <elestio_password>Begin by checking the total number of keys:
DBSIZEInspect specific keys or key patterns:
KEYS *
GET some_key
TYPE some_key
Validate TTLs, data structures, and expected values. Run application-specific health checks and confirm that the application can read and write to the new instance without errors.
If you made any changes to connection strings or credentials, update your environment variables or secret managers accordingly. Elestio also supports automated backups, which you should enable post-migration to protect the restored dataset.
Benefits of Manual Migration
Manual KeyDB migration using native dump files on Elestio provides several key advantages:
- Compatibility and Portability: Logical dumps allow you to migrate from any KeyDB- or Redis-compatible source into Elestio, including on-premises systems, Docker containers, or other clouds.
- Version-Safe Upgrades: The tools support migrating across KeyDB versions, which is ideal during controlled upgrades.
- Offline Archiving: Manual dumps serve as portable archives for cold storage, disaster recovery, or historical snapshots.
- Platform Independence: You retain full access to KeyDB native tools without being locked into Elestio-specific formats or interfaces.
This method complements Elestio’s automated backup and migration features by enabling custom workflows and one-off imports with full visibility into each stage.