How-To Guides
- Creating a Database
- Upgrading to a Major Version
- Installing and Updating an Extension
- Creating Manual Backups
- Restoring a Backup
- Identifying Slow Queries
- Detect and terminate long-running queries
- Preventing Full Disk Issues
- Checking Database Size and Related Issues
Creating a Database
MySQL is a leading open-source relational database management system (RDBMS) known for its reliability, scalability, and ease of use. Setting up a database properly in MySQL is crucial for ensuring long-term maintainability, performance, and security of applications. This guide walks through different ways to create a MySQL database: using the MySQL CLI, using Docker containers, and using the mysqladmin tool. It also emphasises best practices that should be followed at each step.
Creating a Database Using MySQL CLI
The most common and straightforward way to create a database is by using the MySQL command-line interface (mysql client). First, a connection must be established to the MySQL server using an account with appropriate privileges, typically the root account or a designated administrative user.
Connect to MySQL:
Connect to MySQL:
mysql -u root -pTo connect to a remote MySQL database using the MySQL CLI, you need to specify the host’s IP address or domain name using the -h flag along with the username and password:
mysql -h <remote_host> -P <port> -u <username> -pYou will be prompted to enter the password for the root user. Upon successful login, the MySQL shell opens where SQL queries can be executed.
Create a New Database
To create a database with default settings:
CREATE DATABASE mydatabase;However, it is a best practice to explicitly define the character set and collation. This prevents potential problems with encoding and sorting, especially when dealing with multilingual data or special characters. The recommended character set for modern applications is utf8mb4, which fully supports Unicode.
Create a database with specific character set and collation:
CREATE DATABASE mydatabase CHARACTER SET utf8mb4 COLLATE utf8mb4_unicode_ci;You can verify that the database was created by listing all databases:
SHOW DATABASES;Explicitly setting the character set ensures data consistency and minimizes future migration issues. Additionally, defining these settings at creation time avoids relying on server defaults, which can vary across different environments.
Creating a Database in Docker
Docker is a tool that helps run applications in isolated environments called containers. A MySQL container provides a self-contained database instance that can be quickly deployed and managed. If you are running MySQL inside a Docker container, follow these steps:
Access Elestio Terminal
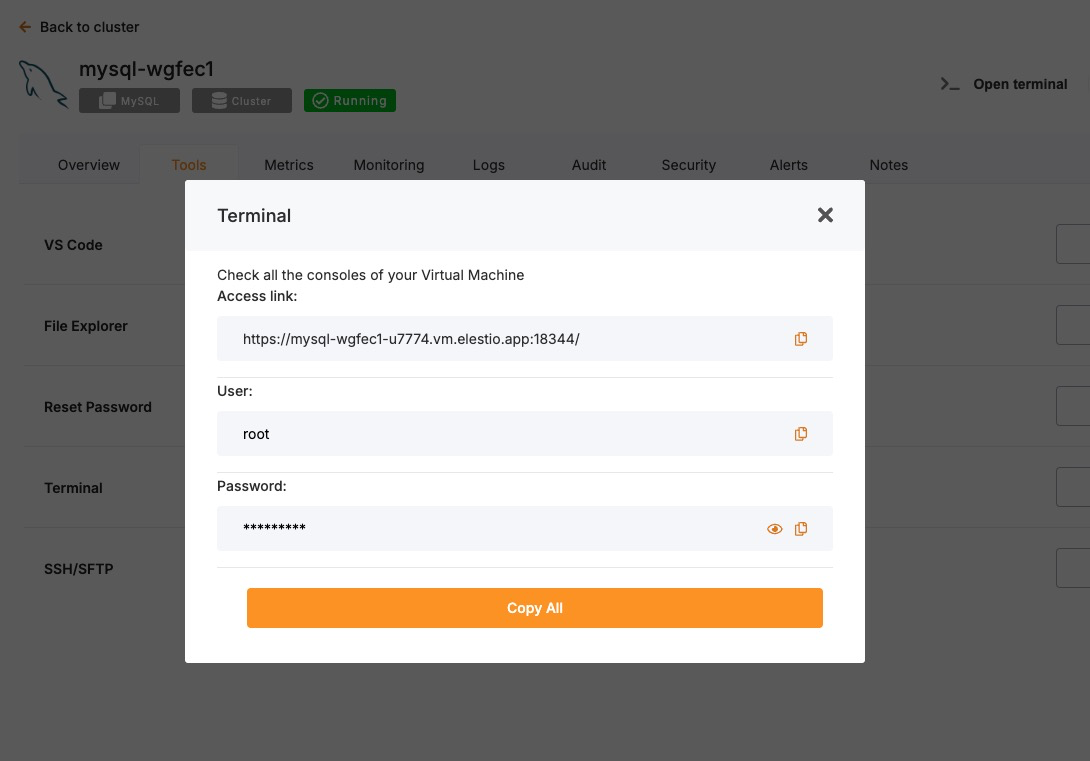
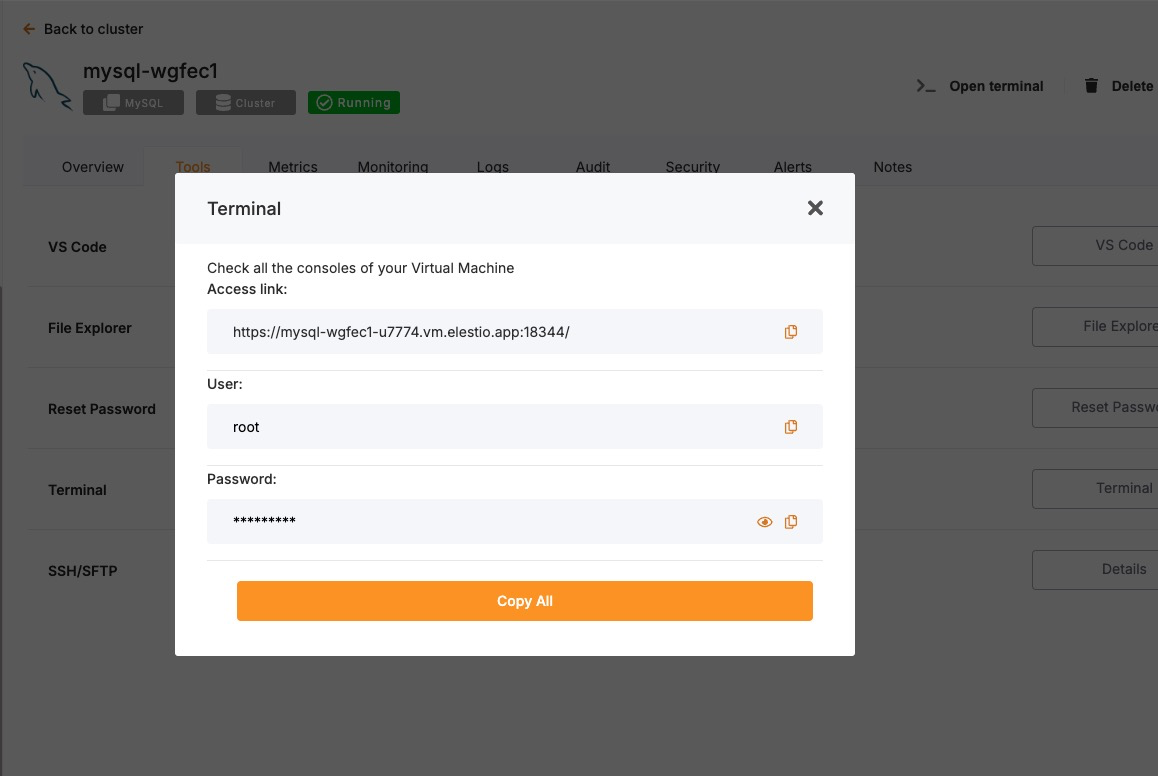
Head over to your deployed MySQL service dashboard and head over to Tools > Terminal. Use the credentials provided there to log in to your terminal.
Once you are in your terminal, run the following command to head over to the correct directory to perform the next steps
cd /opt/app/Access the MySQL Container Shell
docker-compose exec mysql bashInside the container, access the MySQL shell:
mysql -u root -pCreate Database
Now, to create a database, use the following command. This command tells MySQL to create a new logical database called mydatabase. By default, it inherits settings like encoding and collation from the template database (template1), unless specified otherwise.
CREATE DATABASE mydatabase;Creating a Database Using mysqladmin
The mysqladmin utility provides a non-interactive way to create databases. It is particularly useful for automation scripts and quick administrative tasks.
To create a database:
mysqladmin -h <host> -P <port> -u root -p create mydatabaseOne limitation of mysqladmin is that it does not allow specifying character set and collation at creation time. Therefore, if these settings need to be controlled explicitly (which is generally recommended), it is better to use the mysql CLI instead.
Before using mysqladmin, ensure the MySQL server is running. On traditional installations, check the status:
sudo systemctl status mysqlIf the service is not active, it can be started with:
sudo systemctl start mysqlBest Practices for Creating Databases
Use Meaningful Names
Choosing clear and descriptive names for databases helps in organisation and long-term maintenance. Avoid generic names like testdb or database1, as they do not convey the database’s role or content. Instead, choose names that reflect the kind of data stored or the application it supports, such as customer_data, sales_records, or analytics_db. Meaningful names improve clarity for developers, DBAs, and future maintainers who need to quickly understand the purpose of each database without relying heavily on documentation.
Follow Naming Conventions
A standardized naming convention across all environments and teams simplifies database management and reduces confusion. MySQL database names are case-sensitive on Unix-based systems, so consistent use of lowercase letters is recommended. Use underscores to separate words (e.g., order_details) rather than camelCase or spaces. This avoids the need for extra quoting in SQL queries and prevents platform-specific bugs. Additionally, avoid using reserved MySQL keywords or special characters in database names, as these can lead to parsing errors and unexpected behaviour.
Restrict User Permissions
Granting only the minimum required permissions significantly strengthens database security and reduces the likelihood of accidental damage or data leaks. Following the Principle of Least Privilege, reporting users should only be given SELECT access, while application users may require SELECT, INSERT, UPDATE, and DELETE rights. Only a few trusted administrative users should have powerful privileges like ALTER, DROP, or GRANT. Avoid assigning superuser access unless absolutely necessary. Creating user roles or groups with defined scopes can help standardise permission levels across teams and services.
Enable Backups
Regular backups are critical to ensure business continuity and safeguard against data loss from unexpected events such as accidental deletions, server crashes, or software bugs. MySQL provides tools like mysqldump for logical backups of individual databases, and mysqlpump or xtrabackup for more advanced use cases. It’s good practice to schedule automated backups using cron jobs or database orchestration tools. Backup files should be stored securely and regularly tested for restoration to verify that the process works as expected during emergencies.
Monitor Performance
Ongoing performance monitoring is essential to maintain the responsiveness and stability of MySQL databases. Monitoring tools like performance_schema, information_schema, or external platforms like Percona Monitoring and Management (PMM) help identify slow queries, locked transactions, and system resource bottlenecks. Use EXPLAIN and ANALYZE to understand query plans and optimize indexes. Keeping an eye on connection stats, query latency, and buffer pool usage allows for timely tuning and ensures efficient database operations at scale.
Common Issues and Their Solutions
Here’s a table summarizing common problems faced during database creation and how to resolve them:
|
Issue |
Cause |
Solution |
|---|---|---|
|
ERROR 1044 (42000): Access denied for user |
The connected user does not have the CREATE privilege. |
Connect as a user with administrative privileges or grant necessary permissions. |
|
ERROR 1007 (HY000): Can't create database; database exists |
Attempting to create a database that already exists. |
Choose a different name or drop the existing database if appropriate using DROP DATABASE. |
|
Can't connect to MySQL server on 'localhost' |
MySQL server is not running, or incorrect connection parameters are used. |
Start the MySQL service and verify network and authentication parameters. |
|
Collation or character set issues later in application |
Database created without explicitly specifying character set or collation. |
Always specify utf8mb4 and a collation like utf8mb4_unicode_ci during database creation. |
|
Docker MySQL container refuses connections |
MySQL container not ready or port mappings not correctly set. |
Check container logs with docker-compose logs mysql and verify port exposure settings in docker-compose.yml. |
Upgrading to a Major Version
Upgrading a database service on Elestio can be done without creating a new instance or performing a full manual migration. Elestio provides a built-in option to change the database version directly from the dashboard. This is useful for cases where the upgrade does not involve breaking changes or when minimal manual involvement is preferred. The version upgrade process is handled by Elestio internally, including restarting the database service if required. This method reduces the number of steps involved and provides a way to keep services up to date with minimal configuration changes.
Log In and Locate Your Service
To begin the upgrade process, log in to your Elestio dashboard and navigate to the specific database service you want to upgrade. It is important to verify that the correct instance is selected, especially in environments where multiple databases are used for different purposes such as staging, testing, or production. The dashboard interface provides detailed information for each service, including version details, usage metrics, and current configuration. Ensure that you have access rights to perform upgrades on the selected service. Identifying the right instance helps avoid accidental changes to unrelated environments.
Back Up Your Data
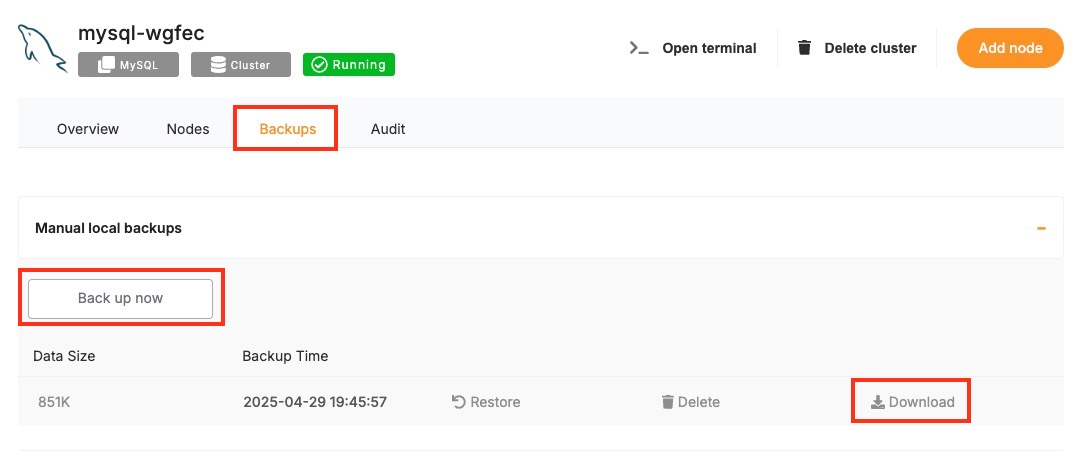
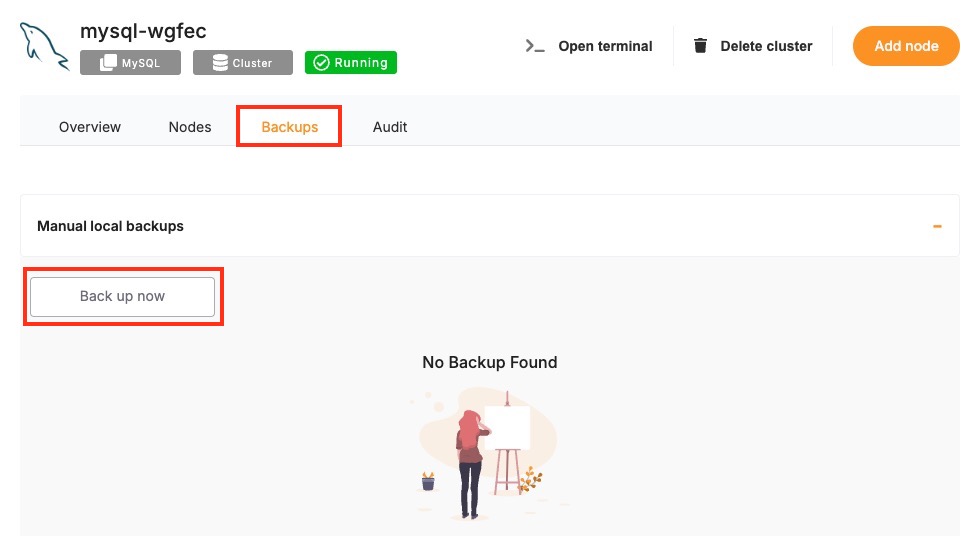
Before starting the upgrade, create a backup of your database. A backup stores the current state of your data, schema, indexes, and configuration, which can be restored if something goes wrong during the upgrade. In Elestio, this can be done through the Backups tab by selecting Back up now under Manual local backups and Download the backup file. Scheduled backups may also be used, but it is recommended to create a manual one just before the upgrade. Keeping a recent backup allows quick recovery in case of errors or rollback needs. This is especially important in production environments where data consistency is critical.
Select the New Version
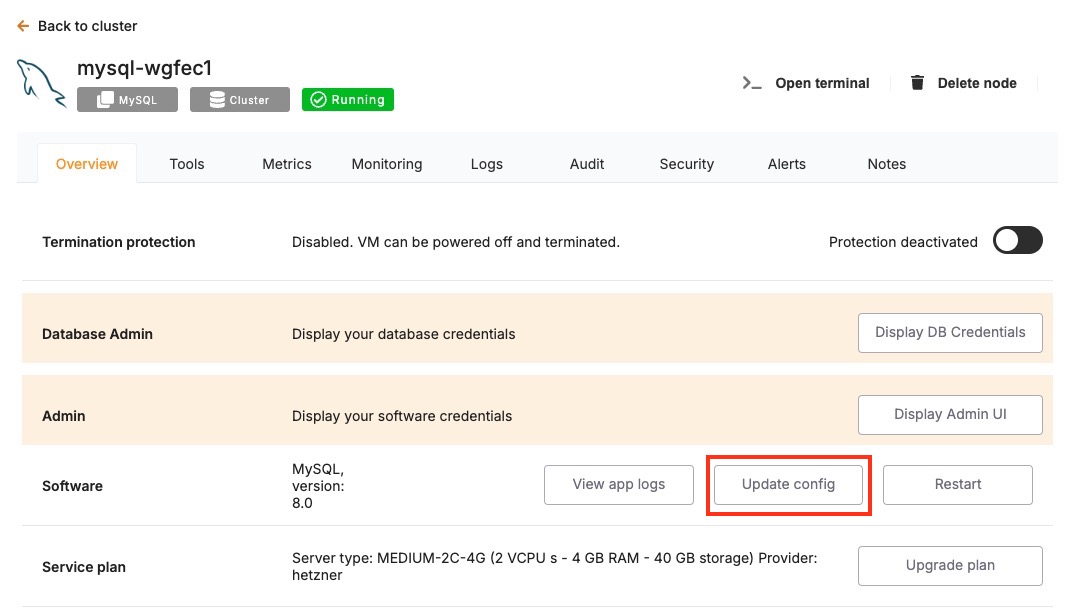
Once your backup is secure, proceed to the Overview and then Software > Update config tab within your database service page.
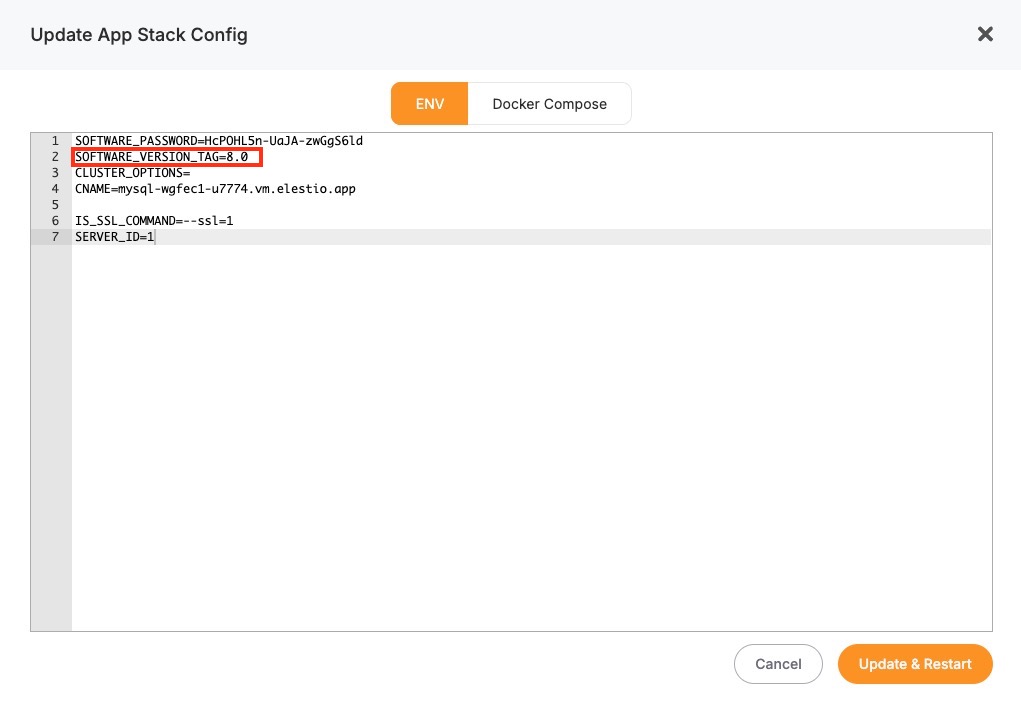
Here, you'll find an option labeled ENV. In the ENV menu, change the desired database version to SOFTWARE_VERSION. After confirming the version, Elestio will begin the upgrade process automatically. During this time, the platform takes care of the version change and restarts the database if needed. No manual commands are required, and the system handles most of the operational aspects in the background.
Monitor the Upgrade Process
The upgrade process may include a short downtime while the database restarts. Once it is completed, it is important to verify that the upgrade was successful and the service is operating as expected. Start by checking the logs available in the Elestio dashboard for any warnings or errors during the process. Then, review performance metrics to ensure the database is running normally and responding to queries. Finally, test the connection from your client applications to confirm that they can interact with the upgraded database without issues.
Installing and Updating an Extension
MySQL supports a variety of plugins that extend the functionality of the database engine. These plugins add features like authentication methods, full-text search improvements, audit logging, and more. Popular examples include auth_socket, validate_password, and audit_log. In Elestio-hosted MySQL instances, many common plugins are already available and can be enabled or disabled as needed. This guide explains how to install, manage, and troubleshoot MySQL plugins and verify compatibility with different MySQL versions.
Installing and Enabling Plugins
In MySQL, plugins are usually installed globally at the server level, not per-database. If the plugin binaries are available, they can be loaded dynamically at runtime without restarting the server.
Start by connecting to your MySQL database using a client like mysql:
mysql -u root -p -h your-elestio-hostnameTo enable a plugin, use the INSTALL PLUGIN command. For example, to enable the validate_password plugin:
INSTALL PLUGIN validate_password SONAME 'validate_password.so';You can verify that the plugin is installed by checking the plugin list:
SHOW PLUGINS;To enable a plugin automatically at server startup, add its configuration in the my.cnf file. However, for managed Elestio instances, this may require support team intervention unless custom configuration access is provided.
Checking Plugin Availability & Compatibility
Plugins must be compiled for the specific MySQL version and platform. Before upgrading MySQL or installing a new plugin, verify that a compatible version is available for your target setup. You can find plugin binaries under the plugin_dir, which you can locate with:
SHOW VARIABLES LIKE 'plugin_dir';To check if a specific plugin is installed and active:
SELECT * FROM INFORMATION_SCHEMA.PLUGINS WHERE PLUGIN_NAME = 'validate_password';If a plugin is incompatible or missing from the plugin_dir, the server will return an error when you attempt to install it. In this case, contact Elestio support to request installation or confirm version compatibility.
Updating or Uninstalling Plugins
After a MySQL version upgrade, some plugins may need to be reinstalled or updated. If a plugin is malfunctioning after an upgrade, it is good practice to uninstall and reinstall it:
UNINSTALL PLUGIN validate_password;
INSTALL PLUGIN validate_password SONAME 'validate_password.so';
Not all plugins support automatic upgrades. You should consult plugin-specific documentation or Elestio’s compatibility matrix before proceeding.
Troubleshooting Common Plugin Issues
|
Issue |
Cause |
Resolution |
|---|---|---|
|
Can't open shared library |
Plugin binary not found in plugin_dir |
Check if the |
|
Plugin already installed |
Attempting to install a plugin that is already active |
Use |
|
Permission denied |
Current user lacks |
Log in as a user with |
|
Plugin is not loaded at startup |
Plugin not defined in configuration file |
Contact Elestio to add it to the MySQL startup config ( |
Security Considerations
Plugins can have significant control over database behavior. Only enable trusted plugins from verified sources. Avoid enabling plugins you do not need, as they can introduce security or performance risks. Always test plugin behavior in a staging environment before deploying to production.
Creating Manual Backups
Regular backups are a key part of managing a MySQL deployment. While Elestio provides automated backups by default, you may want to perform manual backups for specific reasons, such as preparing for a major change, keeping a local copy, or testing backup automation. This guide walks through how to create MySQL backups on Elestio using multiple approaches. It covers manual backups through the Elestio dashboard, using MySQL CLI tools, and Docker Compose-based setups. It also includes advice for backup storage, retention policies, and automation using scheduled jobs.
Manual Service Backups on Elestio
If you’re using Elestio’s managed MySQL service, the easiest way to create a manual backup is through the dashboard. This built-in method creates a full snapshot of your current database state and stores it within Elestio’s infrastructure. These backups are tied to your service and can be restored through the same interface. This option is recommended when you need a quick, consistent backup without using any terminal commands.
To trigger a manual backup from the Elestio dashboard:
-
Log in to the Elestio dashboard and navigate to your MySQL service/cluster.
-
Click the Backups tab in the service menu.
-
Select Back up now to generate a snapshot.
Manual Backups Using MySQL CLI
MySQL provides a set of command-line tools that are useful when you want to create backups from your terminal. These include mysqldump for exporting databases and mysql for connectivity and basic queries. This approach is useful when you need to store backups locally or use them with custom automation workflows. The CLI method gives you full control over the backup format and destination.
Collect Database Connection Info
To use the CLI tools, you’ll need the database host, port, name, username, and password. These details can be found in the Overview section of your MySQL service in the Elestio dashboard.

Back Up with mysqldump
Use mysqldump to export the database to a .sql file. This file can later be used to recreate the database or specific tables.
mysqldump -h <host> -P <port> -u <username> -p<password> <database_name> > <output_file>.sql-
Replace the placeholders with actual values from your Elestio dashboard.
-
The -p<password> flag must not have a space between -p and the password.
Example:
mysqldump -h mysql-example.elestio.app -P 24306 -u elestio -pelestioPass mydb > mydb_backup.sqlYou can add the --single-transaction flag for InnoDB tables to ensure consistency during the dump.
Manual Backups Using Docker Compose
If your MySQL database is deployed through a Docker Compose setup on Elestio, you can run the mysqldump command from within the running container. This is useful when the tools are installed inside the container environment and you want to keep everything self-contained. The backup can be created inside the container and then copied to your host system for long-term storage or transfer.
Access Elestio Terminal
Head over to your deployed MySQL service dashboard and go to Tools > Terminal. Use the credentials provided there to log in to your terminal.
Once you are in your terminal, navigate to the correct directory:
cd /opt/app/Run mysqldump Inside the Container
Use this command to run the backup from within the MySQL container. Ensure environment variables like MYSQL_USER, MYSQL_PASSWORD, and MYSQL_DATABASE are defined, or replace them with actual values.
docker-compose exec mysql \
  bash -c "mysqldump -u \$MYSQL_USER -p\$MYSQL_PASSWORD \$MYSQL_DATABASE > /tmp/manual_backup.sql"
This command saves the backup to /tmp/manual_backup.sql inside the container.
Copy Backup to Host
Once the backup is created inside the container, use the following command to copy it to your host system:
docker cp $(docker-compose ps -q mysql):/tmp/manual_backup.sql ./manual_backup.sqlThis creates a local copy of the backup file, which you can then upload to external storage or keep for versioned snapshots.
Backup Storage & Retention Best Practices
Once backups are created, they should be stored securely and managed with a clear retention policy. Proper naming, encryption, and rotation reduce the risk of data loss and help during recovery. Use timestamped filenames to identify when the backup was created. External storage services such as AWS S3, Backblaze B2, or an encrypted server volume are recommended for long-term storage.
Guidelines to follow:
-
Name backups clearly:
mydb_backup_2025_04_29.sql -
Store in secure, off-site storage if possible.
-
Retain 7 daily backups, 4 weekly backups, and 3–6 monthly backups.
-
Remove old backups automatically to save space using automation or scripts.
By combining storage hygiene with regular scheduling, you can maintain a reliable backup history and reduce manual effort.
Automating Manual Backups (cron)
Manual backup commands can be scheduled using tools like cron on Linux-based systems. This allows you to regularly back up your database without needing to run commands manually. Automating the process also reduces the risk of forgetting backups and ensures more consistent retention.
Example: Daily Backup at 2 AM
Open your crontab file for editing:
crontab -eThen add a job like the following:
0 2 * * * mysqldump -h db.vm.elestio.app -P 24306 -u elestio -pelestioPass mydatabase > /backups/backup_$(date +\%F).sql-
This will create a timestamped .sql file every day at 2 AM.
-
Make sure the /backups/ directory exists and is writable by the user running the cron job.
You can also compress the backup or upload it to cloud storage in the same script using tools like gzip, rclone, or aws-cli.
Restoring a Backup
Restoring backups is essential for recovery, environment duplication, or rollback scenarios. Elestio supports restoring backups both through its built-in dashboard and via command-line tools like mysql and mysqldump. You can also restore from inside Docker Compose environments. This guide provides detailed steps for full and partial restores using each method and explains how to address common errors that occur during restoration.
Restoring from a Backup via Terminal
This method is used when you’ve created a .sql dump file using mysqldump. You can restore it using the mysql command-line client. This approach is useful for restoring backups to new environments, during version upgrades, or testing data locally.
Create the target database if it does not exist
If the database you’re restoring into doesn’t already exist, you must create it first:
mysql -u <username> -p -h <host> -P <port> -e "CREATE DATABASE <database_name>;"You’ll be prompted to enter the password after running the command.
Run MySQL to import the backup
This command restores the full contents of the .sql file into the specified database:
mysql -u <username> -p -h <host> -P <port> <database_name> < <backup_file>.sqlYou’ll again be prompted for the password. This command restores everything from the dump file, including schema and data.
Restoring via Docker Compose
If your MySQL service is deployed using Docker Compose, you can restore the database inside the container environment. This is useful when MySQL runs in an isolated Docker setup, and you want to handle all backup and restore processes inside that environment.
Copy the backup into the container
Use docker cp to move the .sql file from your host machine to the MySQL container:
docker cp ./manual_backup.sql $(docker-compose ps -q mysql):/tmp/manual_backup.sqlRun the restore inside the container
Use the mysql CLI tool from within the container to restore the file:
docker-compose exec mysql \
  bash -c "mysql -u \$MYSQL_USER -p\"\$MYSQL_PASSWORD\" \$MYSQL_DATABASE < /tmp/manual_backup.sql"
Make sure your environment variables in the Docker Compose file (MYSQL_USER, MYSQL_PASSWORD, MYSQL_DATABASE) match the values used here.
Partial Restores
MySQL supports partial restores when the dump file is created with selective options in mysqldump. For example, you can restore just a specific table or only schema definitions.
Restore a specific table
If you created a dump for a specific table using mysqldump -t, you can restore it independently:
mysql -u <username> -p -h <host> -P <port> <database_name> < <table_dump_file>.sqlRestore schema only (no data)
To restore only the schema (no table contents), ensure that your dump file was created using:
mysqldump -u <username> -p -h <host> -P <port> --no-data <database_name> > schema_only.sqlThen restore it like this:
mysql -u <username> -p -h <host> -P <port> <database_name> < schema_only.sqlPartial restores work best when the original backup was generated with the appropriate level of granularity.
Common Errors & How to Fix Them
Errors during restore are often caused by permission issues, incorrect formats, or existing conflicting objects. Understanding the error messages and their causes will help you recover faster and avoid data loss.
1. Access denied for user
ERROR 1045 (28000): Access denied for user 'user'@'host'Ensure you are using the correct username/password and that the user has privileges to access the target database.
2. Table already exists
ERROR 1050 (42S01): Table 'my_table' already existsEither drop the target database before restoring:
mysql -u <username> -p -h <host> -P <port> -e "DROP DATABASE <database_name>;"
mysql -u <username> -p -h <host> -P <port> -e "CREATE DATABASE <database_name>;"
Or manually drop the conflicting tables before restore.
3. ERROR 1064 (Syntax Error)
ERROR 1064 (42000): You have an error in your SQL syntax...Check if you’re trying to import a binary or incorrectly formatted file. Ensure you’re using .sql text dump files with the mysql command and not raw .ibd or .frm files.
4. ERROR 1049 (Unknown Database)
ERROR 1049 (42000): Unknown database 'mydatabase'The specified database doesn’t exist. Create it manually before restoring.
mysql -u <username> -p -h <host> -P <port> -e "CREATE DATABASE mydatabase;"Identifying Slow Queries
Slow queries can degrade the performance of your MySQL-based application, leading to lag, timeouts, or higher resource consumption. On Elestio, whether you’re accessing MySQL via terminal, inside a Docker Compose container, or using MySQL CLI tools, there are structured ways to inspect and optimize query performance. This guide covers how to analyze slow queries, interpret execution plans, and apply performance improvements using techniques like EXPLAIN, slow query logs, and schema analysis.
Analyzing Slow Queries from the Terminal
When connected to a MySQL server from a terminal, you can use native SQL statements and built-in features to analyze the performance of specific queries. This is ideal for diagnosing issues in staging or production without needing container access.
Connect to your MySQL instance via terminal
To begin, log in to your MySQL server using the MySQL client:
mysql -u <username> -h <host> -pYou’ll be prompted for the password. Once inside, you can start analyzing queries.
Use EXPLAIN to view the execution plan
The EXPLAIN keyword shows how MySQL plans to execute a query. It breaks down how tables are accessed and joined, whether indexes are used, and how many rows are expected to be scanned.
EXPLAIN SELECT * FROM orders WHERE customer_id = 42;Review the type, key, rows, and Extra columns in the output. Look out for full table scans (type = ALL), which often signal that an index may be missing.
Check current running queries
To view which queries are actively running and their duration, use:
SHOW FULL PROCESSLIST;This can help identify long-running or stuck queries in real time.
Analyzing Inside Docker Compose
If your MySQL service is running inside a Docker Compose setup (as Elestio uses), it may not be directly exposed on your host. In this case, analysis must be done from within the container.
Access the MySQL container
Open a shell inside your MySQL container using Docker Compose:
docker-compose exec mysql bashThis gives you a command-line shell inside the container.
Connect to MySQL from inside the container
Once inside the container, use the environment-defined credentials to access the database:
mysql -u $MYSQL_USER -p$MYSQL_PASSWORD $MYSQL_DATABASEThis gives you the same SQL interface as from the host terminal, enabling you to use EXPLAIN, SHOW PROCESSLIST, and performance schema tools.
Enable and view the slow query log
MySQL can log slow queries to a file. This must be enabled in your container’s my.cnf configuration file:
[mysqld]
slow_query_log = 1
slow_query_log_file = /var/log/mysql/slow.log
long_query_time = 1
After applying these settings, restart the container. Slow queries taking longer than long_query_time (in seconds) will be logged.
You can then inspect the log file:
cat /var/log/mysql/slow.logUsing Performance Schema
MySQL’s performance schema and built-in commands help track query statistics over time. This is useful when diagnosing repeat offenders or inefficient patterns.
Enable the performance schema (if not already)
Ensure performance_schema is enabled in your MySQL configuration:
[mysqld]
performance_schema=ON
Restart the container after updating the config.
Identify top queries using statement summaries
This SQL query shows which SQL statements have the longest average execution times:
SELECT digest_text, count_star, avg_timer_wait/1000000000000 AS avg_time_sec
FROM performance_schema.events_statements_summary_by_digest
ORDER BY avg_timer_wait DESC
LIMIT 10;
This helps you find the most resource-intensive queries over time.
Understanding the MySQL Execution Plan
Reading the output of EXPLAIN is essential to understand how MySQL processes your query and whether it is using indexes efficiently.
Key output fields to interpret:
-
type: The join type. Prefer ref, range, or const over ALL (which indicates a full table scan).
-
key: The index used for the query. A NULL value may indicate a missing index.
-
rows: Estimated number of rows MySQL will scan. Lower is better.
-
Extra: Look for warnings like Using temporary or Using filesort, which may suggest suboptimal queries.
Use EXPLAIN ANALYZE (available in MySQL 8.0+) to see actual vs. estimated performance:
EXPLAIN ANALYZE SELECT * FROM orders WHERE customer_id = 42;Optimizing Queries for Better Performance
Once you’ve identified inefficient queries, optimization involves rewriting queries, adding indexes, or adjusting the schema.
Common techniques:
-
Add indexes to columns frequently used in WHERE, JOIN, and ORDER BY.
-
Avoid SELECT* : Only fetch columns you need to reduce I/O.
-
Use LIMIT when fetching preview data or paginated results.
-
Re-write joins or subqueries to reduce temporary tables and filesort operations.
-
Update statistics with ANALYZE TABLE:
ANALYZE TABLE orders;Detect and terminate long-running queries
Long-running queries in MySQL can degrade database performance by consuming system resources like CPU, memory, and disk I/O for extended periods. In production environments such as Elestio, it’s essential to monitor and manage these queries effectively to maintain responsiveness and avoid service disruptions. This guide explains how to detect, analyze, and safely terminate long-running queries in MySQL using terminal tools, Docker Compose setups, and built-in logging features. It also includes preventive strategies for avoiding such queries in the future.
Monitoring Long-Running Queries
When connected to your MySQL instance via the terminal using the MySQL CLI, you can inspect active sessions and identify queries that have been running for an excessive duration. This is useful for spotting inefficient or blocked operations.
To check all current sessions and running queries, execute:
SHOW FULL PROCESSLIST;This will return all client connections along with their process ID (Id), command type (Command), execution time in seconds (Time), and the actual SQL query (Info). The Time column indicates how long each query has been executing, allowing you to prioritize the longest-running ones.
If you want to isolate queries that have been running for more than a certain duration, such as 60 seconds, you can filter using the information_schema.processlist view:
SELECT * FROM information_schema.processlist
WHERE COMMAND != 'Sleep' AND TIME > 60;
This command excludes idle connections and focuses only on active queries that may need attention.
Terminating Long-Running Queries Safely
Once you’ve identified a query that’s taking too long, MySQL allows you to stop it using its process ID (Id). This can be done either by cancelling just the query or by killing the entire connection.
To stop the query and leave the connection active, run:
KILL QUERY <Id>;This interrupts the execution of the current query but keeps the client connection open.
If the connection is completely stuck or no longer needed, you can terminate it entirely:
KILL CONNECTION <Id>;Use this approach with caution, especially in shared environments, as it may interrupt ongoing operations or cause errors for connected applications.
Managing Long-Running Queries
If MySQL is running in a Docker Compose setup on Elestio, you’ll first need to access the container to inspect queries. You can do so by opening a shell inside the MySQL container:
docker-compose exec mysql bashOnce inside the container, connect to the MySQL service using the credentials defined in your environment:
mysql -u $MYSQL_USER -p$MYSQL_PASSWORD $MYSQL_DATABASEAfter connecting, you can run the same SHOW FULL PROCESSLIST and KILL commands to identify and handle long-running queries directly from inside the container environment. The logic and process are identical; the only difference is that you’re executing these operations within the container shell.
Using Slow Query Logs
MySQL supports slow query logging, which records statements that exceed a specified execution time. This is useful for long-term analysis and identifying recurring performance issues.
To enable this feature, update your MySQL configuration file (e.g., my.cnf or mysqld.cnf) with the following lines:
[mysqld]
slow_query_log = 1
slow_query_log_file = /var/log/mysql/slow.log
long_query_time = 1
This setup logs any query taking longer than one second. Once configured, restart the MySQL service to apply the changes.
You can then inspect the log with:
cat /var/log/mysql/slow.logTo summarize patterns in slow queries, use the mysqldumpslow tool:
mysqldumpslow /var/log/mysql/slow.logThis helps you identify repetitive or particularly expensive SQL statements based on execution time and frequency.
Analyzing Expensive Queries Over Time
To gain visibility into queries that are consistently slow over time, enable MySQL’s performance_schema. This built-in feature aggregates statistics about SQL statement execution, allowing you to pinpoint inefficiencies.
Make sure performance schema is enabled in your config:
[mysqld]
performance_schema = ON
Once it’s active, use this query to analyze the most time-consuming query patterns:
SELECT digest_text, count_star, avg_timer_wait/1000000000000 AS avg_time_sec
FROM performance_schema.events_statements_summary_by_digest
ORDER BY avg_timer_wait DESC
LIMIT 10;
This highlights SQL statements that are not just slow once, but frequently expensive, helping you focus on queries with the biggest overall impact.
Best Practices to Prevent Long-Running Queries
It’s better to prevent long-running queries than to reactively terminate them. A few strategic adjustments in your query design and database configuration can significantly improve performance.
-
Index critical columns used in WHERE, JOIN, and ORDER BY clauses to speed up lookups and sorting.
-
Avoid SELECT * in queries — fetch only the necessary columns to reduce result size and memory usage.
-
Use EXPLAIN to analyze how a query will be executed and whether indexes are being used
EXPLAIN SELECT * FROM orders WHERE customer_id = 42;-
Limit result sets in user-facing tools or admin dashboards using LIMIT clauses to avoid returning large datasets unnecessarily.
-
Set execution time limits at the session level
SET SESSION MAX_EXECUTION_TIME = 2000; -- in milliseconds-
Implement timeouts in applications and ORMs to prevent client-side hanging when the database becomes slow.
-
Monitor actively using slow query logs, processlist views, and the performance schema. Consider integrating this into your monitoring stack to set up alerts for unusually long or frequent queries.
Preventing Full Disk Issues
Running out of disk space in a MySQL environment can result in failed writes, temporary unavailability, and even data corruption. MySQL requires space not only for storing table data and indexes, but also for binary logs, temporary tables, transaction logs, and background operations. On platforms like Elestio, while the infrastructure is managed, users are responsible for monitoring data growth, managing logs, and planning for scale. This guide covers how to monitor disk usage, configure alerts, clean up unused data, and follow best practices to prevent full disk scenarios in a MySQL setup.
Monitoring Disk Usage
Effective disk usage monitoring allows you to detect unexpected growth before it becomes critical. A combination of operating system-level checks and MySQL-specific queries gives a complete view of space consumption.
To inspect overall system storage from the terminal or container shell, use:
df -hThis command shows available and used space for each mount point. Identify the mount that hosts your MySQL data directory—usually /var/lib/mysql on Linux systems.
To check database-level usage inside MySQL, connect using the MySQL CLI and run:
SELECT table_schema AS db_name,
       ROUND(SUM(data_length + index_length) / 1024 / 1024, 2) AS size_mb
FROM information_schema.tables
GROUP BY table_schema
ORDER BY size_mb DESC;
This reveals the size of each database schema in megabytes, including both data and indexes. For insights at the table level, run:
SELECT table_name,
       ROUND((data_length + index_length) / 1024 / 1024, 2) AS size_mb
FROM information_schema.tables
WHERE table_schema = 'your_database_name'
ORDER BY size_mb DESC
LIMIT 10;
Replace 'your_database_name' with your actual schema name. This helps pinpoint which tables are growing fastest or consuming disproportionate space.
Configuring Alerts and Cleaning Up Storage
Monitoring alone isn’t enough—automatic alerting and cleanup strategies ensure you’re notified in time and can act without downtime. In Docker Compose setups, container disk usage can be reviewed using:
docker system dfThis shows disk consumption across images, containers, and volumes. To list and inspect unused volumes:
docker volume lsAnd to remove a specific unused volume:
docker volume rm <volume-name>Do not remove any volume actively used by MySQL. Before any cleanup, confirm that your database volumes are backed up and not mounted by a running service. Within MySQL, temporary tables, binary logs, and undo logs can consume space rapidly. You can check the binary log directory and purge old logs manually:
SHOW BINARY LOGS;To delete older binary logs and reclaim space:
PURGE BINARY LOGS BEFORE NOW() - INTERVAL 7 DAY;This deletes logs older than 7 days. Adjust the interval based on your backup retention policy. You can also automate this behavior using the configuration option:
[mysqld]
expire_logs_days = 7
Managing & Optimizing Temporary Files
MySQL uses temporary files for complex queries, especially those involving large sorts or joins without indexes. These files are stored in the tmpdir directory and can fill up if not managed. Monitor the temp directory using OS tools:
du -sh /tmpIf temp file usage is consistently high, consider tuning the tmp_table_size and max_heap_table_size variables to reduce reliance on disk-based temporary tables.
To identify tables with excessive unused space, use:
SHOW TABLE STATUS WHERE Data_free > 0;These tables may benefit from optimization. Reclaim the unused space by running:
OPTIMIZE TABLE your_table_name;This rewrites the table and defragments it, reclaiming disk space. For InnoDB tables, this can also compact the clustered index.
Best Practices for Disk Space Management
Long-term disk health in MySQL requires more than just cleanup—it demands strategic design and active space governance.
-
Avoid storing large files in the database. Use external object storage for PDFs, images, or videos and store references (e.g., URLs) in the database.
-
Implement data retention policies. Archive old transactional data to another schema, flat files, or cold storage if it’s no longer queried frequently.
-
Partition large tables using range or list partitioning to separate older data. Partitioning improves manageability and enables easier purging or archiving.
-
Rotate logs regularly. Besides binary logs, general logs and error logs should be rotated using tools like logrotate, especially in containerized environments.
-
Monitor InnoDB transaction logs (the ib_logfile* files). These are critical for crash recovery but should not grow indefinitely. If they become too large, you may need to reconfigure their size safely and restart the service.
-
Store backups offsite. Backups stored on the same volume as your live database can fill your disk. Use Elestio’s backup tools to export backups to cloud storage or another disk.
Checking Database Size and Related Issues
As your MySQL database grows, it’s crucial to track how space is being used across schemas, tables, and indexes. Uncontrolled growth can slow down queries, consume disk space, and complicate backups. While Elestio provides managed infrastructure, database storage optimization is still your responsibility. This guide explains how to inspect database size, find the largest tables and indexes, detect unused or bloated space, and optimize your data layout in MySQL.
Checking Database and Table Sizes
MySQL’s information_schema tables provide insights into how storage is distributed across your databases. This data helps prioritize cleanup, tuning, or archiving strategies. To calculate the total size used by each database:
SELECT table_schema AS db_name,
       ROUND(SUM(data_length + index_length) / 1024 / 1024, 2) AS size_mb
FROM information_schema.tables
GROUP BY table_schema
ORDER BY size_mb DESC;
This output includes both table data and indexes, giving you an overview of which databases are consuming the most space. To identify the largest tables across all schemas:
SELECT table_schema, table_name,
       ROUND((data_length + index_length) / 1024 / 1024, 2) AS total_size_mb
FROM information_schema.tables
ORDER BY total_size_mb DESC
LIMIT 10;
This helps pinpoint space-heavy tables so you can review their contents, indexes, or retention policy. To break down data size versus index size for the top tables in a specific schema:
SELECT table_name,
       ROUND(data_length / 1024 / 1024, 2) AS table_mb,
       ROUND(index_length / 1024 / 1024, 2) AS index_mb
FROM information_schema.tables
WHERE table_schema = 'your_database'
ORDER BY table_mb DESC
LIMIT 10;
Replace 'your_database' with your actual schema name. A high index-to-data ratio could indicate overly aggressive indexing or opportunities for consolidation.
Detecting Bloat and Unused Space
MySQL tables especially those using the InnoDB storage engine can accumulate unused space over time due to updates, deletes, or internal fragmentation. This can inflate table size and degrade performance.
To list tables with free (unused) space that could be reclaimed:
SELECT table_name,
       ROUND(data_free / 1024 / 1024, 2) AS free_space_mb
FROM information_schema.tables
WHERE table_schema = 'your_database'
  AND data_free > 0
ORDER BY free_space_mb DESC
LIMIT 10;
Large data_free values may indicate internal fragmentation or deleted rows that haven’t been reclaimed yet. You can recover this space using table optimization. To view the number of rows deleted but not yet reclaimed (estimated):
SHOW TABLE STATUS FROM your_database;Check the Rows and Data_free columns for each table. If many rows have been deleted but space hasn’t shrunk, the table may need to be optimized.
Optimizing and Reclaiming Storage
Once bloated or inefficient tables have been identified, MySQL provides several tools for optimization:
Reclaim free space and defragment tables
OPTIMIZE TABLE your_table;This command rewrites the table and indexes, reclaiming space and improving performance. It’s safe for InnoDB tables and especially useful after large DELETE or UPDATE operations.
Rebuild fragmented or oversized indexes
If indexes have grown large due to repeated updates or inserts, rebuilding them can reduce size and improve query speed. Use:
ALTER TABLE your_table ENGINE=InnoDB;This effectively recreates the table and all associated indexes, helping reclaim space and improve internal ordering.
Note: Both OPTIMIZE and ALTER ENGINE operations lock the table for a short period. Run these during maintenance windows if the table is actively queried.
Remove or archive old rows
For time-series data or logs, consider deleting or archiving old records:
DELETE FROM your_table
WHERE created_at < NOW() - INTERVAL 90 DAY;
Use EXPLAIN before executing large deletes to ensure they use indexes efficiently. You may also consider archiving to flat files or cold-storage tables.
Partition large tables for better control
If tables grow continuously (e.g., transaction logs or audit trails), use MySQL’s range partitioning or list partitioning:
CREATE TABLE logs (
  id BIGINT,
  created_at DATE,
  ...
)
PARTITION BY RANGE (YEAR(created_at)) (
  PARTITION p2022 VALUES LESS THAN (2023),
  PARTITION p2023 VALUES LESS THAN (2024),
  PARTITION pmax VALUES LESS THAN MAXVALUE
);
Partitioning allows you to drop old data in chunks without full table scans or long DELETE operations.
Best Practices for Storage Management
-
Avoid storing large binary data in MySQL. Store files like images and videos in external object storage and reference them by URL or metadata.
-
Monitor binary logs and purge them periodically. If replication or point-in-time recovery isn’t needed beyond a certain timeframe, add to your config:
expire_logs_days = 7-
Or purge manually:
PURGE BINARY LOGS BEFORE NOW() - INTERVAL 7 DAY;-
Track backup file size and location. Ensure backups are stored on a separate volume or offsite to avoid filling the same disk as your live database.
-
Enable slow query logging to detect inefficient queries that cause unnecessary data scans and table growth.
-
Use monitoring tools (like Netdata, Prometheus exporters, or custom alert scripts) to track disk consumption trends over time.