Security
- Overview
- Nginx advanced configuration
- Using Cloudflare
- Network Firewall
- IP rate limiter
- Output Cache
- Termination protection & grace period
- Manage SSH Keys
- How to connect to an Elestio service with SSH keys
- SMTP service
- Multi-factor authentication
- How to Enable or Disable IPv6 on a Linux Virtual Machine
- How to configure NGINX to Listen on IPv6
- How to secure your application with Cloudflare Tunnel
- Custom domain and automated encryption (SSL/TLS)
- PTR Record Configuration
Overview
We automatically setup all services with several layers of security activated by default.
This includes:
- Automated SSL / TLS
- Network Firewall
- IP Rate Limiter
- Output Cache
- Accidental termination protection & Grace period
- Manage SSH Keys
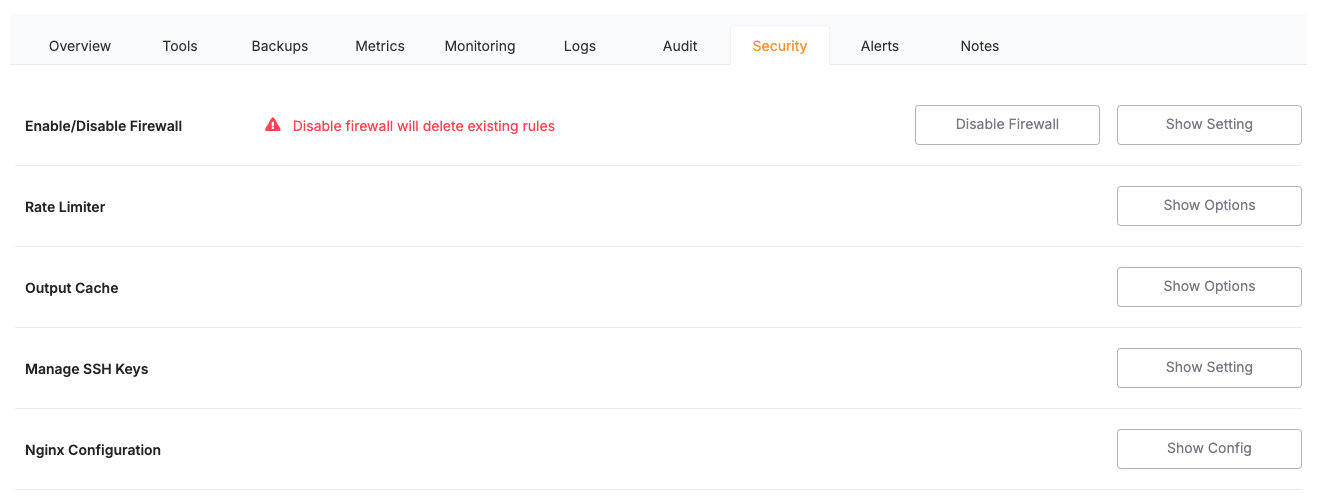
Each of these features are accessible from your Dashboard via the Security tab.
Nginx advanced configuration
Edit the website nginx configuration
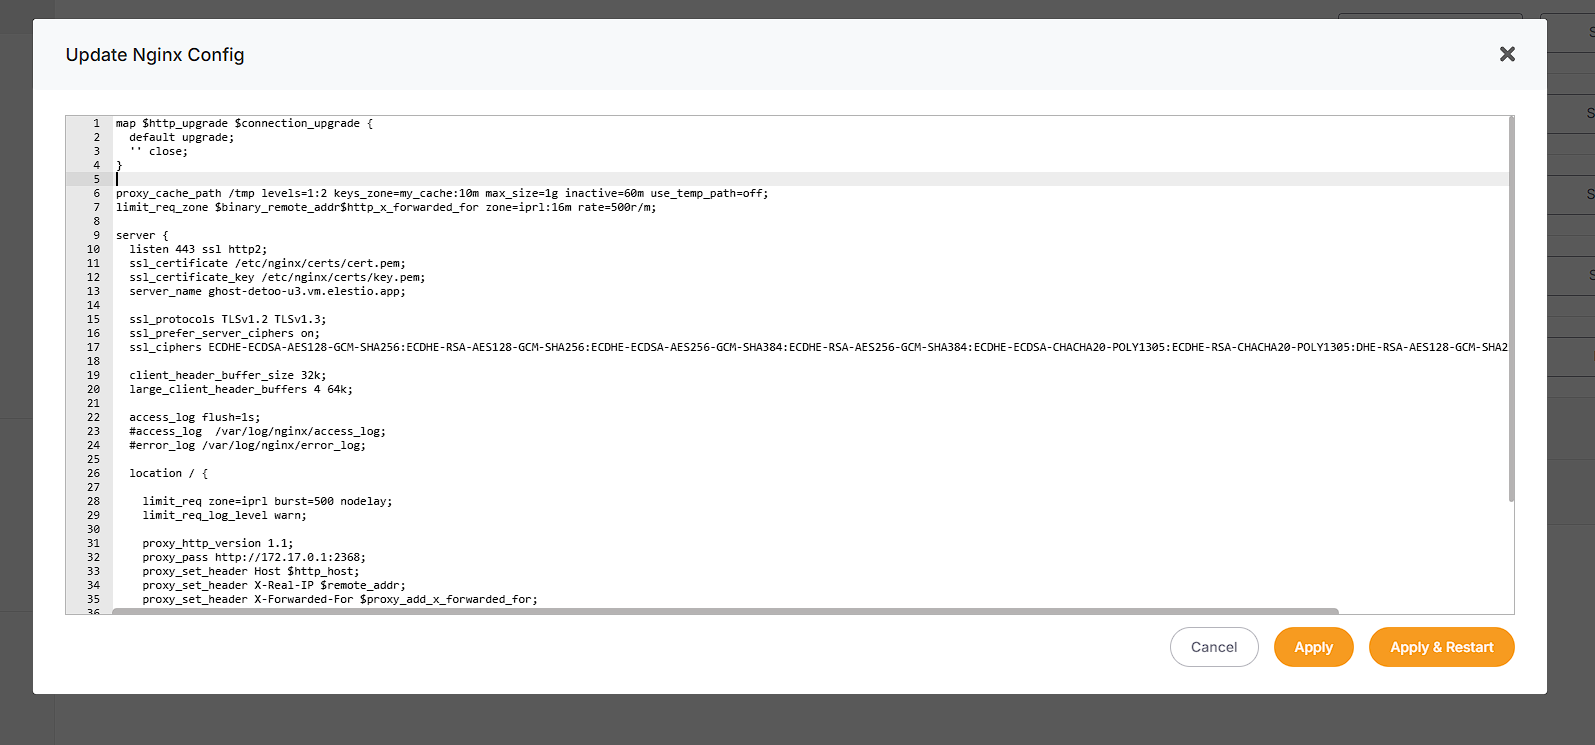
From the service overview screen it's possible to edit the nginx configuration for the elestio default subdomain domain & custom domain, to do that go to the Security tab, then click on Nginx configuration then click on Config button.
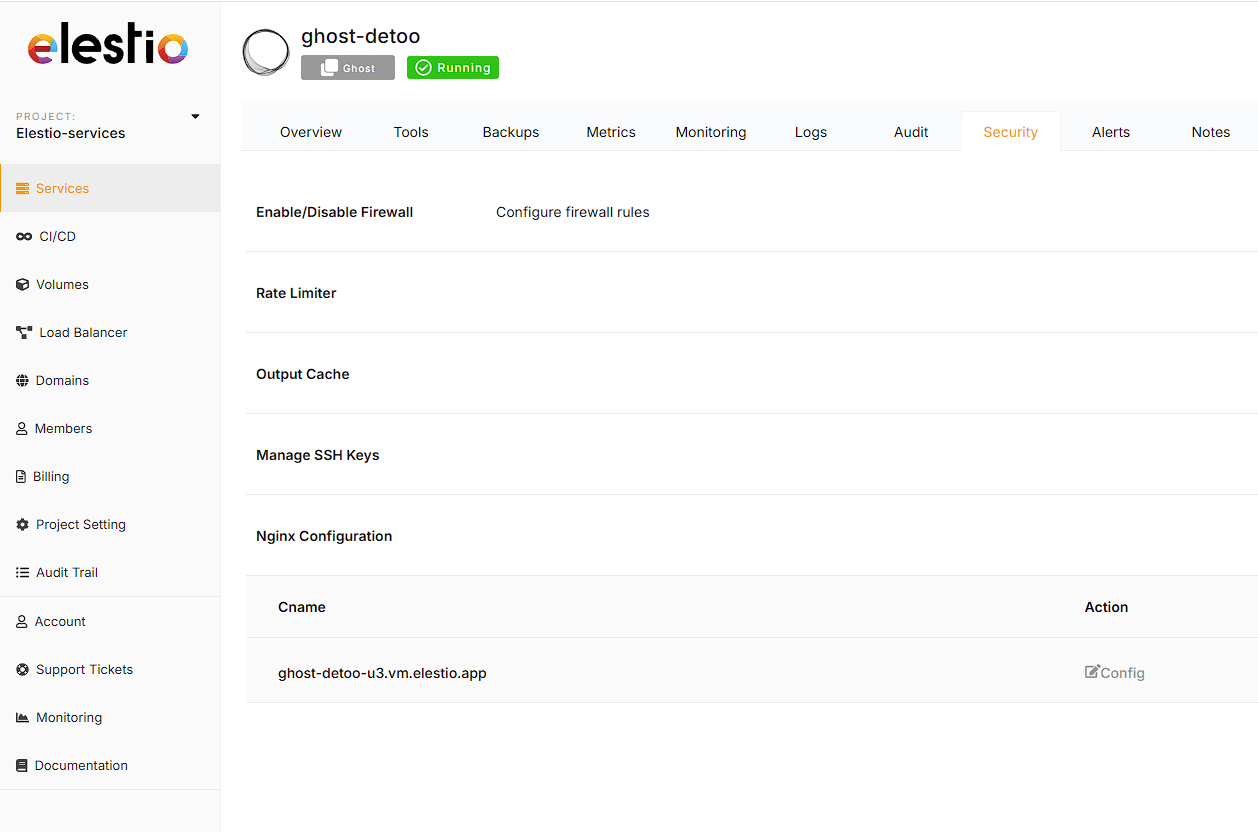
There you will see the site configuration in nginx, you are able from there to add or remove headers, to configure the reverse proxy and much more. Nginx is very powerful and provide tons of customizations and control.
Edit the global Nginx configuration
It's also possible to edit the global nginx configuration, to do that follow those steps:
1) create a file named nginx.conf in /opt/elestio/nginx/
2) Paste exactly this content in the file, then you can customize if for your needs:
worker_processes auto;

worker_rlimit_nofile 100000;

events {
  worker_connections 4000;
}

http {
  include mime.types;
  default_type application/octet-stream;
  sendfile on;
  tcp_nopush on;
  tcp_nodelay on;
  server_tokens off;

  # reasonable defaults
  client_header_timeout 10m;
  client_body_timeout 10m;
  send_timeout 10m;
  client_max_body_size 5120M;

  connection_pool_size 256;
  client_header_buffer_size 32k;
  large_client_header_buffers 4 64k;
  request_pool_size 4k;

  server_names_hash_bucket_size 4096;

  output_buffers 1 32k;
  postpone_output 1460;

  proxy_buffer_size   128k;
  proxy_buffers   4 256k;
  proxy_busy_buffers_size   256k;

  ignore_invalid_headers on;

  # enable gzip support
  include server-gzip.conf;

  # auto-ssl lua magic for automatic generation of certs
  include resty-http.conf;

  server {
    listen 80 default_server;

    include resty-server-http.conf;
  }

  include /etc/nginx/conf.d/*.conf;
}

stream {
 include /etc/nginx/streams/*.conf;
}
3) edit this file: /opt/elestio/nginx/docker-compose.yml and add there a new line under volumes
- /opt/elestio/nginx/nginx.conf:/usr/local/openresty/nginx/conf/nginx.conf
It should look like this:
version: '2'
services:
  nginx:
    image: elestio/nginx-auto-ssl:latest
    container_name: elestio-nginx
    restart: always
    network_mode: "host"
    volumes:
      - /opt/elestio/nginx/nginx.conf:/usr/local/openresty/nginx/conf/nginx.conf
      - /opt/elestio/nginx/ssl_data:/etc/resty-auto-ssl
      - /opt/elestio/nginx/conf.d:/etc/nginx/conf.d
      - /opt/elestio/nginx/streams:/etc/nginx/streams
      - /opt/elestio/nginx/logs:/var/log/nginx/
      - /root/.acme.sh/vm.elestio.app/fullchain.cer:/etc/nginx/certs/cert.pem
      - /root/.acme.sh/vm.elestio.app/vm.elestio.app.key:/etc/nginx/certs/key.pem
    env_file:
      - .env
4) Restart nginx with this command:
cd /opt/elestio/nginx/;
docker-compose down;
docker-compose up -d;
Now nginx reverse proxy will use your custom global configuration
Using Cloudflare
Cloudflare DNS:
If you wish to use Cloudflare for DNS ONLY, you can configure it just like any other DNS provider, and simply follow the steps for adding a custom domain as usual.
WARNING: Your domain DNS entry must have a GRAY cloud, not an ORANGE (proxied) cloud next to the entry.
![]() This is the correct image shown for DNS-only entries.
This is the correct image shown for DNS-only entries.
Cloudflare Proxy
Even though Elest.io automatically provides SSL and has a firewall, there can be advantages to using Cloudflare for Proxying traffic, notably DDoS attacks and automatic filtering of scripted attacks.
Note: Cloudflare only proxies traffic on certain ports. If you want to use this hostname for SSH, FTP, or other services whose ports are not listed in the above link, you must configure Cloudflare to provide DNS only or use Cloudflare's Spectrum offer.
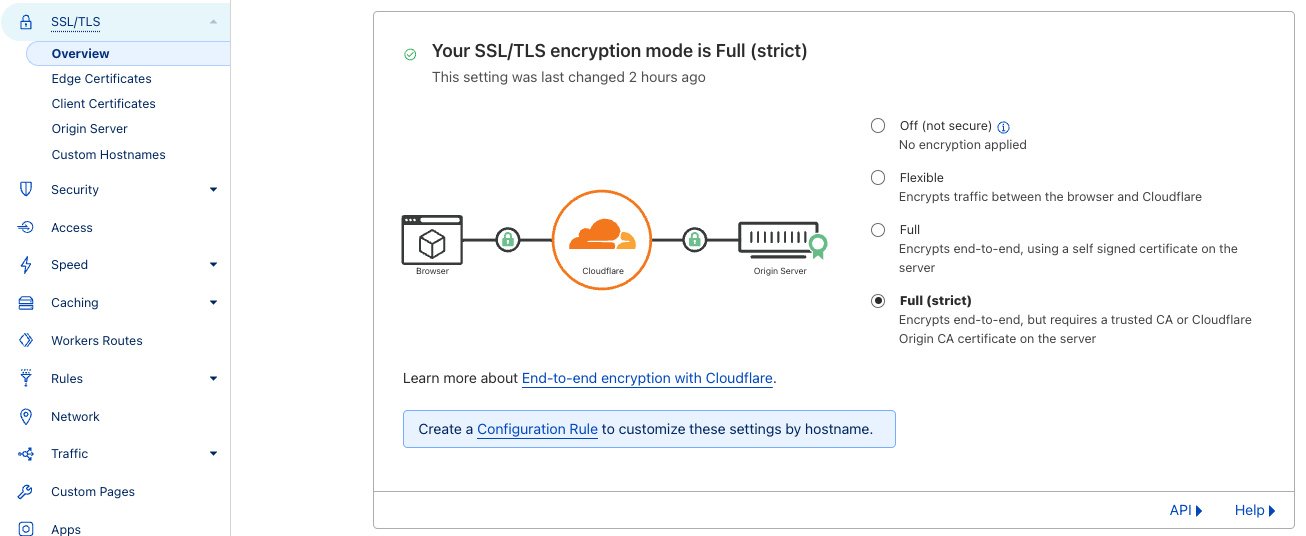
Because Elest.io already creates an SSL certificate for your website trusted by a root CA, the recommended configuration is to set Cloudflare to use Strict SSL verification when connecting to your server.
Before continuing, ensure you have already configured the domains as per the instructions on the previous page.
Option 1: To set up strict SSL verification for your whole domain:
Option 2: To set up strict SSL verification for a specific subdomain:
- In your domain's dashboard, navigate to
Rules > Configuration Rulesand clickCreate Rule - Name your rule, and configure the incoming request filters.

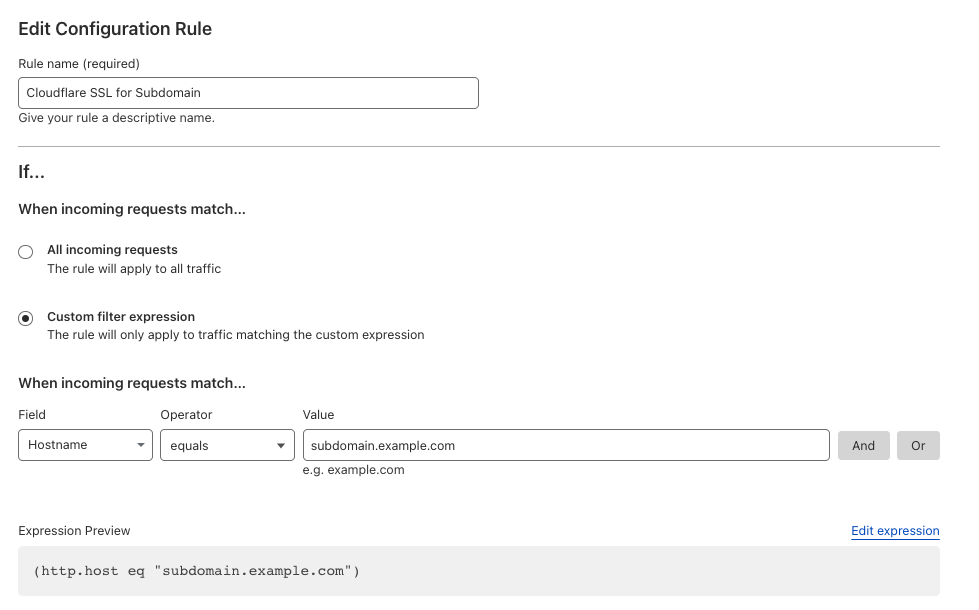
3. Configure the SSL to Strict
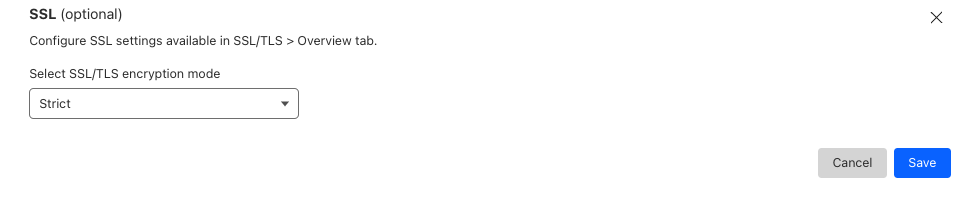
4. Click Save
Option 3: Manual configuration (Advanced)
If you need a custom implementation, you can disable the creation of an SSL certificate with the following steps.
Create a CNAME record for your Cloudflare entry and point to the CNAME provided for that service in the Elestio dashboard.
These changes can be overwritten in the future if you modify the list of domains via the Elest.io dashboard.
1) Connect to the VM with SSH and type this:
nano /opt/elestio/nginx/.env
there remove your domain from the first line and save with CTRL+X
then type this command:
cd /opt/elestio/nginx;
docker-compose down;
docker-compose up -d;
After that, nginx won't try again to obtain an SSL certificate for your domain.
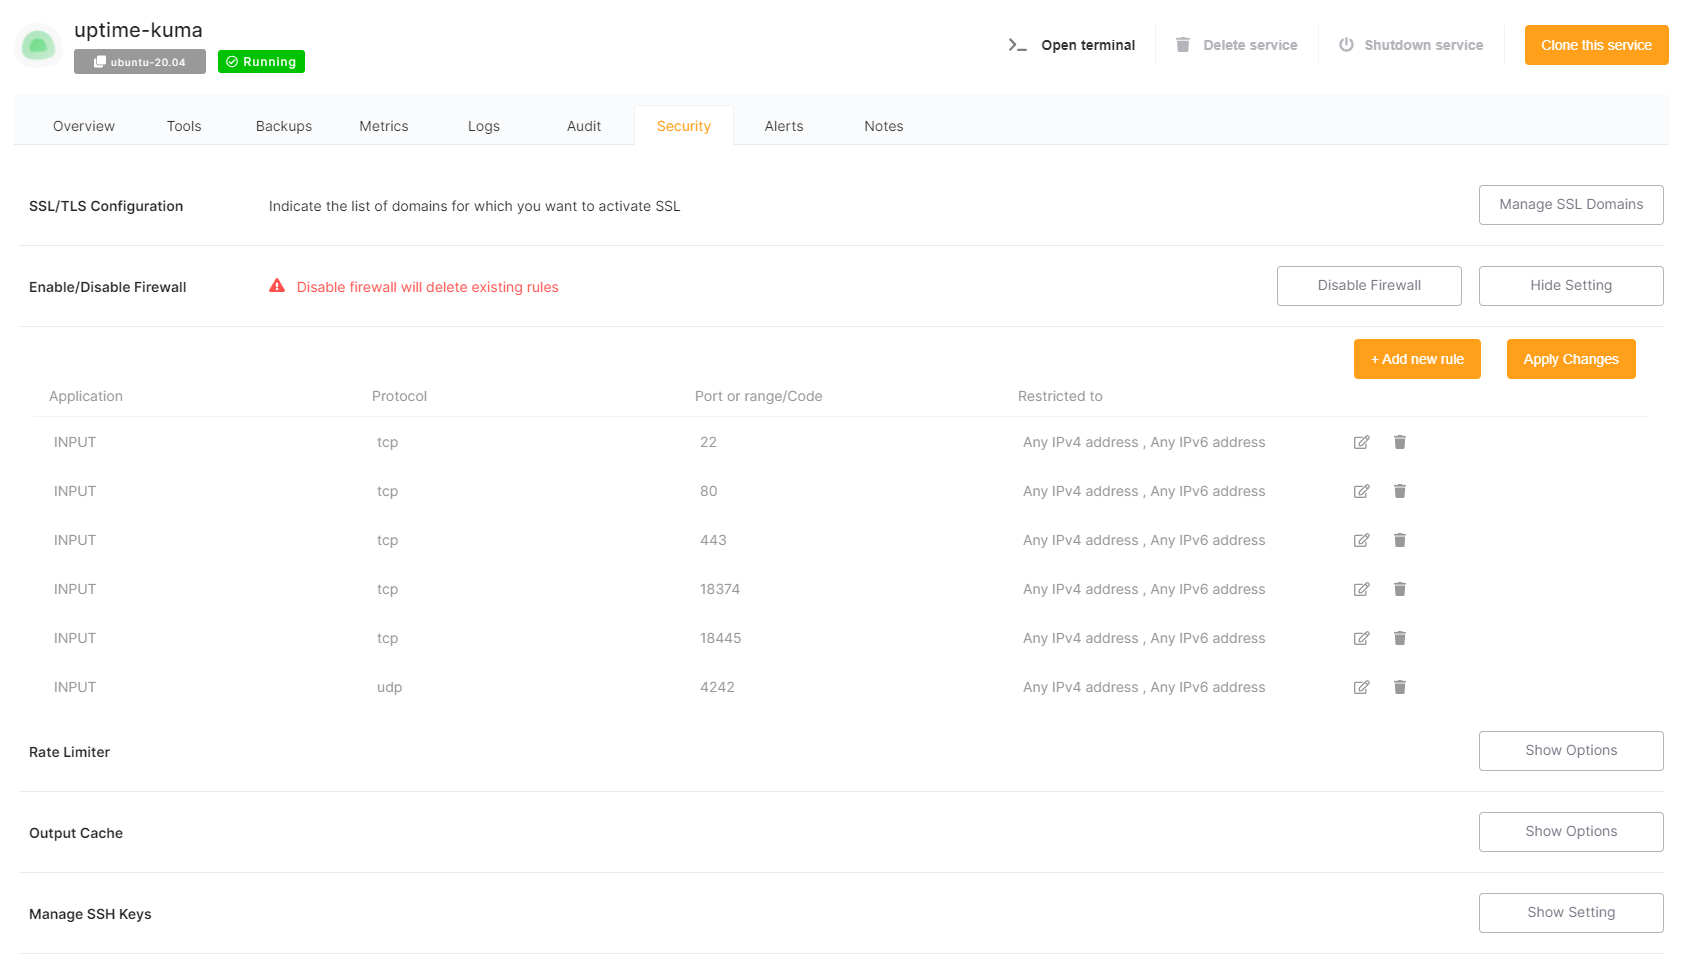
Network Firewall
By default, we only open the ports necessary for the application you have deployed.
How can I restrict access to my service by IP address?
From the Dashboard, select "Security", then "Show Settings" on the Firewall row
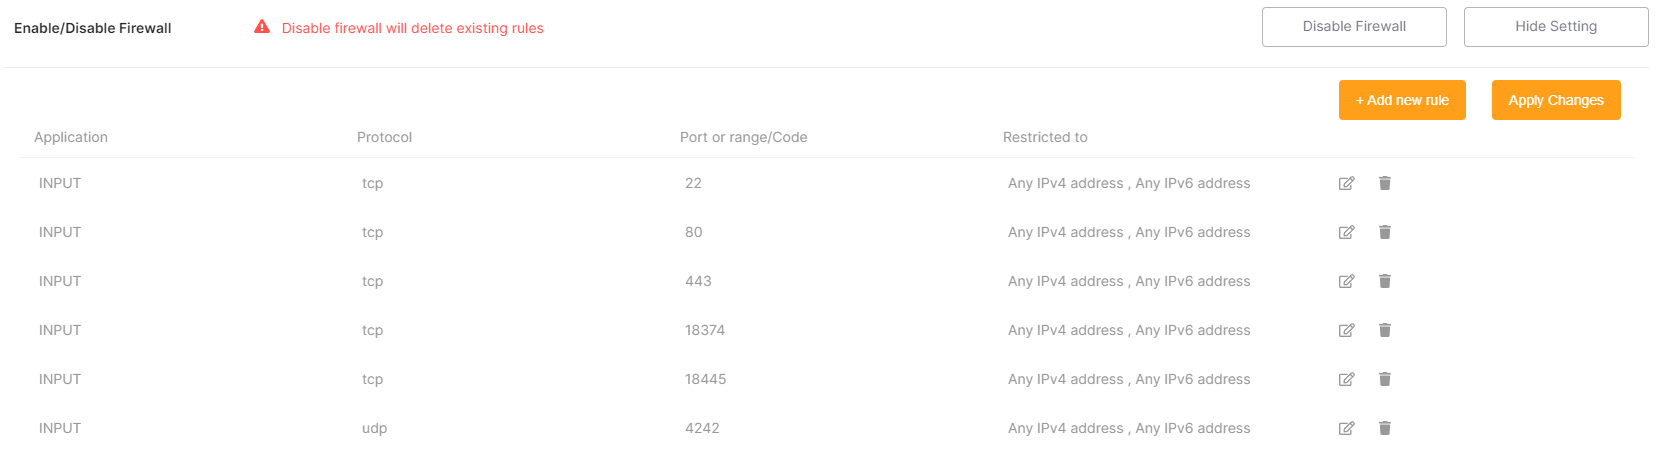
From there you can modify, remove, or add new rules to open a port from your service to the internet (or just to a specific target IP).
All services come preconfigured with firewall rules that match the software you are deploying.
You have to keep port 80 open to any ipv4/ipv6 or else Letsencrypt won't be able to generate an SSL certificate.
Here is a compilation of the ports necessary for Elestio Automation:
| Mandatory | Application | Protocol | Port | Usage |
| ✔️ | Input | TCP | 22 | Automation SSH |
| ❌ | Input | UDP | 4242 | Nebula/ Global IP |
| ❌ | Input | TCP | 18345 | VS Code |
| ❌ | Input | TCP | 18374 | Open Terminal |
| ❌ | Input | TCP | 18346 | File Explorer |
| ❌ | Input | TCP | 18445 | Tail Logs |
| ❌ | Input | TCP | 18344 | Terminal |
❌ => Ports are necessary only if you are utilizing specific tools and activating global private IP functionality.
IP rate limiter
From the Dashboard, click on Security then Rate Limiter > Show Options.
From here, you can easily modify and adjust your service's rate limiter configurations, by amount and per minute or second, per IP address.
By default, all services are preconfigured with a rate limiter of 150 requests per minute and per IP address.
Rate limiter is used only for web traffic.

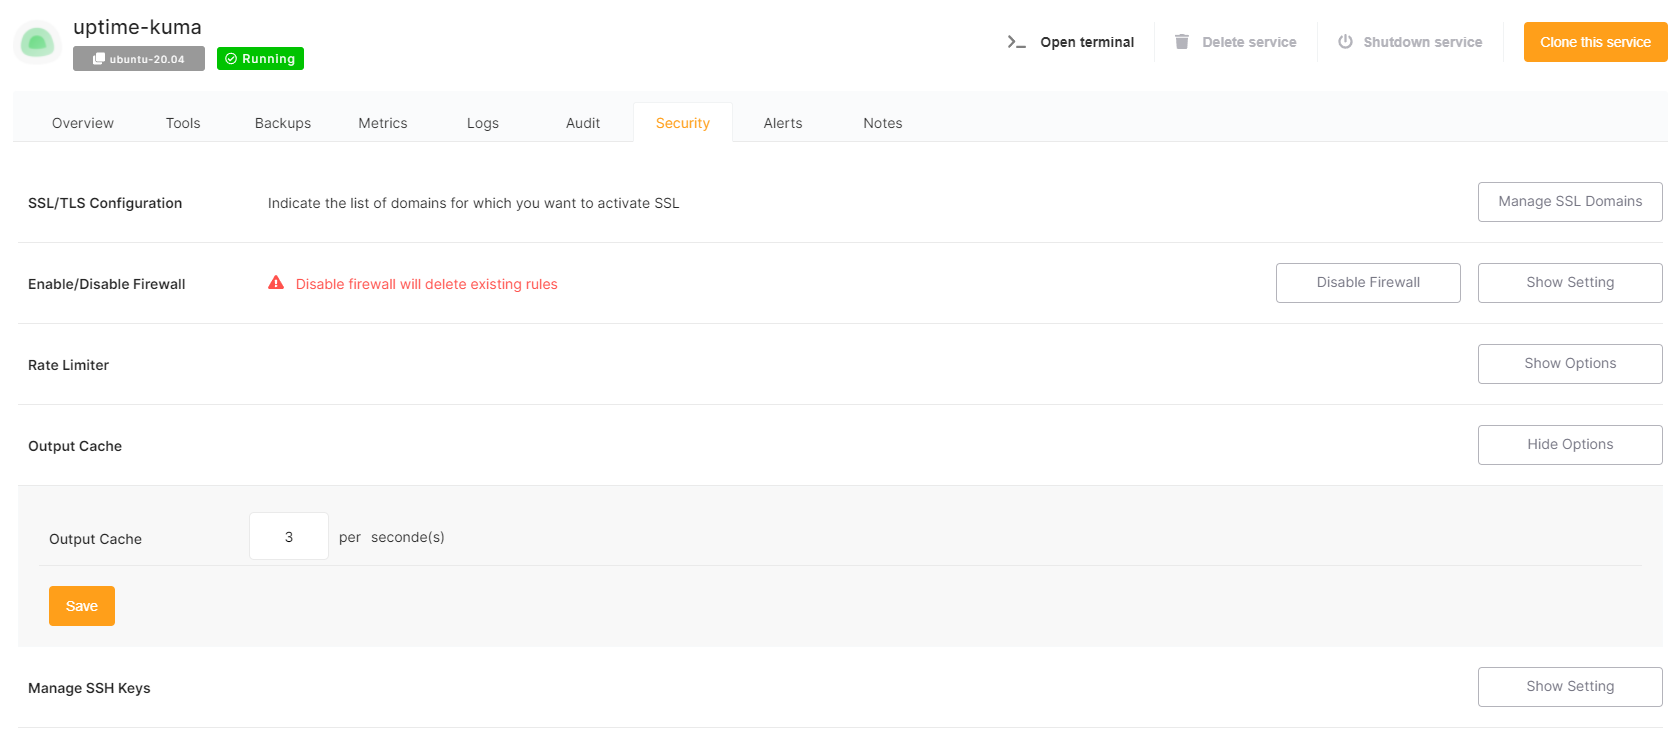
Output Cache
From the Dashboard, navigate to the Security tab and select Show Options under Output Cache.
From here, you can modify your output cache configurations.
All GET requests are cached for 3 seconds, which is useful in preventing Denial of Service (DOS) attacks.
All services come preconfigured with Output cache by default.
Output cache is used for web traffic only.
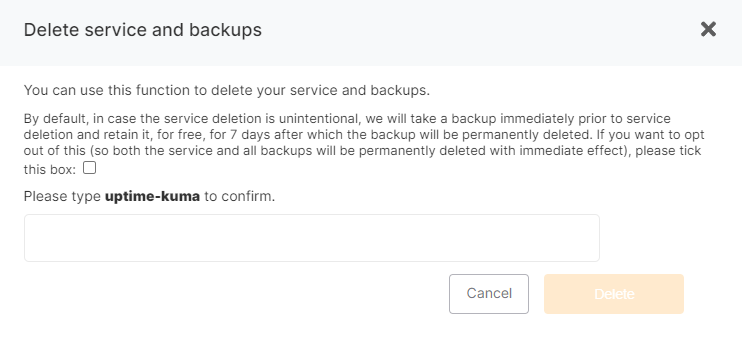
Termination protection & grace period
You can enable or disable the Termination protection option from your Dashboard Overview, using the toggle on the right-hand side. This setting is disabled by default.

It's not possible to change software versions, delete, shut down, power off, reset or reboot your service when Termination protection is enabled. To make these changes, you must first disable Termination protection.
Our grace period for storing backups after the deletion of service is 7 days, making it easier for you to restore your service in this window of time for any reason.
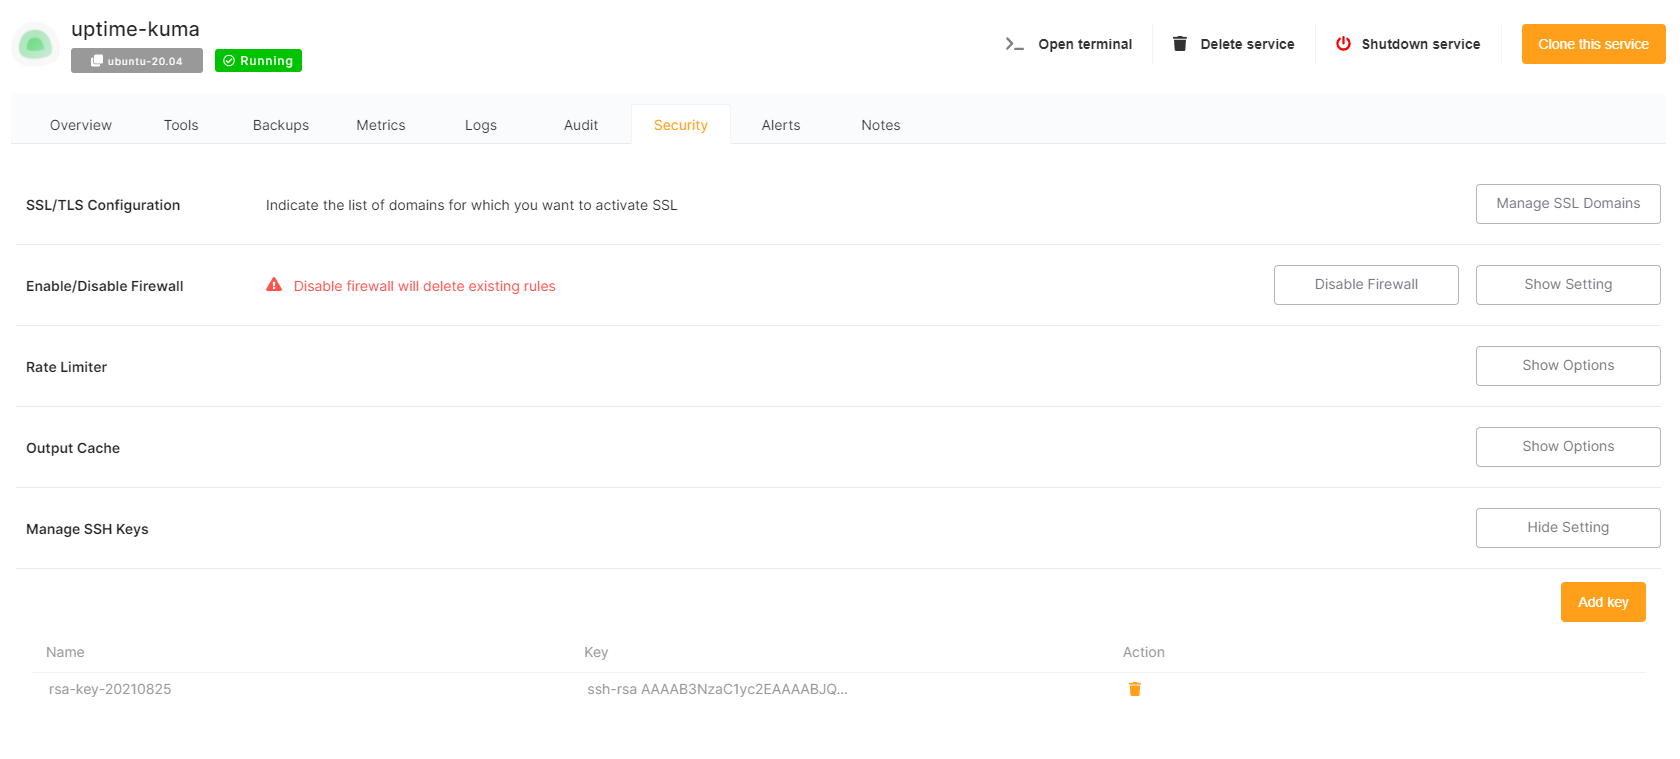
Manage SSH Keys
From the Dashboard, navigate to the Security tab and select the Show Options button to Manage SSH Keys.
From here, you can add or remove SSH keys allowed on the server.
Add an SSH key
Click on the Add key. Simply give your key a title and save!
Deleting an SSH key
Select the 'trash' icon to the right of the key you wish to delete. We'll always double-check with you before making a deletion, just to be sure!
How to connect to an Elestio service with SSH keys
Connecting to an Elestio service Using Existing SSH Keys from a Mac/Linux Machine
Step 1: Check for Existing SSH Key Pair
First, verify if you have an existing SSH key pair by checking the .ssh directory. Open a terminal and execute the following command:
ls ~/.sshThe file with the .pub extension is your public key.
If you don't have an existing SSH key pair, you can generate a new one using the following command:
ssh-keygen -b 4096 -t rsaStep 2: Copy your SSH Public Key to your Elestio service
-
Copy the Public Key to Clipboard:
Navigate to the .ssh directory by typing
cd .sshDisplay the contents of your public key using cat. For example, if your public key is id_ed255518.pub, you can view it with:
cat ~/.ssh/id_ed255518.pubCopy the displayed public key and add it to your Elestio service.
-
Add the Public Key to Elestio:
-
Open your Elestio service and navigate to the 'Security' tab.
-
Go to 'Manage SSH Keys' and click on the 'Add key' button.
-
Paste your public key into the provided field.
-
Step 3: Confirm and Test Connection
To test the SSH connection to your VM, use the following command from your local machine:
ssh root@IPV4_TARGET_VMReplace "IPV4_TARGET_VM" with the actual IPv4 address of your target VM, which you can find in the 'Overview' tab of your service.
For example:
ssh root@128.144.84.22If the connection is successful, you'll be logged into your VM 🚀
Connecting to an Elestio service Using Existing SSH Keys from a Windows Machine with WSL (Windows Subsystem for Linux)
Step 1: Set up WSL (Windows Subsystem for Linux)
Before proceeding, you need to ensure that WSL is installed and configured on your Windows machine. Here's how you can set up WSL:
-
Enable WSL: Open PowerShell as Administrator and run the following command:
wsl --installThis command will automatically enable the necessary features and install the latest version of WSL on your system.
-
Install a Linux Distribution: After WSL is installed, visit the Microsoft Store and search for your preferred Linux distribution (e.g., Ubuntu). Click "Install" to download and install it.
-
Initialize WSL: Once the distribution is installed, launch it from the Start menu. This will initialize the distribution and prompt you to create a user account and set up a password.
-
Update and Upgrade: After the setup is complete, it's a good idea to update and upgrade the packages within your Linux distribution to ensure you have the latest versions. You can do this by running the following commands:
sudo apt update sudo apt upgradeFollow the same tutorial to connect to an Elestio service using existing SSH keys from a Mac/Linux machine.
SMTP service
All deployed services include a basic preconfigured SMTP service, useful for sending alerts and notifications from your service.
This is free, but comes with a few limitations:
- You can only send transactional emails. Marketing emails are not permitted.
Any violation of this will lead to a suspension or termination of your service.
- You can send up to 300 transactional emails per hour. That's up to 7200 emails per day!
- All emails must be sent from [domain]@vm.elestio.app where [domain] is the URL of your service.
Attempts at sending from any other email address will be rejected.
- The SMTP service is only available from the global private network IP of your VM.
Of course in several cases you will want to change the smtp configuration in the web UI of your software to use another smtp service. It's useful if you want to be able to configure another sender address or to overcome any limitations stated above.
Check out our list of recommended SMTP providers:
Multi-factor authentication
By default, Elestio uses Email-based MFA, each time you log in to Elestio we will send you an email with a one-time code to enter into our UI to be able to connect. This protection is in place to enforce security and avoid account hacking.
We also have TOTP-based MFA, this is more secure because it's based on an app installed on your phone to generate TOTP codes instead of us sending them by email. So even if your mailbox is compromised your Elestio account will still be safe.
We recommend all users use TOTP Generator, you can activate it in a few clicks from our dashboard > user profile > Security tab.

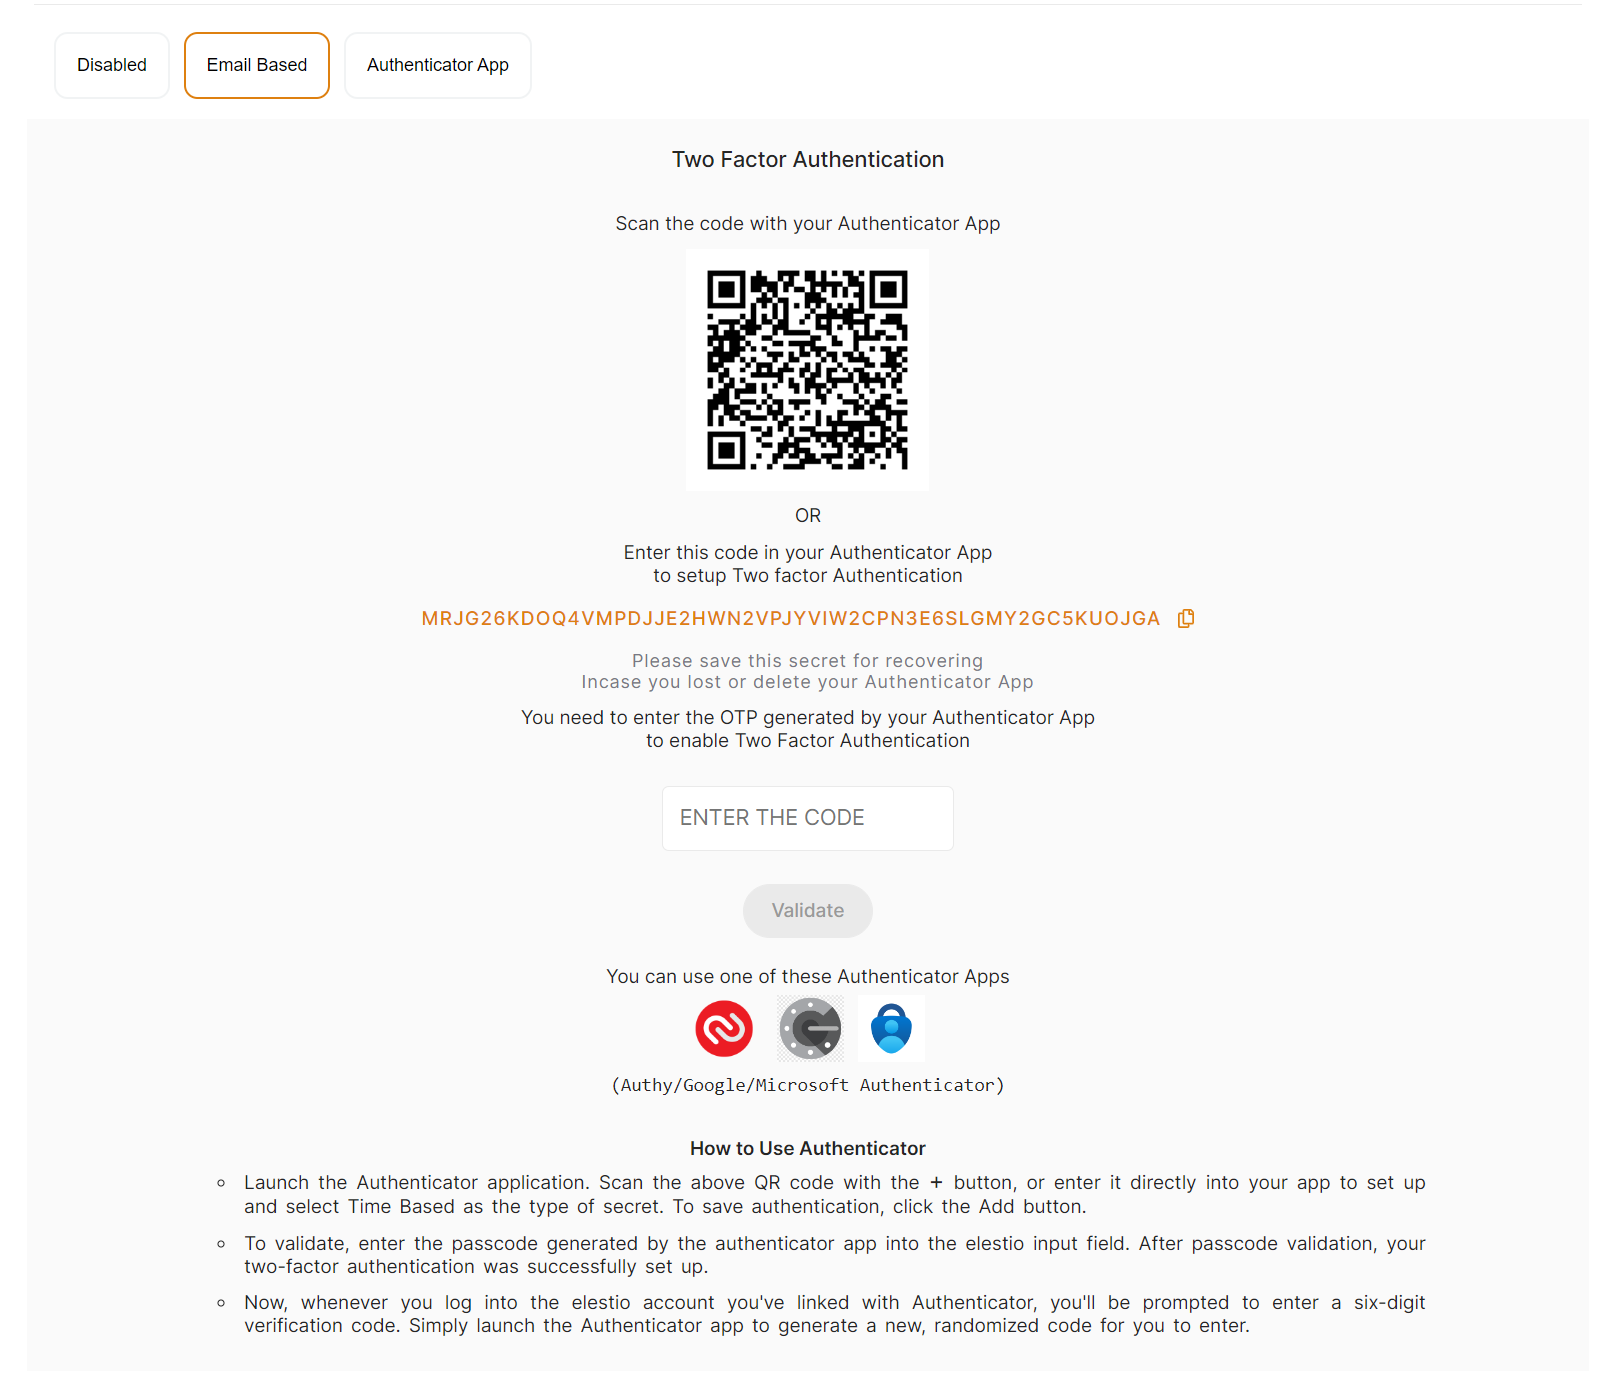
The process to activate TOTP MFA on your account
- Open the account security tab here: https://dash.elest.io/account/security
- Click on Configure button in Manage Two-Factor Authentication.
- Select the Authenticator App tab.
- Download an authenticator app: Authy (recommended) or Google Authenticator or Microsoft Authenticator
- Open your authenticator app then scan the QR code on the screen
- Generate a code with your app and enter it on the Elestio screen
- Click on Validate
Done, Strong MFA is now enabled on your account, and will be required to login into your Elestio account
You should keep the text version somewhere safe (in orange in the screenshot), this will allow you to recover in case you lose your phone or authenticator app.
If you have lost both your authenticator app and text secret, you can contact our support team via email with proof of identity to get MFA removed from your account.
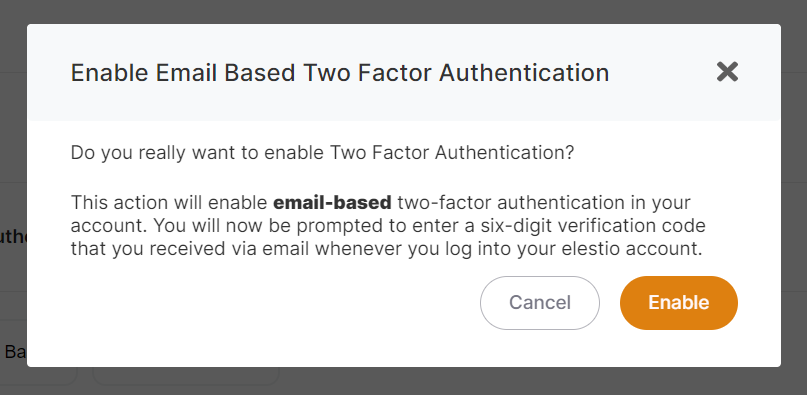
The process to Activate Email Based MFA on your account
- Open the account security tab here: https://dash.elest.io/account/security
- Click on Configure button in Manage Two-Factor Authentication.
- Select the Email Based tab.
- Click on Enable button to activate it.
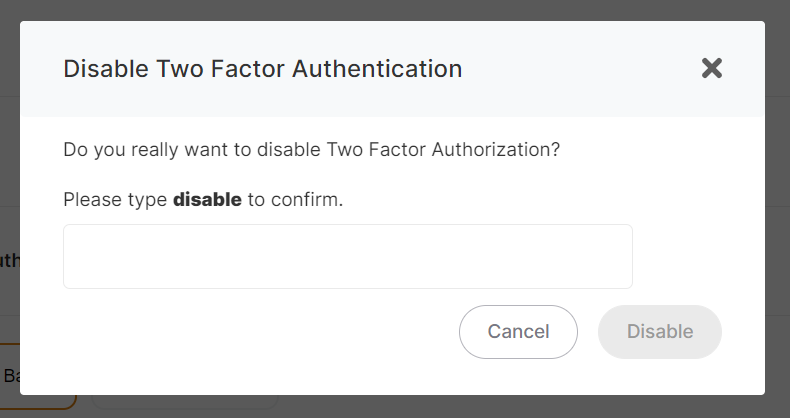
The process to Deactivate MFA on your account
- Open the account security tab here: https://dash.elest.io/account/security
- Click on Configure button in Manage Two-Factor Authentication.
- Select the Disabled tab.
- To confirm the action, type disable in the confirmation input field on the confirmation modal.
- Click on Disable button to disable it.
How to Enable or Disable IPv6 on a Linux Virtual Machine
If you are encountering issues with the Docker Hub rate limit, it is recommended to disable IPv6 on your VM by following the steps outlined in the "Disabling IPv6" section below.
Enabling IPv6
1. Temporarily Enable IPv6: To enable IPv6 without rebooting:
sudo sysctl -w net.ipv6.conf.all.disable_ipv6=0
sudo sysctl -w net.ipv6.conf.default.disable_ipv6=0
This change will revert after a system reboot.
2. Permanently Enable IPv6: To enable IPv6 persistently:
- Edit the `sysctl.conf` file:
sudo nano /etc/sysctl.conf- Locate and comment out the following lines (if present):
# net.ipv6.conf.all.disable_ipv6 = 1
# net.ipv6.conf.default.disable_ipv6 = 1- Apply the changes:
sudo sysctl -pIPv6 will now remain enabled even after a reboot.
Disabling IPv6
If IPv6 is causing issues, such as with Docker Hub rate limits, follow these steps to disable it.
1. Temporarily Disable IPv6: To disable IPv6 without rebooting:
sudo sysctl -w net.ipv6.conf.all.disable_ipv6=1
sudo sysctl -w net.ipv6.conf.default.disable_ipv6=1
This change is not permanent and will be reset after a reboot.
2. Permanently Disable IPv6: To disable IPv6 persistently:
- Edit the `sysctl.conf` file:
sudo nano /etc/sysctl.conf- Add the following lines to the file:
net.ipv6.conf.all.disable_ipv6 = 1
net.ipv6.conf.default.disable_ipv6 = 1- Apply the changes:
sudo sysctl -pIPv6 will now remain disabled even after a reboot.
How to configure NGINX to Listen on IPv6
IPv6 is quickly becoming standard. If your VM already supports it, you just need to tell NGINX to listen on an IPv6 socket.
(If IPv6 is disabled on the VM itself, start with the “Enable IPv6 on your VM” article and come back here.)
1. Open the dashboard
-
Go to your project → Services → Security tab.
-
Click NGINX Configuration › Show config.
2 . Edit the server block for your domain
Choose your domain and find edit the NGINX config then find
listen 443 ssl http2;
Add the IPv6 line directly beneath:
listen 443 ssl http2;
listen [::]:443 ssl http2;
(Keep the original IPv4 line—now NGINX will listen on both stacks.)

Click Apply & Restart. NGINX reloads and your server is now ready to serve HTTPS traffic over IPv6.
How to secure your application with Cloudflare Tunnel
What is Cloudflare Tunnel?
Cloudflare Tunnel is a secure solution that connects your web applications to Cloudflare's global network without exposing your server's IP address or opening inbound ports. It creates an encrypted tunnel between your origin server and Cloudflare's edge, providing enhanced security and performance for your applications.
Why Use Cloudflare Tunnel?
Key Benefits:
Getting Started with Cloudflare Tunnel
Prerequisites
Step-by-Step Installation Guide
Step 1: Access Zero Trust Dashboard
Navigate to your Cloudflare dashboard and click on Zero Trust in the sidebar. This is where all tunnel management happens.
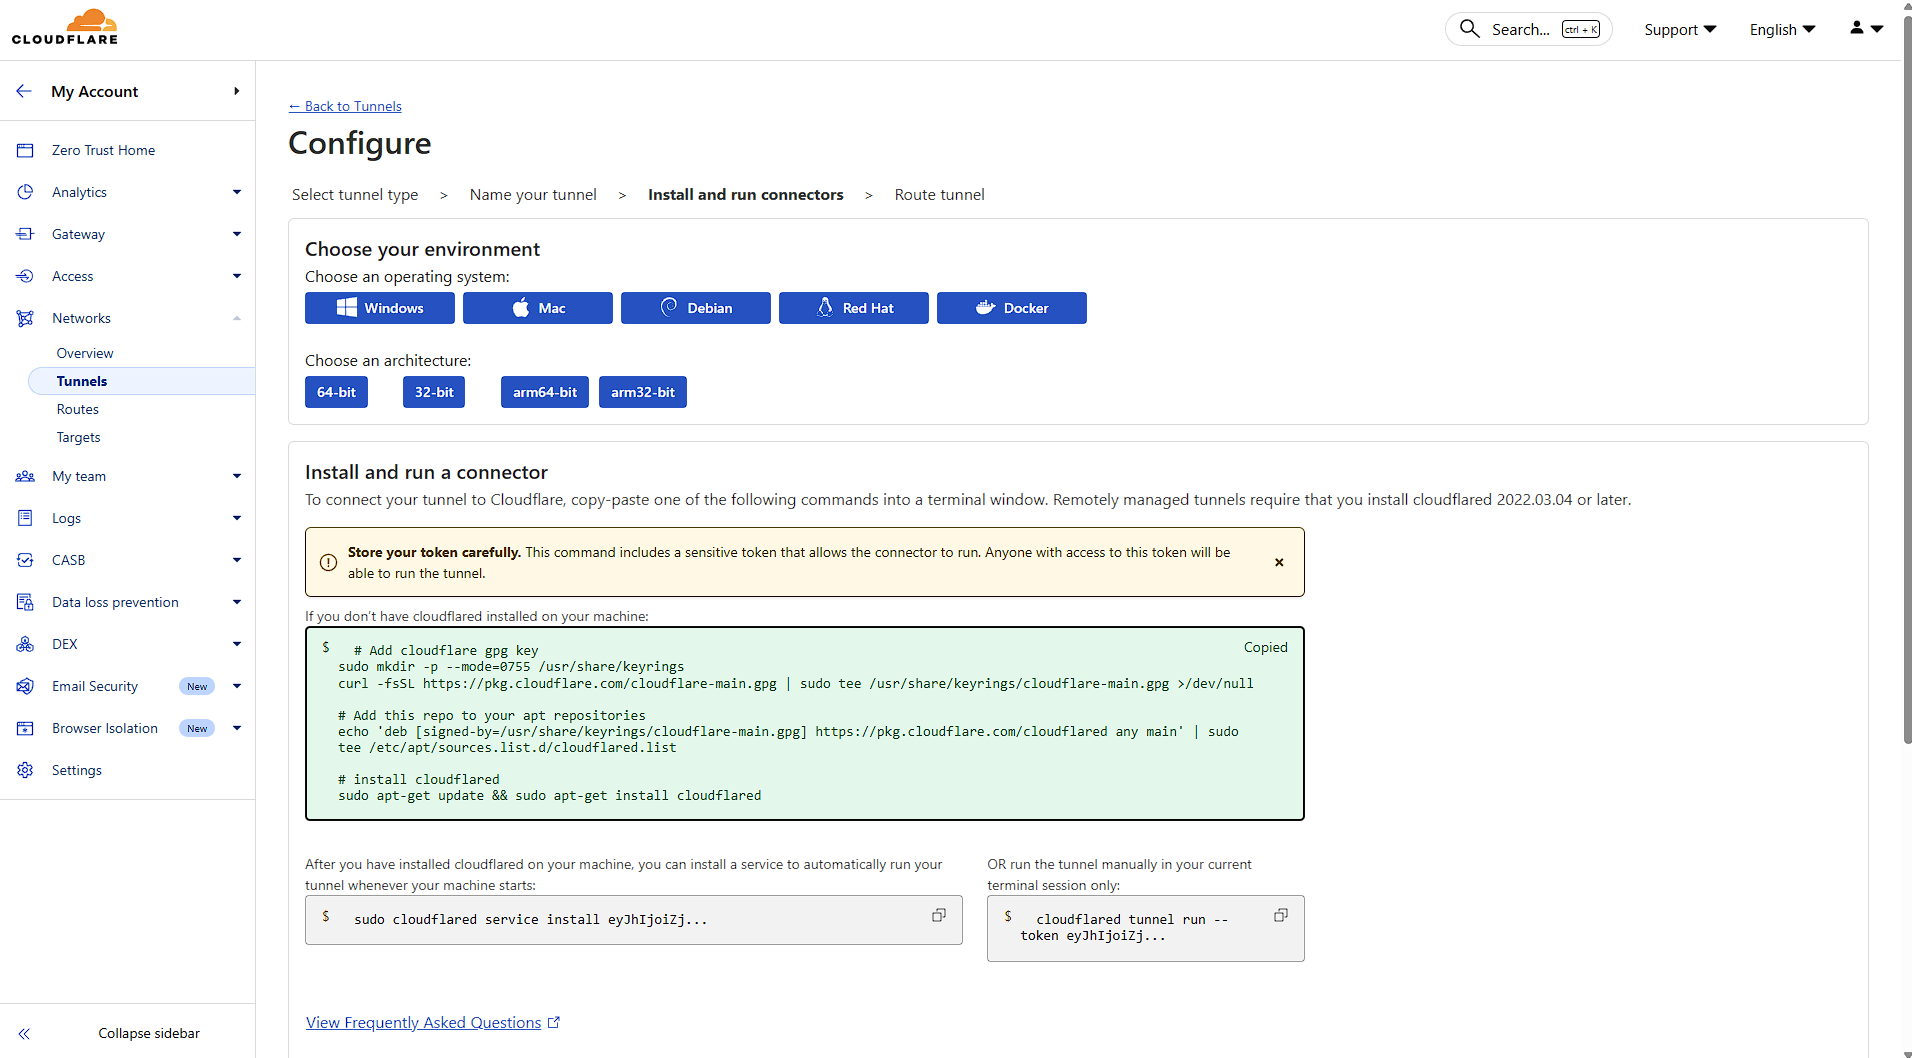
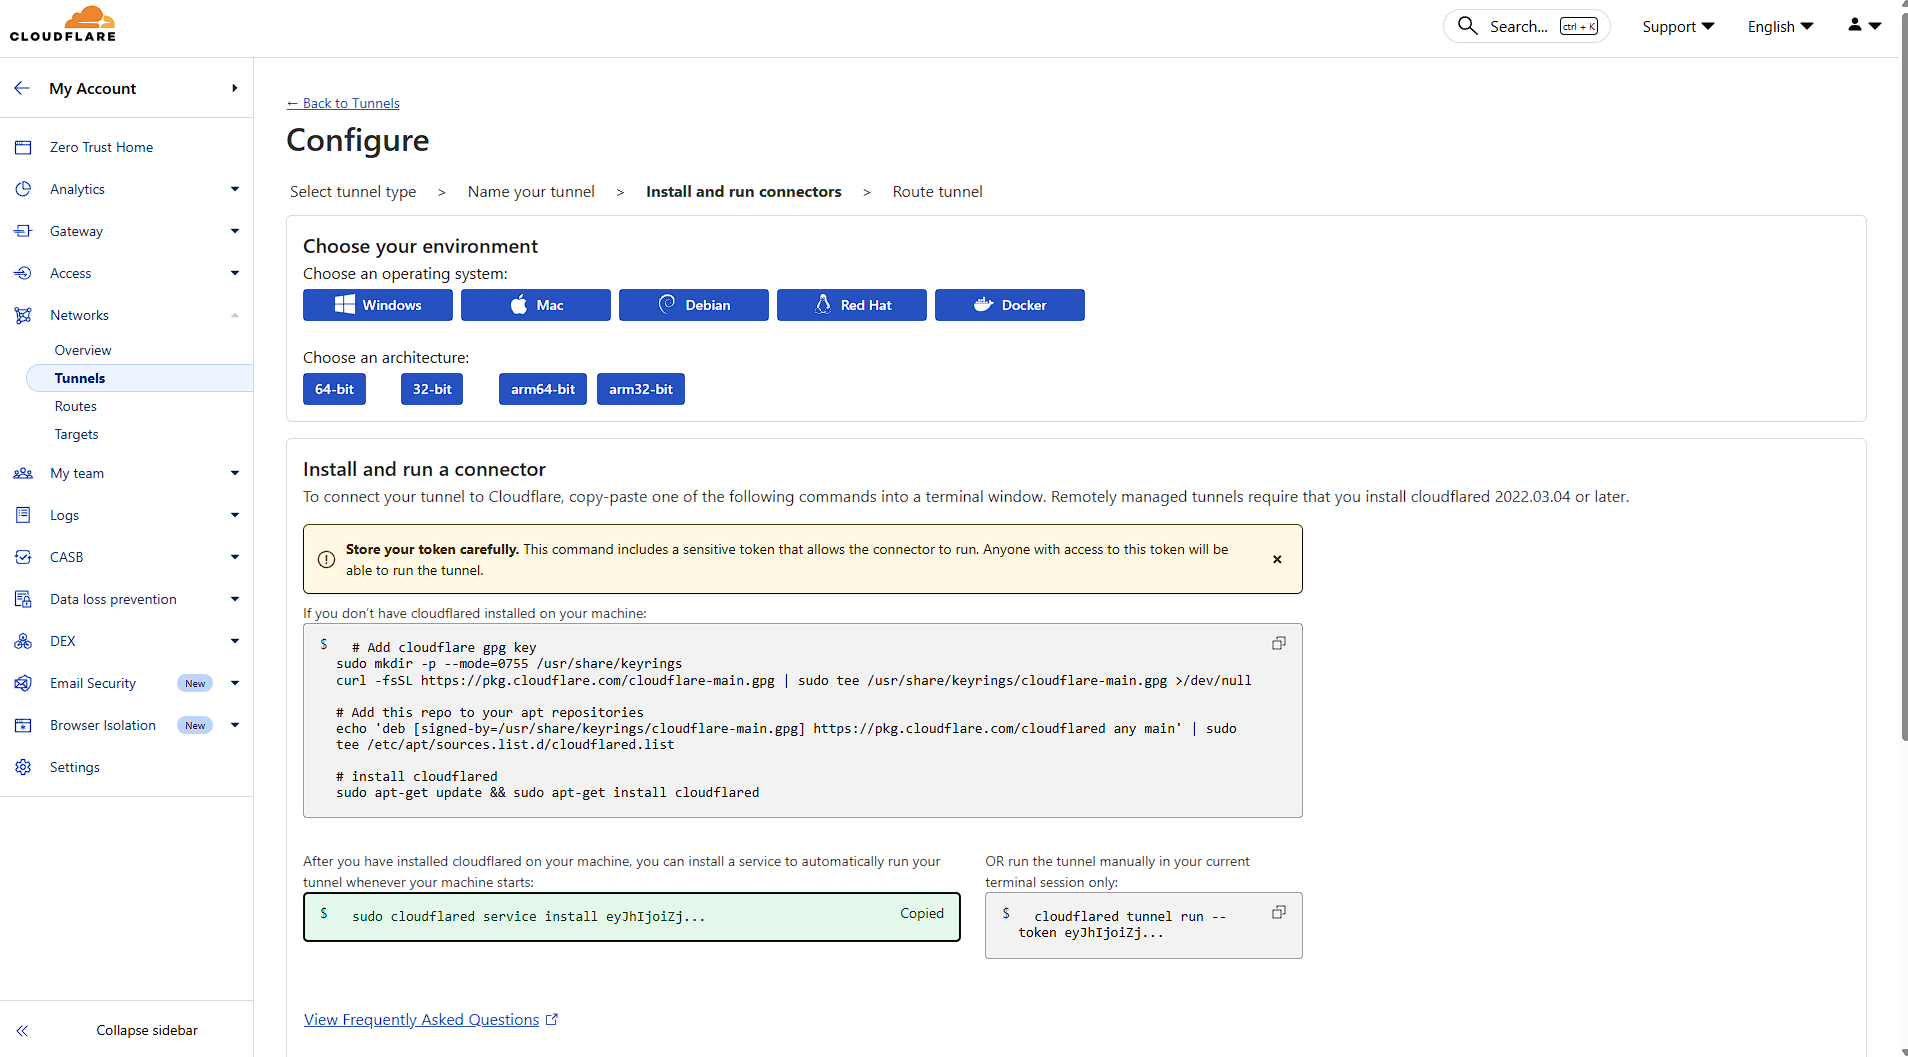
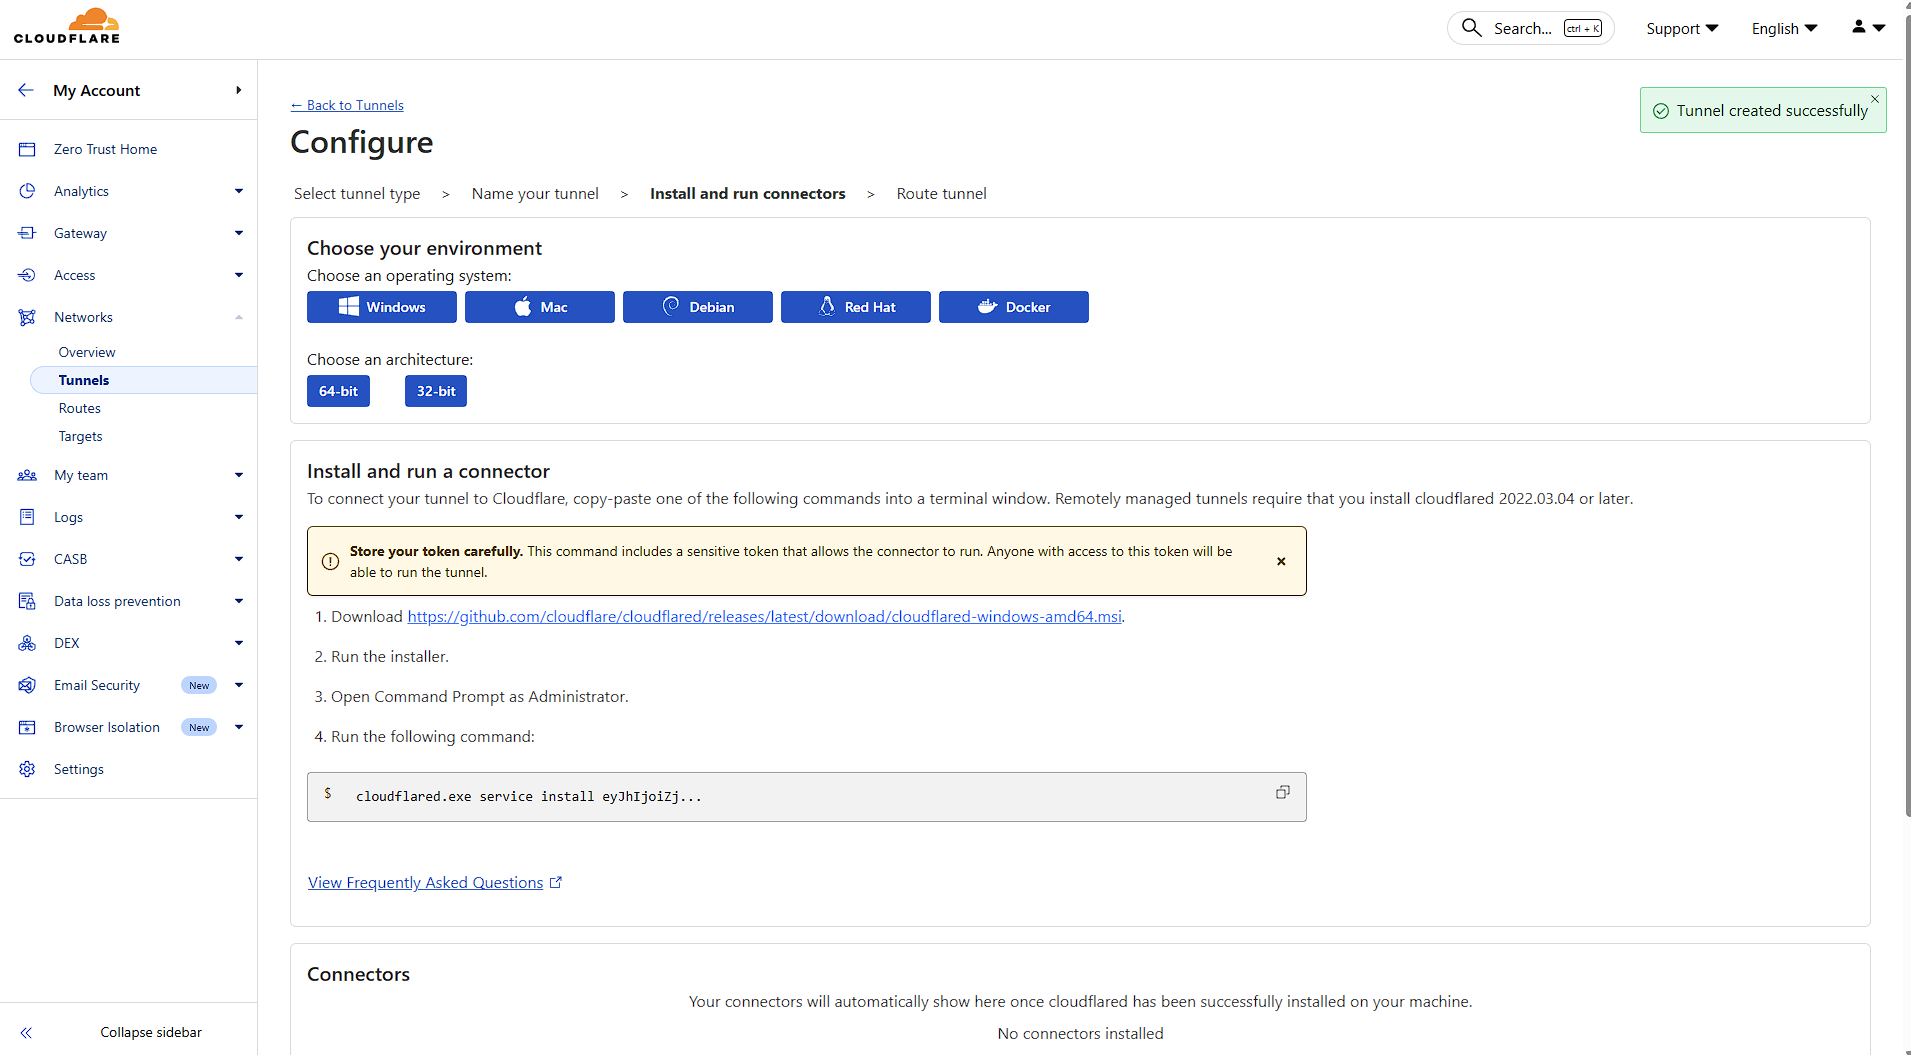
When installing Cloudflare on your Elestio service, make sure to select Debian as the operating system.
Next, open your Elestio Terminal. Once inside, install Cloudflare and set up the service to run your tunnel by copying and pasting the commands provided by Cloudflare.
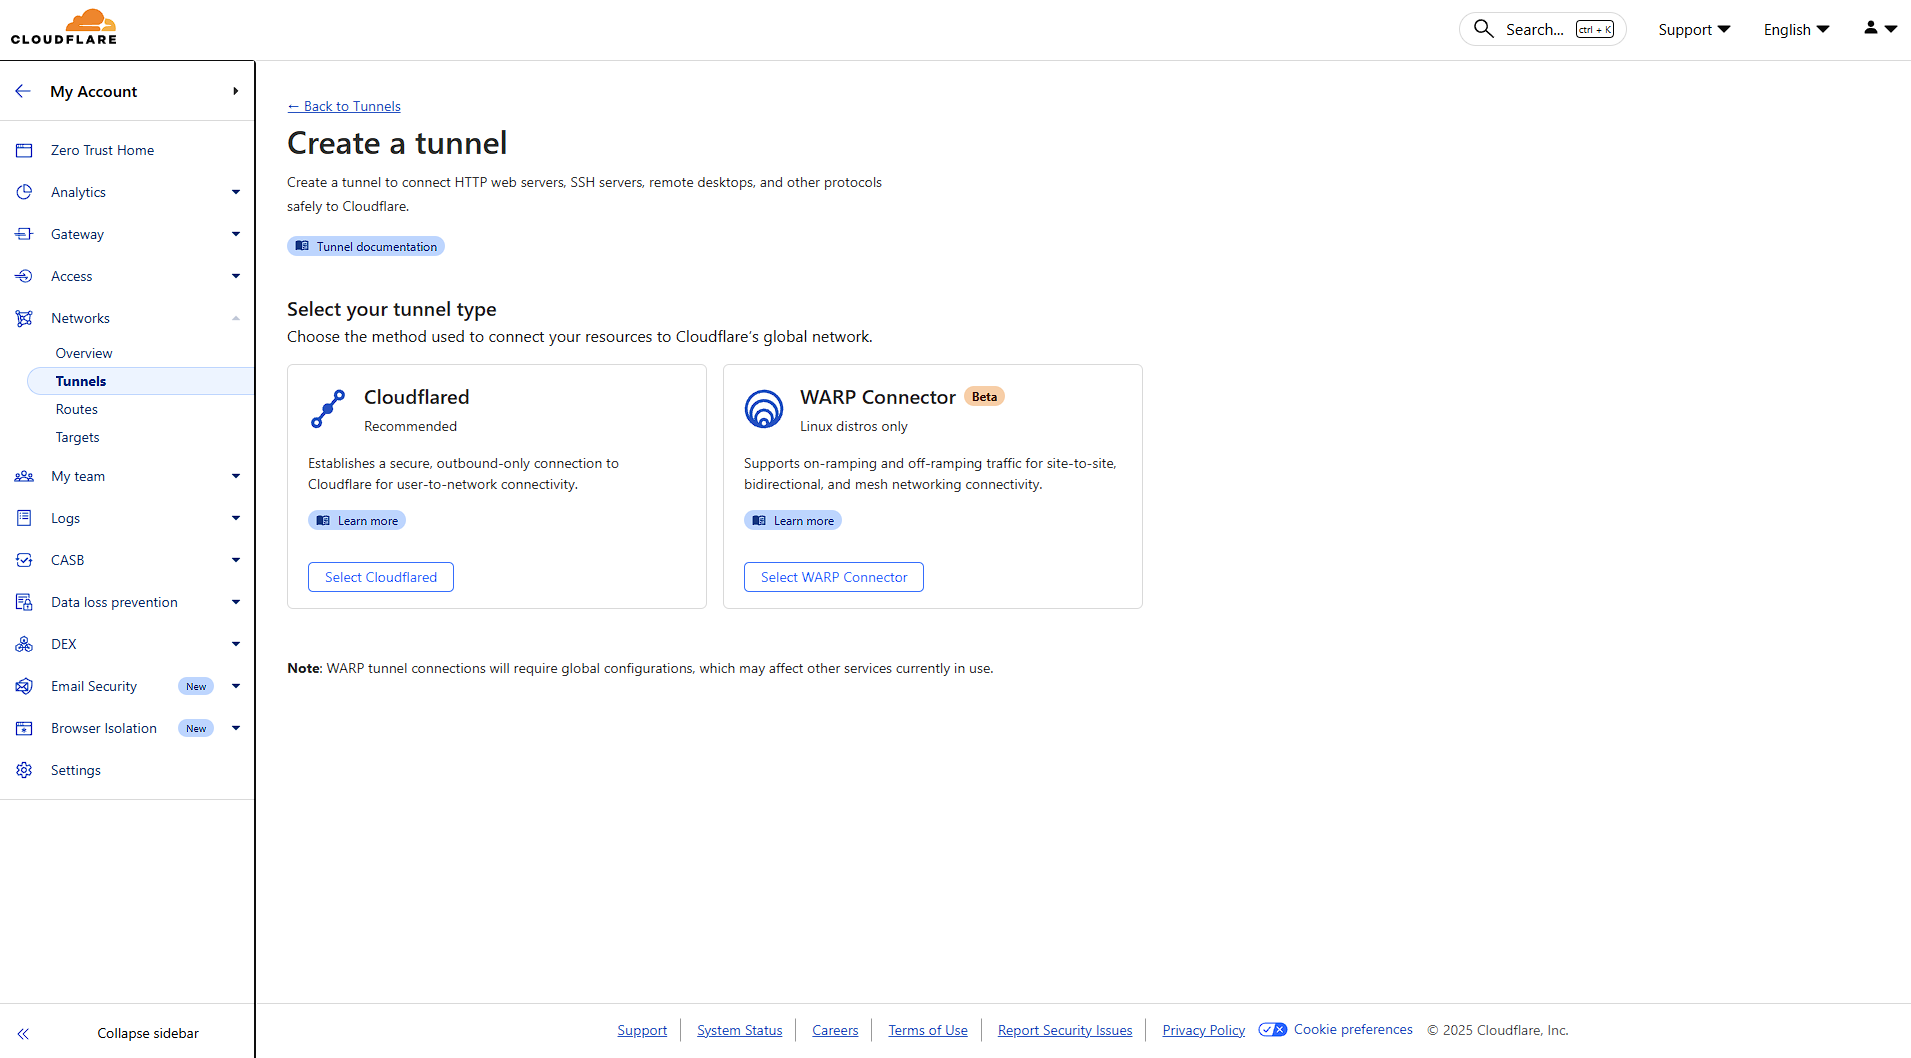
Step 2: Navigate to Tunnels
Under the Networks section, click on Tunnels. This is your central hub for creating and managing all your tunnels.
Click "Create a tunnel" to begin the setup process. You'll be presented with two options:
Select Cloudflared for this guide.
Choose a descriptive name for your tunnel. This helps you identify it later, especially if you manage multiple tunnels.
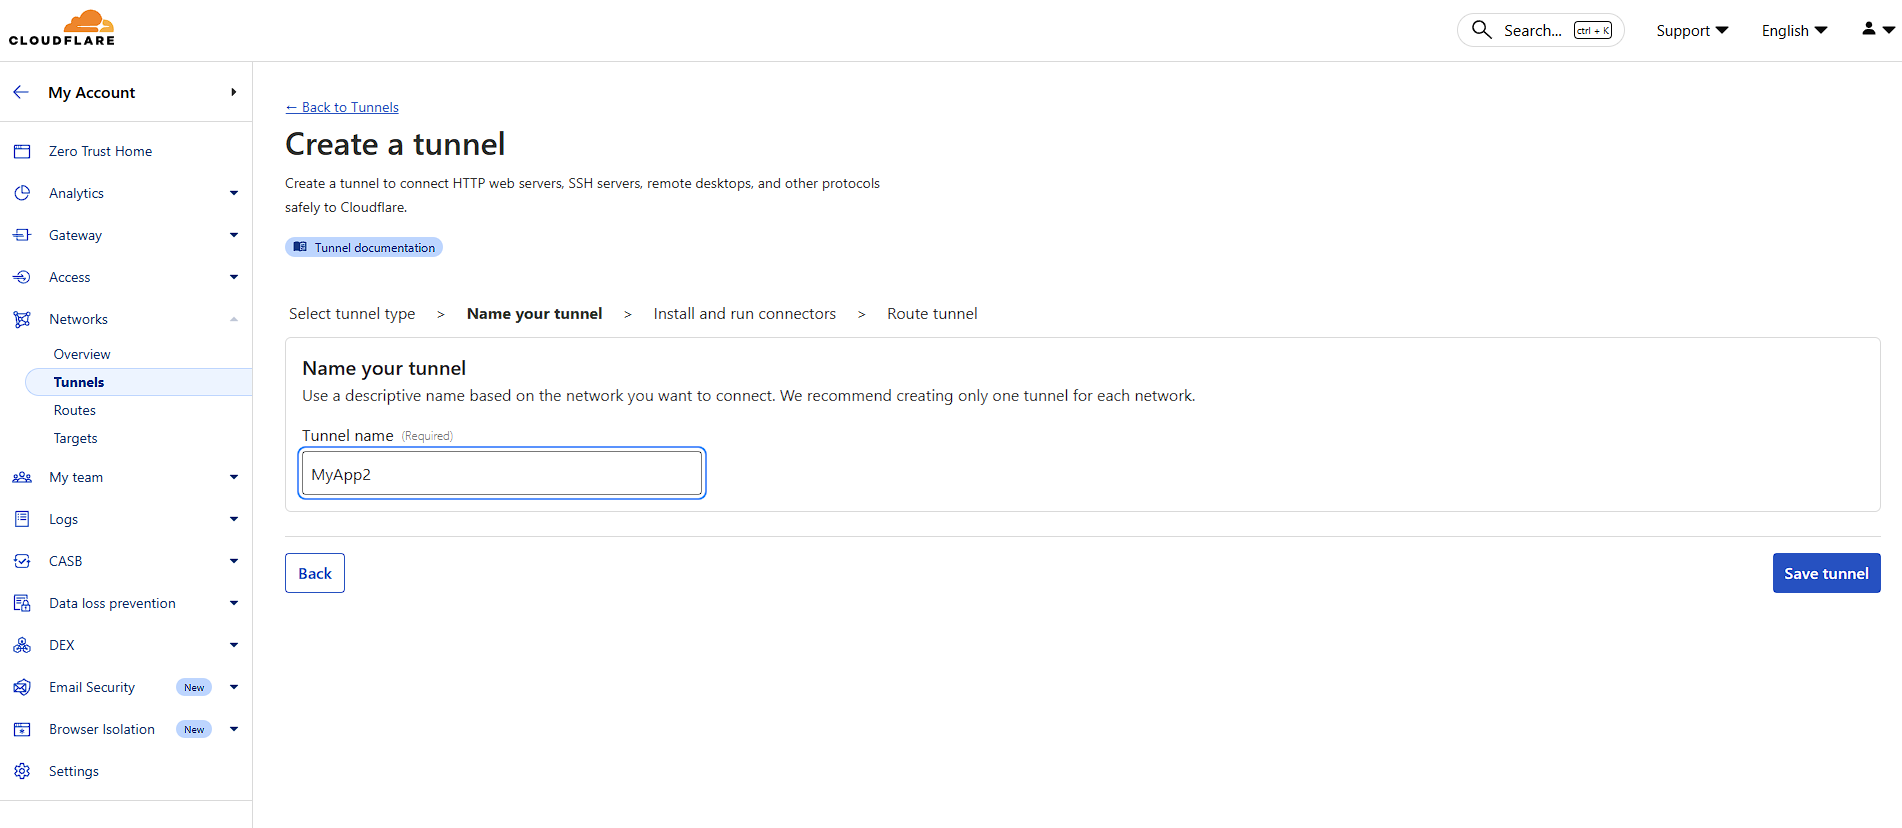
Click "Save tunnel" to proceed.
Step 3: Configure Your Application Route
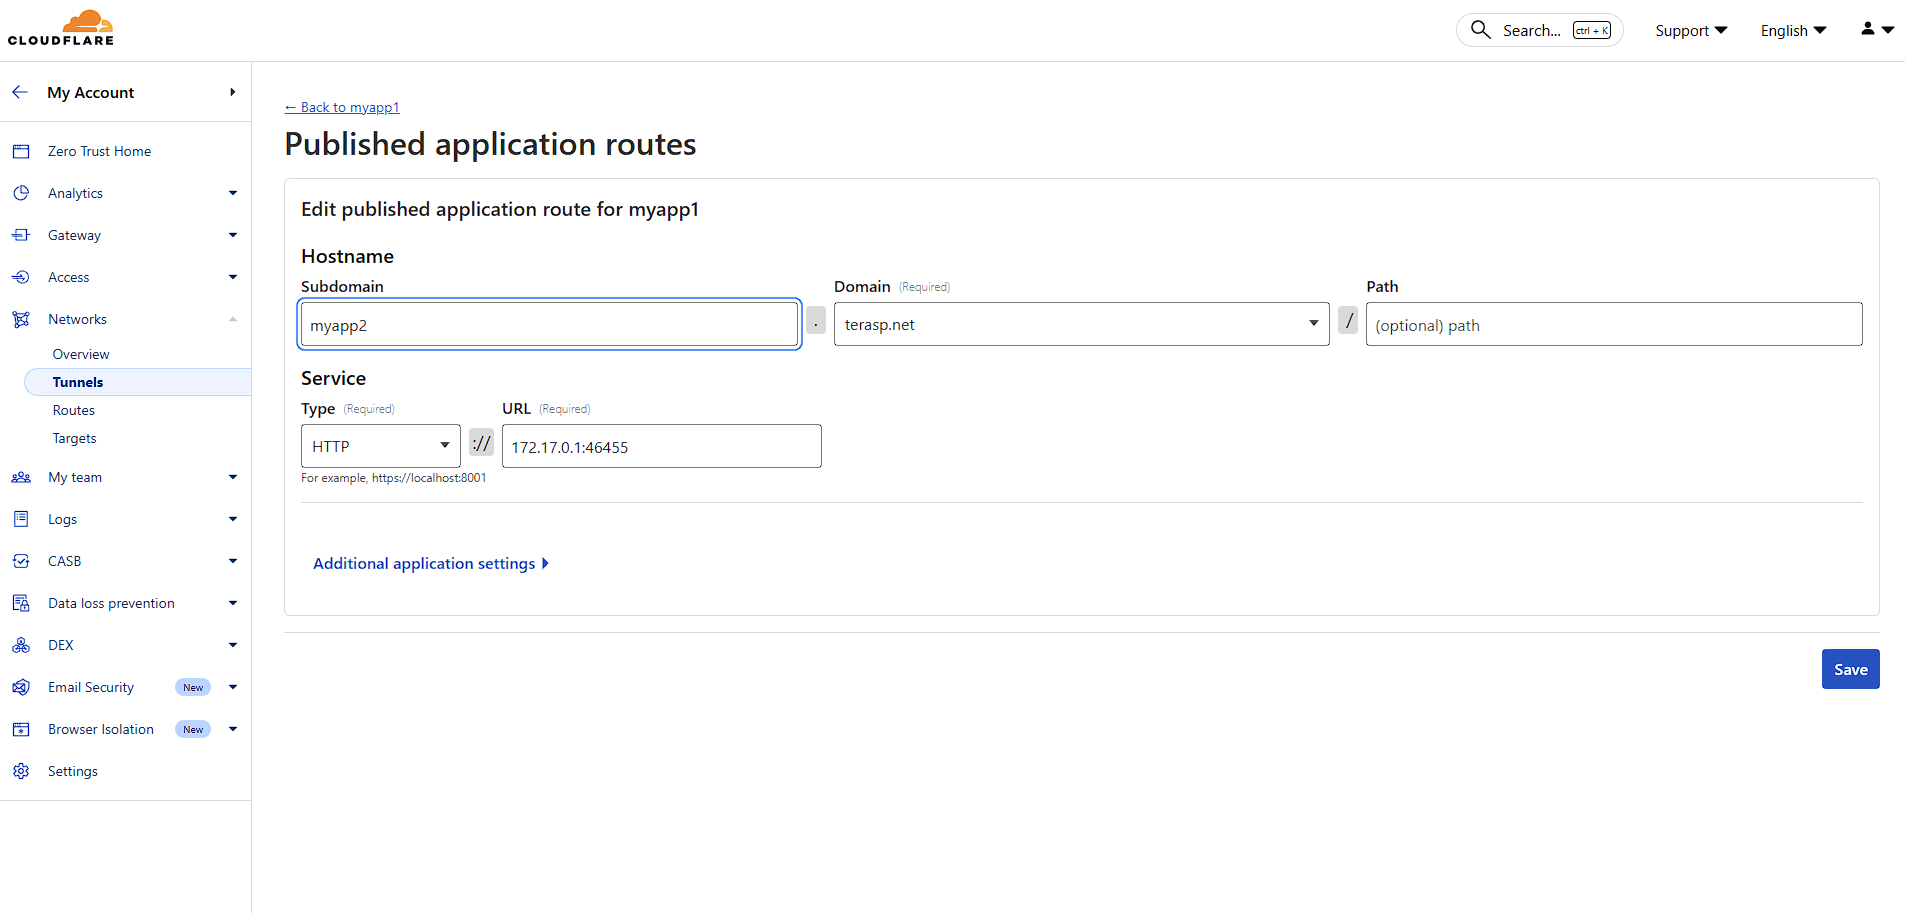
Hostname Configuration:
Service Configuration:
You can easily find the correct port by clicking Update Config in the Overview tab of your service, then checking the Ports section to see which port your application is bound to.
Click "Save" to finalize your configuration. Your tunnel is now active and routing traffic!
Cloudflare Tunnel revolutionizes how we expose applications to the internet. By eliminating the need for public IP addresses and open ports, it significantly reduces attack surface while providing enterprise-grade performance and security.
Combining Elestio's managed infrastructure with Cloudflare Tunnel gives you professional-grade deployment with minimal complexity - perfect for securing your applications, APIs, and services behind Cloudflare's global network.
Custom domain and automated encryption (SSL/TLS)
Prerequisites
If the firewall is enabled on your service, ensure that port 80 is open. This is required for SSL certificate creation and renewal.
Accessing the Configuration
-
Go to the Overview tab of your service dashboard.
-
Locate the Custom Domain Names section inside the Domain Management tab.
-
Click Manage Domains.

In this section, you will have two ways to configure custom domains.
Method 1: Manual DNS Setup
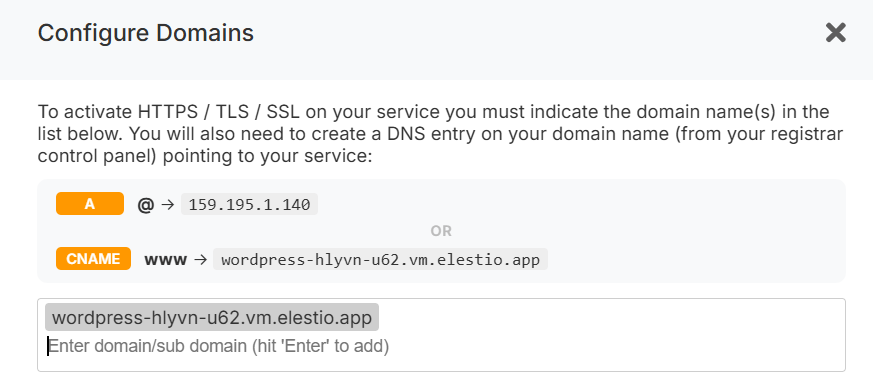
-
In this step, enter your domain and press Enter to add it to the list of authorized domains.
-
Configure DNS records in your domain registrar panel.
Required DNS Records
-
A record:
@→<service IPv4>
(Points the root domain to your service IP) -
CNAME record:
www→<service CNAME>
(Recommended remains stable even if your IP changes, e.g., after migration.)
-
Verify DNS propagation using a tool like: https://dnschecker.org/
Once propagation is complete, the SSL certificate will be automatically generated and renewed, and HTTPS will start working.
Method 2: One-Click DNS Setup via Cloudflare (Domain Connect)
A One-click DNS Setup section is available if the domain name server or registrar is Cloudflare, allowing automatic DNS configuration via the Domain Connect protocol.
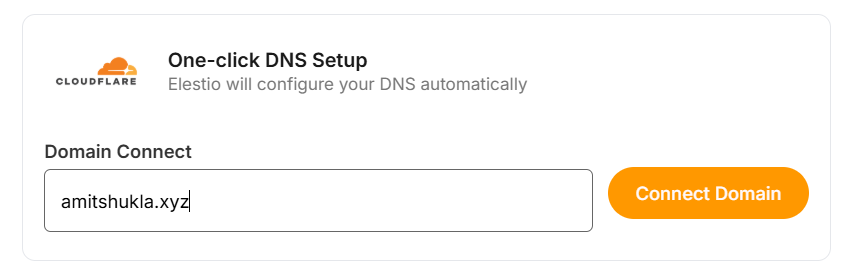
Steps
-
Enter your domain (e.g.
example.com). -
Click Connect Domain.
-
This action will redirect you to the Cloudflare dashboard for accepting the DNS record configuration.
Environment Variable Update
Some applications require updating an environment variable to reflect the configured domain.

To update:
-
Go to the Overview page of your service.
-
Click the Update Config tab in the software row.
-
Open the Env tab.
-
Update the domain-related environment variable.
Cloudflare Reverse Proxy Users
If you are using method 1 and want Cloudflare with the proxy enabled (orange cloud icon), refer to the detailed guide:
https://docs.elest.io/books/security/page/using-cloudflare
Troubleshooting: SSL Not Generated
View Nginx Logs
You can inspect logs using a terminal command:
cd /opt/elestio/nginx;
docker-compose logs -f;
Press Ctrl + C to stop live log output.
Reset SSL Data Folder
In some cases, the SSL data directory /opt/elestio/nginx/ssl_data may become corrupted:
To fix:
-
Connect to your service via terminal.
-
Run the below command.
cd /opt/elestio/nginx/;
docker-compose down;
mv ./ssl_data/ ./ssl_data_old/;
mkdir ./ssl_data/;
chmod 777 ./ssl_data/;
docker-compose up -d
Once executed, just open your custom website URL again, and your certificate should be generated and your site served over SSL/TLS.
PTR Record Configuration
Accessing the Configuration
-
Go to the Overview tab of your service dashboard.
-
Locate the Manage PTR Record section.
- Click Manage PTR Record

Steps
-
Enter your domain (pre-filled if an existing PTR or CNAME is available).
-
Create the following DNS records:
-
A record → Service IPv4
-
AAAA record → Service IPv6
-
-
Verify propagation using the DNSChecker.
-
Click Update to apply changes.
Provider-Specific Notes
-
DigitalOcean
-
The system will reboot after applying changes.
-
PTR updates may take a few hours due to DNS caching.
-
-
Scaleway
-
For SMTP servers, IPv6 may need to be disabled on the VM.
-