Services Dashboard
- Overview
- Service protection
- Power Management
- Admin UI
- Database credentials
- Service Support Plans
- Selected / change software version
- Bandwidth & Networks
- Move a Service to Another Project
- Software & OS Updates configuration
- Upgrade service plan
- Upgrade support plan
- Delete a service
- Software logs, configuration, restart app, change version
- Resync
- Increase AWS Main (Disk Or Volume) Size
- Tools
- Backups
- Metrics
- Alerts
- Notes
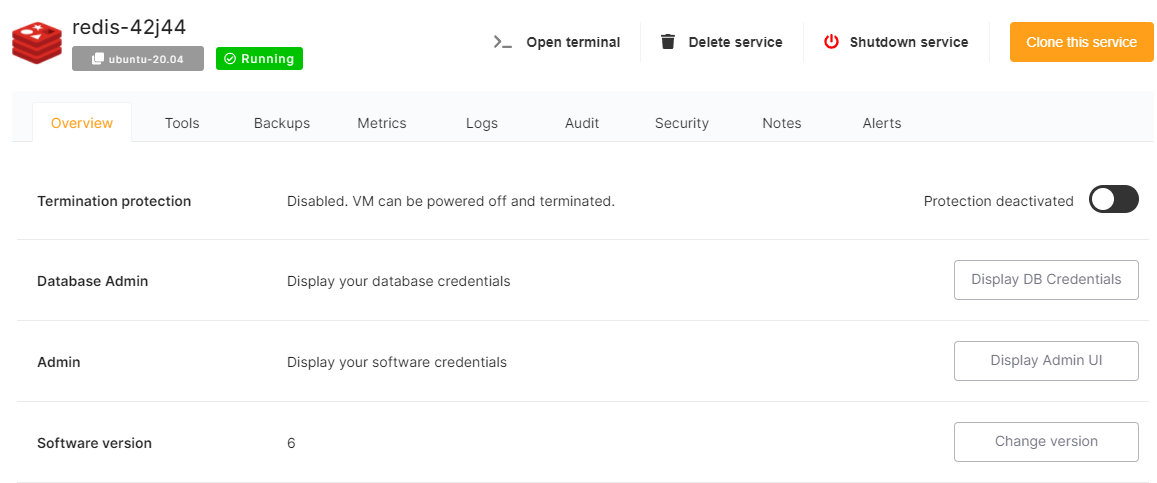
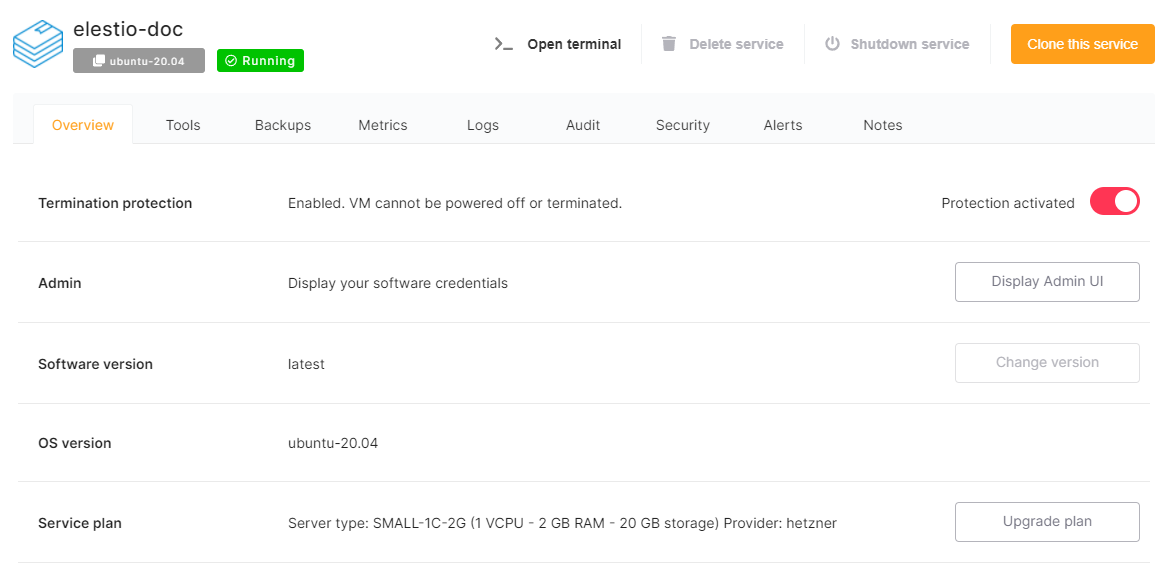
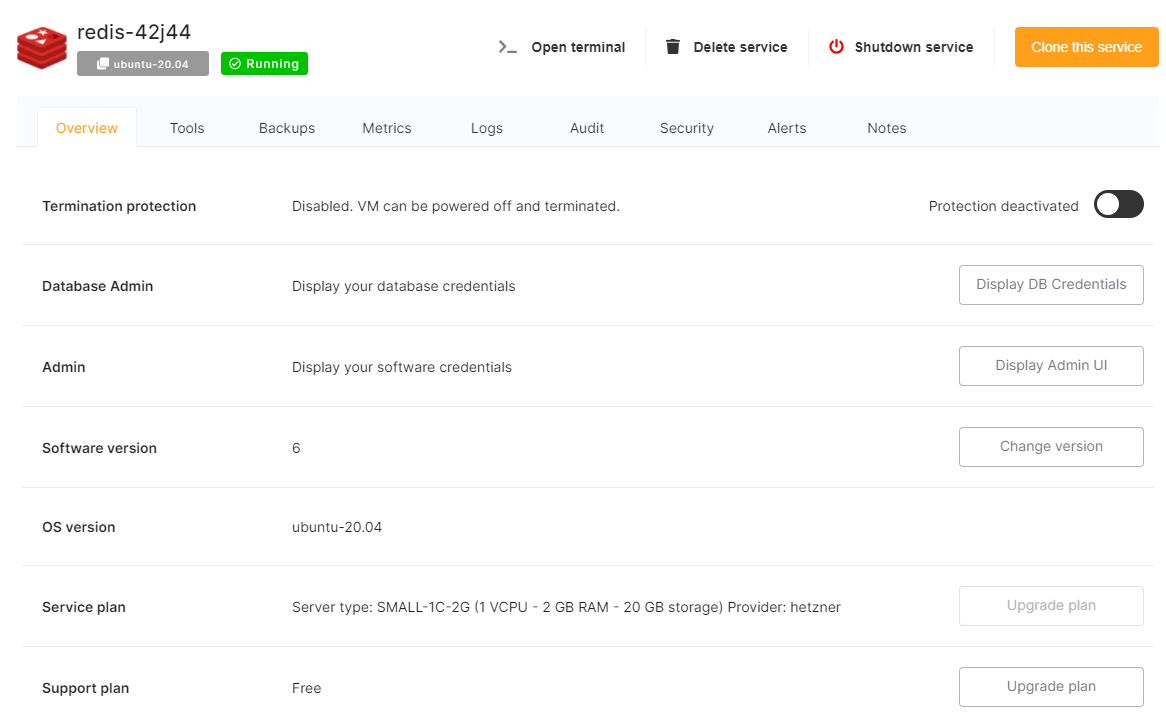
Overview
Service protection
Elestio services can be protected against accidental deletion by enabling the Termination protection feature:
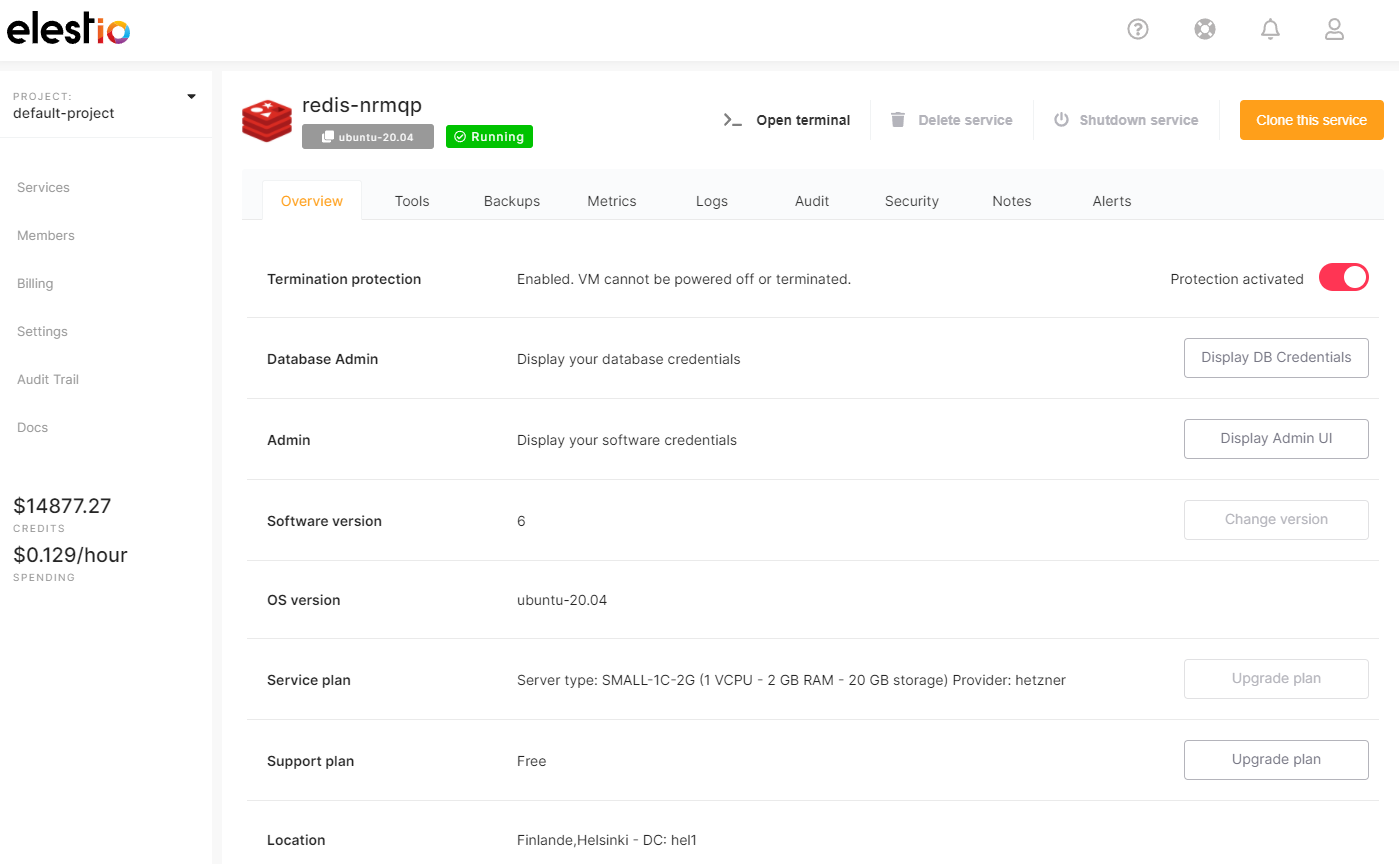
When Termination protection is enabled for a service, it can't be terminated or powered down. In order to terminate or power off a protected service, you will need to disable Termination protection.
Running out of credits will cause your service to be powered down even if Termination protection is activated.
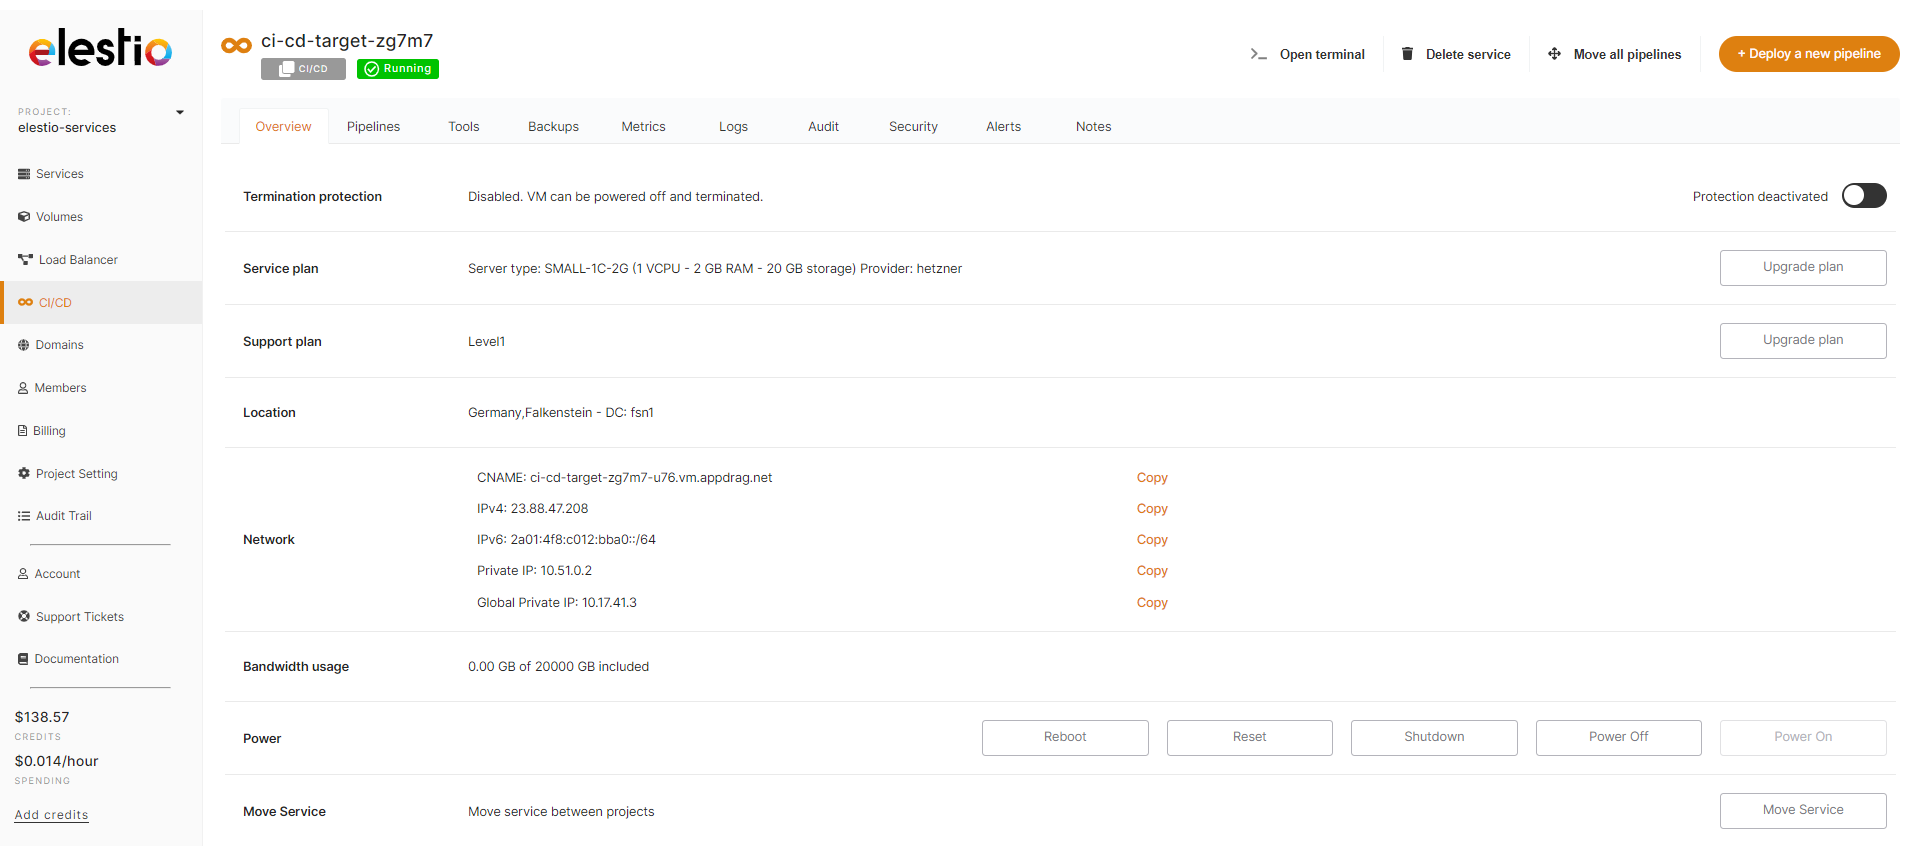
Power Management
You may manage power management on an elestio by using the Reboot, Reset, Shutdown, Power On, and Power Off buttons.
- Reboot service:- Sends an ACPI request to restart a server gracefully. Otherwise, the Server won't reboot. This requires that the Server operating system support ACPI and respond to the request.
- Reset service:- Turns off the power to a service and then restarts it. This abruptly terminates it without allowing the Service operating system to gently terminate it. Comparable to unplugging and replugging an electrical device, this might result in data loss.
When rebooting does not work, use Reset.
-
Shutdown service:- Sends an ACPI shutdown request to gracefully shut down a server. Otherwise, the Server won't shut down since the Server operating system doesn't support ACPI or respond to the request.
- TURN / Power off:- It cuts off the Service's power. This abruptly terminates it without allowing the Service operating system to gently terminate it. Data loss may occur if the power cable is unplugged.
When shutdown does not function, use the power off.
- Power on:- It simply starts your stopped service.
Shutting down and powering off the service will not stop the billing because the IP address and storage are still reserved, the only way to stop the billing is to delete the services.
The power off and shutdown feature is not available during the free trial period, therefore if you try to power off and shutdown the service, the delete service dialogue will appear. However, once the free trial period has expired, you will be able to power off and shut down the service.
If you need to quickly turn off and on the service, you can utilise the reboot button.
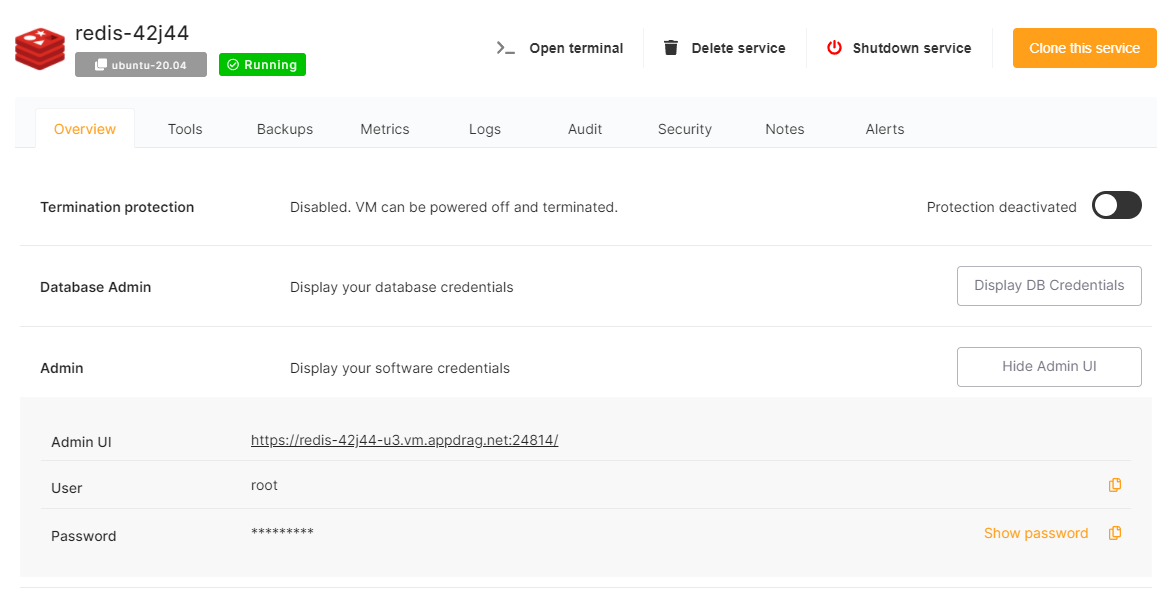
Admin UI
Most supported softwares have an administrative web interface.
Selecting the Display Admin UI button will display the URL, user name and password used to connect to a service's administrative UI.
Some software, especially databases, do not have a web management UI. Use the credentials, and the specified port to connect.
Certain applications do not allow for the pre-creation of administrative users. If the password field appears blank in the service dashboard, visit the given administrative URL to begin the setup process.
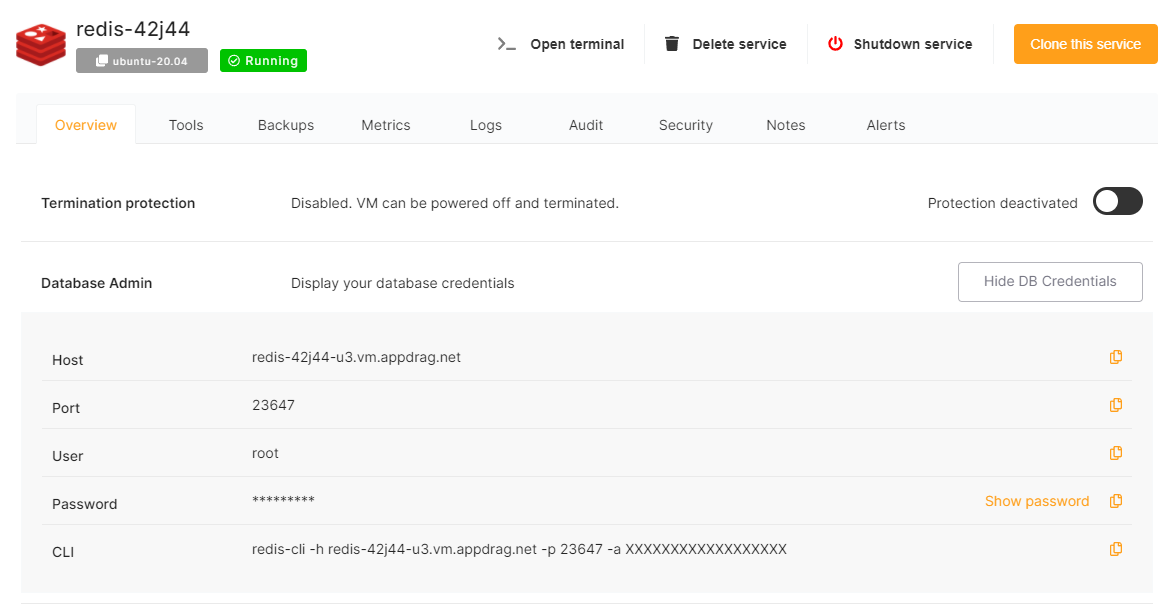
Database credentials
This only applies to database software.
You can view your database software in your service Dashboard in the Overview tab, by selecting the Display DB Credentials button.
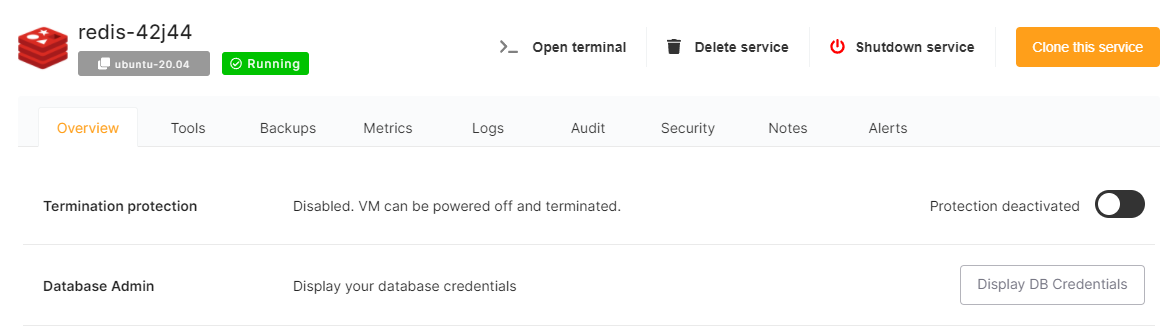
You'll find all the details you'll need to connect to your database directly: host address, port, username and password, and CLI.
Service Support Plans
Elestio offers 3 levels of support.
Our Level 1 Support plan is included for free with all deployed services.
Levels 2 and 3 are recommended for important workloads where you need a guaranteed response time, longer backup retention, and priority support through multiple support channels.
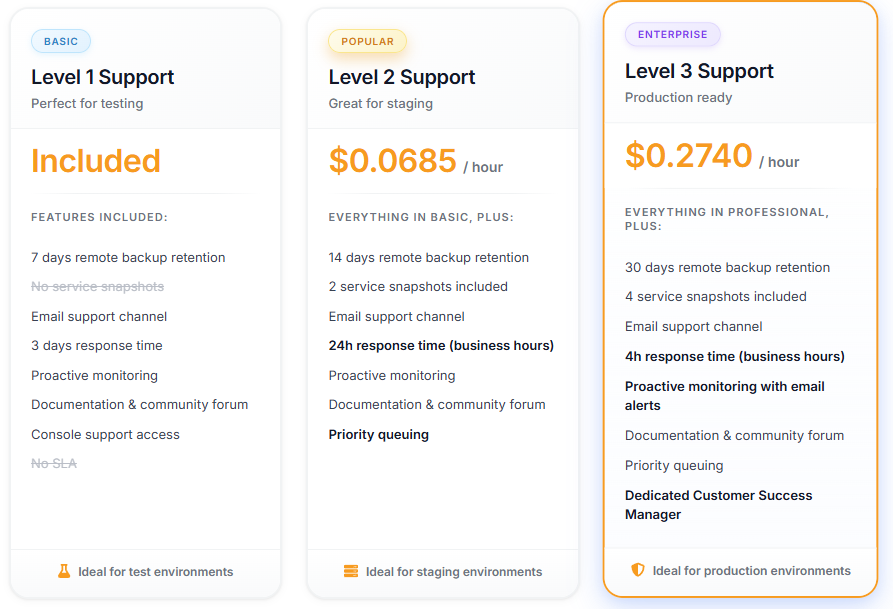
If you have support needs not covered by our plans or you require a custom SLA, don't hesitate to get in touch with us at: sales@elest.io
Please note it's only possible to change your support plan one time per month.
Support plans are billed per hour like all other services.
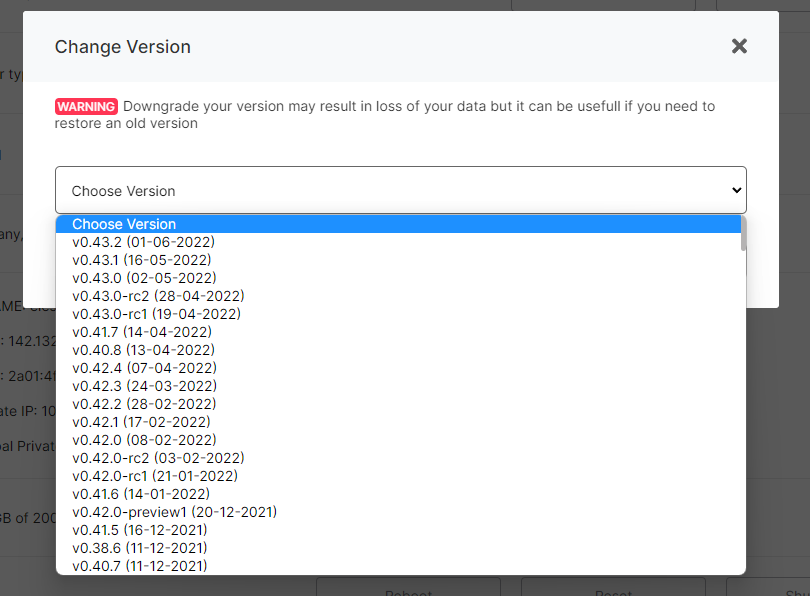
Selected / change software version
You can select another version of your deployed software in your service's Dashboard Overview.
1. Click the Change version button
2. Choose the software version you'd like to update or change to
3. Don't forget to save!
To apply these new settings, select Update Now under Software auto updates.
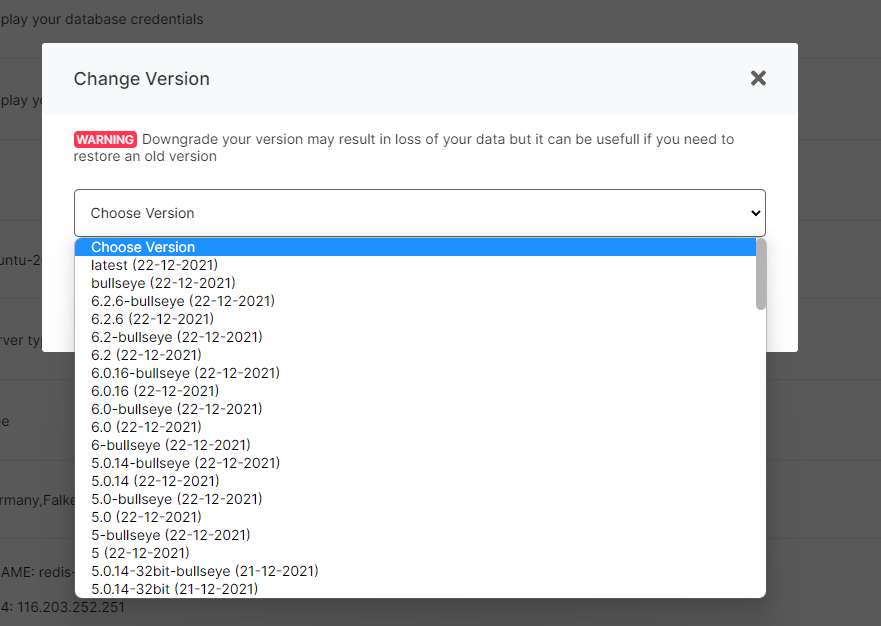
Downgrade your version may result in the loss of your data but it can be useful if you need to restore an old version
If the Button Appears Disabled, Termination Protection is Enabled – Follow These Steps to Disable It
Bandwidth & Networks
In the service Dashboard Overview tab, you will also find a recap of your bandwidth usage for the current month.

Bandwidth usage includes In&Out traffic.
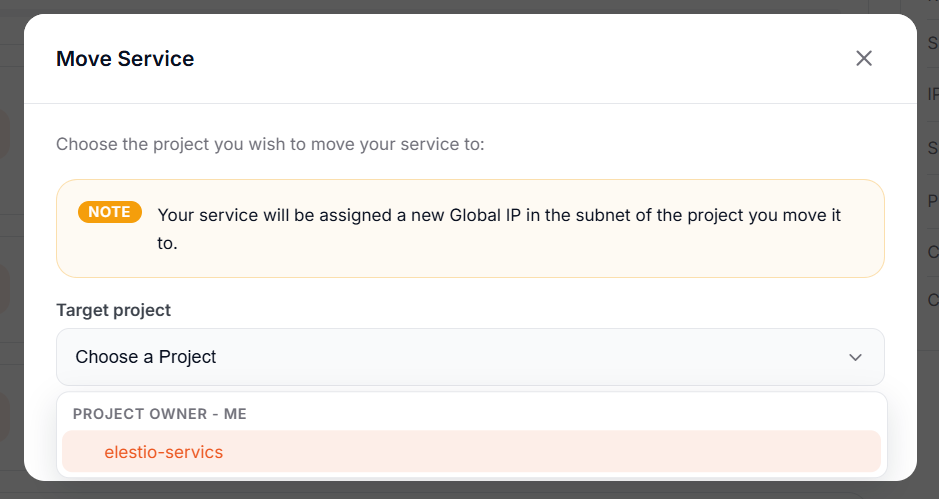
Move a Service to Another Project
You can easily move your services between projects.
1. From the service Dashboard Overview tab, select Move Service.
2. Click Move to move your service successfully.
You can only move services to projects you own.

Software & OS Updates configuration
OS & Software updates are enabled by default when you create a new service.
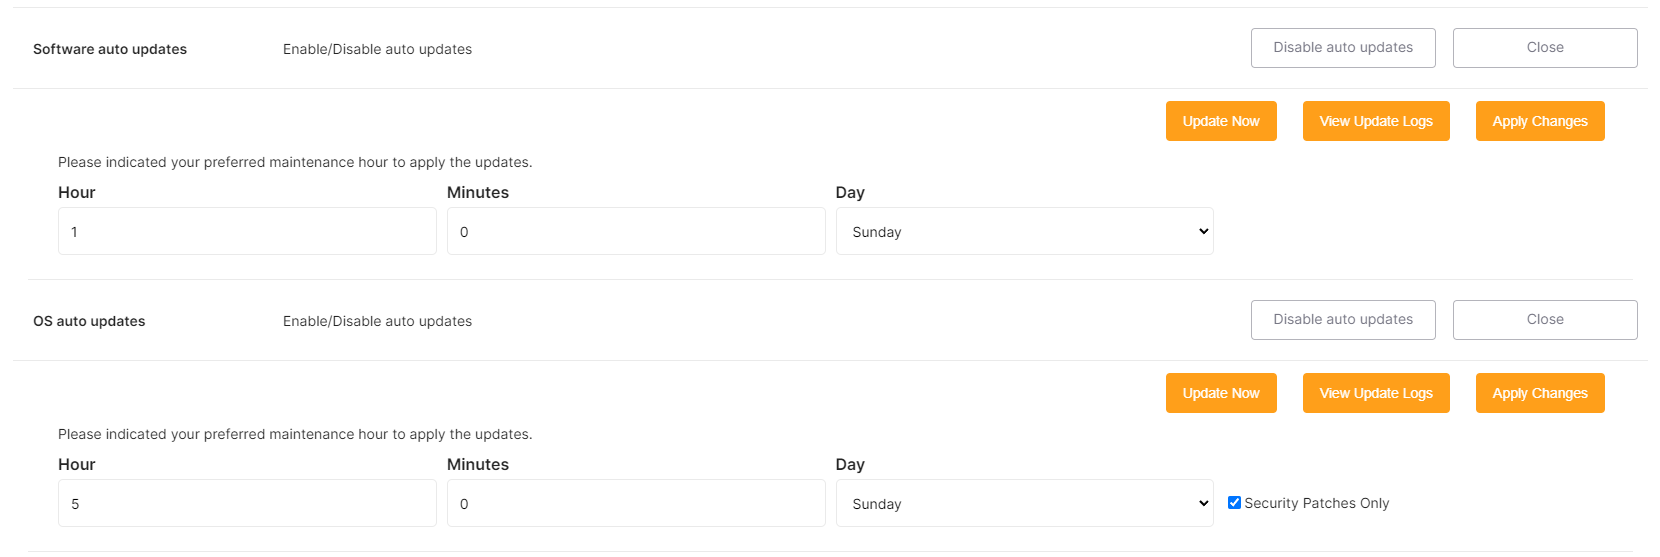
You can configure when updates are applied - by the minute, hour, or day.
All times configured in the dashboard are UTC (Coordinated Universal Time).
It's also possible to start an update interactively with the Update now buttons or view logs of previous updates.

Upgrade service plan
In the service overview, disable the termination protection then shut down the service, once done you will be able to click on the "Upgrade plan" button and select another service size.
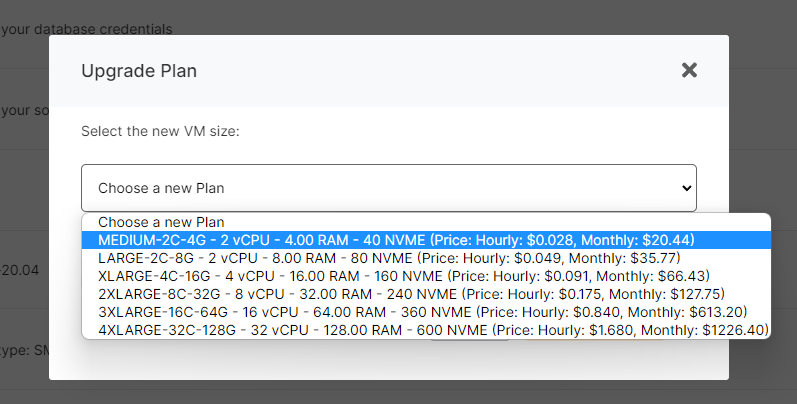
To be able to upgrade your service plan, you must first shutdown your service
When you resize a service you have an option to resize only the CPU & RAM without modifying the disk size, if you check that option, you will be able to downgrade later if needed.
Upgrade support plan
From the service overview, click on "Upgrade plan" on the support plan row to change your support plan:
There you can switch to any other support plan
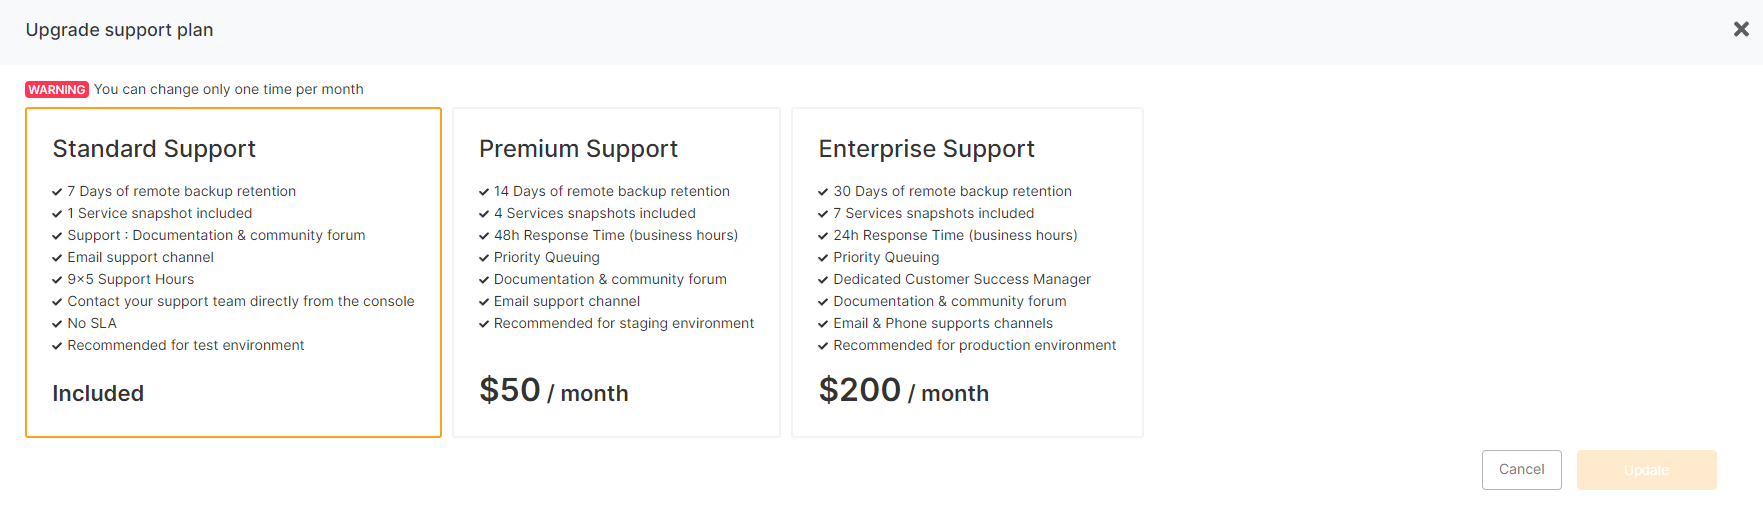
While it's possible to change support plans, it's important to note this is only possible once every 30 days.
Support plans are billed per hour like all our other services.
Delete a service
To delete a service, ensure that termination protection is disabled then click on "Delete service" button in the top bar.
There you must type or copy/paste the service name below to confirm the service deletion
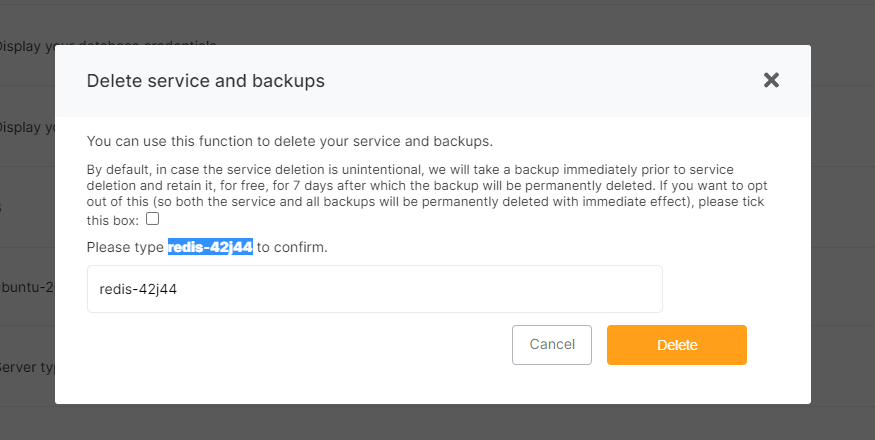
By default, deleted services will be kept for 7 days as a remote backup before total deletion. This allows users to restore deleted services in case of a mistake. If you're sure and you want to delete a service with immediate effect, simply tick the checkbox, and all backs up will be immediately destroyed.
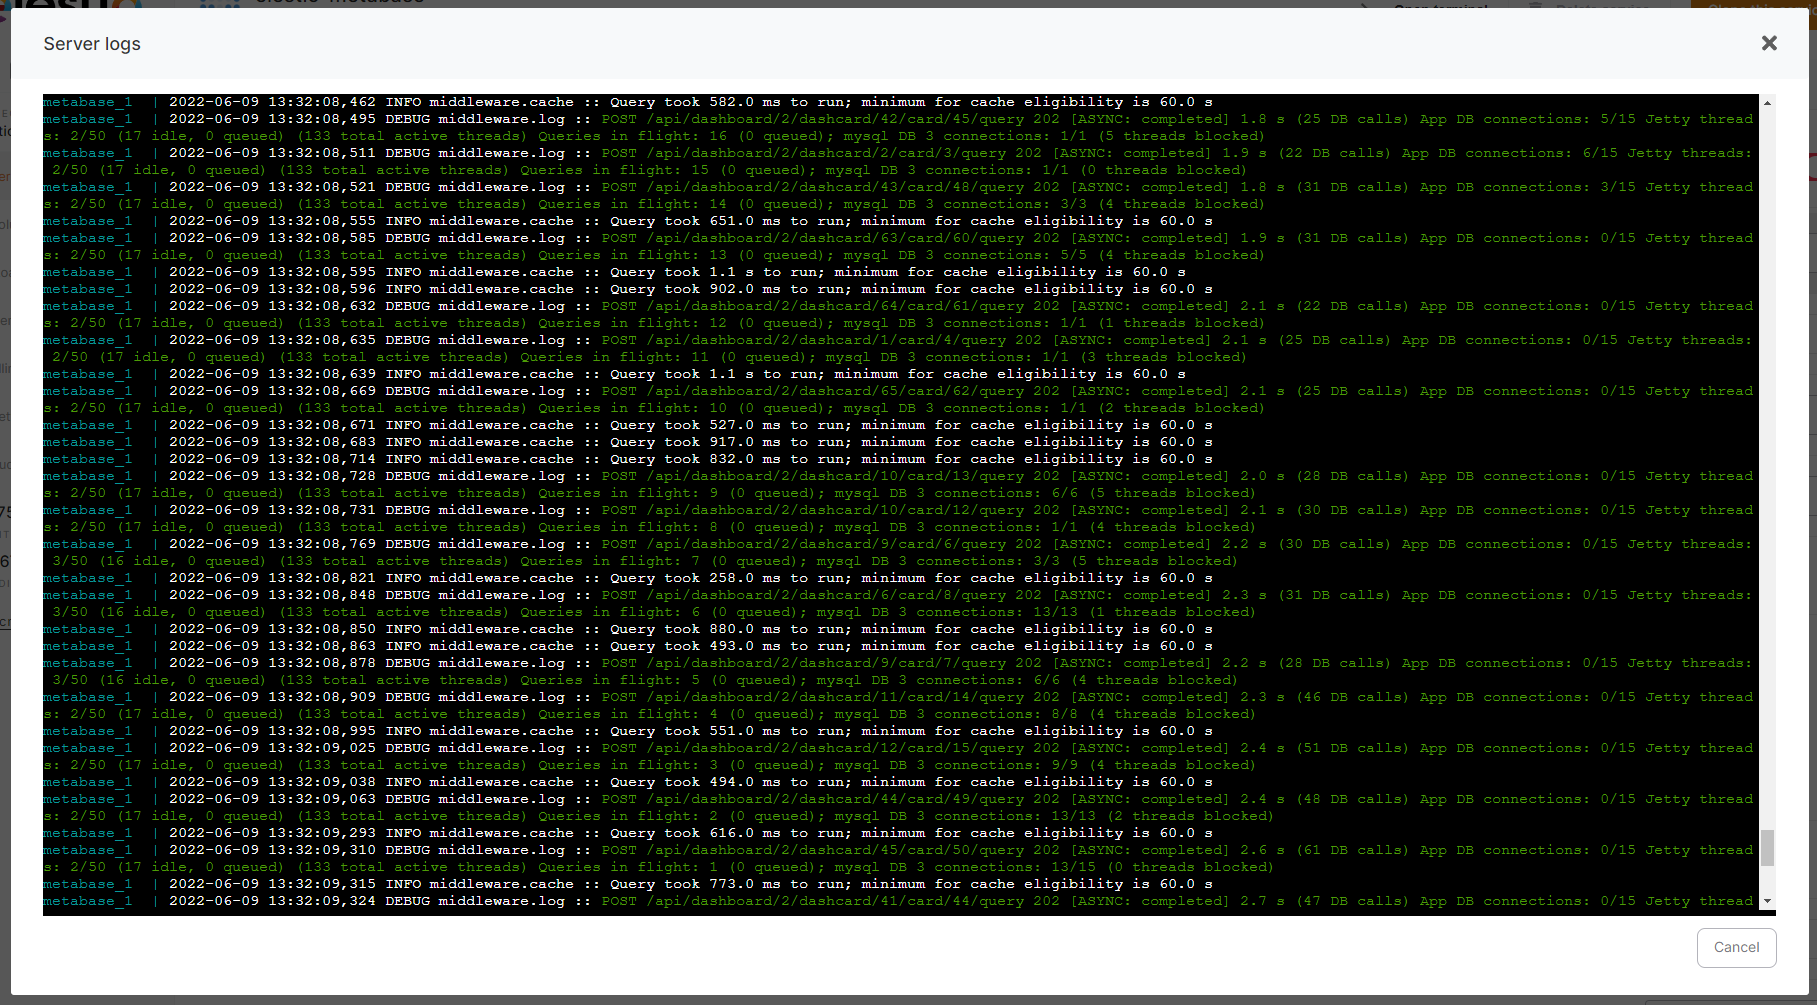
Software logs, configuration, restart app, change version

From the service overview, you can open live logs with the "View app logs" button
You can change the .env & docker-compose.yml configuration if you click on "Update config" button
If you click on "Update Config" you will be able to edit the configuration and apply it.
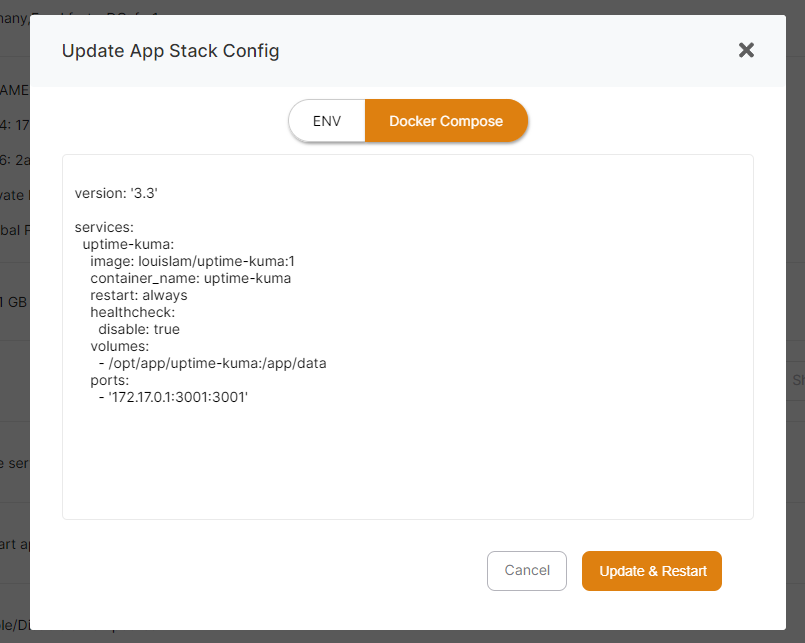
If you click on Restart (or Update & Restart), you will see the stack restarted and also the output log of your stack. This is useful after changing your configuration to ensure everything is still working as expected.
If you click on "Change version" button you can select any other available version (fetched from the docker repository):
Resync
After cloning a service, you will have a new option visible in the service overview: Resync
From the service overview, click on "Resync" button to resynchronize your cloned service from the orgin. After a confirmation, the process will start and will do:
- Create a new backup from the origin
- Stop your app in the destination server
- Restore the latest fresh backup
- Restart the service
This includes the docker-compose stack, the .env, credentials, volumes. But global settings changes like custom backup configuration, custom alerts rules and custom firewall rules are not copied in this process.
Increase AWS Main (Disk Or Volume) Size
Your AWS provider instance disc size can be changed at any time between 10 GB and 10 TB.
On AWS Disk, you can only increase the disc size, not decrease it.
According to AWS policy, after upgrading a disc size, you must wait at least 6 hours before upgrading it again.
To increase the disc size, navigate to your service overview and then to the section's Main Volume.
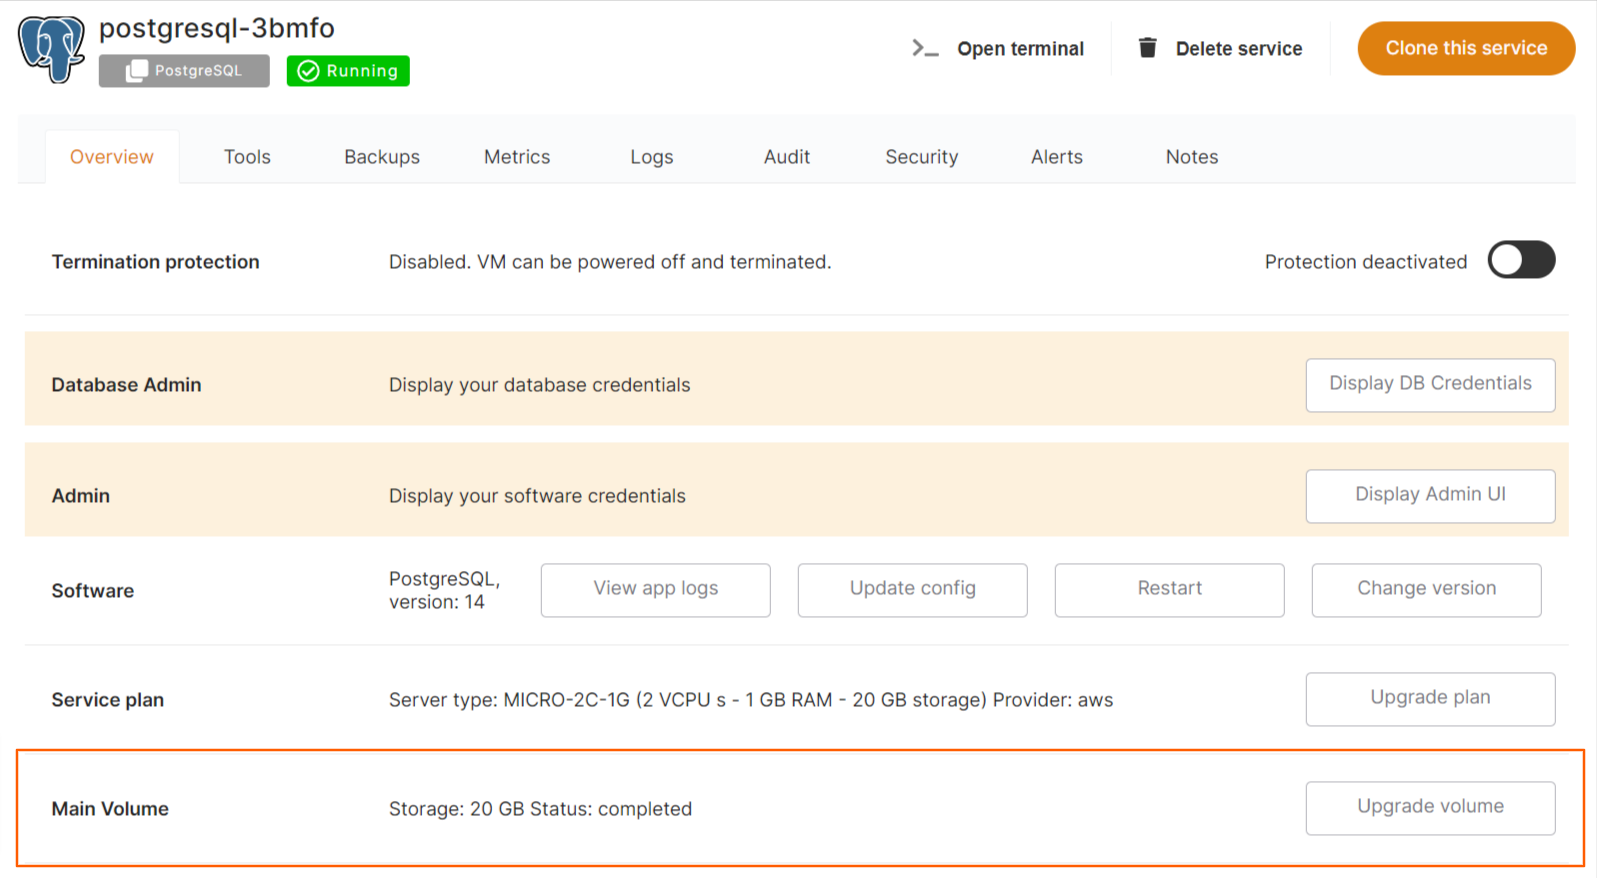
Here, you will find information about your current disc size, its status, and an Upgrade volume button.
A prompt modal will appear when you click the Upgrade volume button to increase the disc size.

Enter the size of the disc you want to upgrade here, followed by the name of your service in the input field for confirmation. Click the Do Upgrade button to confirm the upgrade, or Cancel to reject it.
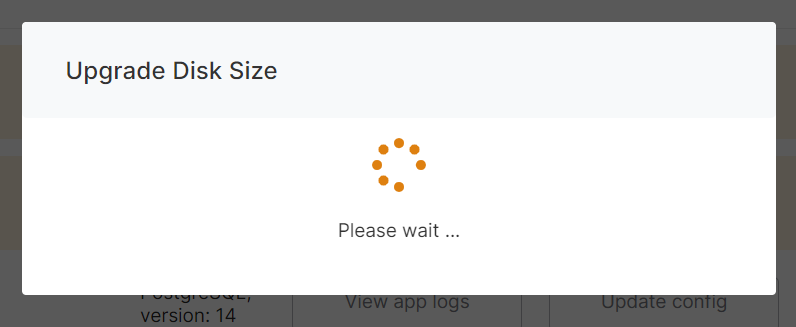
After you confirm, a loader modal will appear, and it will take a few seconds or a minute to upgrade the size of your disc.

You can get your updated size in the Storage section and Status Optimizing after upgrading a size.
Your disk's status will change from optimizing to completed after a short while (or several hours).
When you modify an Amazon EBS volume, the volume goes through a sequence of states. These volume states include the modifying state, the optimizing state, and finally the completed state.
If you increase the size of the volume, then the new size is available for use immediately after the modification. However, if the volume is in the Optimizing state, then the performance of the volume is in between the source and target configuration specifications. The performance of the volume is measured in terms of I/O operations per second and throughput.
Modifying an EBS volume can take from a few minutes to a few hours depending on the configuration changes being applied. An EBS volume of size 1 TiB can typically take up to 6 hours to be modified. However, the same volume might take 24 hours or longer in other situations. The time it takes for volumes to be modified doesn't always scale linearly. Therefore, a larger volume might take less time, and a smaller volume might take more time.
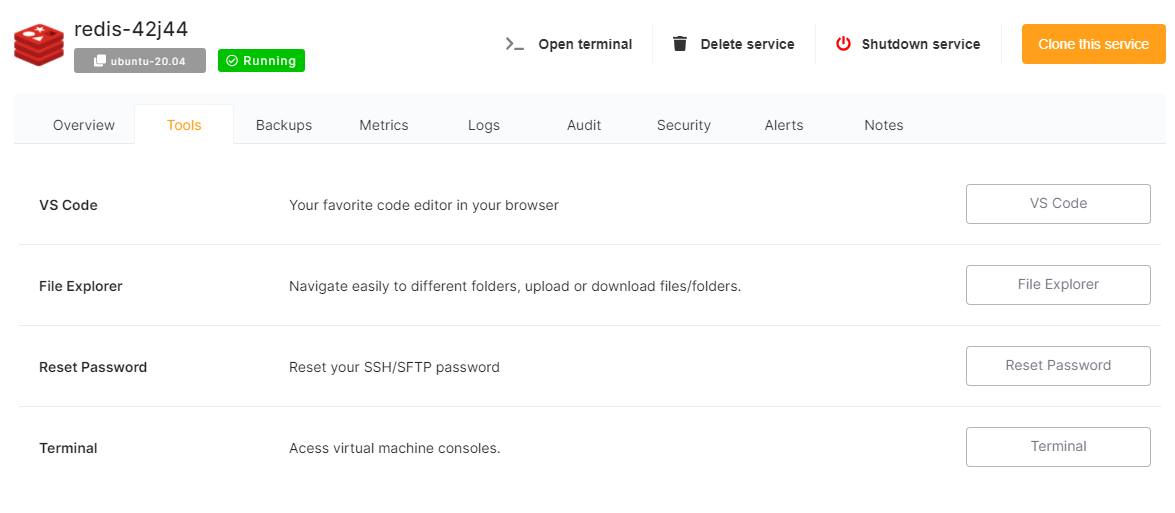
Tools
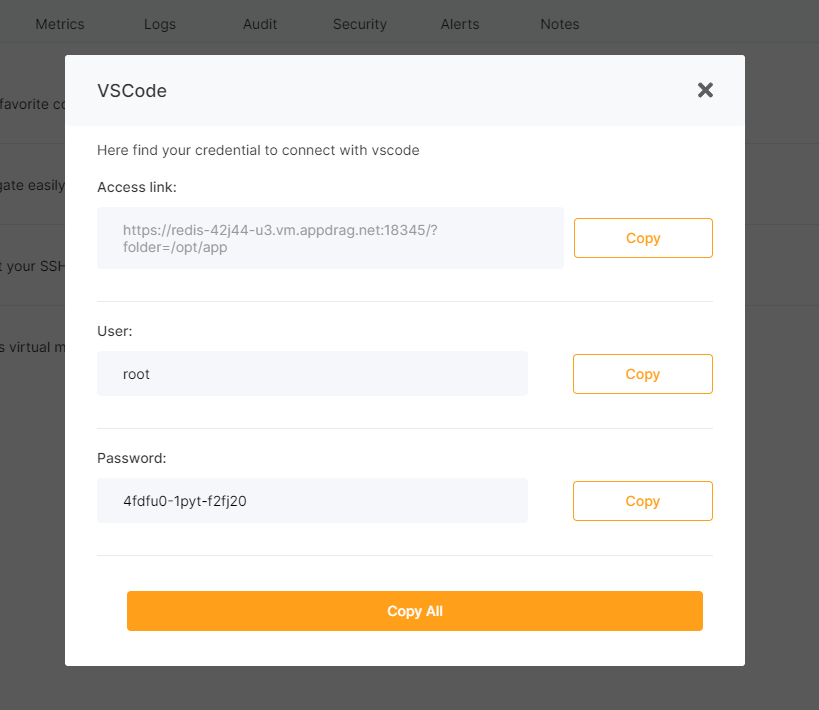
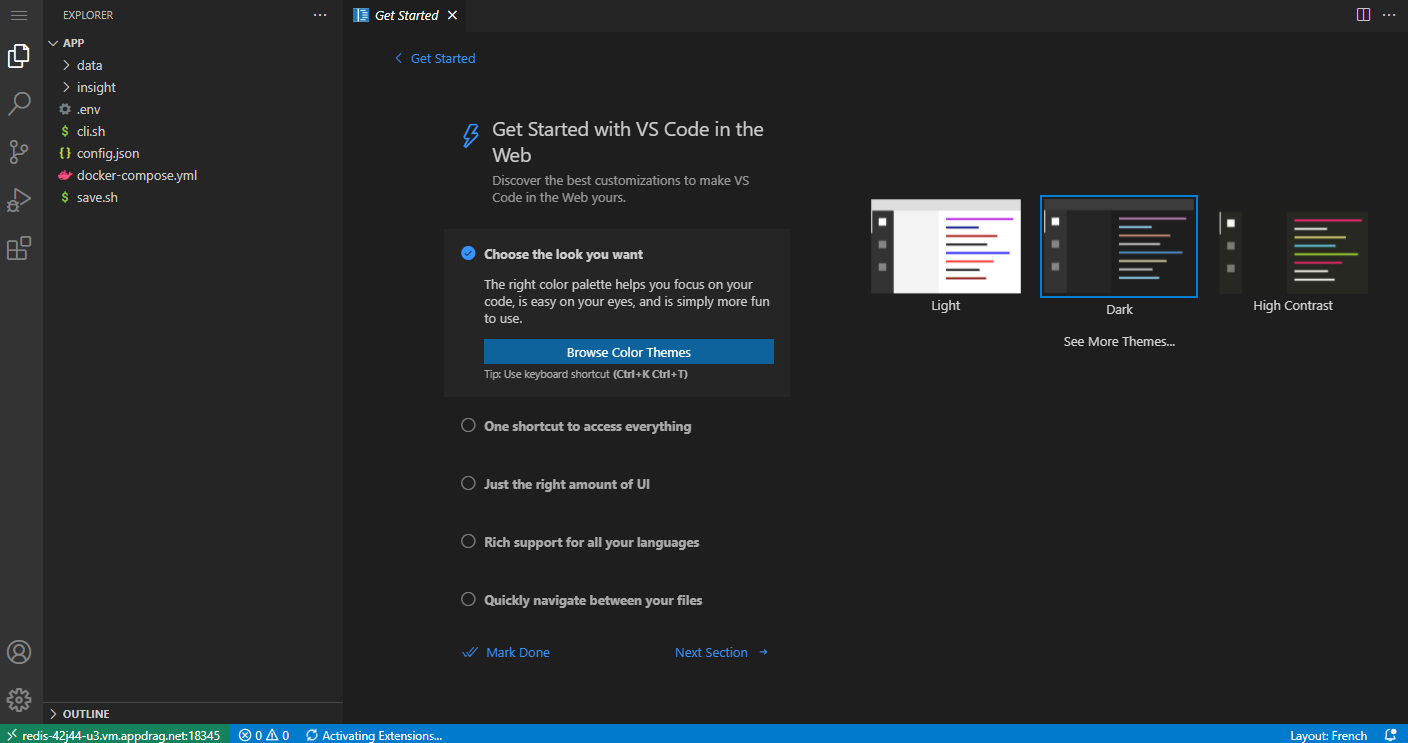
VSCode
From the Tools tab in the service overview, click on VS Code button to start VS Code in the browser directly in the context of your service.
From there you can edit the configuration, download or upload files with drag&drop on the left column or open a terminal
The first launch can take up to 1-2 minutes while VS Code installs.
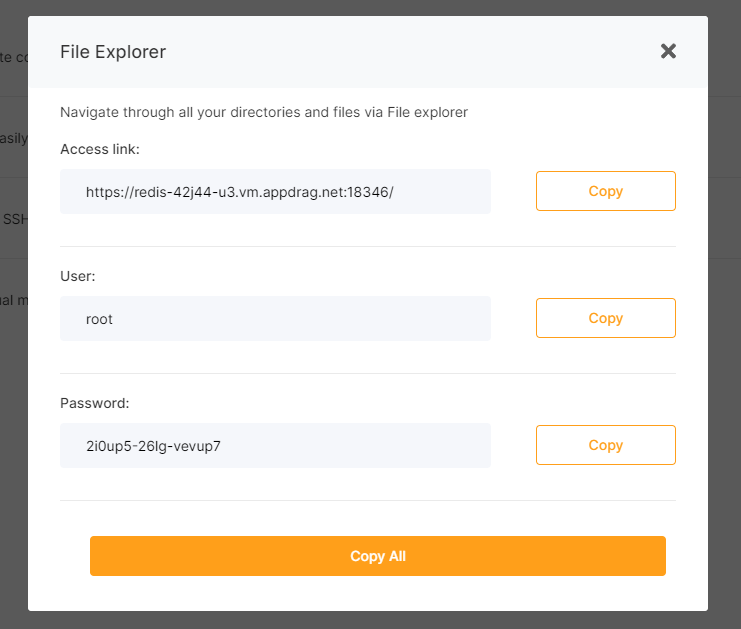
File Explorer
From the Tools tab in the service overview, click on the "File Explorer" button.
The first launch can take 1-2 minutes because File Explorer is installed on your service. The next launch is nearly instant.
This will open a pop-up window, providing you with a temporary password and Access link.
Copy the temporary password and click on the Access link.
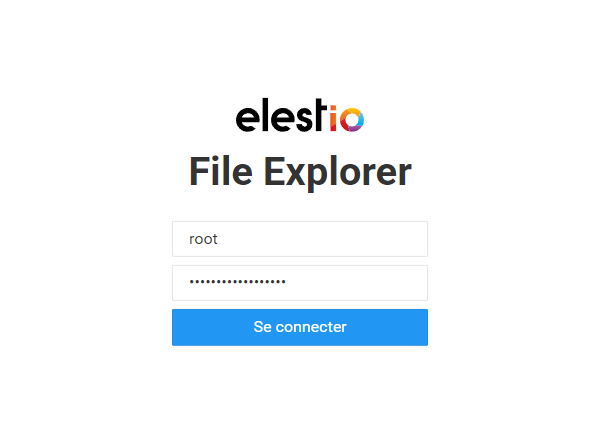
Authenticate with the credentials on the file explorer page:
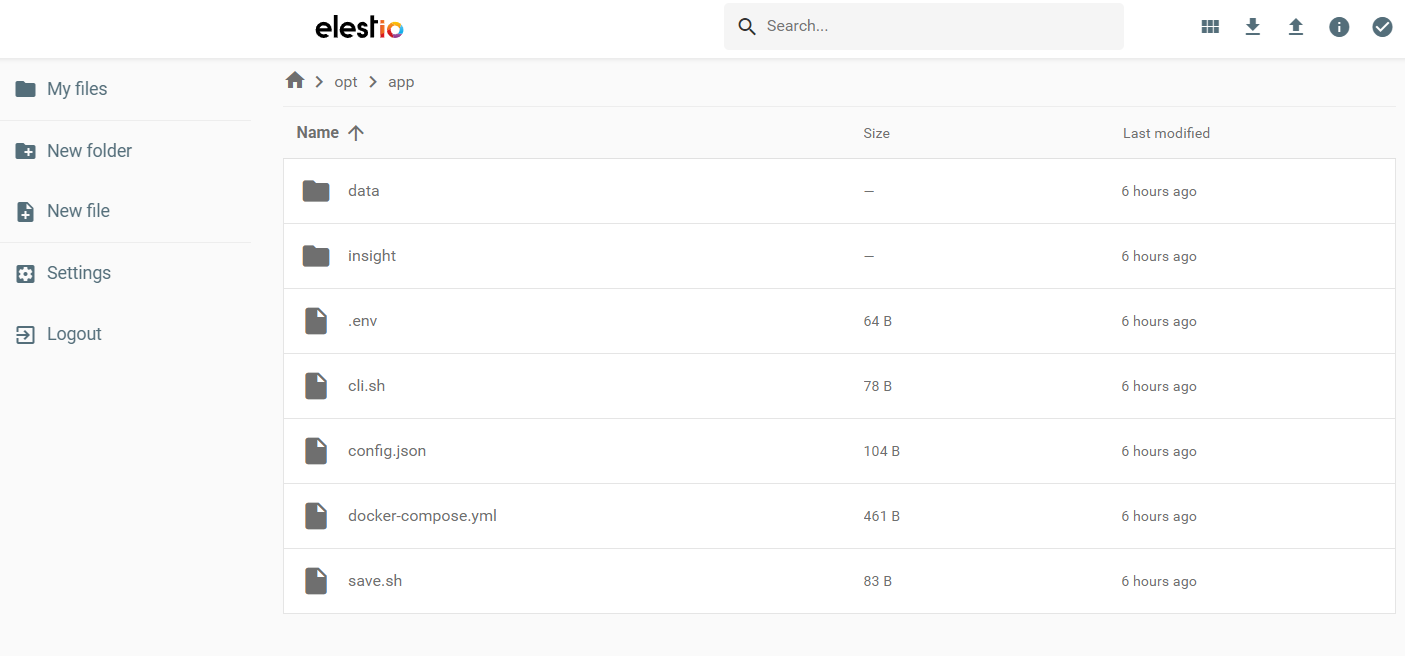
Once logged in, you'll be able to browse, edit, download, and upload the files on the server:
Web Terminal
From the Tools tab in the service overview, click on the "Terminal" button
The first launch can take 1-2 minutes because the Web terminal is installed on your service. The next launch is nearly instant.


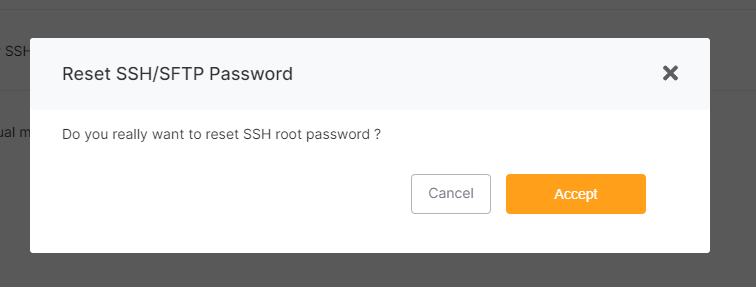
Reset SSH/SFTP Password
By default, password authentication is disabled. For security reasons, we recommend using SSH Pubkeys instead.
From the Tools tab in the service overview, click on the "Reset Password" button
Backups
Please check the Backups details page
Metrics
Metrics tabs allow you to view your service's metrics in real-time.
You can configure the update period to as low as a 1-second interval.

Enabling additional metrics in real-time will use additional CPU while you are viewing the Dashboard. To limit CPU usage, increase the update period interval or select fewer metrics.
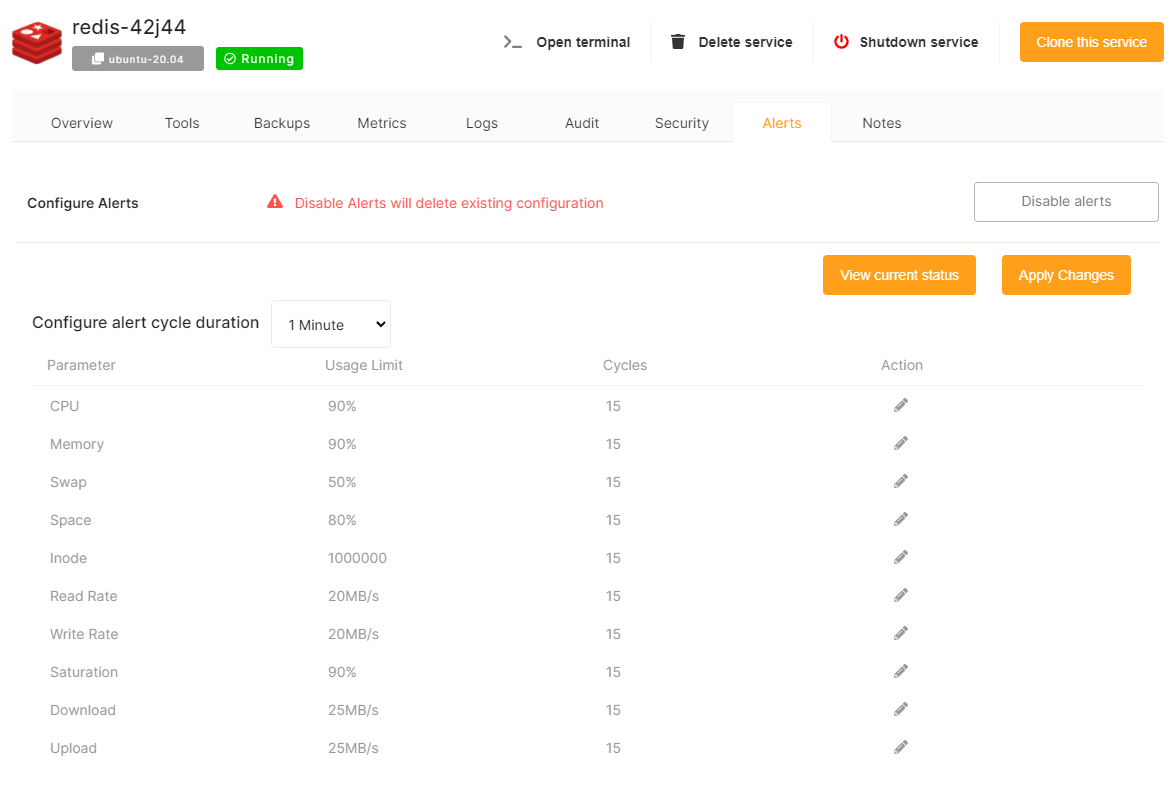
Alerts
Alerts are enabled by default on all new services.
You can enable or completely disable alerts. You can also configure usage limits per resource.
The default cycle duration is 1 minute and you can configure a number of cycles above the limit before sending an alert.
Alerts are sent via email to the server owner's email address on file.
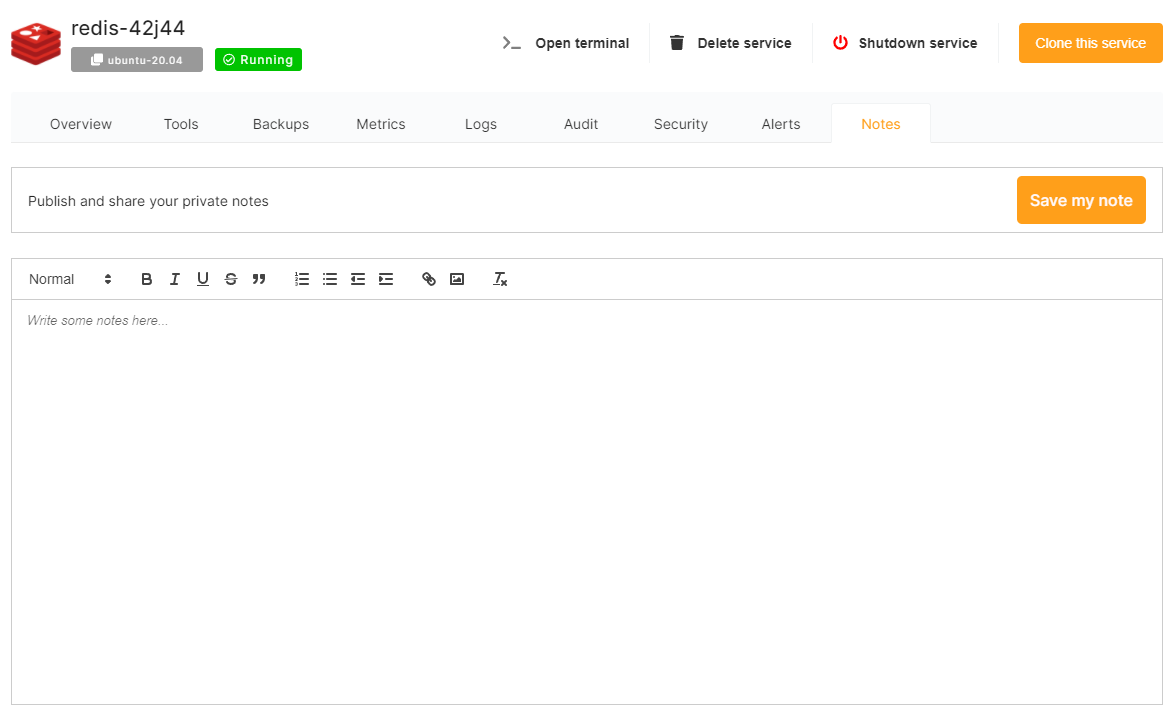
Notes
The notes tab is useful to save textual notes about service, for yourself or other team members