
Custom domains on CI/CD pipelines
Prerequisites
YouIf canthe addfirewall anyis number of custom domain namesenabled on your CI/CDservice, pipeline,ensure Elestiothat willport automatically80 configureis theopen. routingThis ofis therequired traffic andfor SSL termination / certificate creation and renewals.renewal.
To
Accessing the detailsConfiguration
Go to the Overview tab of your pipeline dashboard.
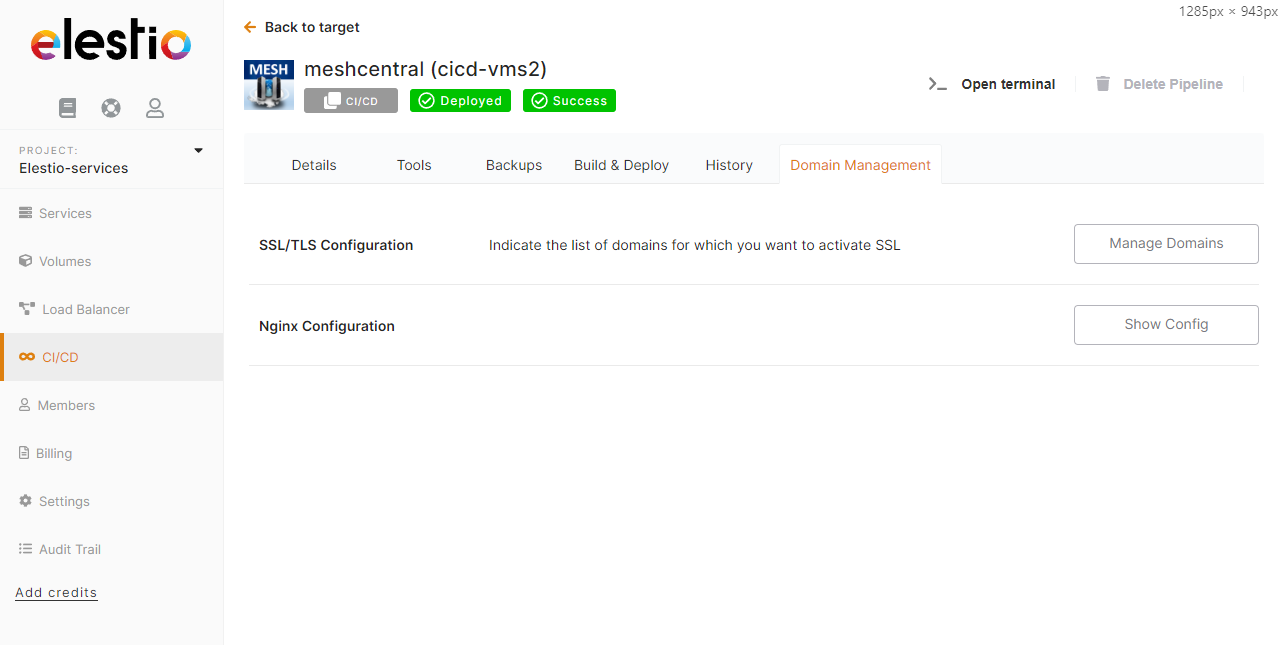
Then click onLocate the "ManageCustom Domains"Domain button

There you can clicksection inside the input,Domain typeManagement tab.
Click Manage Domains.

In this section, you will have two ways to configure custom domains.
Method 1: Manual DNS Setup
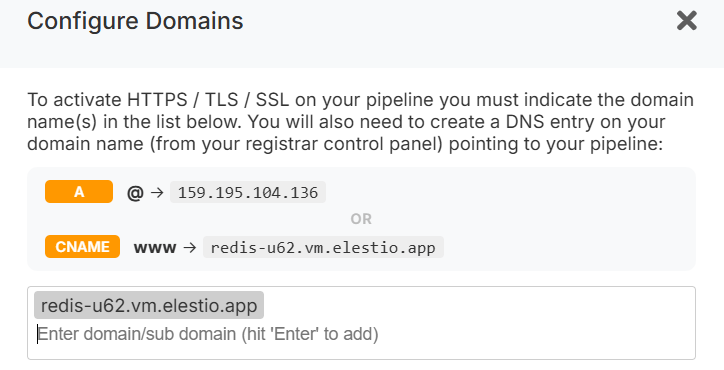
In this step, enter your custom domain name (Eg: mydomain.com) and press enterEnter to add it to the list of authorized domains.
Finally,Configure goDNS records in your domain registrar panel.
Required DNS Records
A record:@ → <service IPv4>
(Points the root domain to your domainservice registrar,IP)
CNAME record:www of→ type<service CNAME>
(Recommended (Eg: www)remains andstable in the value put the value in bold from the popup (Eg: xxxxxxxxxx-u3.vm.elestio.app)
Wait until the DNS entry is propagated (usually anywhere between 15 min up to 2 hours), you can checkeven if your IP changes, e.g., after migration.)
Verify DNS entrypropagation isusing propagateda withtool this free online tool:like: https://dnschecker.org/
Once propagation is complete, the SSL certificate will be automatically generated and renewed, and HTTPS will start working.
Method 2: One-Click DNS Setup via Cloudflare (Domain Connect)
A One-click DNS Setup section is available if the domain name server or registrar is Cloudflare, allowing automatic DNS configuration via the Domain Connect protocol.
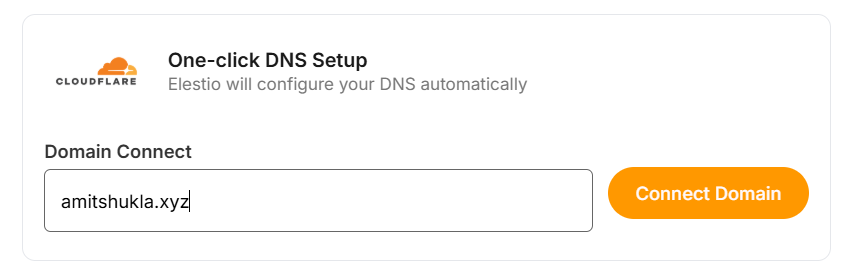
Steps
Enter your domain (e.g. example.com).
Click Connect Domain.
This action will redirect you to the Cloudflare dashboard for accepting the DNS record configuration.
Cloudflare Reverse Proxy Users
If you are using method 1 and want Cloudflare with the proxy enabled (orange cloud icon), refer to the detailed guide:
https://docs.elest.io/books/security/page/using-cloudflare
Environment Variable Update
Some applications require updating an environment variable to reflect the configured domain.
To update:
Go to the Overview page of your pipeline.
Click the Build & Deploy tab.
Open the Environment variable section.
Update the domain-related environment variable.
Troubleshooting: SSL Not Generated
View Nginx Logs
You can inspect logs using a terminal command:
cd /opt/elestio/nginx;
docker-compose logs -f;
Press Ctrl + C to stop live log output.
Reset SSL Data Folder
In some cases, the SSL data directory /opt/elestio/nginx/ssl_data may become corrupted:
To fix:
Connect to your service via terminal.
Run the command below.
cd /opt/elestio/nginx/;
docker-compose down;
mv ./ssl_data/ ./ssl_data_old/;
mkdir ./ssl_data/;
chmod 777 ./ssl_data/;
docker-compose up -d
Once executed, just open your custom website URL again; your certificate should be generated, and your site served over SSL/TLS.
We recommend to useusing CNAME records instead of A,A records; that wayway, if you later you decide to move your pipeline in 1 click from our UIUI, it will work right away. If you used an A record, you will have to go back to your registrar to update the A record to point to the new IP address.