
Connecting with Node.js
This guide explains how to establish a connection between a Node.js application and a MySQL database using the mysql2 package. It walks through the necessary setup, configuration, and execution of a simple SQL query.
Variables
Certain parameters must be provided to establish a successful connection to a MySQL database. Below is a breakdown of each required variable, its purpose, and where to find it. Here’s what each variable represents:
|
Variable |
Description |
Purpose |
|---|---|---|
|
|
MySQL username, from the Elestio service overview page |
Identifies the database user who has permission to access the MySQL database. |
|
|
MySQL password, from the Elestio service overview page |
The authentication key is required for the specified USER to access the database. |
|
|
Hostname for MySQL connection, from the Elestio service overview page |
The address of the server hosting the MySQL database. |
|
|
Port for MySQL connection, from the Elestio service overview page |
The network port used to connect to MySQL. The default port is 3306. |
|
|
Database Name for MySQL connection, from the Elestio service overview page |
The name of the database being accessed. A MySQL instance can contain multiple databases. |
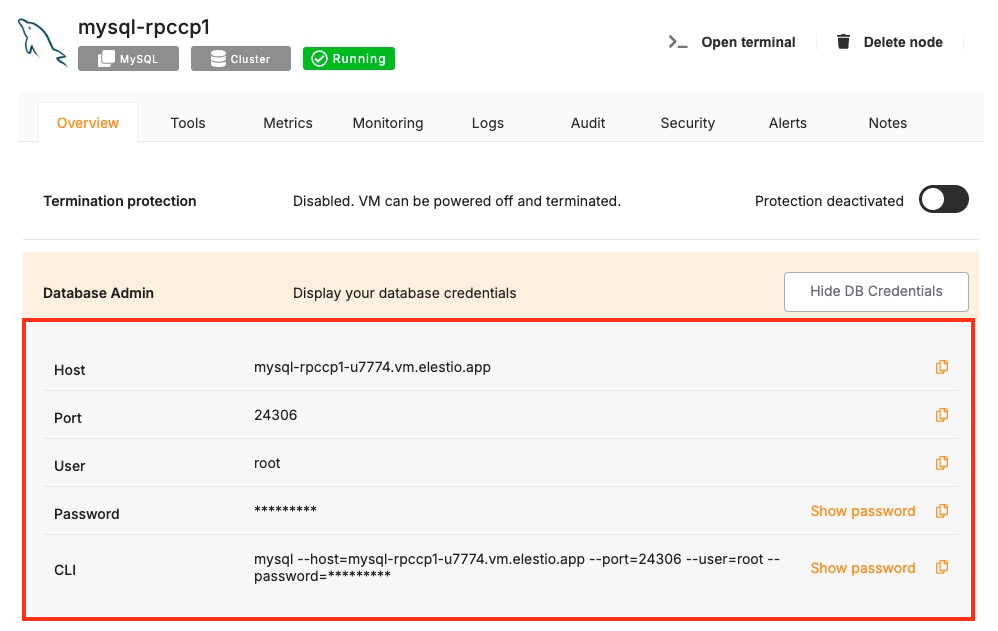
These values can usually be found in the Elestio service overview details as shown in the image below, make sure to take a copy of these details and add it to the code moving ahead.
Prerequisites
- Install Node.js and NPM
- Check if Node.js is installed by running:
node -v
- Check if Node.js is installed by running:
-
- If not installed, download it from nodejs.org and install. Additionally, verify npm installation:
npm -v
- If not installed, download it from nodejs.org and install. Additionally, verify npm installation:
- Install the mysql2 Package
- The mysql2 package enables Node.js applications to interact with MySQL. Install it using:
npm install mysql2 --save
- The mysql2 package enables Node.js applications to interact with MySQL. Install it using:
Code
Once all prerequisites are set up, create a new file named mysql.js and add the following code:
const mysql = require("mysql2");

// Database connection configuration
const config = {
  host: "HOST",
  user: "USER",
  password: "PASSWORD",
  database: "DATABASE",
  port: PORT,
};

// Create a MySQL connection
const connection = mysql.createConnection(config);

// Connect to the database
connection.connect((err) => {
  if (err) {
    console.error("Connection failed:", err);
    return;
  }
  console.log("Connected to MySQL");

  // Run a test query to check the MySQL version
  connection.query("SELECT VERSION() AS version", (err, results) => {
    if (err) {
      console.error("Query execution failed:", err);
      connection.end();
      return;
    }

    console.log("MySQL Version:", results[0]);

    // Close the database connection
    connection.end((err) => {
      if (err) console.error("Error closing connection:", err);
    });
  });
});
To execute the script, open the terminal or command prompt and navigate to the directory where mysql.js is located. Once in the correct directory, run the script with the command:
node mysql.jsIf the connection is successful, the terminal will display output similar to:
Connected to MySQL
MySQL Version: { version: '8.0.41' }