
Creating Manual Backups
Regular backups are a key part of managing a MySQL deployment. While Elestio provides automated backups by default, you may want to perform manual backups for specific reasons, such as preparing for a major change, keeping a local copy, or testing backup automation. This guide walks through how to create MySQL backups on Elestio using multiple approaches. It covers manual backups through the Elestio dashboard, using MySQL CLI tools, and Docker Compose-based setups. It also includes advice for backup storage, retention policies, and automation using scheduled jobs.
Manual Service Backups on Elestio
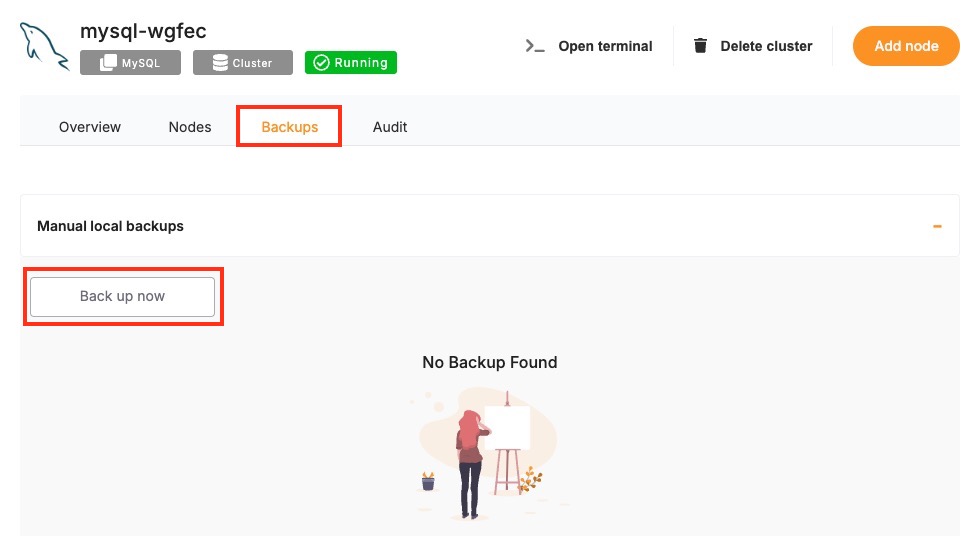
If you’re using Elestio’s managed MySQL service, the easiest way to create a manual backup is through the dashboard. This built-in method creates a full snapshot of your current database state and stores it within Elestio’s infrastructure. These backups are tied to your service and can be restored through the same interface. This option is recommended when you need a quick, consistent backup without using any terminal commands.
To trigger a manual backup from the Elestio dashboard:
-
Log in to the Elestio dashboard and navigate to your MySQL service/cluster.
-
Click the Backups tab in the service menu.
-
Select Back up now to generate a snapshot.
Manual Backups Using MySQL CLI
MySQL provides a set of command-line tools that are useful when you want to create backups from your terminal. These include mysqldump for exporting databases and mysql for connectivity and basic queries. This approach is useful when you need to store backups locally or use them with custom automation workflows. The CLI method gives you full control over the backup format and destination.
Collect Database Connection Info
To use the CLI tools, you’ll need the database host, port, name, username, and password. These details can be found in the Overview section of your MySQL service in the Elestio dashboard.

Back Up with mysqldump
Use mysqldump to export the database to a .sql file. This file can later be used to recreate the database or specific tables.
mysqldump -h <host> -P <port> -u <username> -p<password> <database_name> > <output_file>.sql-
Replace the placeholders with actual values from your Elestio dashboard.
-
The -p<password> flag must not have a space between -p and the password.
Example:
mysqldump -h mysql-example.elestio.app -P 24306 -u elestio -pelestioPass mydb > mydb_backup.sqlYou can add the --single-transaction flag for InnoDB tables to ensure consistency during the dump.
Manual Backups Using Docker Compose
If your MySQL database is deployed through a Docker Compose setup on Elestio, you can run the mysqldump command from within the running container. This is useful when the tools are installed inside the container environment and you want to keep everything self-contained. The backup can be created inside the container and then copied to your host system for long-term storage or transfer.
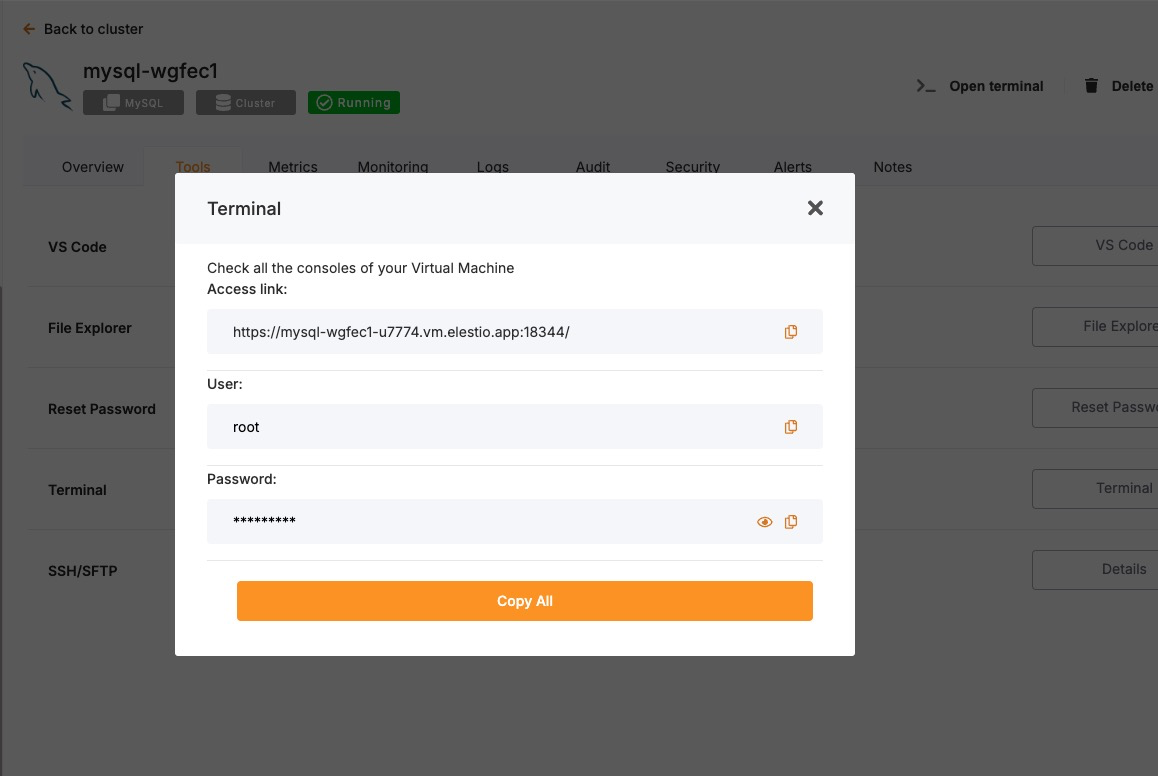
Access Elestio Terminal
Head over to your deployed MySQL service dashboard and go to Tools > Terminal. Use the credentials provided there to log in to your terminal.
Once you are in your terminal, navigate to the correct directory:
cd /opt/app/Run mysqldump Inside the Container
Use this command to run the backup from within the MySQL container. Ensure environment variables like MYSQL_USER, MYSQL_PASSWORD, and MYSQL_DATABASE are defined, or replace them with actual values.
docker-compose exec mysql \
  bash -c "mysqldump -u \$MYSQL_USER -p\$MYSQL_PASSWORD \$MYSQL_DATABASE > /tmp/manual_backup.sql"
This command saves the backup to /tmp/manual_backup.sql inside the container.
Copy Backup to Host
Once the backup is created inside the container, use the following command to copy it to your host system:
docker cp $(docker-compose ps -q mysql):/tmp/manual_backup.sql ./manual_backup.sqlThis creates a local copy of the backup file, which you can then upload to external storage or keep for versioned snapshots.
Backup Storage & Retention Best Practices
Once backups are created, they should be stored securely and managed with a clear retention policy. Proper naming, encryption, and rotation reduce the risk of data loss and help during recovery. Use timestamped filenames to identify when the backup was created. External storage services such as AWS S3, Backblaze B2, or an encrypted server volume are recommended for long-term storage.
Guidelines to follow:
-
Name backups clearly:
mydb_backup_2025_04_29.sql -
Store in secure, off-site storage if possible.
-
Retain 7 daily backups, 4 weekly backups, and 3–6 monthly backups.
-
Remove old backups automatically to save space using automation or scripts.
By combining storage hygiene with regular scheduling, you can maintain a reliable backup history and reduce manual effort.
Automating Manual Backups (cron)
Manual backup commands can be scheduled using tools like cron on Linux-based systems. This allows you to regularly back up your database without needing to run commands manually. Automating the process also reduces the risk of forgetting backups and ensures more consistent retention.
Example: Daily Backup at 2 AM
Open your crontab file for editing:
crontab -eThen add a job like the following:
0 2 * * * mysqldump -h db.vm.elestio.app -P 24306 -u elestio -pelestioPass mydatabase > /backups/backup_$(date +\%F).sql-
This will create a timestamped .sql file every day at 2 AM.
-
Make sure the /backups/ directory exists and is writable by the user running the cron job.
You can also compress the backup or upload it to cloud storage in the same script using tools like gzip, rclone, or aws-cli.