Connect to Keycloak
Connect to Elestio Keycloak from Node.js, Python, PHP, Go, Java, frontend apps, the Admin REST API, and external identity providers.
Connecting with Node.js
This guide explains how to establish a secure connection between a Node.js application and a Keycloak identity provider using the keycloak-connect middleware. It walks through the necessary setup, configuration, and usage of a protected route that requires authentication.
Variables
Certain parameters must be provided to integrate a Node.js application with Keycloak. Below is a breakdown of each required variable, its purpose, and where to find it. Here’s what each variable represents:
| Variable | Description | Purpose |
|---|---|---|
REALM | The realm name from the Keycloak Admin Console | Defines the namespace for authentication and authorization |
AUTH_SERVER_URL | The full realm URL from Keycloak (e.g., https://your-domain/realms/xyz) | Used as the OIDC issuer base URL |
CLIENT_ID | Client ID from the Keycloak Clients page | Identifies the application in Keycloak |
CLIENT_SECRET | Secret for the OIDC client, found in the Credentials tab of the client | Authenticates the Node.js application to Keycloak |
REDIRECT_URI | URI where users are redirected after authentication | Ensures Keycloak returns control to your app after login |
These values can usually be found in the Keycloak Admin Console under Clients and Realm Settings. Make sure to copy these details and add them to the code moving ahead.
Prerequisites
Install Node.js and NPM
Check if Node.js is installed by running:
node -v
If not installed, download it from https://nodejs.org and install.
Verify NPM installation:
npm -v
Install Required Packages
The keycloak-connect package enables Node.js applications to authenticate using Keycloak. Install the required packages using:
npm install express express-session keycloak-connect
Code
Once all prerequisites are set up, create a new file named keycloak.js and add the following code:
const express = require("express");
const session = require("express-session");
const Keycloak = require("keycloak-connect");

const app = express();
const port = process.env.PORT || 3000;

const memoryStore = new session.MemoryStore();

app.use(
  session({
    secret: "supersecret",
    resave: false,
    saveUninitialized: true,
    store: memoryStore,
  })
);

const keycloakConfig = {
  realm: "REALM",
  authServerUrl: "AUTH_SERVER_URL",
  clientId: "CLIENT_ID",
  credentials: {
    secret: "CLIENT_SECRET",
  },
  sslRequired: "external",
  confidentialPort: 0,
};

const keycloak = new Keycloak({ store: memoryStore }, keycloakConfig);
app.use(keycloak.middleware());

app.get("/", (req, res) => {
  res.send("Welcome to the public route.");
});

app.get("/protected", keycloak.protect(), (req, res) => {
  res.send("You have accessed a protected route.");
});

app.get("/logout", (req, res) => {
  req.logout();
  res.redirect("/");
});

app.listen(port, () => {
  console.log(`Server running at http://localhost:${port}`);
});
Replace the placeholder values (REALM, AUTH_SERVER_URL, CLIENT_ID, and CLIENT_SECRET) with actual values from your Keycloak server.
Execution
Open the terminal or command prompt and navigate to the directory where keycloak.js is saved. Once in the correct directory, run the script with the command:
node keycloak.js
If the connection is successful:
- Visit http://localhost:3000 in your browser to access the public route.
- Visit http://localhost:3000/protected to trigger Keycloak authentication.
- Upon successful login, you’ll be redirected back and see protected content.
- Visit http://localhost:3000/logout to log out and end the session.
Connecting with Python
This guide explains how to establish a connection between a Python Flask application and a Keycloak identity provider using Flask-OIDC. It walks through the necessary setup, configuration, and usage of a protected route that requires authentication.
Variables
Certain parameters must be provided to integrate a Python Flask application with Keycloak. Below is a breakdown of each required variable, its purpose, and where to find it. Here’s what each variable represents:
| Variable | Description | Purpose |
|---|---|---|
CLIENT_ID | Client ID from the Keycloak Clients page | Identifies the Flask app in the Keycloak realm |
CLIENT_SECRET | Secret from the Credentials tab of the client | Authenticates the Flask app with Keycloak |
ISSUER | Full Keycloak realm URL (e.g. https://your-domain/realms/your-realm) | Defines the OpenID Connect issuer |
REDIRECT_URI | The callback URL Keycloak will redirect to after login | Used by Flask-OIDC to complete login flow |
TOKEN_ENDPOINT | Token URL from Keycloak | Used for exchanging authorization codes for access tokens |
USERINFO_ENDPOINT | User info endpoint from Keycloak | Used to fetch user profile after login |
These values can be found in the Keycloak Admin Console under Clients → [Your Client] → Settings / Credentials / Endpoints. Make sure to copy and add them to the code as shown.
Prerequisites
Install Python and pip
Check if Python is installed by running:
python3 --version
If not installed, download it from https://python.org and install.
Verify pip installation:
pip3 --version
Install Required Packages
Install the required Python packages using:
pip3 install flask flask-oidc
Code
Once all prerequisites are set up, create a new file named app.py and add the following code:
from flask import Flask, redirect, url_for, jsonify
from flask_oidc import OpenIDConnect

app = Flask(__name__)

# Keycloak OIDC configuration (no JSON file required)
app.config.update({
    'SECRET_KEY': 'your-random-secret',
    'OIDC_CLIENT_SECRETS': {
        "web": {
            "client_id": "CLIENT_ID",
            "client_secret": "CLIENT_SECRET",
            "auth_uri": "https://your-keycloak-domain/realms/your-realm/protocol/openid-connect/auth",
            "token_uri": "https://your-keycloak-domain/realms/your-realm/protocol/openid-connect/token",
            "userinfo_uri": "https://your-keycloak-domain/realms/your-realm/protocol/openid-connect/userinfo",
            "redirect_uris": ["http://localhost:5000/oidc/callback"]
        }
    },
    'OIDC_SCOPES': ['openid', 'email', 'profile'],
    'OIDC_CALLBACK_ROUTE': '/oidc/callback',
    'OIDC_COOKIE_SECURE': False
})

oidc = OpenIDConnect(app)

@app.route('/')
def index():
    return 'Welcome to the public route.'

@app.route('/protected')
@oidc.require_login
def protected():
    user_info = oidc.user_getinfo(['email', 'sub', 'name'])
    return jsonify({
        "message": "You are authenticated",
        "user": user_info
    })

@app.route('/logout')
def logout():
    oidc.logout()
    return redirect(url_for('index'))

if __name__ == '__main__':
    app.run(debug=True)
Replace the placeholders in the client_id, client_secret, and URL fields with actual values from your Keycloak instance.
Execution
Open the terminal and navigate to the directory where app.py is saved. Once in the correct directory, run the script with the command:
python3 app.py
If the connection is successful:
- Open http://localhost:5000 in your browser — Public route.
- Open http://localhost:5000/protected — Redirects to Keycloak login.
- After logging in, you’ll see user info returned from the protected route.
- Visit http://localhost:5000/logout to end the session and return to the public page.
Connecting with PHP
This guide explains how to establish a connection between a PHP application and a Keycloak identity provider using the jumbojett/openid-connect-php library. It walks through the necessary setup, configuration, and execution of a protected login route using OpenID Connect (OIDC).
Variables
Certain parameters must be provided to integrate a PHP application with Keycloak. Below is a breakdown of each required variable, its purpose, and where to find it. Here’s what each variable represents:
| Variable | Description | Purpose |
|---|---|---|
CLIENT_ID | Client ID from the Keycloak Admin Console | Identifies the PHP app in the Keycloak realm |
CLIENT_SECRET | Secret from the Client > Credentials tab | Authenticates the PHP app with Keycloak |
ISSUER | The Keycloak realm URL (e.g., https://your-domain/realms/your-realm) | Acts as the OIDC issuer and discovery endpoint |
REDIRECT_URI | The URI that Keycloak will redirect to after login | Where the user will be sent after successful authentication |
TOKEN_ENDPOINT | Token URL under the selected realm | Used to retrieve access/ID tokens |
USERINFO_ENDPOINT | URL to fetch user profile information | Used to retrieve authenticated user details |
These values can be copied from the Keycloak Admin Console under Clients > [Your Client] > Endpoints.
Prerequisites
Install PHP and Composer
Ensure PHP is installed:
php -v
Install Composer (PHP dependency manager) if not already installed:
composer --version
If not installed, visit https://getcomposer.org and follow the install instructions
Install Required Package
Install the jumbojett/openid-connect-php package using Composer:
composer require jumbojett/openid-connect-php
Code
Once all prerequisites are set up, create a file named keycloak.php and add the following code:
<?php
require_once __DIR__ . '/vendor/autoload.php';

use Jumbojett\OpenIDConnectClient;

$oidc = new OpenIDConnectClient(
    'https://your-keycloak-domain/realms/your-realm',
    'CLIENT_ID',
    'CLIENT_SECRET'
);

// Optional config
$oidc->setRedirectURL('http://localhost:8000/keycloak.php');
$oidc->setProviderConfigParams([
    'token_endpoint' => 'https://your-keycloak-domain/realms/your-realm/protocol/openid-connect/token',
    'userinfo_endpoint' => 'https://your-keycloak-domain/realms/your-realm/protocol/openid-connect/userinfo'
]);

// Start login flow
$oidc->authenticate();

// Show user info
$userInfo = $oidc->requestUserInfo();

echo "<h1>Welcome, " . htmlspecialchars($userInfo->preferred_username) . "</h1>";
echo "";
print_r($userInfo);
echo "";
?>
Replace:
- https://your-keycloak-domain/realms/your-realm with your actual realm URL
- CLIENT_ID and CLIENT_SECRET with credentials from the Keycloak client settings
- http://localhost:8000/keycloak.php with your desired callback/redirect URI
Ensure the Valid Redirect URIs field in Keycloak matches the above redirect URI.
Execution
Start a PHP development server in the directory containing keycloak.php:
php -S localhost:8000
Open your browser and navigate to:
http://localhost:8000/keycloak.php
If the connection is successful:
- You’ll be redirected to the Keycloak login page.
- After authentication, you’ll be redirected back to the PHP script.
- The user profile will be displayed using data returned from Keycloak.
Connecting with Go
This guide explains how to establish a connection between a Go application and a Keycloak identity provider using the OIDC (OpenID Connect) protocol. It walks through the necessary setup, configuration, and execution of a basic login flow to authenticate users through Keycloak.
Variables
Certain parameters must be provided to integrate a Go application with Keycloak. Below is a breakdown of each required variable, its purpose, and where to find it. Here’s what each variable represents:
| Variable | Description | Purpose |
|---|---|---|
CLIENT_ID | Client ID from the Keycloak Admin Console | Identifies the Go app in the Keycloak realm |
CLIENT_SECRET | Secret from the Credentials tab of the client | Authenticates the Go app with Keycloak |
ISSUER_URL | Realm URL (e.g., https://your-domain/realms/your-realm) | Base URL for OIDC discovery and validation |
REDIRECT_URL | The callback URL Keycloak redirects to after successful login | Required to complete the OIDC flow |
These values are found under Clients > [Your Client] > Settings / Endpoints in the Keycloak Admin Console.
Prerequisites
Install Go
Check if Go is installed:
go version
If not installed, download it from https://golang.org/dl and install.
Install Required Packages
Install the required Go packages:
go get github.com/coreos/go-oidc/v3
go get golang.org/x/oauth2
Code
Once all prerequisites are set up, create a new file named main.go and add the following code:
package main

import (
	"context"
	"fmt"
	"log"
	"net/http"

	"golang.org/x/oauth2"
	"golang.org/x/oauth2/clientcredentials"
	"golang.org/x/oauth2/endpoints"
	"github.com/coreos/go-oidc/v3/oidc"
)

var (
	clientID     = "CLIENT_ID"
	clientSecret = "CLIENT_SECRET"
	redirectURL  = "http://localhost:8080/callback"
	issuerURL    = "https://your-keycloak-domain/realms/your-realm"
)

func main() {
	ctx := context.Background()

	provider, err := oidc.NewProvider(ctx, issuerURL)
	if err != nil {
		log.Fatalf("Failed to get provider: %v", err)
	}

	verifier := provider.Verifier(&oidc.Config{ClientID: clientID})

	config := oauth2.Config{
		ClientID:     clientID,
		ClientSecret: clientSecret,
		Endpoint:     provider.Endpoint(),
		Scopes:       []string{oidc.ScopeOpenID, "profile", "email"},
		RedirectURL:  redirectURL,
	}

	http.HandleFunc("/", func(w http.ResponseWriter, r *http.Request) {
		url := config.AuthCodeURL("state", oauth2.AccessTypeOffline)
		http.Redirect(w, r, url, http.StatusFound)
	})

	http.HandleFunc("/callback", func(w http.ResponseWriter, r *http.Request) {
		ctx := r.Context()
		if r.URL.Query().Get("state") != "state" {
			http.Error(w, "state mismatch", http.StatusBadRequest)
			return
		}

		oauth2Token, err := config.Exchange(ctx, r.URL.Query().Get("code"))
		if err != nil {
			http.Error(w, "failed to exchange token: "+err.Error(), http.StatusInternalServerError)
			return
		}

		rawIDToken, ok := oauth2Token.Extra("id_token").(string)
		if !ok {
			http.Error(w, "no id_token field in oauth2 token", http.StatusInternalServerError)
			return
		}

		idToken, err := verifier.Verify(ctx, rawIDToken)
		if err != nil {
			http.Error(w, "failed to verify ID Token: "+err.Error(), http.StatusInternalServerError)
			return
		}

		var claims map[string]interface{}
		if err := idToken.Claims(&claims); err != nil {
			http.Error(w, "failed to parse claims: "+err.Error(), http.StatusInternalServerError)
			return
		}

		fmt.Fprintf(w, "Login successful! User info:\n\n%v", claims)
	})

	log.Println("Server started at http://localhost:8080")
	log.Fatal(http.ListenAndServe(":8080", nil))
}
Replace:
- CLIENT_ID and CLIENT_SECRET with your Keycloak client credentials
- https://your-keycloak-domain/realms/your-realm with your realm’s base URL
- http://localhost:8080/callback should be registered in Keycloak’s Valid Redirect URIs
Execute
- Run the application with:
go run main.go
- In your browser, navigate to:
http://localhost:8080
- You will be redirected to the Keycloak login screen. After logging in:
- The app will redirect to /callback
- If successful, you’ll see your decoded user info printed on the screen
Connecting with Java
This guide explains how to establish a connection between a Java Spring Boot application and a Keycloak identity provider using the OAuth2 resource server configuration. It walks through the necessary setup, configuration, and creation of a protected endpoint that verifies Keycloak-issued access tokens.
Variables
Certain parameters must be provided to integrate a Spring Boot application with Keycloak. Below is a breakdown of each required variable, its purpose, and where to find it. Here’s what each variable represents:
| Variable | Description | Purpose |
|---|---|---|
REALM | The name of the Keycloak realm | Defines the authentication namespace |
CLIENT_ID | Client ID from the Keycloak Admin Console | Identifies the Spring Boot app in Keycloak |
ISSUER_URI | Realm URL (e.g. https://your-domain/realms/your-realm) | Used by Spring Security for token validation |
JWKS_URI | URL to the JWKS endpoint (auto-resolved by Spring from ISSUER_URI) | Used to fetch public keys for token signature verification |
These values can be found in the Keycloak Admin Console → Clients and under the OpenID Connect Endpoints section for your realm.
Prerequisites
Install Java and Maven
Ensure Java is installed:
java -version
Ensure Maven is installed:
mvn -version
If not, download and install from https://adoptium.net or https://maven.apache.org.
Code
Once all prerequisites are set up, create a new Spring Boot project with the following structure:
spring-keycloak-demo/
├── src/
│   └── main/
│       ├── java/com/example/demo/
│       │   ├── DemoApplication.java
│       │   └── HelloController.java
│       └── resources/
│           └── application.yml
├── pom.xml
pom.xml
<project xmlns="http://maven.apache.org/POM/4.0.0" ...>
  <modelVersion>4.0.0</modelVersion>
  <groupId>com.example</groupId>
  <artifactId>spring-keycloak-demo</artifactId>
  <version>0.0.1-SNAPSHOT</version>
  <properties>
    <java.version>17</java.version>
    <spring.boot.version>3.1.5</spring.boot.version>
  </properties>

  <dependencies>
    <dependency>
      <groupId>org.springframework.boot</groupId>
      <artifactId>spring-boot-starter-web</artifactId>
    </dependency>
    <dependency>
      <groupId>org.springframework.boot</groupId>
      <artifactId>spring-boot-starter-oauth2-resource-server</artifactId>
    </dependency>
  </dependencies>

  <build>
    <plugins>
      <plugin>
        <groupId>org.springframework.boot</groupId>
        <artifactId>spring-boot-maven-plugin</artifactId>
      </plugin>
    </plugins>
  </build>
</project>
application.yml
server:
  port: 8080

spring:
  security:
    oauth2:
      resourceserver:
        jwt:
          issuer-uri: https://your-keycloak-domain/realms/your-realm
Replace https://your-keycloak-domain/realms/your-realm with the full issuer URI from your Keycloak realm.
DemoApplication.java
package com.example.demo;

import org.springframework.boot.SpringApplication;
import org.springframework.boot.autoconfigure.SpringBootApplication;

@SpringBootApplication
public class DemoApplication {
  public static void main(String[] args) {
    SpringApplication.run(DemoApplication.class, args);
  }
}
HelloController.java
package com.example.demo;

import org.springframework.web.bind.annotation.GetMapping;
import org.springframework.web.bind.annotation.RestController;
import org.springframework.security.core.annotation.AuthenticationPrincipal;
import org.springframework.security.oauth2.jwt.Jwt;

@RestController
public class HelloController {

  @GetMapping("/")
  public String publicEndpoint() {
    return "Welcome to the public endpoint.";
  }

  @GetMapping("/protected")
  public String protectedEndpoint(@AuthenticationPrincipal Jwt jwt) {
    return "Hello " + jwt.getClaimAsString("preferred_username") + ", you have accessed a protected route.";
  }
}
Execution
- Start the Spring Boot app with:
mvn spring-boot:run
- Generate a JWT access token by logging in through your frontend or REST client (e.g., using Postman with client credentials).
- Make a request to:
GET http://localhost:8080/protected
Authorization: Bearer <access_token>
If the token is valid:
- You will receive a welcome message with the Keycloak username
- If no token is provided or it’s invalid, you’ll get a 401 Unauthorized error
Connecting with Frontend Applications
This guide explains how to establish a connection between a frontend single-page application (SPA) — such as those built with React, Vue, or Angular and a Keycloak identity provider using the official Keycloak JavaScript adapter. It walks through the necessary setup, configuration, and execution of a protected login flow.
Variables
Certain parameters must be provided to integrate a frontend application with Keycloak. Below is a breakdown of each required variable, its purpose, and where to find it. Here’s what each variable represents:
| Variable | Description | Purpose |
|---|---|---|
URL | Full Keycloak realm URL (e.g., https://your-domain/realms/your-realm) | The base endpoint for authentication, token requests, and user info |
CLIENT_ID | Client ID from the Keycloak Admin Console | Identifies the SPA in Keycloak |
REALM | The realm name where the client is defined | Defines the identity space |
REDIRECT_URI | The URL where the frontend app should return after login | Must be registered in Keycloak as a Valid Redirect URI |
These values can be found under Clients > [Your Client] > Settings in the Keycloak Admin Console.
Prerequisites
Install Node.js and NPM
Check if Node.js is installed:
node -v
If not, download and install from https://nodejs.org.
Set Up Frontend Project
Create a frontend project using your framework of choice. For example:
- React:
npx create-react-app keycloak-app
cd keycloak-app
- Vue:
npm init vue@latest
cd keycloak-app
- Angular:
ng new keycloak-app
cd keycloak-app
Then install the Keycloak JS adapter:
npm install keycloak-js
Code
Create a file named keycloak.js inside your src/ directory with the following content:
import Keycloak from "keycloak-js";

const keycloak = new Keycloak({
  url: "https://your-keycloak-domain",
  realm: "your-realm",
  clientId: "your-client-id",
});

export default keycloak;
Then update your app’s entry point (App.js, main.js, or main.ts) to initialize Keycloak:
Example (React - App.js):
import React, { useEffect, useState } from "react";
import keycloak from "./keycloak";

function App() {
  const [authenticated, setAuthenticated] = useState(false);

  useEffect(() => {
    keycloak.init({ onLoad: "login-required" }).then((auth) => {
      setAuthenticated(auth);
    });
  }, []);

  if (!authenticated) return Loading...;

  return (

      <h1>Welcome, {keycloak.tokenParsed?.preferred_username}</h1>
      <p>You have accessed a protected frontend app using Keycloak.</p>

  );
}

export default App;
Notes for Vue and Angular
- In Vue, you can wrap keycloak.init() inside a plugin and gate your app rendering using the onReady() hook.
- In Angular, use route guards (CanActivate) to protect routes based on Keycloak session state.
Execution
- Replace all placeholders in the config with actual values from your Keycloak setup.
- Start your frontend application:
npm start
- Open your browser and navigate to:
http://localhost:3000
-
The Keycloak login page will appear. After authentication:
- You’ll be redirected back to your SPA
- The user info will be displayed, indicating successful integration
Connecting with Keycloak Admin Rest API
This guide explains how to authenticate with and use the Keycloak Admin REST API from a backend application. It walks through the necessary setup, authentication flow, and execution of a sample API request to list users in a realm.
Variables
Certain parameters must be provided to access the Keycloak Admin REST API successfully. Below is a breakdown of each required variable, its purpose, and where to find it. Here’s what each variable represents:
| Variable | Description | Purpose |
|---|---|---|
BASE_URL | The base URL of the Keycloak server (e.g., https://your-domain) | All admin API requests are made under this URL |
REALM | The realm name used to obtain an admin access token | Typically "master" if accessing all realms, or your target realm |
CLIENT_ID | The client ID configured for admin access (must have sufficient privileges) | Authenticates the backend to obtain an access token |
CLIENT_SECRET | The client secret associated with the client | Required to authenticate confidential clients |
ADMIN_USERNAME | A Keycloak admin user with the manage-users or admin role | Used in password grant to fetch an access token |
ADMIN_PASSWORD | The password for the above admin user | Used with the username to authenticate |
These values can be found in the Keycloak Admin Console under Clients > [Your Admin Client] and Users > [Admin User].
Prerequisites
Install Node.js and NPM
Check if Node.js is installed:
node -v
Verify npm installation:
npm -v
Install Required Package
We’ll use Axios to make HTTP requests. Install it with:
npm install axios
Code
Once all prerequisites are set up, create a new file named admin-api.js and add the following code:
const axios = require("axios");

const BASE_URL = "https://your-keycloak-domain";
const REALM = "master";
const CLIENT_ID = "admin-cli";
const ADMIN_USERNAME = "your-admin-username";
const ADMIN_PASSWORD = "your-admin-password";

async function getAccessToken() {
  const response = await axios.post(
    `${BASE_URL}/realms/${REALM}/protocol/openid-connect/token`,
    new URLSearchParams({
      client_id: CLIENT_ID,
      grant_type: "password",
      username: ADMIN_USERNAME,
      password: ADMIN_PASSWORD,
    }),
    {
      headers: {
        "Content-Type": "application/x-www-form-urlencoded",
      },
    }
  );
  return response.data.access_token;
}

async function listUsers() {
  try {
    const token = await getAccessToken();
    const response = await axios.get(
      `${BASE_URL}/admin/realms/${REALM}/users`,
      {
        headers: {
          Authorization: `Bearer ${token}`,
        },
      }
    );

    console.log("Users in realm:", response.data);
  } catch (err) {
    console.error("Failed to list users:", err.response?.data || err.message);
  }
}

listUsers();
Replace:
- BASE_URL with your Keycloak server base URL
- ADMIN_USERNAME and ADMIN_PASSWORD with your actual admin user credentials
- REALM with master (or a custom realm if you configured admin access)
Execution
Open the terminal and navigate to the directory where admin-api.js is saved. Once in the correct directory, run the script with the command:
node admin-api.js
If the connection is successful:
- The script will authenticate using the password grant type
- It will retrieve a valid admin access token
- It will fetch and display the list of users in the specified realm
If an error occurs (such as a 401 unauthorized), double-check your admin credentials and client permissions.
Connecting External Identity Providers
This guide explains how to integrate external identity providers (IdPs) like Google, GitHub, Facebook, or LDAP/Active Directory into a Keycloak realm. It walks through the necessary setup, configuration, and execution of a login flow that delegates authentication to the external provider.
Variables
Certain parameters must be provided to integrate an external identity provider into Keycloak. Below is a breakdown of each required variable, its purpose, and where to find it. Here’s what each variable represents:
| Variable | Description | Purpose |
|---|---|---|
IDP_ALIAS | Unique alias name for the identity provider in Keycloak | Used to identify and manage the identity provider internally |
CLIENT_ID | OAuth2/OpenID Connect Client ID provided by the external IdP | Authenticates Keycloak with the external provider |
CLIENT_SECRET | Client secret provided by the external IdP | Used for secure communication with the IdP |
AUTH_URL | Authorization endpoint of the external provider | Used to start the OAuth2 login flow |
TOKEN_URL | Token endpoint of the external provider | Used to exchange authorization code for access token |
USERINFO_URL | User info endpoint of the external provider (for OIDC) | Fetches profile info for the logged-in user |
These values are available from the external identity provider’s developer console (e.g., Google Cloud Console, GitHub Developer Settings, Facebook for Developers, or LDAP configuration).
Prerequisites
Keycloak Admin Access
Make sure you are logged into the Keycloak Admin Console with sufficient permissions to:
- Modify identity providers
- Configure clients and mappers
- Assign default roles or groups (optional)
External Provider Setup
You must first register your Keycloak app with the external identity provider (e.g., Google, GitHub, etc.) and obtain the client ID and client secret, along with redirect URI.
Example (Google):
- Go to https://console.cloud.google.com
- Register a new OAuth2 Client under APIs & Services > Credentials
- Set redirect URI to:
https://<keycloak-domain>/realms/<your-realm>/broker/google/endpoint
Code-Free Setup (via Keycloak Admin UI)
-
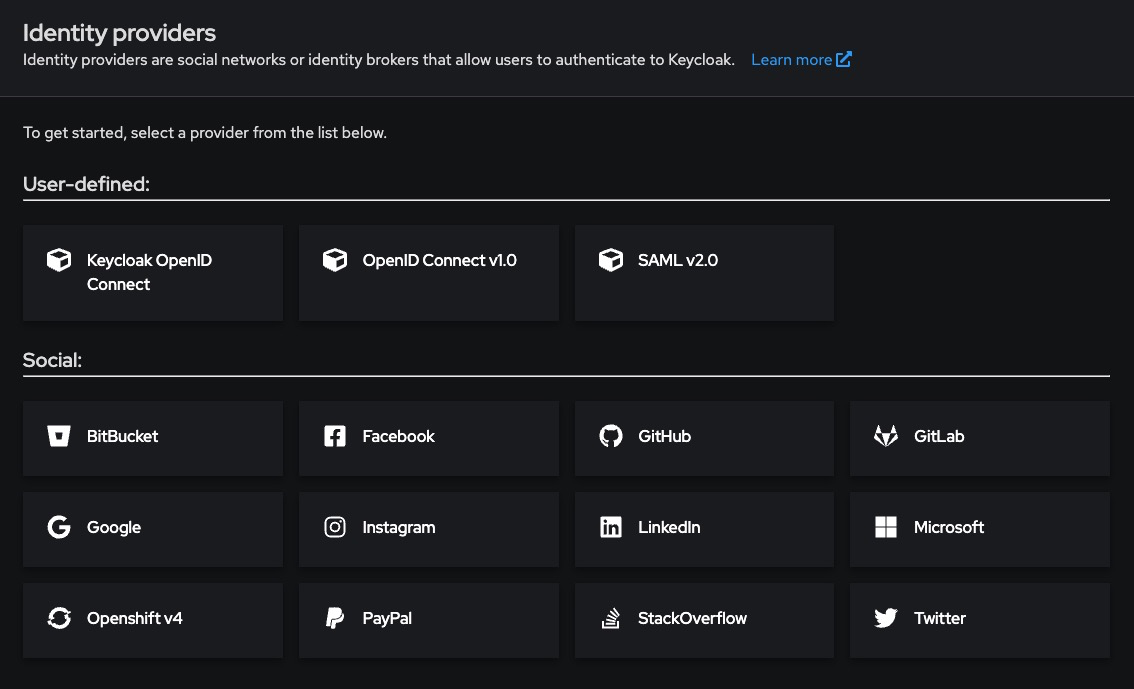
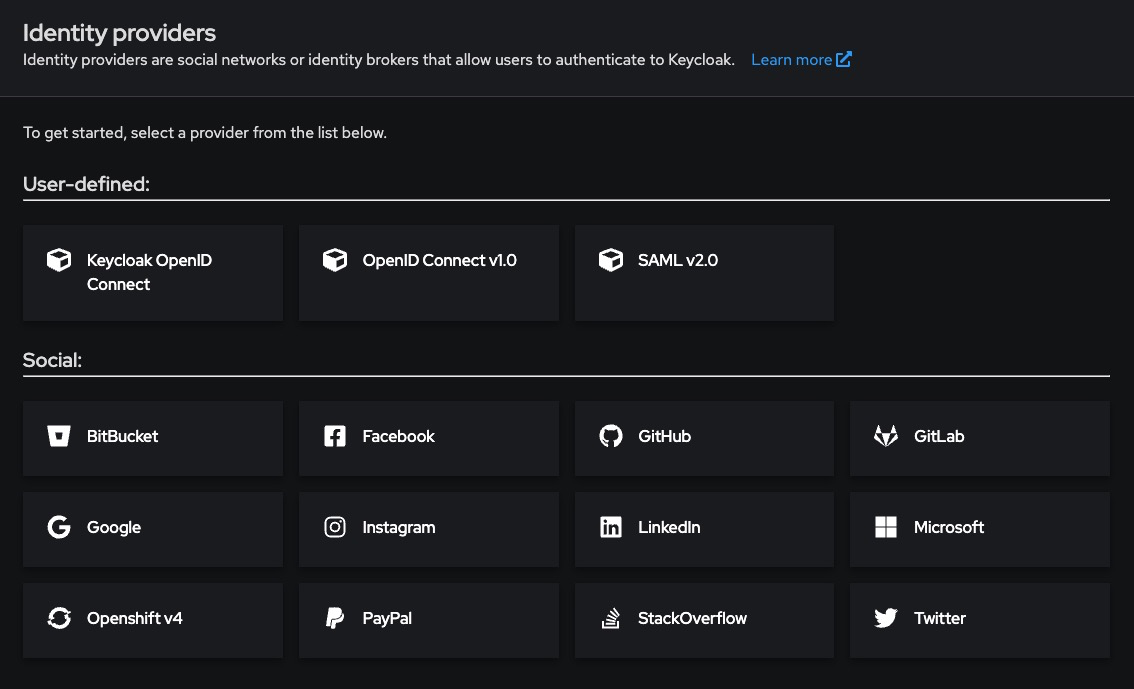
Go to your realm > Identity Providers
-
Click “Add provider” → Choose from list (e.g., Google, GitHub, Facebook, etc.)
-
Enter the required fields:
- Alias: google, github, etc.
- Client ID: From the external IdP
- Client Secret: From the external IdP
-
Configure Default Scopes and any user attribute mappers (e.g., email, name)
-
Enable the provider by checking “Enabled”
-
Save
You’ll now see the provider appear on your login page as a social button or link.
LDAP / Active Directory Integration
For enterprise identity backends like LDAP or Active Directory, follow these steps:
- Go to User Federation > Add Provider → LDAP
- Fill in the following fields:
| Field | Example |
|---|---|
| Connection URL | ldap://ldap.mycompany.com |
| Users DN | ou=users,dc=mycompany,dc=com |
| Bind DN | cn=admin,dc=mycompany,dc=com |
| Bind Credential | Your LDAP admin password |
| Vendor | Choose from Active Directory, Novell, Red Hat, etc. |
- Set Edit Mode to READ_ONLY or WRITABLE based on your use case
- Enable periodic sync if needed under Sync Settings
- Save and test the connection
Execution
Once saved, test the login by:
- Navigating to the Keycloak login page
- You will now see “Login with Google”, “Login with GitHub”, etc.
- Click the button to initiate the external login
- Upon successful authentication, you will be redirected back to Keycloak with a valid session
You can manage the linked identity in the Keycloak Admin Console under:
Users > [user] > Identity Provider Links