Connect to KeyDB
Connect to your Elestio KeyDB database from your application and CLI tools.
Connecting with Node.js
This guide explains how to establish a connection between a Node.js application and a KeyDB database using the redis package. It walks through the necessary setup, configuration, and execution of a simple KeyDB command.
Variables
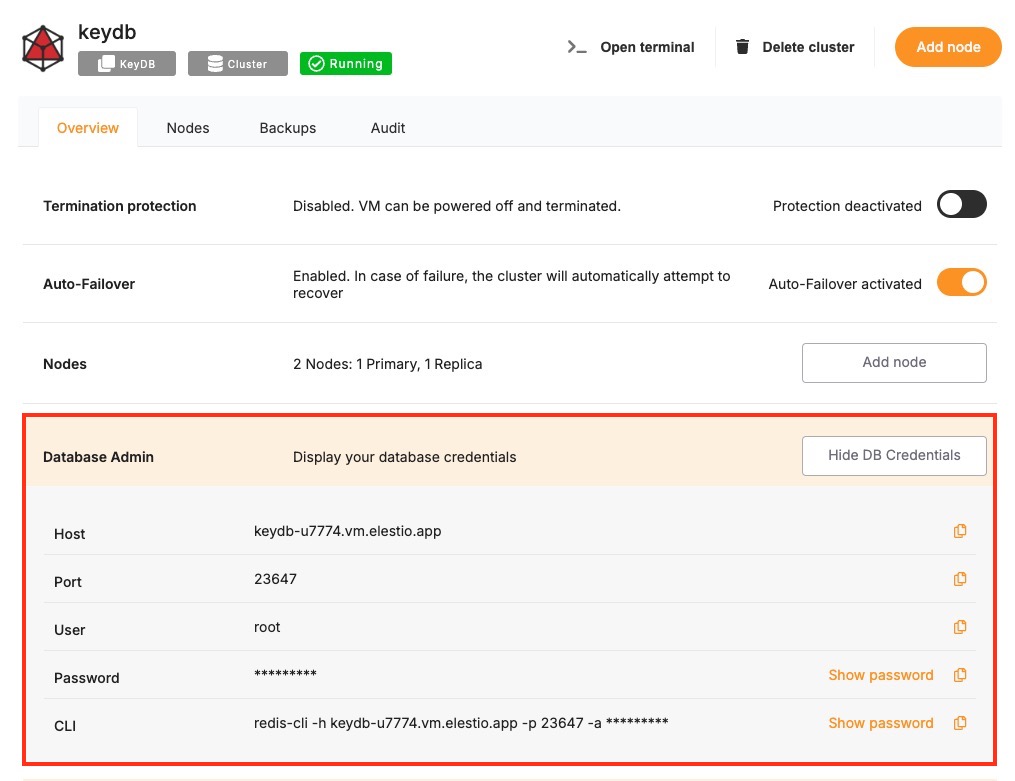
To successfully connect to a KeyDB instance, you’ll need to provide the following parameters. These can typically be found on the Elestio service overview page.
| Variable | Description | Purpose |
|---|---|---|
HOST | KeyDB hostname (from Elestio service overview) | The address of the server hosting your KeyDB instance. |
PORT | KeyDB port (from Elestio service overview) | The port used for the KeyDB connection. The default KeyDB port is 6379. |
PASSWORD | KeyDB password (from Elestio service overview) | Authentication key used to connect securely to the KeyDB instance. |
These values can usually be found in the Elestio service overview details as shown in the image below, make sure to take a copy of these details and add it to the code moving ahead.
Prerequisites
Install Node.js and NPM
- Check if Node.js is installed by running:
node -v
- If not installed, download and install it from nodejs.org.
- Confirm npm is installed by running:
npm -v
Install the redis Package
The redis package enables communication between Node.js applications and KeyDB.
npm install redis --save
Code
Create a new file named keydb.js and add the following code:
const keydb = require("redis");

// KeyDB connection configuration
const config = {
  socket: {
    host: "HOST",
    port: PORT,
  },
  password: "PASSWORD",
};

// Create a Redis client
const client = keydb.createClient(config);

// Handle connection errors
client.on("error", (err) => {
  console.error("KeyDB connection error:", err);
});

// Connect and run a test command
(async () => {
  try {
    await client.connect();
    console.log("Connected to KeyDB");

    // Set and retrieve a test key
    await client.set("testKey", "Hello KeyDB");
    const value = await client.get("testKey");
    console.log("Retrieved value:", value);

    // Disconnect from KeyDB
    await client.disconnect();
  } catch (err) {
    console.error("KeyDB operation failed:", err);
  }
})();
To execute the script, open the terminal or command prompt and navigate to the directory where keydb.js is located. Once in the correct directory, run the script with the command:
node keydb.js
If the connection is successful, the output should resemble:
Connected to KeyDB
Retrieved value: Hello KeyDB
Connecting with Python
This guide explains how to connect a Python application to a KeyDB database using the redis library. It walks through the required setup, configuration, and execution of a simple KeyDB command.
Variables
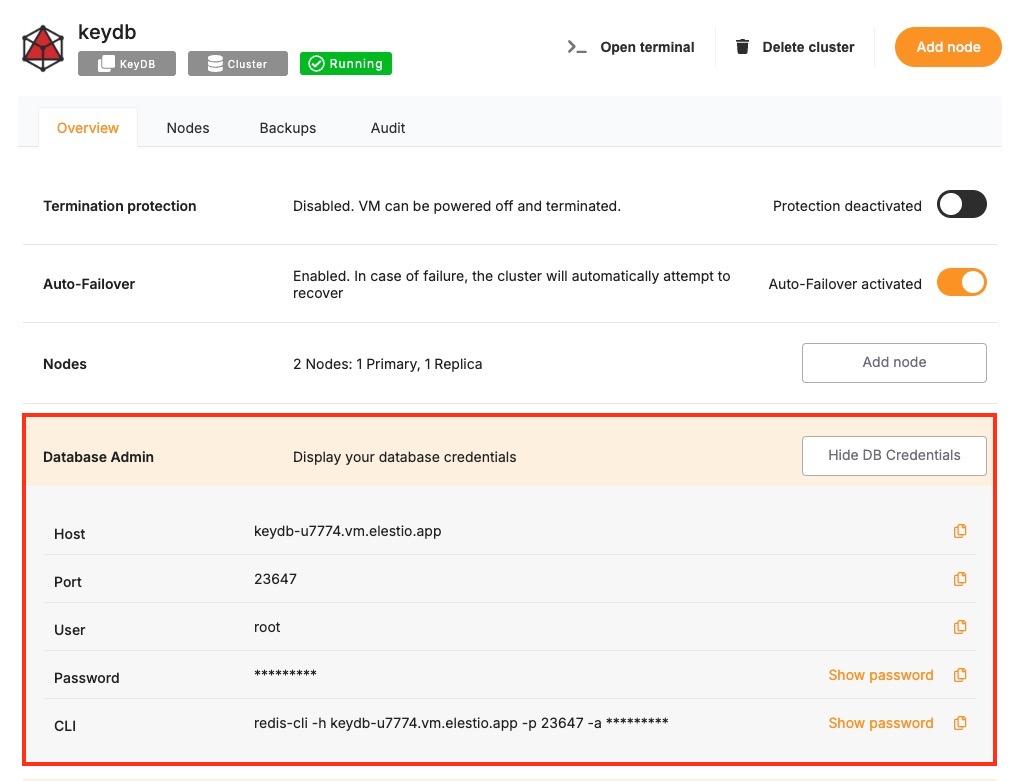
To connect to KeyDB, the following parameters are needed. You can find these values in the Elestio KeyDB service overview.
| Variable | Description | Purpose |
|---|---|---|
HOST | KeyDB hostname (from Elestio service overview) | Address of the KeyDB server. |
PORT | KeyDB port (from Elestio service overview) | Port used to connect to KeyDB. The default is 6379. |
PASSWORD | KeyDB password (from Elestio service overview) | Authentication credential for the KeyDB connection. |
These values can usually be found in the Elestio service overview details as shown in the image below, make sure to take a copy of these details and add it to the code moving ahead.
 Prerequisites
Install Python and pip
- Check if Python is installed by running:
python3 --version
- If not installed, download and install it from python.org.
- Check pip (Python package installer):
pip --version
Install the redis Package
Install the official redis library using pip:
pip install redis
Code
Create a file named keydb.py and paste the following code:
import redis

config = {
    "host": "HOST",
    "port": PORT,  # Example: 6379
    "password": "PASSWORD",
    "decode_responses": True
}

try:
    client = redis.Redis(**config)
    client.set("testKey", "Hello KeyDB")
    value = client.get("testKey")
    print("Connected to KeyDB")
    print("Retrieved value:", value)

except redis.RedisError as err:
    print("KeyDB connection or operation failed:", err)
To execute the script, open the terminal or command prompt and navigate to the directory where keydb.py is located. Once in the correct directory, run the script with the command:
python3 redis.py
If everything is set up correctly, the output will be:
Connected to KeyDB
Retrieved value: Hello KeyDB
Connecting with PHP
This guide explains how to establish a connection between a PHP application and a KeyDB database using the phpredis extension. It walks through the necessary setup, configuration, and execution of a simple KeyDB command.
Variables
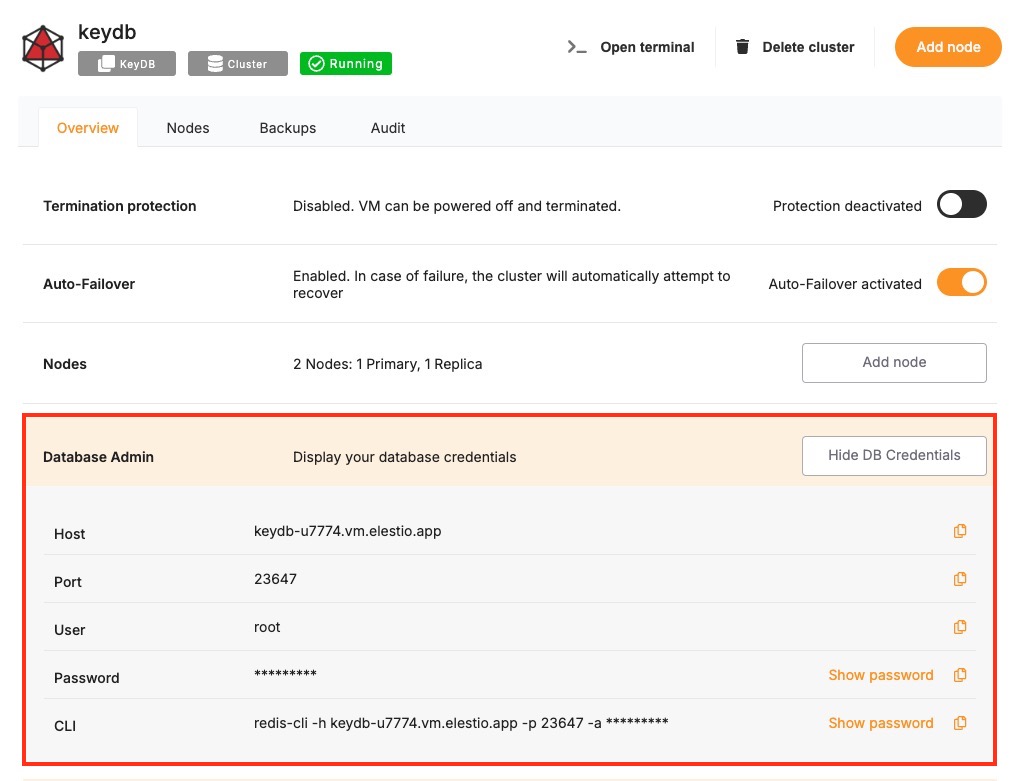
Certain parameters must be provided to establish a successful connection to a KeyDB database. Below is a breakdown of each required variable, its purpose, and where to find it. Here’s what each variable represents:
| Variable | Description | Purpose |
|---|---|---|
HOST | KeyDB hostname, from the Elestio service overview page | The address of the server hosting your KeyDB instance. |
PORT | Port for KeyDB connection, from the Elestio service overview page | The network port used to connect to KeyDB. The default port is 6379. |
PASSWORD | KeyDB password, from the Elestio service overview page | The authentication key required to connect securely to KeyDB. |
These values can usually be found in the Elestio service overview details as shown in the image below. Make sure to take a copy of these details and add it to the code moving ahead.
Prerequisites
- Install PHP
- Check if PHP is installed by running:
php -v
-
- If not installed, download it from php.net and install.
- Install the phpredis Extension
- The phpredis extension provides a native PHP interface for KeyDB. You can install it using:
sudo pecl install redis
-
- Then enable it in your php.ini:
extension=redis
-
- To verify it’s installed:
php -m | grep redis
Code
Once all prerequisites are set up, create a new file named keydb.php and add the following code:
<?php

$host = 'HOST';
$port = PORT;
$password = 'PASSWORD';

$keydb = new Redis();

try {
    $keydb->connect($host, $port);

    if (!$keydb->auth($password)) {
        throw new Exception('Authentication failed');
    }

    echo "Connected to KeyDB\n";

    $keydb->set("testKey", "Hello KeyDB");
    $value = $keydb->get("testKey");
    echo "Retrieved value: $value\n";

    $keydb->close();

} catch (Exception $e) {
    echo "KeyDB connection or operation failed: " . $e->getMessage() . "\n";
}
Open the terminal or command prompt and navigate to the directory where keydb.php is located. Once in the correct directory, run the script with the command:
php keydb.php
If the connection is successful, the terminal will display output similar to:
Connecting with Go
This guide explains how to establish a connection between a Go application and a KeyDB database using the go-redis package. It walks through the necessary setup, configuration, and execution of a simple KeyDB command.
Variables
Certain parameters must be provided to establish a successful connection to a KeyDB database. Below is a breakdown of each required variable, its purpose, and where to find it. Here’s what each variable represents:
| Variable | Description | Purpose |
|---|---|---|
HOST | KeyDB hostname, from the Elestio service overview page | The address of the server hosting your KeyDB instance. |
PORT | Port for KeyDB connection, from the Elestio service overview page | The network port used to connect to KeyDB. The default port is 6379. |
PASSWORD | KeyDB password, from the Elestio service overview page | The authentication key required to connect securely to KeyDB. |
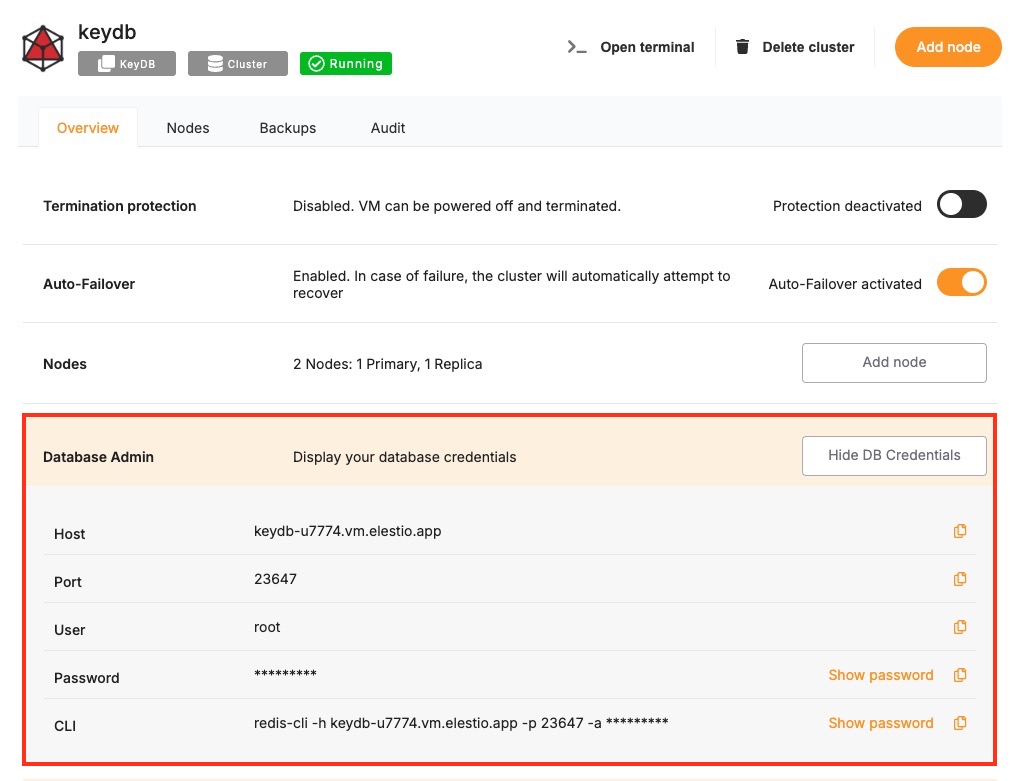
These values can usually be found in the Elestio service overview details as shown in the image below, make sure to take a copy of these details and add it to the code moving ahead.
Prerequisites
Install Go
Check if Go is installed by running:
go version
If not installed, download it from golang.org and install.
Install the go-redis Package
The go-redis package enables Go applications to interact with KeyDB. Install it using:
go get github.com/redis/go-redis/v9
Code
Once all prerequisites are set up, create a new file named keydb.go and add the following code:
package main

import (
	"context"
	"fmt"
	"time"

	"github.com/redis/go-redis/v9"
)

func main() {
	opt := &redis.Options{
		Addr:     "HOST:PORT",
		Password: "PASSWORD",
		DB:       0,
	}

	kdbdb := redis.NewClient(opt)
	ctx, cancel := context.WithTimeout(context.Background(), 5*time.Second)
	defer cancel()

	err := kdbdb.Set(ctx, "testKey", "Hello KeyDB", 0).Err()
	if err != nil {
		fmt.Println("KeyDB operation failed:", err)
		return
	}

	val, err := kdbdb.Get(ctx, "testKey").Result()
	if err != nil {
		fmt.Println("KeyDB operation failed:", err)
		return
	}

	fmt.Println("Connected to KeyDB")
	fmt.Println("Retrieved value:", val)

	if err := kdbdb.Close(); err != nil {
		fmt.Println("Error closing connection:", err)
	}
}
To execute the script, open the terminal or command prompt and navigate to the directory where keydb.go is located. Once in the correct directory, run the script with the command:
go run keydb.go
If the connection is successful, the terminal will display output similar to:
Connected to KeyDB
Retrieved value: Hello KeyDB
Connecting with Java
This guide explains how to establish a connection between a Java application and a KeyDB database using the Jedis library. It walks through the necessary setup, configuration, and execution of a simple KeyDB command.
Variables
Certain parameters must be provided to establish a successful connection to a KeyDB database. Below is a breakdown of each required variable, its purpose, and where to find it. Here’s what each variable represents:
| Variable | Description | Purpose |
|---|---|---|
HOST | KeyDB hostname, from the Elestio service overview page | The address of the server hosting your KeyDB instance. |
PORT | Port for KeyDB connection, from the Elestio service overview page | The network port used to connect to KeyDB. The default port is 6379. |
PASSWORD | KeyDB password, from the Elestio service overview page | The authentication key required to connect securely to KeyDB. |
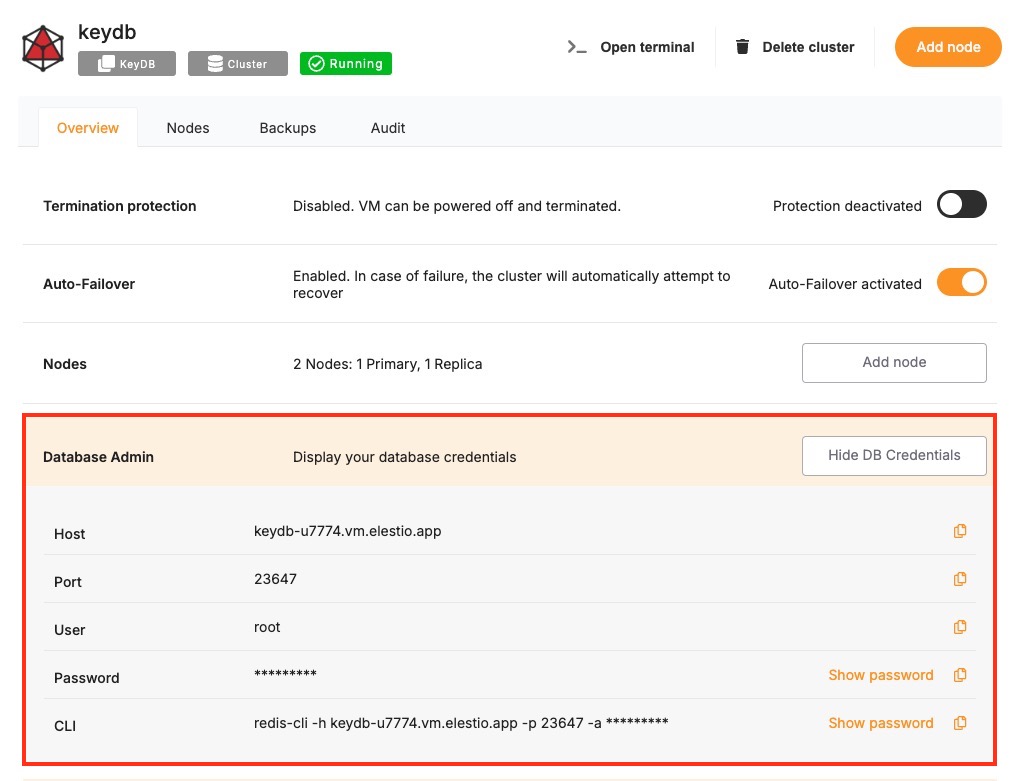
These values can usually be found in the Elestio service overview details as shown in the image below, make sure to take a copy of these details and add it to the code moving ahead.
Prerequisites
Install Java
Check if Java is installed by running:
java -version
If not installed, download it from oracle.com and install.
Download Jedis and Dependencies
The Jedis library enables Java applications to interact with KeyDB. You need to download two JAR files manually:
-
Jedis JAR (Jedis 5.1.0):
https://repo1.maven.org/maven2/redis/clients/jedis/5.1.0/jedis-5.1.0.jar
-
Apache Commons Pool2 JAR (Required by Jedis):
https://repo1.maven.org/maven2/org/apache/commons/commons-pool2/2.11.1/commons-pool2-2.11.1.jar
Place both JAR files in the same directory as your Java file.
Code
Once all prerequisites are set up, create a new file named KeyDBTest.java and add the following code:
import redis.clients.jedis.JedisPooled;

public class KeyDBTest {
    public static void main(String[] args) {
        String host = "HOST";
        int port = PORT; // e.g., 6379
        String password = "PASSWORD";

        JedisPooled jedis = new JedisPooled(host, port, password);

        try {
            jedis.set("testKey", "Hello KeyDB");
            String value = jedis.get("testKey");

            System.out.println("Connected to KeyDB");
            System.out.println("Retrieved value: " + value);

        } catch (Exception e) {
            System.out.println("KeyDB connection or operation failed: " + e.getMessage());
        }
    }
}
To execute the script, open the terminal or command prompt and navigate to the directory where KeyDBTest.java is located. Once in the correct directory, run the following commands:
On Linux/macOS :
javac -cp "jedis-5.1.0.jar:commons-pool2-2.11.1.jar" KeyDBTest.java
java -cp ".:jedis-5.1.0.jar:commons-pool2-2.11.1.jar" KeyDBTest
On Windows :
javac -cp "jedis-5.1.0.jar;commons-pool2-2.11.1.jar" KeyDBTest.java
java -cp ".;jedis-5.1.0.jar;commons-pool2-2.11.1.jar" KeyDBTest
If the connection is successful, the terminal will display output similar to:
Connected to KeyDB
Retrieved value: Hello KeyDB
Connecting with RedisInsight
This guide explains how to establish a connection between RedisInsight and a KeyDB database instance. It walks through the necessary setup, configuration, and connection steps using the official Redis GUI.
Variables
Certain parameters must be provided to establish a successful connection to a KeyDB database. Below is a breakdown of each required variable, its purpose, and where to find it. Here’s what each variable represents:
| Variable | Description | Purpose |
|---|---|---|
HOST | KeyDB hostname, from the Elestio service overview page | The address of the server hosting your KeyDB instance. |
PORT | Port for KeyDB connection, from the Elestio service overview page | The network port used to connect to KeyDB. The default port is 6379. |
PASSWORD | KeyDB password, from the Elestio service overview page | The authentication key required to connect securely to KeyDB. |
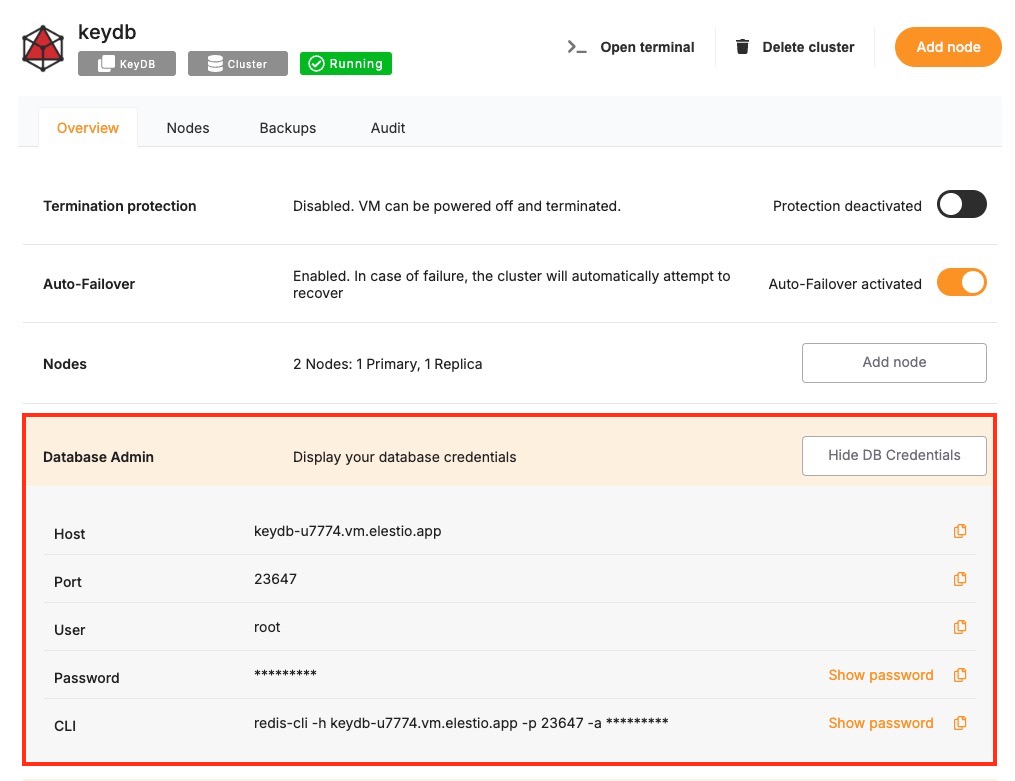
These values can usually be found in the Elestio service overview details as shown in the image below, make sure to take a copy of these details and add it to the tool moving ahead.
Prerequisites
Install RedisInsight
RedisInsight is a graphical tool for managing Redis databases. Download and install RedisInsight from:
https://redis.com/redis-enterprise/redis-insight/
RedisInsight is available for Windows, macOS, and Linux.
Steps
Once all prerequisites are set up, follow these steps to connect:
-
Launch RedisInsight
Open the RedisInsight application after installation.
-
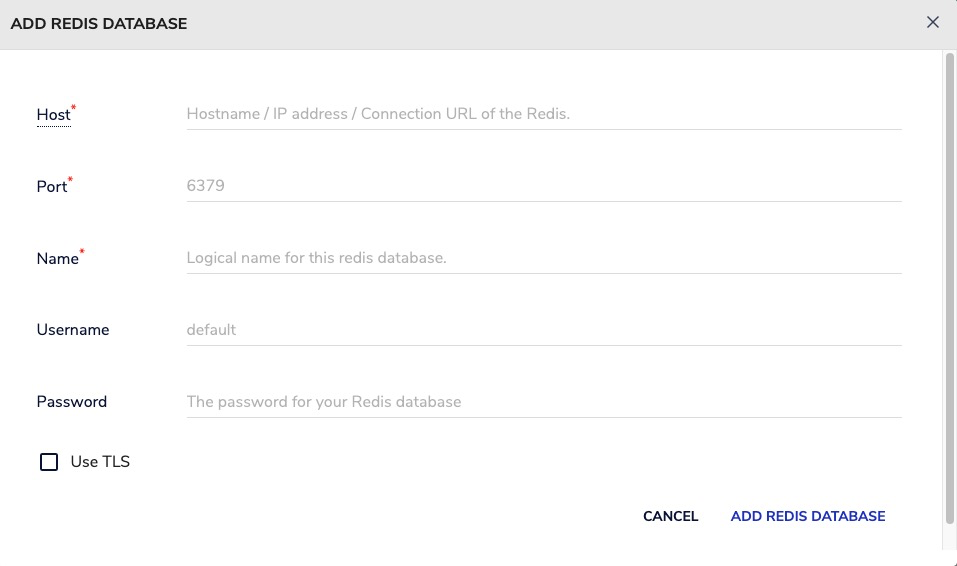
Add a New KeyDB Database
Click on “Add KeyDB Database”.
-
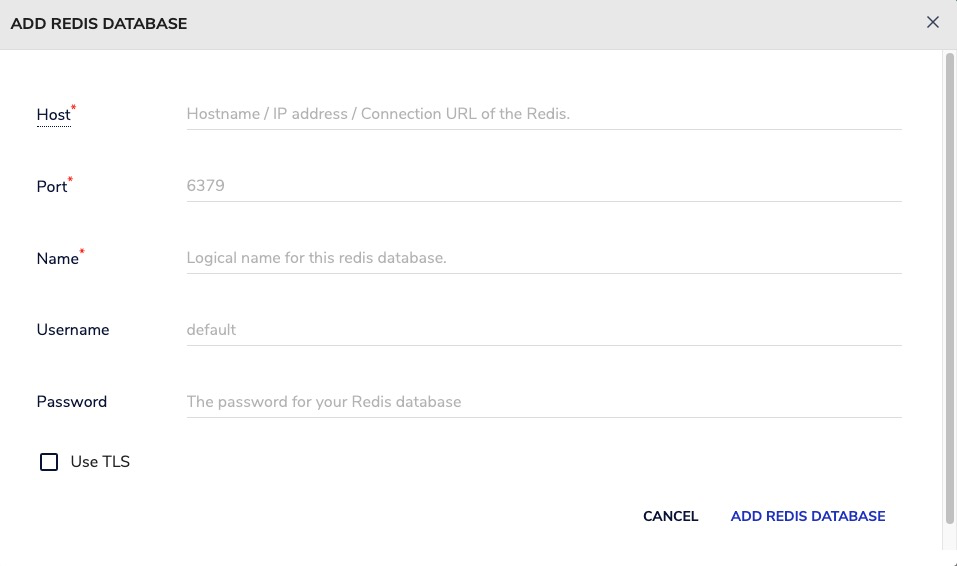
Enter Your Connection Details
Fill in the following fields using your Elestio KeyDB service information:
- Host: HOST
- Port: PORT
- Password: PASSWORD
-
Test and Save the Connection
Click on “Test Connection” to verify the details. If successful, click “Connect” or “Add Database”.
If the connection is successful, RedisInsight will display a dashboard showing key metrics, data structures, memory usage, and allow you to interact directly with KeyDB using a built-in CLI or visual browser.
Connecting with keydb-cli
This guide explains how to establish a connection between keydb-cli and a KeyDB database instance. It walks through the necessary setup, configuration, and execution of a simple KeyDB command from the terminal.
Variables
Certain parameters must be provided to establish a successful connection to a KeyDB database. Below is a breakdown of each required variable, its purpose, and where to find it. Here’s what each variable represents:
| Variable | Description | Purpose |
|---|---|---|
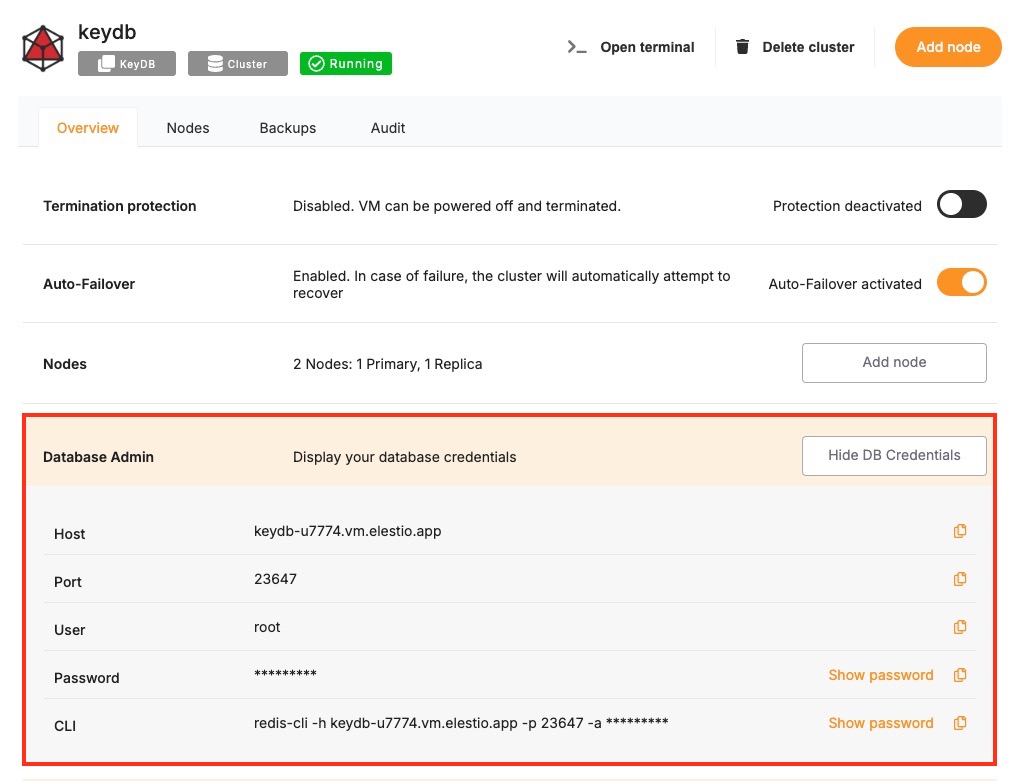
HOST | KeyDB hostname, from the Elestio service overview page | The address of the server hosting your KeyDB instance. |
PORT | Port for KeyDB connection, from the Elestio service overview page | The network port used to connect to KeyDB. The default port is 6379. |
PASSWORD | KeyDB password, from the Elestio service overview page | The authentication key required to connect securely to KeyDB. |
These values can usually be found in the Elestio service overview details as shown in the image below. Make sure to take a copy of these details and use them in the command moving ahead.
Prerequisites
Install keydb-cli
Check if keydb-cli is installed by running:
keydb-cli --version
If not installed, you can install it via:
- macOS:
brew install keydb
- Ubuntu/Debian:
sudo add-apt-repository ppa:keydb/keydb
sudo apt-get update
sudo apt-get install keydb-tools
- Windows:
Use Windows Subsystem for Linux (WSL) or download the CLI binaries from the KeyDB GitHub releases page.
Command
Once all prerequisites are set up, open the terminal or command prompt and run the following command:
keydb-cli -h HOST -p PORT -a PASSWORD
Replace HOST, PORT, and PASSWORD with the actual values from your Elestio KeyDB service.
If the connection is successful, the terminal will display a KeyDB prompt like this:
127.0.0.1:6379>
Test the Connection
You can then run a simple command to test the connection:
set testkey "Hello KeyDB"
get testkey
Expected output:
OK
"Hello KeyDB"
If the connection is successful, the terminal will display output similar to the above.