
Manual Migration Using pg_dump and pg_restore
Manual Migrations using PostgreSQL’s built-in tools pg_dump and pg_restore are ideal for users who prefer full control over data export and import, particularly during provider transitions, database version upgrades, or when importing an existing self-managed PostgreSQL dataset into Elestio’s managed environment. This guide walks through the process of performing a manual migration to and from Elestio PostgreSQL services using command-line tools, ensuring that your data remains portable, auditable, and consistent.
When to Use Manual Migration
Manual migration using pg_dump and pg_restore is well-suited for scenarios where full control over the data export and import process is required. This method is particularly useful when migrating from an existing PostgreSQL setup, whether self-hosted, on-premises, or on another cloud provider, into Elestio’s managed PostgreSQL service. It allows for one-time imports without requiring continuous connectivity between source and target systems.
This approach is also ideal when dealing with version upgrades, as PostgreSQL’s logical backups can be restored into newer versions without compatibility issues. In situations where Elestio’s built-in snapshot or replication tools aren’t applicable such as migrations from isolated environments or selective schema transfers, manual migration becomes the most practical option. Additionally, this method enables users to retain portable, versioned backups outside of Elestio’s infrastructure, which can be archived, validated offline, or re-imported into future instances.
Performing the Migration
Prepare the Environments
Before initiating a migration, verify that PostgreSQL is properly installed and configured on both the source system and your Elestio service. On the source, you need an active PostgreSQL instance with a user account that has sufficient privileges to read schemas, tables, sequences, and any installed extensions. The user must also be allowed to connect over TCP if the server is remote.
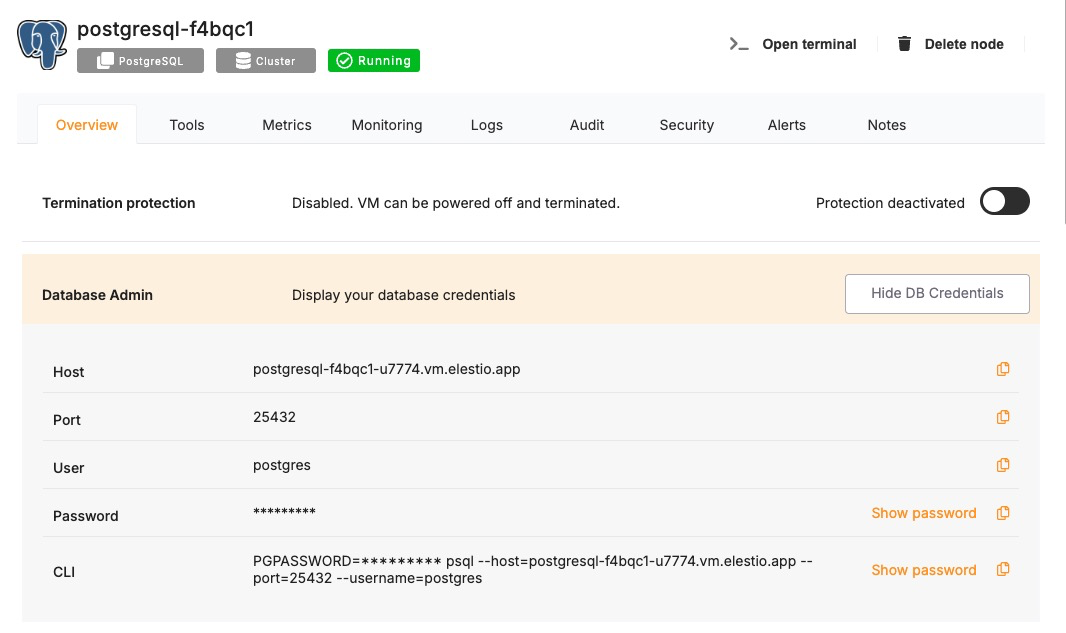
On the Elestio side, provision a PostgreSQL service from the dashboard. Once deployed, retrieve the connection information from the Database admin tab. This includes the hostname, port, database name, username, and password. You’ll use these credentials to connect during the restore step. Ensure that your IP is allowed to connect under the Cluster Overview > Security > Limit access per IP section; otherwise, the PostgreSQL port will be unreachable during the migration.
Create a Dump Using pg_dump
In this step, you generate a logical backup of the source database using pg_dump. This utility connects to the PostgreSQL server and extracts the structure and contents of the specified database. It serializes tables, indexes, constraints, triggers, views, and functions into a consistent snapshot. The custom format (-Fc) is used because it produces a compressed binary dump that can be restored selectively using pg_restore.
pg_dump -U <source_user> -h <source_host> -p <source_host> -Fc <source_database> > backup.dumpThis command connects to the source server (-h), authenticates with the user (-U), targets the database (source_database), and exports the entire schema and data into backup.dump. The resulting file is portable and version-aware. You can also add --no-owner and --no-acl If you’re migrating between environments that use different database roles or access models. This prevents restore-time errors related to ownership mismatches.
Transfer the Dump File to the Target
If your source and target environments are on different hosts, the dump file must be transferred securely. This step ensures the logical backup is available on the system from which you’ll perform the restore. You can use secure copy (scp), rsync, or any remote file transfer method.
scp backup.dump your_user@your_workstation:/path/to/local/If restoring from your local machine to Elestio, ensure the dump file is stored in a location readable by your current shell user. Elestio does not require the file to be uploaded to its servers; the restore is performed by connecting over the network using standard PostgreSQL protocols. At this point, your backup is isolated from the source environment and ready for import.
Create the Target Database
By default, Elestio provisions a single database instance. However, if you wish to restore into a separate database name or if your dump references a different name, you must create the new database manually. Use the psql client to connect to your Elestio service using the credentials from the dashboard.
psql -U <elestio_user> -h <elestio_host> -p <elestio_host> -d postgresWithin the psql session, create the database:
CREATE DATABASE target_database WITH ENCODING='UTF8' LC_COLLATE='en_US.UTF-8' LC_CTYPE='en_US.UTF-8' TEMPLATE=template0;This ensures that the new database has consistent encoding and locale settings, which are critical for text comparison, sorting, and indexing. Using template0 avoids inheriting default extensions or templates that might conflict with your dump file. At this stage, you can also create any roles, schemas, or extensions that were used in the original database if they are not included in the dump.
Restore Using pg_restore
With the target database created and the dump file in place, initiate the restoration using pg_restore. This tool reads the custom-format archive and reconstructs all schema and data objects in the new environment.
pg_restore -U elestio_user -h elestio_host -p 5432 -d target_database -Fc /path/to/backup.dump --verboseThis command establishes a network connection to the Elestio PostgreSQL service and begins issuing CREATE, INSERT, and ALTER statements to rebuild the database. The --verbose flag provides real-time feedback about the objects being restored. You can also use --jobs=N to run the restore in parallel, improving performance for large datasets, provided the dump was created with pg_dump --jobs=N.
It’s important to ensure that all referenced extensions, collations, and roles exist on the target instance to avoid partial restores. If errors occur, the logs will point to the missing components or permission issues that need to be resolved.
Validate the Migration
Once the restore completes, you must validate the accuracy and completeness of the migration. Connect to the Elestio database using psql or a PostgreSQL GUI (such as pgAdmin or TablePlus), and run checks across critical tables.
Begin by inspecting the table existence and row counts:
\dt
SELECT COUNT(*) FROM your_important_table;s
Validate views, functions, and indexes, especially if they were used in reporting or application queries. Run application-specific health checks, reinitialize ORM migrations if applicable, and confirm that the application can read and write to the new database without errors.
If you made any changes to connection strings or credentials, update your environment variables or secret managers accordingly. Elestio also supports automated backups, which you should enable post-migration to protect the restored dataset.
Benefits of Manual Migration
Manual PostgreSQL migration using pg_dump and pg_restore on Elestio provides several key advantages:
-
Compatibility and Portability: Logical dumps allow you to migrate from any PostgreSQL-compatible source into Elestio, including on-premises systems, Docker containers, or other clouds.
-
Version-Safe Upgrades: The tools support migrating across PostgreSQL versions, which is ideal during controlled upgrades.
-
Offline Archiving: Manual dumps serve as portable archives for cold storage, disaster recovery, or historical snapshots.
-
Platform Independence: You retain full access to PostgreSQL’s native tools without being locked into Elestio-specific formats or interfaces.
This method complements Elestio’s automated backup and migration features by enabling custom workflows and one-off imports with full visibility into each stage.