Custom Domain and SSL/TLS
Point your own domain at a service and Elestio generates and renews the SSL certificate automatically.
If the firewall is enabled, ensure port 80 is open. It is required for SSL certificate creation and renewal.
Open the configuration
- Go to the Overview tab of your service dashboard.
- Find Custom Domain Names inside the Domain Management tab.
- Click Manage Domains.

There are two ways to configure a custom domain.
Method 1: Manual DNS setup
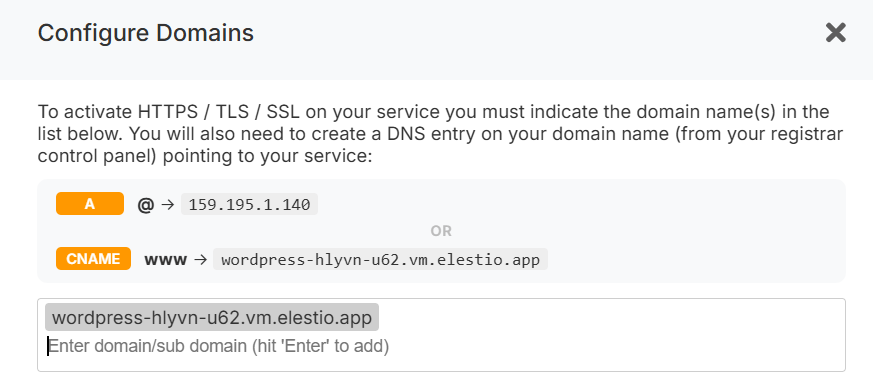
-
Enter your domain and press Enter to add it to the authorized domains.
-
Configure DNS records at your registrar:
- A record:
@points to<service IPv4>(the root domain to your service IP). - CNAME record:
wwwpoints to<service CNAME>(recommended, stays stable even if your IP changes, for example after a migration).
- A record:
-
Verify propagation with a tool like dnschecker.org.
Once propagation completes, the SSL certificate is generated and renewed automatically, and HTTPS starts working.
Method 2: One-click setup via Cloudflare (Domain Connect)
If your domain nameserver or registrar is Cloudflare, a One-click DNS Setup section configures DNS automatically via the Domain Connect protocol.
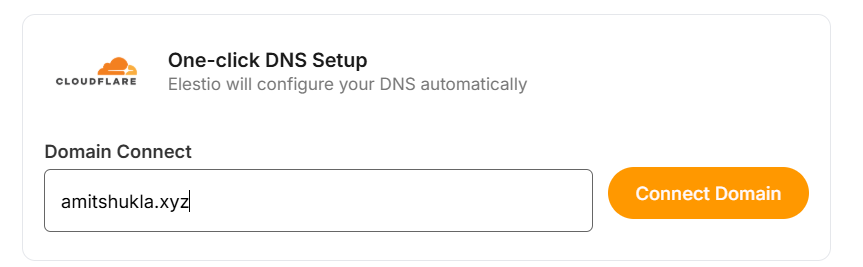
- Enter your domain (for example
example.com). - Click Connect Domain.
- You are redirected to Cloudflare to accept the DNS configuration.
Update the environment variable
Some applications need a domain-related environment variable updated to match.

- Go to the Overview page of your service.
- Click Update Config in the software row.
- Open the Env tab.
- Update the domain-related variable.
Cloudflare reverse proxy users
If you use Method 1 and want the Cloudflare proxy enabled (orange cloud), follow the Using Cloudflare guide.
Troubleshooting: SSL not generated
View Nginx logs:
cd /opt/elestio/nginx;
docker-compose logs -f;
Press Ctrl+C to stop the live log.
Reset the SSL data folder. If /opt/elestio/nginx/ssl_data becomes corrupted:
- Connect to your service terminal.
- Run:
cd /opt/elestio/nginx/;
docker-compose down;
mv ./ssl_data/ ./ssl_data_old/;
mkdir ./ssl_data/;
chmod 777 ./ssl_data/;
docker-compose up -d
Then open your custom URL again. The certificate should be generated and the site served over SSL/TLS.